2018 FORD F250 SUPER DUTY check engine light
[x] Cancel search: check engine lightPage 64 of 656
Car Finder
Press the button twice within
three seconds. A tone sounds
and the direction indicators
flash. We recommend you use this method
to locate your vehicle, rather than using
the panic alarm.
Sounding the Panic Alarm Press the button to sound the
panic alarm. Press the button
again or switch the ignition on to
turn it off.
Note: The panic alarm only operates when
the ignition is off.
Remote Start (If Equipped) WARNING
To avoid exhaust fumes, do not use
remote start if your vehicle is parked
indoors or in areas that are not well
ventilated. Note:
Do not use remote start if your fuel
level is low. The remote start button is on the
transmitter.
This feature allows you to start your
vehicle from the outside. The transmitter
has an extended operating range.
You can configure vehicles with automatic
climate control to turn on the automatic
climate control when you remote start your
vehicle. See Automatic Climate Control
(page
150). A manual climate control
system runs at the setting you set it to
when you switched your vehicle off.
Many states and provinces restrict the use
of remote start. Check your local and state
or provincial laws for specific requirements
regarding remote start systems. The remote start system does not work if
any of the following occur:
•
The ignition is on.
• The anti-theft alarm triggers.
• You switch off the feature.
• The hood is open.
• The transmission is not in park (P).
• The battery voltage is below the
minimum operating voltage.
• The service engine soon light is on.
Remote Control Feedback
An LED on the remote control provides
status feedback of remote start or stop
commands. Status
LED
Remote start orextension
successful
Solid green
Remote stop
successful; vehicle off
Solid red
Remote start orstop failed
Blinking red
Waiting for statusupdate
Blinking green
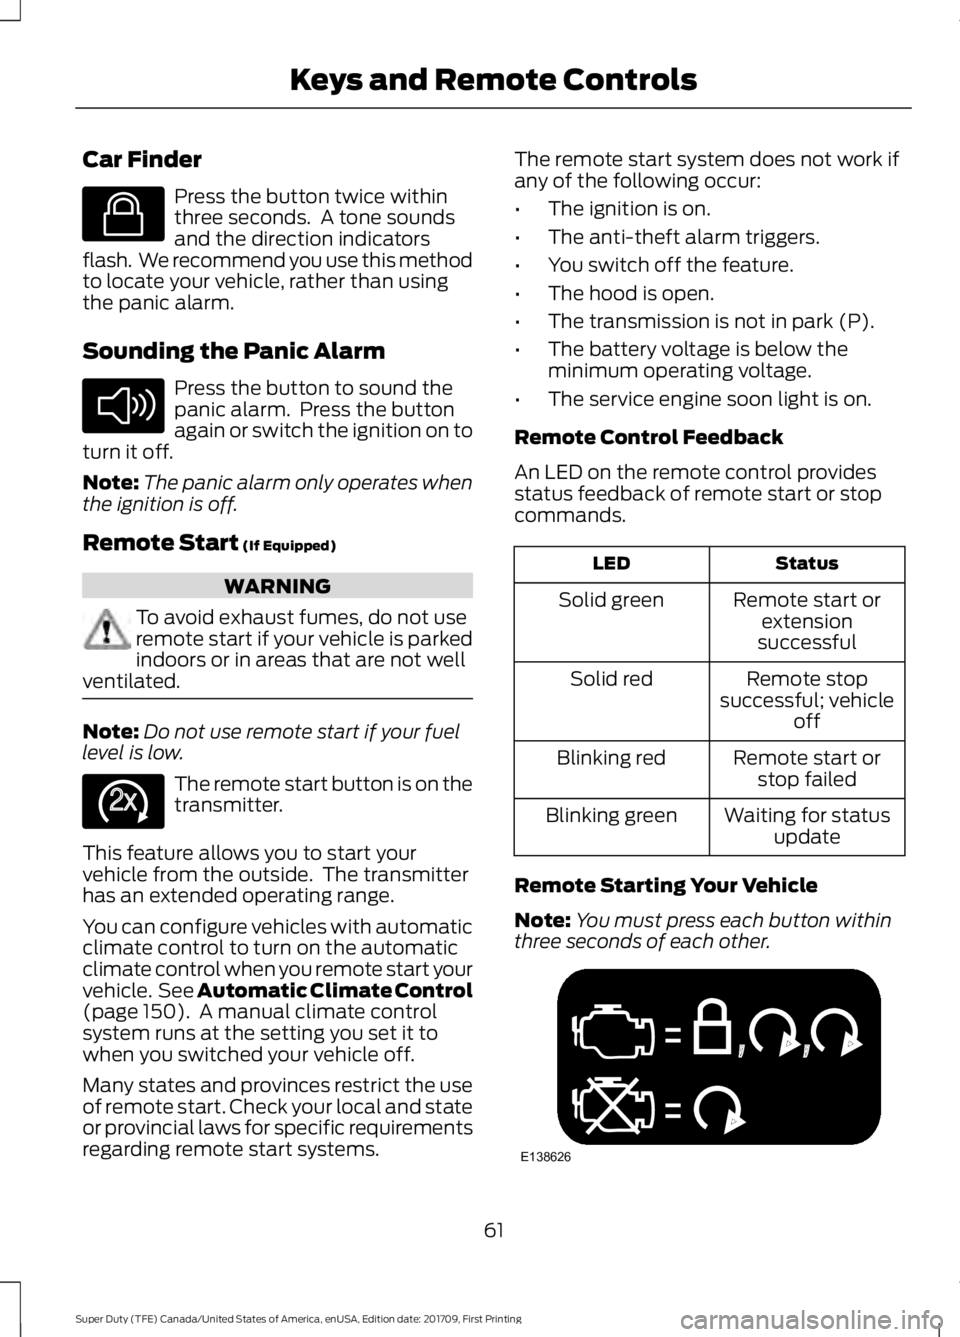
Remote Starting Your Vehicle
Note: You must press each button within
three seconds of each other. 61
Super Duty (TFE) Canada/United States of America, enUSA, Edition date: 201709, First Printing Keys and Remote ControlsE138623 E138624 E138625 E138626
Page 110 of 656
Engine Oil Pressure Gauge
Indicates engine oil pressure. The needle
should stay in the normal operating range
(between L and H). If the needle falls
below the normal range, stop your vehicle,
turn off the engine and check the engine
oil level. Add oil if needed. If the oil level is
correct, have your vehicle checked by an
authorized dealer.
Engine Coolant Temperature
Gauge
WARNING
Do not remove the coolant reservoir
cap when the cooling system is hot.
Wait 10 minutes for the cooling
system to cool down. Cover the coolant
reservoir cap with a thick cloth to prevent
the possibility of scalding and slowly
remove the cap. Failure to follow this
instruction could result in personal injury. Indicates engine coolant temperature. At
normal operating temperature, the level
indicator will be in the normal range. If the
engine coolant temperature exceeds the
normal range, stop your vehicle as soon as
safely possible, switch off the engine and
let the engine cool.
Fuel Gauge
Note:
The fuel gauge may vary slightly
when your vehicle is moving or on a gradient. Switch the ignition on. The fuel gauge will
indicate approximately how much fuel is
left in the fuel tank. The arrow adjacent to
the fuel pump symbol indicates on which
side of your vehicle the fuel filler door is
located.
The needle should move toward F when
you refuel your vehicle. If the needle points
to E after adding fuel, this indicates your
vehicle needs service soon.
After refueling some variability in needle
position is normal:
•
It may take a short time for the needle
to reach F after leaving the gas station.
This is normal and depends upon the
slope of pavement at the gas station.
• The fuel amount dispensed into the
tank is a little less or more than the
gauge indicated. This is normal and
depends upon the slope of pavement
at the gas station.
• If the gas station nozzle shuts off
before the tank is full, try a different
gas pump nozzle.
Low Fuel Reminder
A low fuel reminder triggers when the
distance to empty value reaches 50 mi
(80 km) to empty, with additional
warnings at 25 mi (40 km), 10 mi (20 km)
and 0 mi (0 km) to empty, provided the
message is cleared each time. An
additional warning at
75 mi (120 km) to
empty is provided when the MyKey is being
used.
Variations:
Note: The distance-to-empty warning can appear at different fuel gauge positions depending
on fuel economy conditions. This variation is normal.
107
Super Duty (TFE) Canada/United States of America, enUSA, Edition date: 201709, First Printing Instrument Cluster
Page 113 of 656

Blind Spot Monitor (If Equipped)
It illuminates when you switch
this feature off or in conjunction
with a message. See Blind Spot
Information System
(page 254).
Check Fuel Cap
(If Equipped) Illuminates when the fuel cap
may not be properly installed.
Continued driving with this light
on may cause the Service engine soon
warning indicator to come on.
Cruise Control
(If Equipped) Illuminates when you switch this
feature on. See
Using Cruise
Control (page 245).
Direction Indicator Illuminates when the left or right
turn signal or the hazard warning
flasher is turned on. If the
indicators stay on or flash faster, check for
a burned out bulb.
Door Ajar Displays when the ignition is on
and any door is not completely
closed.
Electronic Locking Differential
(If
Equipped) Illuminates when using the
electronic locking differential.
Engine Coolant Temperature Illuminates when the engine
coolant temperature is high.
Stop the vehicle as soon as
possible, switch off the engine and let cool. Engine Oil If it illuminates with the engine
running or when you are driving,
this indicates a malfunction.
Stop your vehicle as soon as it is safe to
do so and switch the engine off. Check the
engine oil level.
See
Engine Oil Check (page 334).
Note: Do not resume your journey if it
illuminates despite the level being correct.
Have the system checked by your authorized
dealer immediately.
Fasten Seatbelt It illuminates and a chime
sounds to remind you to fasten
your seatbelt.
Front Airbag If it fails to illuminate when you
start your vehicle, continues to
flash or remains on, it indicates
a malfunction. Have the system checked
by your authorized dealer.
Front Fog Lamps
(If Equipped) It illuminates when you switch
the front fog lamps on.
High Beam Illuminates when you switch the
high beam headlamps on. It will
flash when you use the
headlamp flasher.
Hill Descent
(If Equipped) Illuminates when hill descent is
switched on.
110
Super Duty (TFE) Canada/United States of America, enUSA, Edition date: 201709, First Printing Instrument ClusterE151262 E71340 E163170 E71880 E67017 E163171
Page 114 of 656
Low Fuel Level
Illuminates when the fuel level
is low or the fuel tank is nearly
empty. Refuel as soon as
possible.
Low Tire Pressure Warning It illuminates if the tire pressure
in one or more tires is below the
correct tire pressure.
It also illuminates momentarily when you
switch the ignition on to confirm the lamp
is functional. If it does not illuminate when
you switch the ignition on, or begins to
flash at any time, have the system checked
by your authorized dealer.
Powertrain Malfunction/Reduced
Power/Electronic Throttle Control Illuminates when a powertrain
or a 4WD fault has been
detected. Contact your
authorized dealer as soon as possible.
Service Engine Soon If it illuminates when the engine
is running this indicates a
malfunction. The On Board
Diagnostics system has detected a
malfunction of the vehicle emission control
system.
If it flashes, engine misfire may be
occurring. Increased exhaust gas
temperatures could damage the catalytic
converter or other vehicle components.
Drive in a moderate fashion (avoid heavy
acceleration and deceleration) and have
your vehicle immediately serviced.
It illuminates when you switch the ignition
on prior to engine start to check the bulb
and to indicate whether your vehicle is
ready for Inspection and Maintenance
(I/M) testing. Normally, it illuminates until the engine is
cranked and automatically turns off if no
malfunctions are present. However, if after
15 seconds it flashes eight times, this
indicates that your vehicle is not ready for
Inspection and Maintenance (I/M) testing.
See Emission Law (page 197).
Stability Control Illuminates when the system is
active. If it remains illuminated
or does not illuminate when you
switch the ignition on, this indicates a
malfunction. During a malfunction the
system will switch off. Have the system
checked by your authorized dealer
immediately. See
Using Stability
Control (page 233).
Stability Control Off Illuminates when you switch the
system off. It will go out when
you switch the system back on
or when you switch the ignition off.
See
Using Stability Control (page 233).
Transmission Tow/Haul
(If Equipped) Illuminates when the tow/haul
feature has been activated. If the
light flashes steadily, have the
system serviced immediately, damage to
the transmission could occur.
4X2
(If Equipped) Illuminates momentarily when
two-wheel drive high is selected.
If the light fails to display when
the ignition is turned on, or remains on,
have the system serviced immediately by
your authorized dealer.
111
Super Duty (TFE) Canada/United States of America, enUSA, Edition date: 201709, First Printing Instrument Cluster E138639 E130458 E161509 E163173
Page 128 of 656
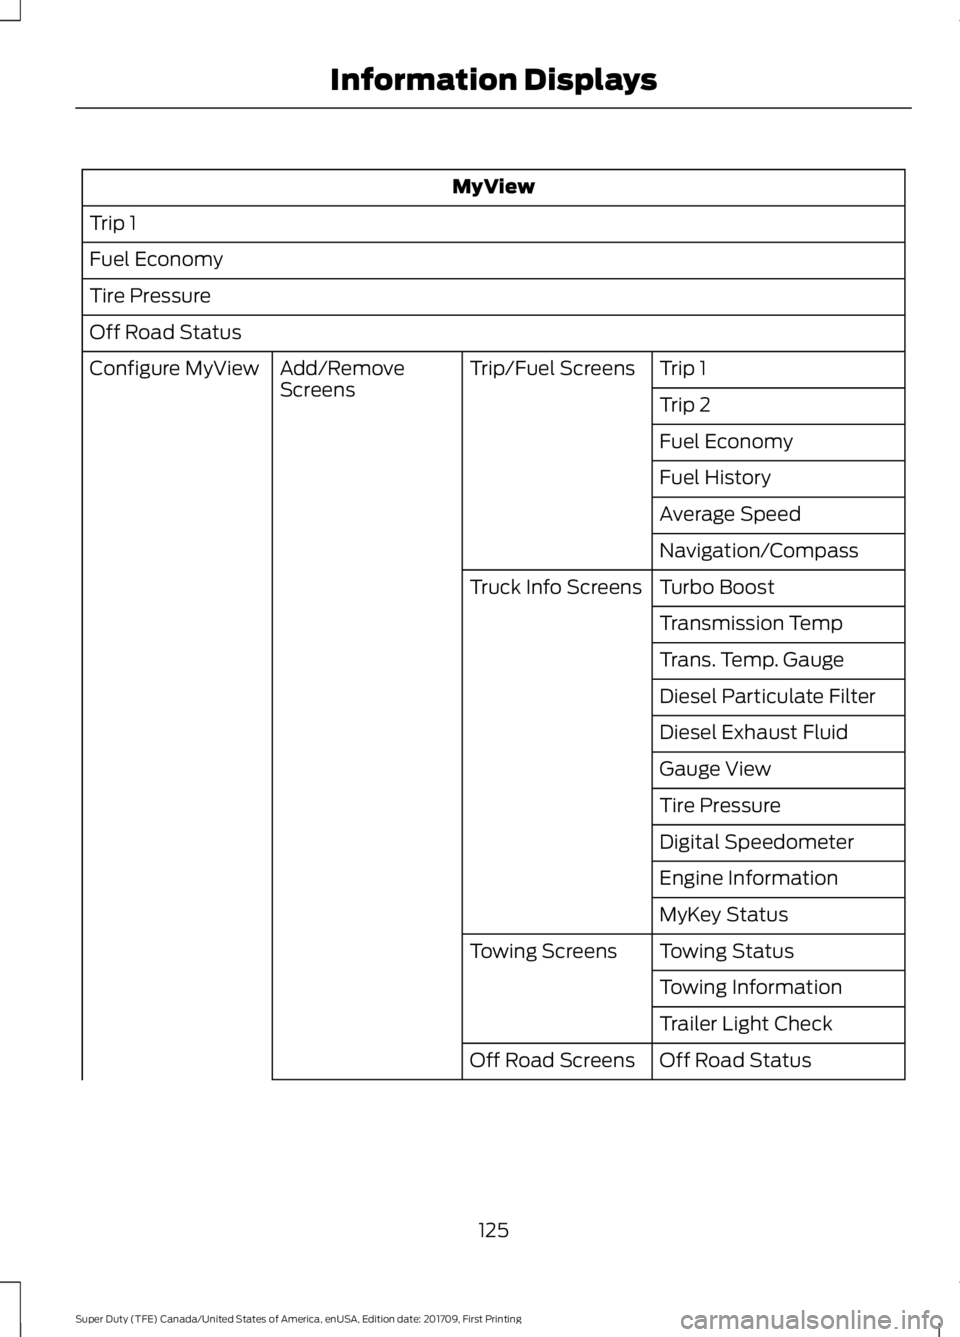
MyView
Trip 1
Fuel Economy
Tire Pressure
Off Road Status Trip 1
Trip/Fuel Screens
Add/Remove
Screens
Configure MyView
Trip 2
Fuel Economy
Fuel History
Average Speed
Navigation/Compass
Turbo Boost
Truck Info Screens
Transmission Temp
Trans. Temp. Gauge
Diesel Particulate Filter
Diesel Exhaust Fluid
Gauge View
Tire Pressure
Digital Speedometer
Engine Information
MyKey Status
Towing Status
Towing Screens
Towing Information
Trailer Light Check
Off Road Status
Off Road Screens
125
Super Duty (TFE) Canada/United States of America, enUSA, Edition date: 201709, First Printing Information Displays
Page 181 of 656
D (start) - Cranks the engine.
KEYLESS STARTING
Note: The system may not function if the
intelligent access key is close to metal
objects or electronic devices, for example
keys or a cell phone.
Note: A valid intelligent access key must
be located inside your vehicle to switch the
ignition on and start your vehicle.
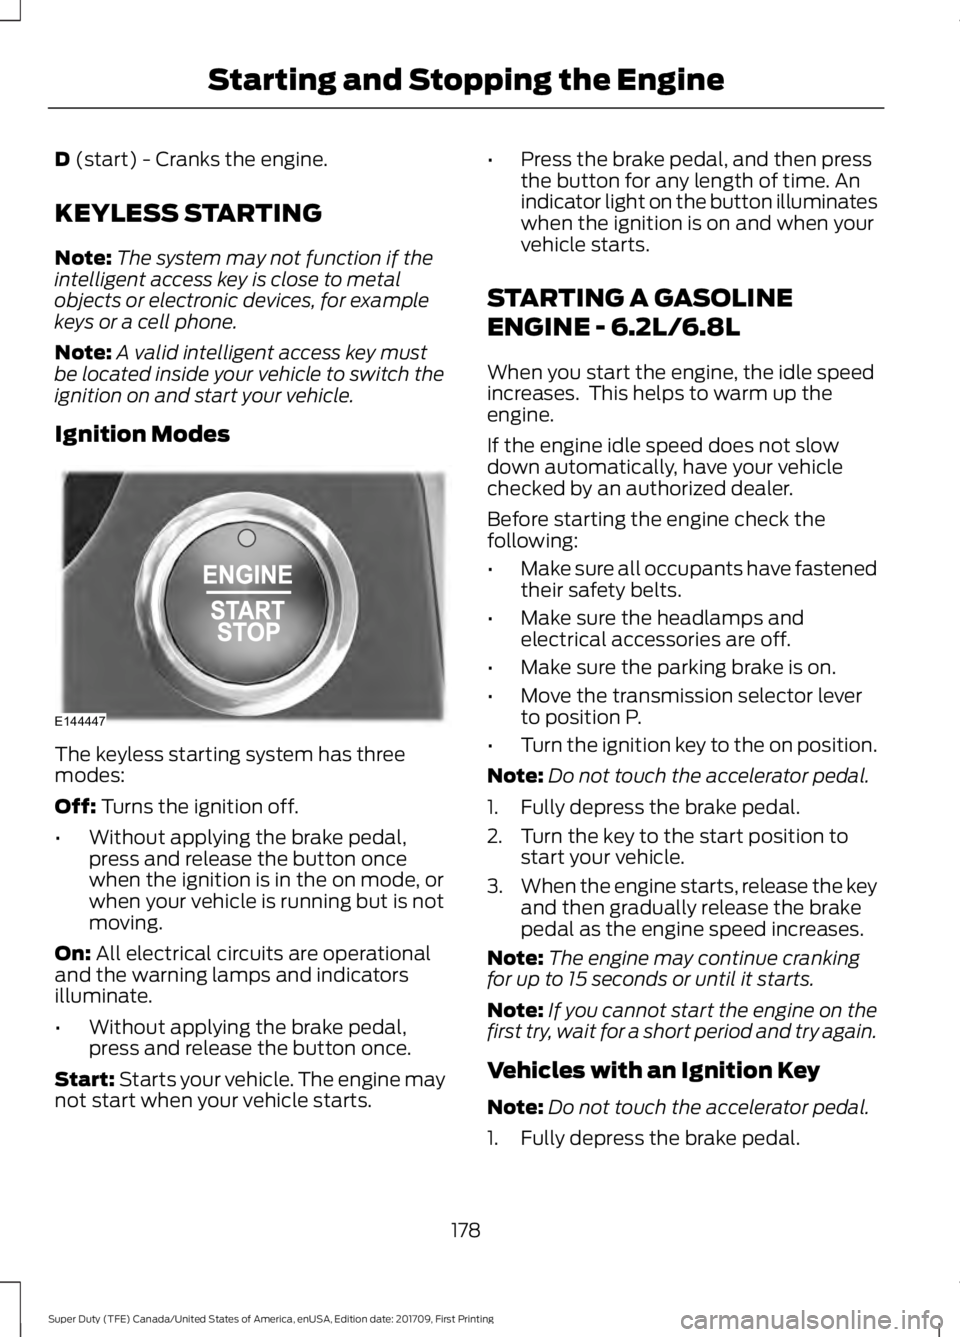
Ignition Modes The keyless starting system has three
modes:
Off:
Turns the ignition off.
• Without applying the brake pedal,
press and release the button once
when the ignition is in the on mode, or
when your vehicle is running but is not
moving.
On:
All electrical circuits are operational
and the warning lamps and indicators
illuminate.
• Without applying the brake pedal,
press and release the button once.
Start:
Starts your vehicle. The engine may
not start when your vehicle starts. •
Press the brake pedal, and then press
the button for any length of time. An
indicator light on the button illuminates
when the ignition is on and when your
vehicle starts.
STARTING A GASOLINE
ENGINE - 6.2L/6.8L
When you start the engine, the idle speed
increases. This helps to warm up the
engine.
If the engine idle speed does not slow
down automatically, have your vehicle
checked by an authorized dealer.
Before starting the engine check the
following:
• Make sure all occupants have fastened
their safety belts.
• Make sure the headlamps and
electrical accessories are off.
• Make sure the parking brake is on.
• Move the transmission selector lever
to position P.
• Turn the ignition key to the on position.
Note: Do not touch the accelerator pedal.
1. Fully depress the brake pedal.
2. Turn the key to the start position to start your vehicle.
3. When the engine starts, release the key
and then gradually release the brake
pedal as the engine speed increases.
Note: The engine may continue cranking
for up to 15 seconds or until it starts.
Note: If you cannot start the engine on the
first try, wait for a short period and try again.
Vehicles with an Ignition Key
Note: Do not touch the accelerator pedal.
1. Fully depress the brake pedal.
178
Super Duty (TFE) Canada/United States of America, enUSA, Edition date: 201709, First Printing Starting and Stopping the EngineE144447
Page 196 of 656
Use the following guidelines to avoid
electrostatic charge build-up when filling
an ungrounded fuel container:
•
Place approved fuel container on the
ground.
• Do not fill a fuel container while it is in
the vehicle (including the cargo area).
• Keep the fuel pump nozzle in contact
with the fuel container while filling.
• Do not use a device that would hold
the fuel pump handle in the fill position.
Fuel Filler Cap WARNINGS
The fuel system may be under
pressure. If you hear a hissing sound
near the fuel filler door, do not refuel
until the sound stops. Otherwise, fuel may
spray out, which could cause serious
personal injury. If you do not use the proper fuel filler
cap, excessive pressure or vacuum
in the fuel tank may damage the fuel
system or cause the fuel cap to disengage
in a collision, which may result in possible
personal injury. Note:
If you must replace the fuel filler cap,
replace it with a fuel filler cap that is
designed for your vehicle. The customer
warranty may be void for any damage to the
fuel tank or fuel system if the correct
genuine Ford, Motorcraft or other certified
fuel filler cap is not used.
Your fuel tank filler cap has an indexed
design with a 1/4th turn on and off feature.
When fueling your vehicle:
1. Put your vehicle in park (P).
2. Switch the engine off.
3. Carefully turn the filler cap counterclockwise until it spins off.
4. Pull to remove the cap from the fuel filler pipe. 5.
To install the cap, align the tabs on the
cap with the notches on the filler pipe.
6. Turn the filler cap clockwise 1/4 of a turn clockwise until it clicks at least
once.
If the Check Fuel Cap light or a Check Fuel
Cap message appears in the instrument
cluster and stays on after you start the
engine, you may not have installed the fuel
filler properly.
If the fuel cap light remains on, at the next
opportunity, safely pull off of the road,
remove the fuel filler cap, align the cap
properly and reinstall it. The check fuel cap
light or Check fuel cap message may not
reset immediately. It may take several
driving cycles for the indicators to turn off.
A driving cycle consists of an engine
start-up (after four or more hours with the
engine off) followed by normal city and
highway driving.
REFUELING - DIESEL WARNINGS
Read and follow all the instructions
on the pump island.
Stay outside your vehicle and do not
leave the fuel pump unattended
when refueling your vehicle.
Keep children away from the fuel
pump. Never let children pump fuel.
Wait at least 10 seconds before
removing the fuel pump nozzle to
allow any residual fuel to drain into
the fuel tank. Do not remove the fuel pump nozzle
from its fully inserted position when
refueling.
193
Super Duty (TFE) Canada/United States of America, enUSA, Edition date: 201709, First Printing Fuel and Refueling
Page 198 of 656
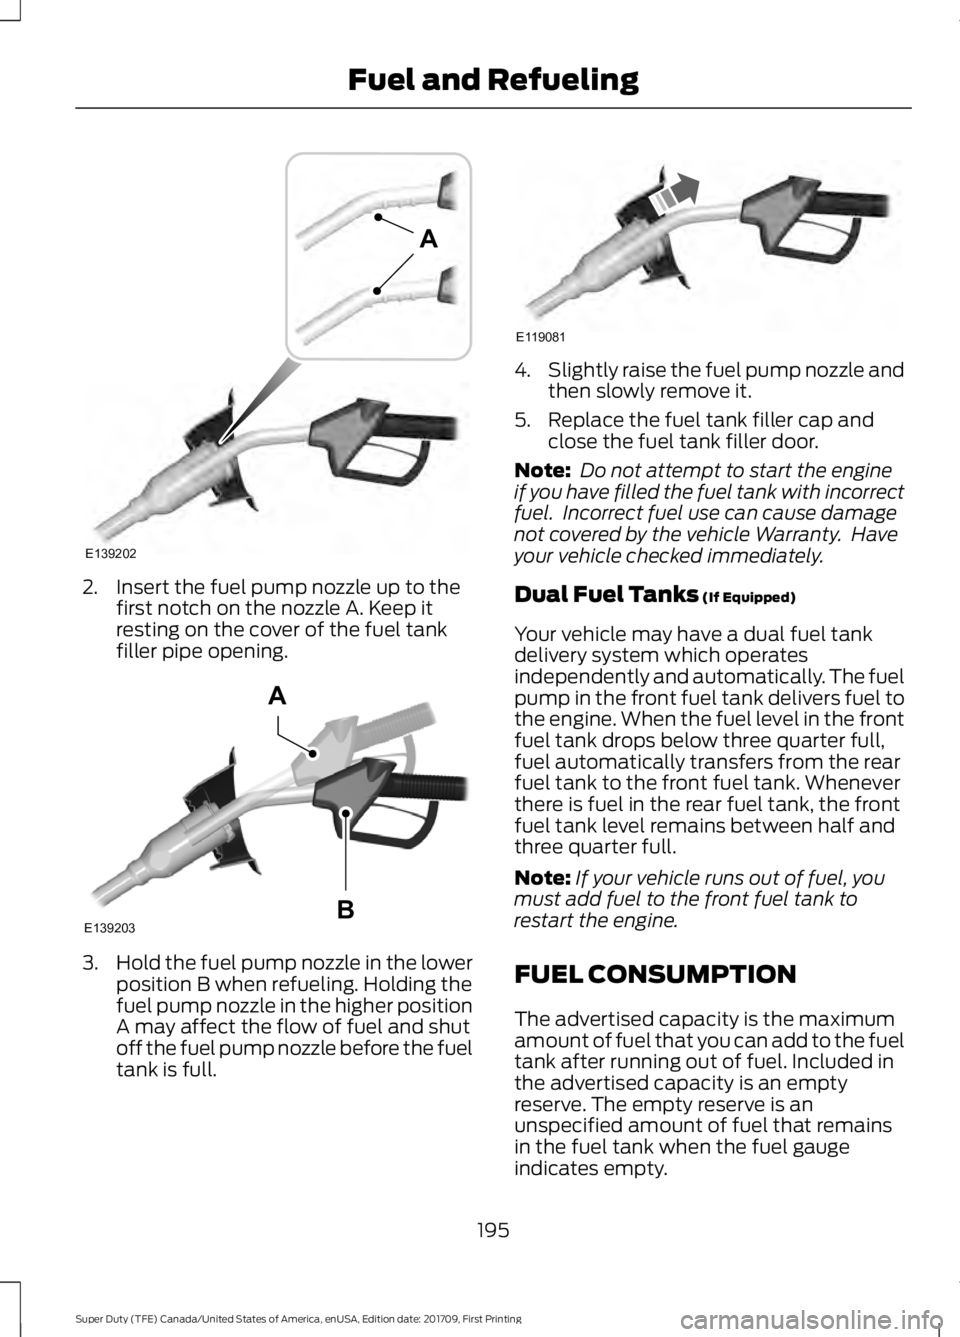
2. Insert the fuel pump nozzle up to the
first notch on the nozzle A. Keep it
resting on the cover of the fuel tank
filler pipe opening. 3.
Hold the fuel pump nozzle in the lower
position B when refueling. Holding the
fuel pump nozzle in the higher position
A may affect the flow of fuel and shut
off the fuel pump nozzle before the fuel
tank is full. 4.
Slightly raise the fuel pump nozzle and
then slowly remove it.
5. Replace the fuel tank filler cap and close the fuel tank filler door.
Note: Do not attempt to start the engine
if you have filled the fuel tank with incorrect
fuel. Incorrect fuel use can cause damage
not covered by the vehicle Warranty. Have
your vehicle checked immediately.
Dual Fuel Tanks (If Equipped)
Your vehicle may have a dual fuel tank
delivery system which operates
independently and automatically. The fuel
pump in the front fuel tank delivers fuel to
the engine. When the fuel level in the front
fuel tank drops below three quarter full,
fuel automatically transfers from the rear
fuel tank to the front fuel tank. Whenever
there is fuel in the rear fuel tank, the front
fuel tank level remains between half and
three quarter full.
Note: If your vehicle runs out of fuel, you
must add fuel to the front fuel tank to
restart the engine.
FUEL CONSUMPTION
The advertised capacity is the maximum
amount of fuel that you can add to the fuel
tank after running out of fuel. Included in
the advertised capacity is an empty
reserve. The empty reserve is an
unspecified amount of fuel that remains
in the fuel tank when the fuel gauge
indicates empty.
195
Super Duty (TFE) Canada/United States of America, enUSA, Edition date: 201709, First Printing Fuel and RefuelingE139202
A E139203
A
B E119081