2018 FORD F-59 warning light
[x] Cancel search: warning lightPage 58 of 168

•
Use the air conditioner or front
defroster.
• Use the speed control in hilly terrain.
• Rest your foot on the brake pedal while
driving.
• Drive a heavily loaded vehicle or tow a
trailer.
• Carry unnecessary weight
(approximately 1 mpg [0.4 km/L] is
lost for every 400 lb [180 kilogram] of
weight carried).
• Driving with the wheels out of
alignment.
Conditions
• Heavily loading a vehicle or towing a
trailer may reduce fuel economy at any
speed.
• Adding certain accessories to your
vehicle (for example bug deflectors,
rollbars, light bars, running boards, ski
racks or luggage racks) may reduce
fuel economy.
• To maximize the fuel economy, drive
with the tonneau cover installed (if
equipped).
• Using fuel blended with alcohol may
lower fuel economy.
• Fuel economy may decrease with lower
temperatures during the first 5–10 mi
(12 –16 km) of driving.
• Driving on flat terrain offers improved
fuel economy as compared to driving
on hilly terrain.
• Transmissions give their best fuel
economy when operated in the top
cruise gear and with steady pressure
on the gas pedal.
• Four-wheel-drive operation (if
equipped) is less fuel efficient than
two-wheel-drive operation.
• Close the windows for high-speed
driving. DRIVING THROUGH WATER WARNING
Do not drive through flowing or deep
water as you may lose control of your
vehicle.
Note:
Driving through standing water can
cause vehicle damage.
Note: Engine damage can occur if water
enters the air filter.
Before driving through standing water,
check the depth. Never drive through water
that is higher than the bottom of the wheel
hubs. When driving through standing water, drive
very slowly and do not stop your vehicle.
Your brake performance and traction may
be limited. After driving through water and
as soon as it is safe to do so:
•
Lightly press the brake pedal to dry the
brakes and to check that they work.
• Check that the horn works.
• Check that the exterior lights work.
• Turn the steering wheel to check that
the steering power assist works.
55
Motorhome (TY3) Canada/United States of America, enUSA, Edition date: 201712, Second Printing Driving HintsE176913
Page 60 of 168
Vehicles Sold in Canada: Getting
Roadside Assistance
To fully assist you should you have a
vehicle concern, Ford Motor Company of
Canada, Limited offers a complimentary
roadside assistance program. This
program is eligible within Canada or the
continental United States.
This program is separate from the New
Vehicle Limited Warranty, but the coverage
is concurrent with the powertrain coverage
period of your vehicle.
Canadian customers who require roadside
assistance, call 1-800-665-2006.
Vehicles Sold in Canada: Using
Roadside Assistance
Complete the roadside assistance
identification card and place it in your
wallet for quick reference.
In Canada, this card is found in the
Warranty Guide in the glove compartment
of your vehicle.
Vehicles Sold in Canada: Roadside
Assistance Program Coverage
The service is available 24 hours a day,
seven days a week.
Canadian roadside coverage and benefits
may differ from the U.S. coverage.
If you require more information, please
refer to the coverage section of your
warranty guide, call us in Canada at
1-800-665-2006, or visit our website at
www.ford.ca.
HAZARD FLASHERS
Note:
If used when the vehicle is not
running, the battery loses charge. As a result,
there may be insufficient power to restart
your vehicle. The hazard flasher control is on the
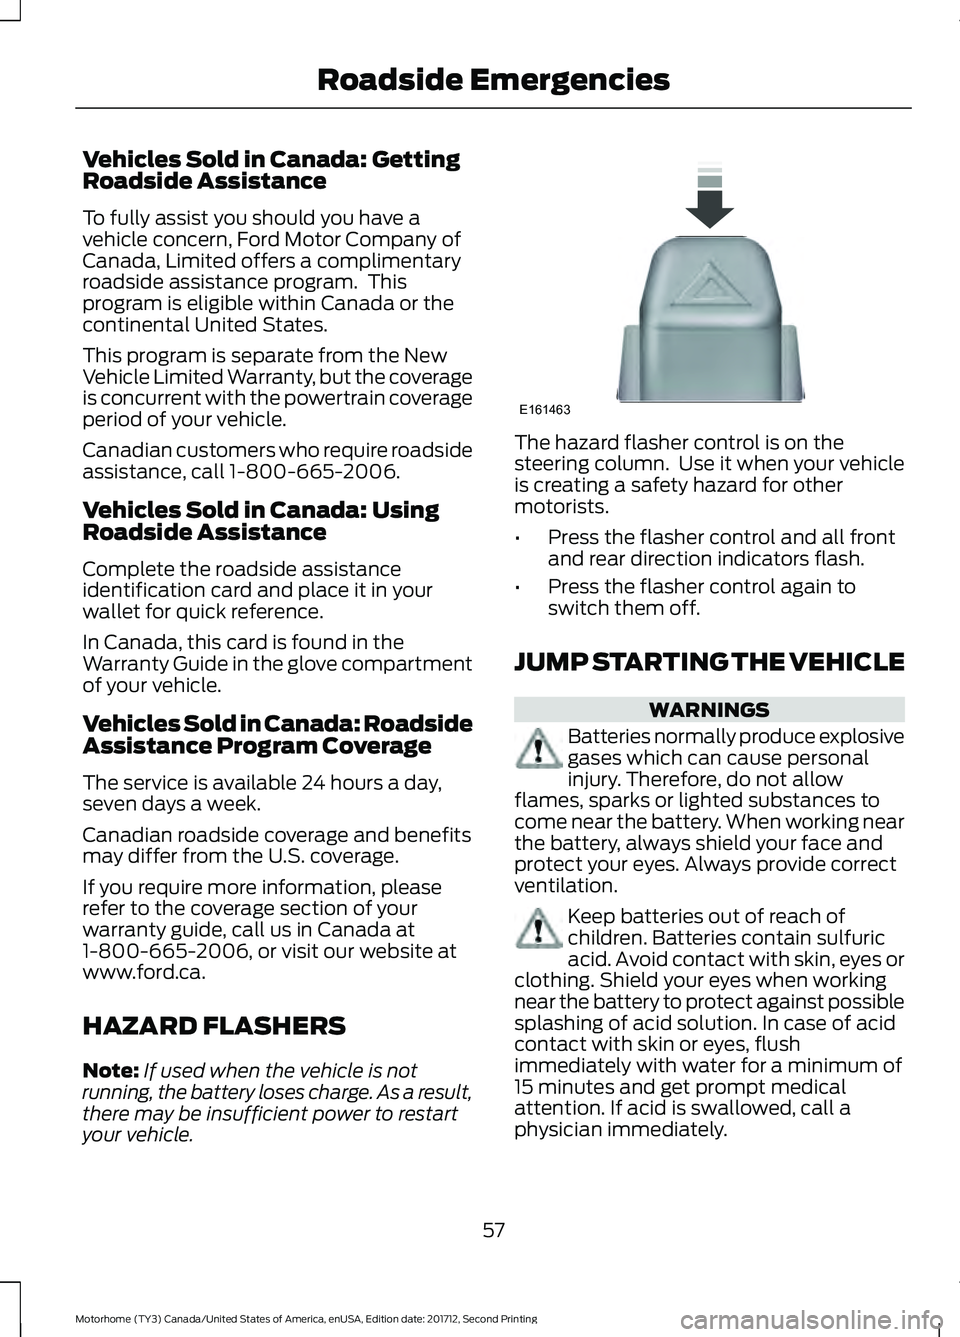
steering column. Use it when your vehicle
is creating a safety hazard for other
motorists.
•
Press the flasher control and all front
and rear direction indicators flash.
• Press the flasher control again to
switch them off.
JUMP STARTING THE VEHICLE WARNINGS
Batteries normally produce explosive
gases which can cause personal
injury. Therefore, do not allow
flames, sparks or lighted substances to
come near the battery. When working near
the battery, always shield your face and
protect your eyes. Always provide correct
ventilation. Keep batteries out of reach of
children. Batteries contain sulfuric
acid. Avoid contact with skin, eyes or
clothing. Shield your eyes when working
near the battery to protect against possible
splashing of acid solution. In case of acid
contact with skin or eyes, flush
immediately with water for a minimum of
15 minutes and get prompt medical
attention. If acid is swallowed, call a
physician immediately.
57
Motorhome (TY3) Canada/United States of America, enUSA, Edition date: 201712, Second Printing Roadside EmergenciesE161463
Page 96 of 168

Note:
Do not add oil further than the
maximum mark. Oil levels above the
maximum mark may cause engine damage.
Note: Make sure you install the oil filler cap
correctly.
Note: Soak up any spillage with an
absorbent cloth immediately.
OIL CHANGE INDICATOR
RESET
Resetting the Oil Life Monitoring
System
Only reset the oil life monitoring system
after changing the engine oil and oil filter.
To reset the oil life monitoring system do
the following:
1. Switch the ignition on. Do not start the
engine.
2. Fully press the accelerator and brake pedals at the same time.
3. Keep the accelerator and brake pedals
fully pressed.
4. After three seconds, a message displays confirming the reset procedure
is in progress.
5. After 25 seconds, a message displays confirming the reset procedure is
complete.
6. Release the accelerator and brake pedals.
7. Switch the ignition off. ENGINE COOLANT CHECK WARNINGS
Do not remove the coolant reservoir
cap when the cooling system is hot.
Wait 10 minutes for the cooling
system to cool down. Cover the coolant
reservoir cap with a thick cloth to prevent
the possibility of scalding and slowly
remove the cap. Failure to follow this
instruction could result in personal injury. Do not put coolant in the windshield
washer fluid reservoir. If sprayed on
the windshield, coolant could make
it difficult to see through the windshield. To reduce the risk of personal injury,
make sure the engine is cool before
unscrewing the coolant pressure
relief cap. The cooling system is under
pressure. Steam and hot liquid can come
out forcefully when you loosen the cap
slightly. Do not add coolant further than the
MAX mark.
When the engine is cold, check the
concentration and level of the coolant at
the intervals listed in the scheduled
maintenance information. See Scheduled
Maintenance
(page 140).
Note: Make sure that the coolant level is
between the
MIN and MAX marks on the
coolant reservoir.
Note: Coolant expands when it is hot. The
level may extend beyond the
MAX mark.
Maintain coolant concentration within
48% to 50%, which equates to a freeze
point between -30°F (-34°C) and -34°F
(-37°C). Coolant concentration should be
checked using a refractometer. We do not
recommend the use of hydrometers or
coolant test strips for measuring coolant
concentration.
93
Motorhome (TY3) Canada/United States of America, enUSA, Edition date: 201712, Second Printing Maintenance
Page 97 of 168

Adding Coolant
WARNING
Never remove the coolant reservoir
cap when the engine is running or
hot.
Note:
Automotive fluids are not
interchangeable. Take care not to put
engine coolant in the windshield washer
fluid reservoir or windshield washer fluid in
the engine coolant reservoir.
Note: Do not use stop leak pellets, cooling
system sealants, or non-specified additives
as they can cause damage to the engine
cooling or heating systems. Resulting
component damage may not be covered by
the vehicle Warranty.
It is very important to use prediluted
coolant approved to the correct
specification in order to avoid plugging the
small passageways in the engine cooling
system. See Capacities and
Specifications (page 129). Do not mix
different colors or types of coolant in your
vehicle. Mixing of engine coolants or using
an incorrect coolant may harm the engine
or cooling system components and may
not be covered by the vehicle Warranty.
Note: If prediluted coolant is not available,
use the approved concentrated coolant
diluting it to 50/50 with distilled water. See
Capacities and Specifications (page 129).
Using water that has not been deionised
may contribute to deposit formation,
corrosion and plugging of the small cooling
system passageways.
Note: Coolants marketed for all makes and
models may not be approved to Ford
specifications and may cause damage to
the cooling system. Resulting component
damage may not be covered by the vehicle
Warranty. If the coolant level is at or below the
minimum mark, add prediluted coolant
immediately.
To top up the coolant level do the
following:
1. Unscrew the cap slowly. Any pressure
escapes as you unscrew the cap.
2. Add prediluted coolant approved to the correct specification. See
Capacities and Specifications (page
129
).
3. Add enough prediluted coolant to reach the correct level.
4. Replace the coolant reservoir cap, turn
it clockwise until you feel a strong
resistance.
5. Check the coolant level in the coolant reservoir the next few times you drive
your vehicle. If necessary, add enough
prediluted engine coolant to bring the
coolant level to the correct level.
If you have to add more than
1.1 qt (1 L) of
engine coolant per month, have your
vehicle checked as soon as possible.
Operating an engine with a low level of
coolant can result in engine overheating
and possible engine damage.
Note: During normal vehicle operation, the
coolant may change color from orange to
pink or light red. As long as the coolant is
clear and uncontaminated, this color change
does not indicate the coolant has degraded
nor does it require the coolant to be drained,
the system to be flushed, or the coolant to
be replaced.
In case of emergency, you can add a large
amount of water without engine coolant
in order to reach a vehicle service location.
In this instance, qualified personnel:
1. Must drain the cooling system.
2. Chemically clean the coolant system with Motorcraft Premium Cooling
System Flush.
94
Motorhome (TY3) Canada/United States of America, enUSA, Edition date: 201712, Second Printing Maintenance
Page 104 of 168
4. Check the fluid level on the dipstick. It
should be between the arrows in the
FULL range on the side of the dipstick
with the words MAX. HOT at the top.
Do not add fluid if the level is within
this range.
5. If the fluid is low, add fluid in small amounts, continuously checking the level until it reaches the FULL range.
Be sure to put the dipstick back in the
reservoir.
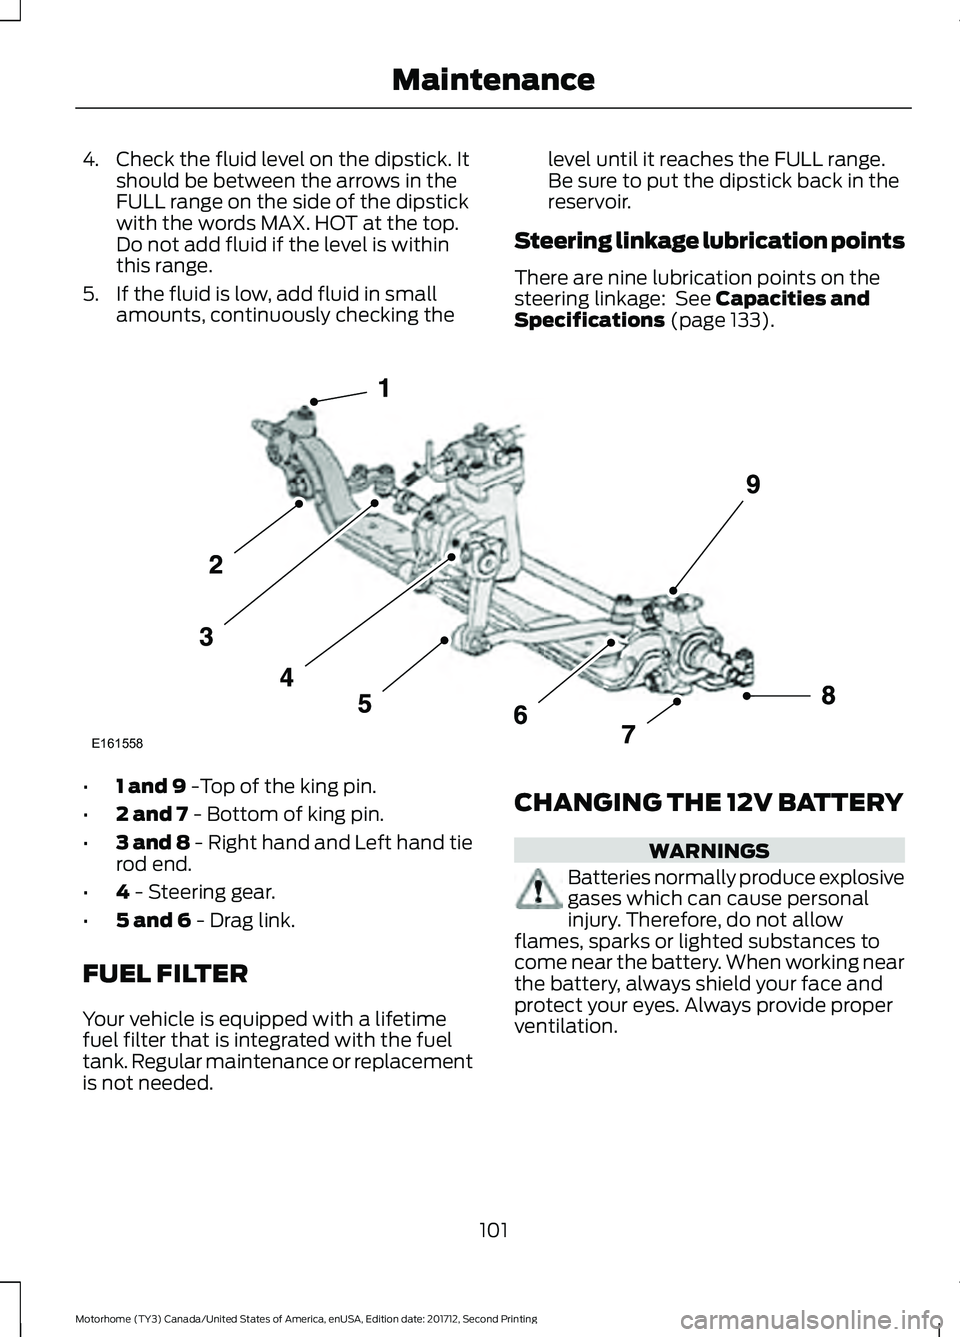
Steering linkage lubrication points
There are nine lubrication points on the
steering linkage: See Capacities and
Specifications (page 133). •
1 and 9
-Top of the king pin.
• 2 and 7
- Bottom of king pin.
• 3 and 8 - Right hand and Left hand tie
rod end.
• 4
- Steering gear.
• 5 and 6
- Drag link.
FUEL FILTER
Your vehicle is equipped with a lifetime
fuel filter that is integrated with the fuel
tank. Regular maintenance or replacement
is not needed. CHANGING THE 12V BATTERY WARNINGS
Batteries normally produce explosive
gases which can cause personal
injury. Therefore, do not allow
flames, sparks or lighted substances to
come near the battery. When working near
the battery, always shield your face and
protect your eyes. Always provide proper
ventilation.
101
Motorhome (TY3) Canada/United States of America, enUSA, Edition date: 201712, Second Printing MaintenanceE161558
Page 112 of 168
TIRE CARE
Information About Uniform
Tire Quality Grading
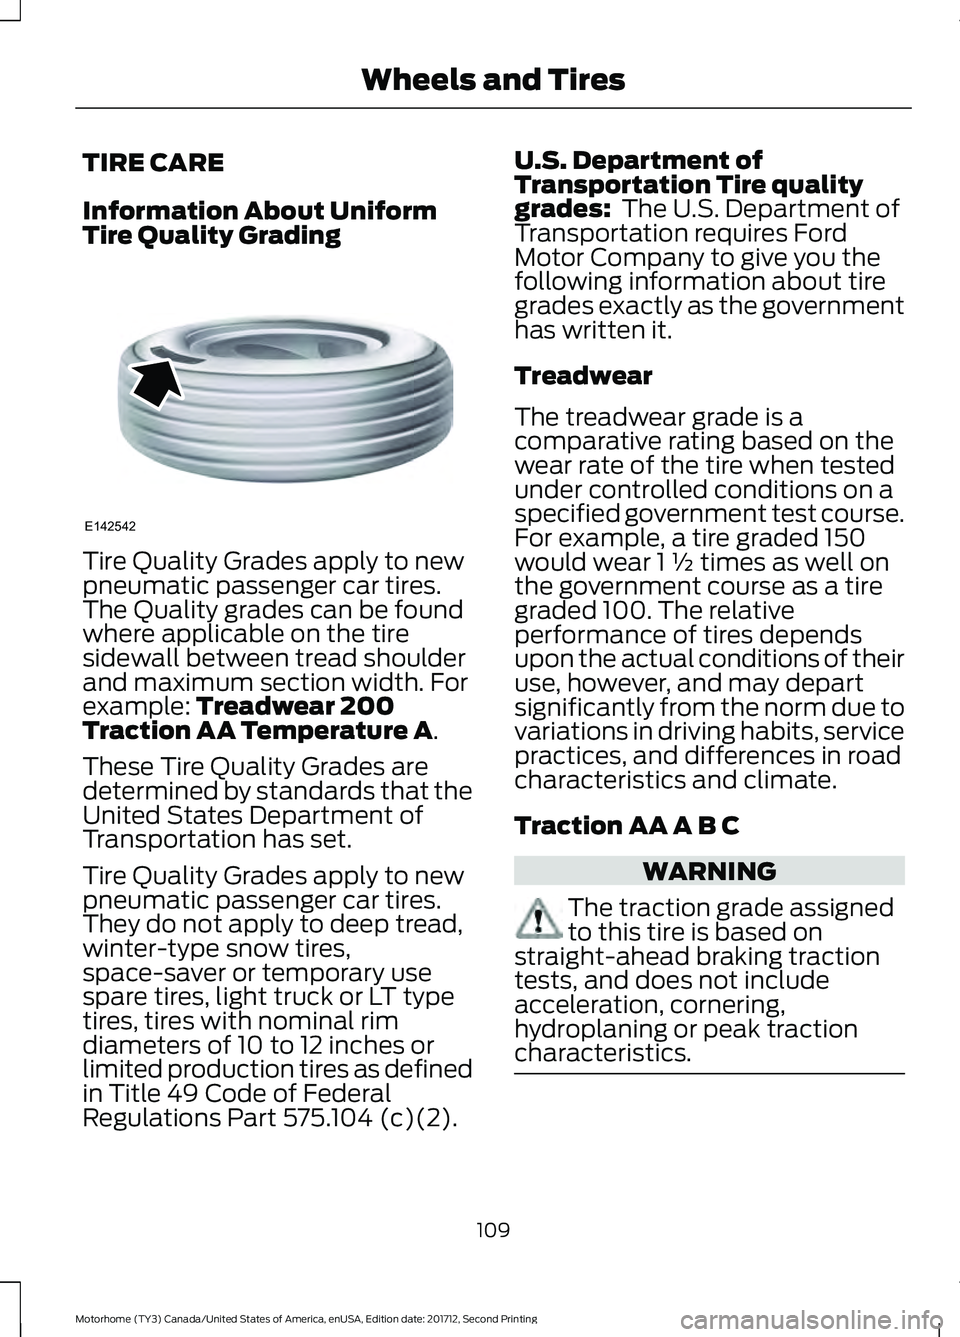
Tire Quality Grades apply to new
pneumatic passenger car tires.
The Quality grades can be found
where applicable on the tire
sidewall between tread shoulder
and maximum section width. For
example: Treadwear 200
Traction AA Temperature A.
These Tire Quality Grades are
determined by standards that the
United States Department of
Transportation has set.
Tire Quality Grades apply to new
pneumatic passenger car tires.
They do not apply to deep tread,
winter-type snow tires,
space-saver or temporary use
spare tires, light truck or LT type
tires, tires with nominal rim
diameters of 10 to 12 inches or
limited production tires as defined
in Title 49 Code of Federal
Regulations Part 575.104 (c)(2). U.S. Department of
Transportation Tire quality
grades:
The U.S. Department of
Transportation requires Ford
Motor Company to give you the
following information about tire
grades exactly as the government
has written it.
Treadwear
The treadwear grade is a
comparative rating based on the
wear rate of the tire when tested
under controlled conditions on a
specified government test course.
For example, a tire graded 150
would wear 1 ½ times as well on
the government course as a tire
graded 100. The relative
performance of tires depends
upon the actual conditions of their
use, however, and may depart
significantly from the norm due to
variations in driving habits, service
practices, and differences in road
characteristics and climate.
Traction AA A B C WARNING
The traction grade assigned
to this tire is based on
straight-ahead braking traction
tests, and does not include
acceleration, cornering,
hydroplaning or peak traction
characteristics. 109
Motorhome (TY3) Canada/United States of America, enUSA, Edition date: 201712, Second Printing Wheels and TiresE142542
Page 117 of 168
*Temperature: The temperature
grades are A (the highest), B and
C, representing the tire's
resistance to the generation of
heat and its ability to dissipate
heat when tested under controlled
conditions on a specified indoor
laboratory test wheel.
M. Maximum Inflation
Pressure:
Indicates the tire
manufacturers' maximum
permissible pressure or the
pressure at which the maximum
load can be carried by the tire. This
pressure is normally higher than
the vehicle manufacturer's
recommended cold inflation
pressure which can be found on
the Safety Compliance
Certification Label. See the
completed vehicle's owner's
manual for the location of the
Safety Compliance Certification
Label. The cold inflation pressure
should never be set lower than the
recommended pressure on the
vehicle label.
The tire suppliers may have
additional markings, notes or
warnings such as standard load
or radial tubeless.
Additional Information
Contained on the Tire Sidewall
for LT Type Tires
Note: Tire Quality Grades do not
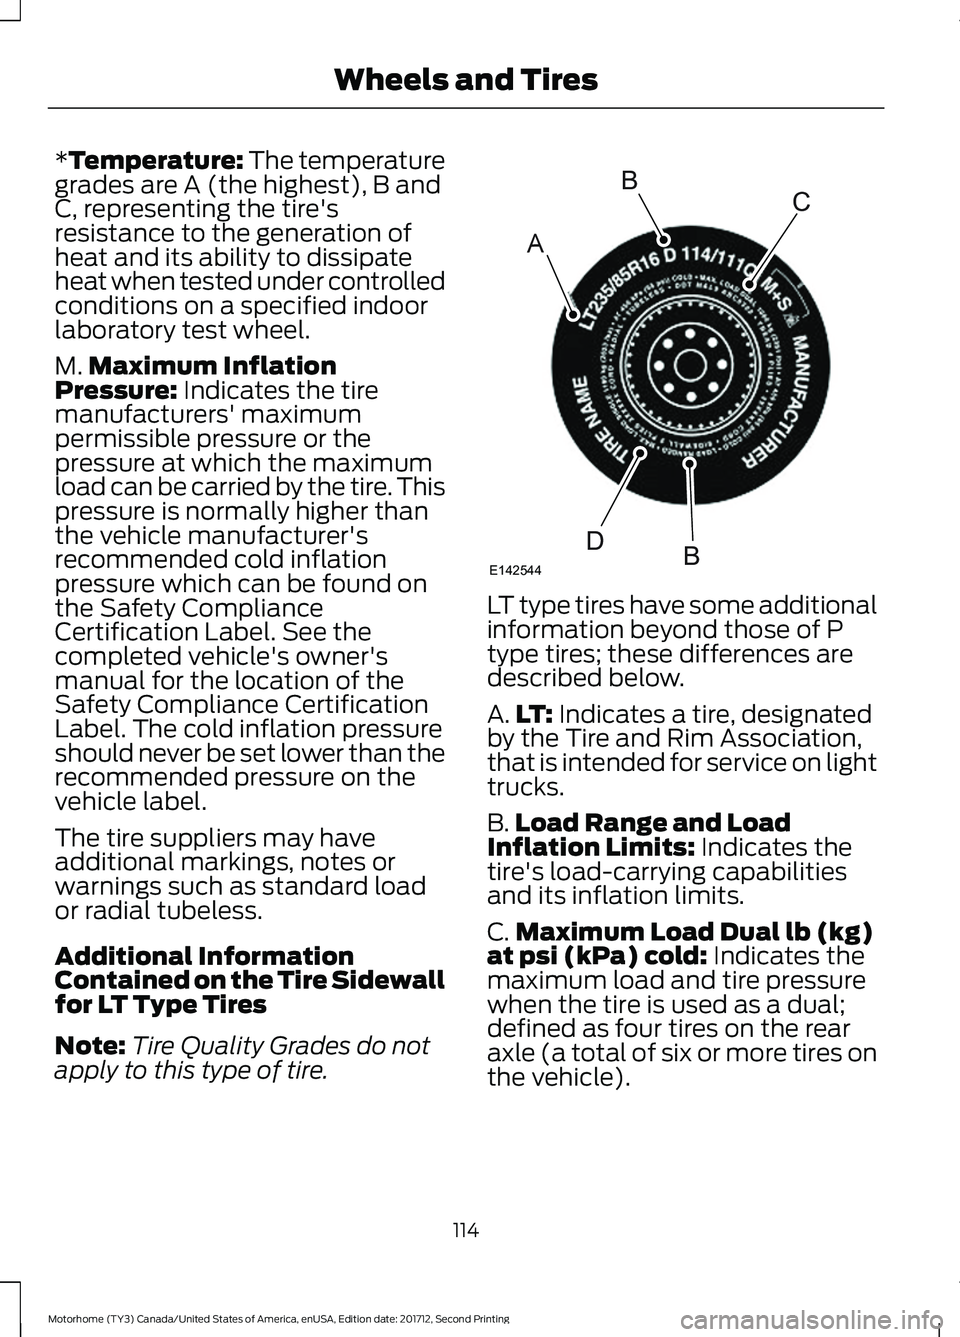
apply to this type of tire. LT type tires have some additional
information beyond those of P
type tires; these differences are
described below.
A.
LT:
Indicates a tire, designated
by the Tire and Rim Association,
that is intended for service on light
trucks.
B. Load Range and Load
Inflation Limits:
Indicates the
tire's load-carrying capabilities
and its inflation limits.
C. Maximum Load Dual lb (kg)
at psi (kPa) cold:
Indicates the
maximum load and tire pressure
when the tire is used as a dual;
defined as four tires on the rear
axle (a total of six or more tires on
the vehicle).
114
Motorhome (TY3) Canada/United States of America, enUSA, Edition date: 201712, Second Printing Wheels and TiresA
BC
BDE142544
Page 121 of 168
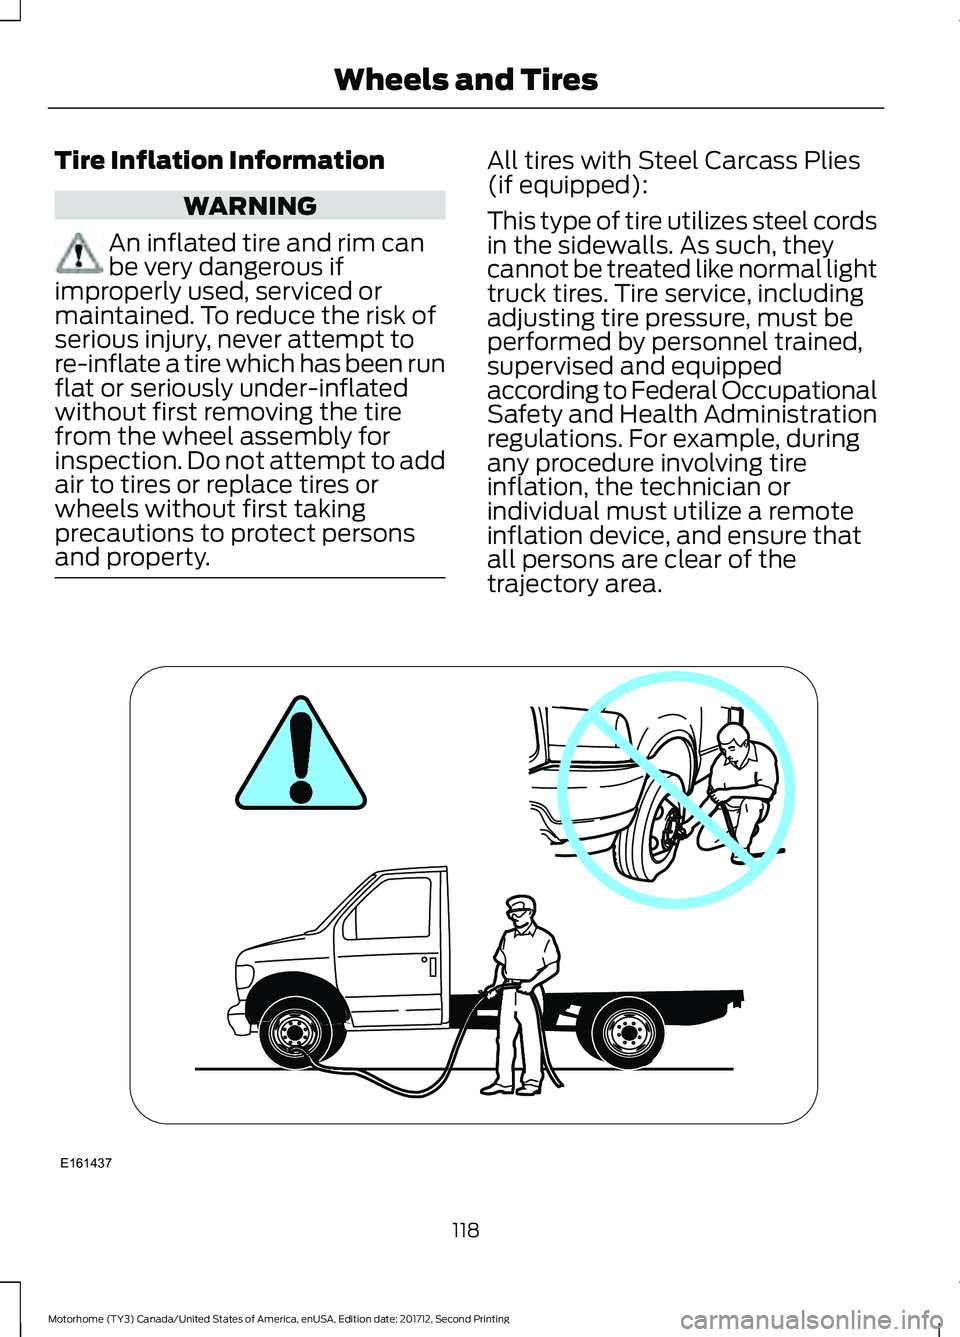
Tire Inflation Information
WARNING
An inflated tire and rim can
be very dangerous if
improperly used, serviced or
maintained. To reduce the risk of
serious injury, never attempt to
re-inflate a tire which has been run
flat or seriously under-inflated
without first removing the tire
from the wheel assembly for
inspection. Do not attempt to add
air to tires or replace tires or
wheels without first taking
precautions to protect persons
and property. All tires with Steel Carcass Plies
(if equipped):
This type of tire utilizes steel cords
in the sidewalls. As such, they
cannot be treated like normal light
truck tires. Tire service, including
adjusting tire pressure, must be
performed by personnel trained,
supervised and equipped
according to Federal Occupational
Safety and Health Administration
regulations. For example, during
any procedure involving tire
inflation, the technician or
individual must utilize a remote
inflation device, and ensure that
all persons are clear of the
trajectory area.
118
Motorhome (TY3) Canada/United States of America, enUSA, Edition date: 201712, Second Printing Wheels and TiresE161437