2018 FORD F-550 brake
[x] Cancel search: brakePage 352 of 660
Do not use supplemental transmission
fluid additives, treatments or cleaning
agents. The use of these materials may
affect transmission operation and result
in damage to internal transmission
components.
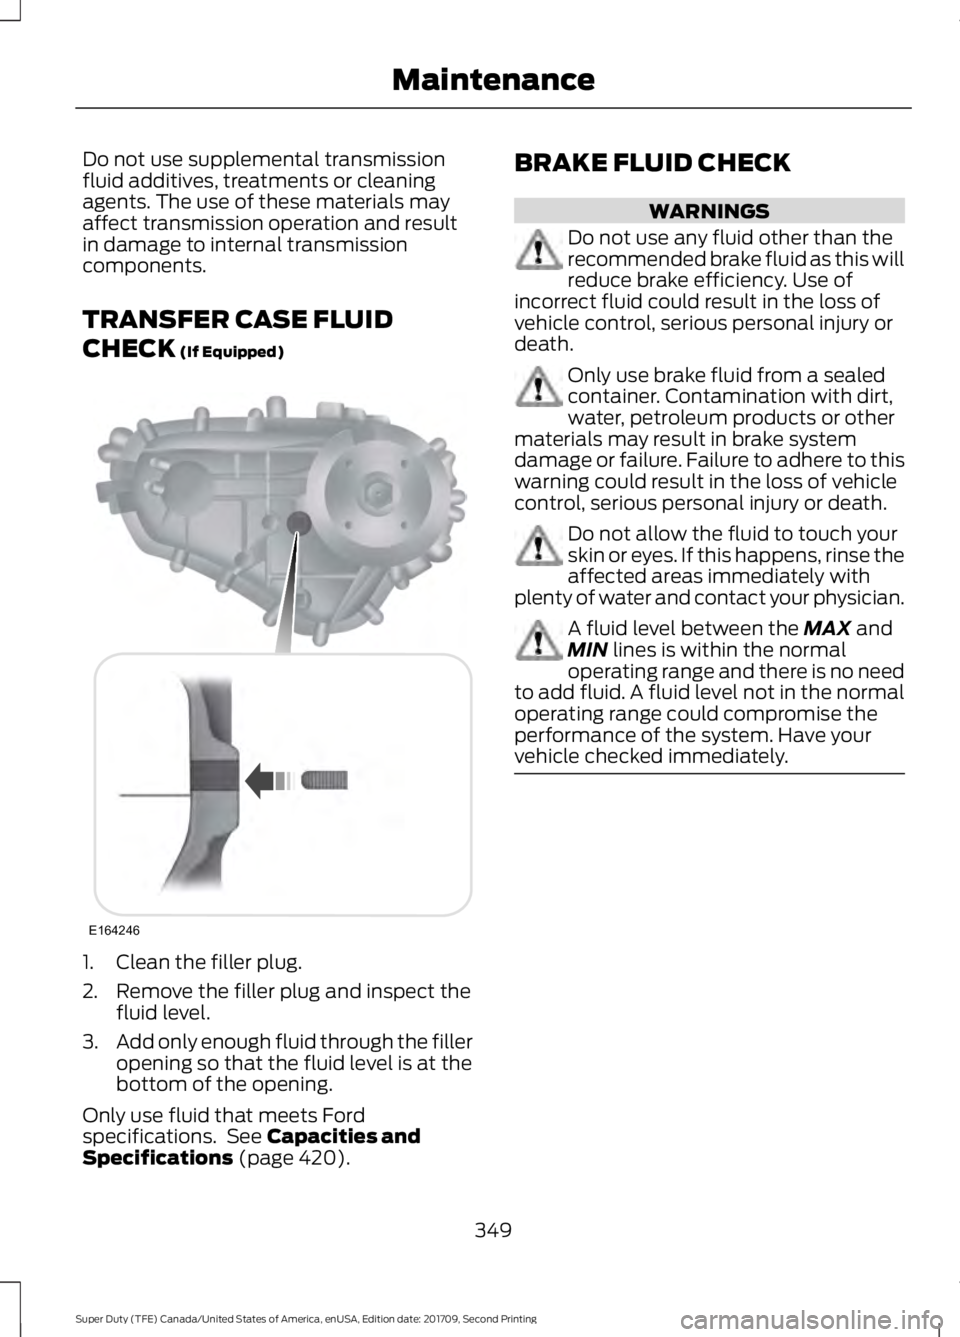
TRANSFER CASE FLUID
CHECK (If Equipped)
1. Clean the filler plug.
2. Remove the filler plug and inspect the
fluid level.
3. Add only enough fluid through the filler
opening so that the fluid level is at the
bottom of the opening.
Only use fluid that meets Ford
specifications. See
Capacities and
Specifications (page 420). BRAKE FLUID CHECK WARNINGS
Do not use any fluid other than the
recommended brake fluid as this will
reduce brake efficiency. Use of
incorrect fluid could result in the loss of
vehicle control, serious personal injury or
death. Only use brake fluid from a sealed
container. Contamination with dirt,
water, petroleum products or other
materials may result in brake system
damage or failure. Failure to adhere to this
warning could result in the loss of vehicle
control, serious personal injury or death. Do not allow the fluid to touch your
skin or eyes. If this happens, rinse the
affected areas immediately with
plenty of water and contact your physician. A fluid level between the
MAX and
MIN lines is within the normal
operating range and there is no need
to add fluid. A fluid level not in the normal
operating range could compromise the
performance of the system. Have your
vehicle checked immediately. 349
Super Duty (TFE) Canada/United States of America, enUSA, Edition date: 201709, Second Printing MaintenanceE164246
Page 356 of 660
CHANGING THE 12V BATTERY
WARNINGS
Batteries normally produce explosive
gases which can cause personal
injury. Therefore, do not allow
flames, sparks or lighted substances to
come near the battery. When working near
the battery, always shield your face and
protect your eyes. Always provide correct
ventilation. When lifting a plastic-cased battery,
excessive pressure on the end walls
could cause acid to flow through the
vent caps, resulting in personal injury and
damage to the vehicle or battery. Lift the
battery with a battery carrier or with your
hands on opposite corners. Keep batteries out of reach of
children. Batteries contain sulfuric
acid. Avoid contact with skin, eyes or
clothing. Shield your eyes when working
near the battery to protect against possible
splashing of acid solution. In case of acid
contact with skin or eyes, flush
immediately with water for a minimum of
15 minutes and get prompt medical
attention. If acid is swallowed, call a
physician immediately. Battery posts, terminals and related
accessories contain lead and lead
compounds. Wash hands after
handling. This vehicle may have more than one
battery. Removing the battery cables
from only one battery does not
disconnect your vehicle electrical system.
Make sure you disconnect the battery
cables from all batteries when
disconnecting power. Failure to do so may
cause serious personal injury or property
damage. Your vehicle is fitted with a Motorcraft
maintenance-free battery which normally
does not require additional water.
When a battery replacement is required,
you must use a recommended
replacement battery that matches the
electrical requirements of the vehicle.
Note:
After cleaning or replacing the
battery, make sure you reinstall the battery
cover or shield.
Note: If you add electrical accessories or
components to the vehicle, it may adversely
affect the low voltage battery performance
and durability. This may also affect the
performance of other electrical systems in
the vehicle.
For longer, trouble-free operation, keep the
top of the battery clean and dry.
If you see any corrosion on the battery or
terminals, remove the cables from the
terminals and clean with a wire brush. You
can neutralize the acid with a solution of
baking soda and water.
Because your vehicle ’s engine is
electronically controlled by a computer,
some control conditions are maintained
by power from the battery. When the
battery is disconnected or a new battery
is installed, the engine must relearn its idle
and fuel trim strategy for optimum
driveability and performance. Flexible fuel
vehicles (FFV) must also relearn the
ethanol content of the fuel for optimum
driveability and performance.
To restore the settings, do the following:
1. Apply the parking brake.
2. Shift into park (P) or neutral (N).
3. Switch off all accessories.
4. Press the brake pedal and start your vehicle.
353
Super Duty (TFE) Canada/United States of America, enUSA, Edition date: 201709, Second Printing Maintenance
Page 361 of 660

1.
Switch all of the lamps and the ignition
off.
2. Disconnect the electrical connector.
3. Turn the bulb holder counterclockwise
and remove it.
Note: You cannot separate the bulb from
the bulb holder.
Note: Handle a halogen headlamp bulb
carefully and keep out of children ’s reach.
Grasp the bulb only by its plastic base and
do not touch the glass. The oil from your
hand could cause the bulb to break the next
time the headlamps are operated.
Fog Lamp Bulbs (If Equipped) 1.
Switch all of the lamps and the ignition
off.
2. To access the bulb, reach behind the bumper.
3. Disconnect the electrical connector.
4. Turn the bulb holder counterclockwise
and remove it.
Note: You cannot separate the bulb from
the bulb holder.
Note: Handle a halogen bulb carefully and
keep out of children ’s reach. Grasp the bulb
only by its plastic base and do not touch the
glass. The oil from your hand could cause
the bulb to break the next time the fog
lamps are operated.
Rear Lamps, Brake Lamps, Rear
Direction Indicator and Reversing
Lamp Bulbs
Pickup Models - Vehicles without Blind
Spot Information System 1.
Switch all of the lamps and the ignition
off.
2. Open the tailgate to expose the lamp assemblies.
358
Super Duty (TFE) Canada/United States of America, enUSA, Edition date: 201709, Second Printing MaintenanceE224991 E163826 E223775
5
Page 362 of 660
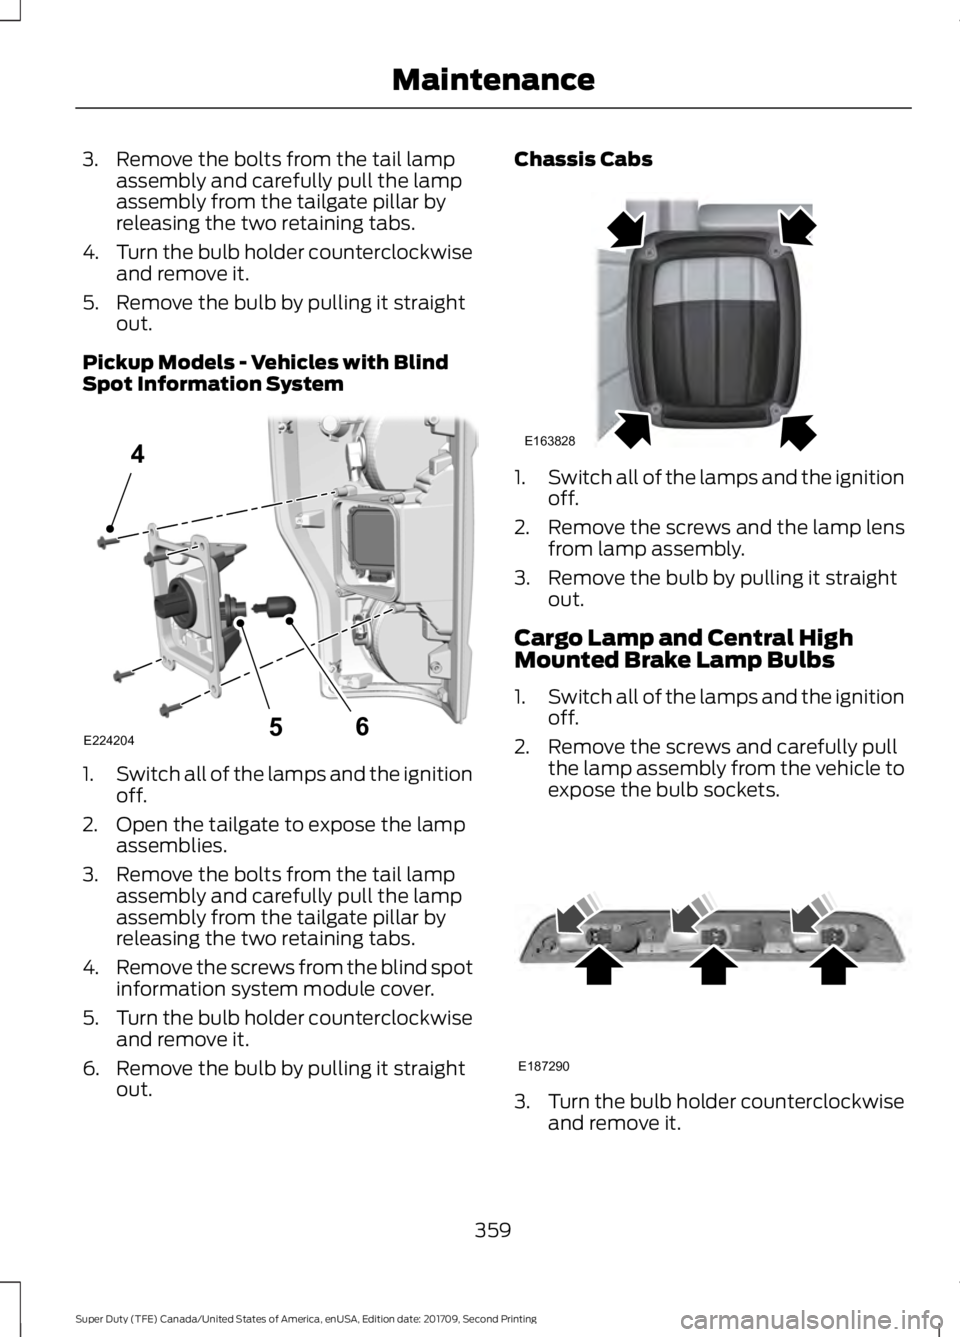
3. Remove the bolts from the tail lamp
assembly and carefully pull the lamp
assembly from the tailgate pillar by
releasing the two retaining tabs.
4. Turn the bulb holder counterclockwise
and remove it.
5. Remove the bulb by pulling it straight out.
Pickup Models - Vehicles with Blind
Spot Information System 1.
Switch all of the lamps and the ignition
off.
2. Open the tailgate to expose the lamp assemblies.
3. Remove the bolts from the tail lamp assembly and carefully pull the lamp
assembly from the tailgate pillar by
releasing the two retaining tabs.
4. Remove the screws from the blind spot
information system module cover.
5. Turn the bulb holder counterclockwise
and remove it.
6. Remove the bulb by pulling it straight out. Chassis Cabs
1.
Switch all of the lamps and the ignition
off.
2. Remove the screws and the lamp lens from lamp assembly.
3. Remove the bulb by pulling it straight out.
Cargo Lamp and Central High
Mounted Brake Lamp Bulbs
1. Switch all of the lamps and the ignition
off.
2. Remove the screws and carefully pull the lamp assembly from the vehicle to
expose the bulb sockets. 3.
Turn the bulb holder counterclockwise
and remove it.
359
Super Duty (TFE) Canada/United States of America, enUSA, Edition date: 201709, Second Printing MaintenanceE224204
4
65 E163828 E187290
Page 363 of 660

4. Remove the bulb by pulling it straight
out.
License Plate Lamp Bulb 1.
Switch all of the lamps and the ignition
off. 2. To access the bulb, reach behind the
bumper.
3. Turn the bulb holder counterclockwise
and remove it.
4. Remove the bulb by pulling it straight out.
BULB SPECIFICATION CHART
Replacement bulbs are specified in the
chart below. Headlamp bulbs must be
marked with an authorized D.O.T. marking
for North America to make sure they have
the proper lamp performance, light
brightness, light pattern and safe visibility.
The correct bulbs will not damage the
lamp assembly or void the lamp assembly
warranty and will provide quality bulb
illumination time.
Exterior Lamps Power (Watt)
Specification
Lamp
60/55
H13/9008
Headlamps.
5
W5W
Front side marker lamps.
40
9140
Front fog lamps.
28/8
T20/7444NA
Front direction indicator and parking
lamps.
27/7
3157
Rear lamps, brake lamps, rear direc-
tion indicator and rear side marker
lamps. Low series.*
LED
LED
Rear lamps, brake lamps, rear direc-
tion indicator and rear side marker
lamps. High series.*
27/7
3157
Rear lamps, brake lamps, rear direc-
tion indicator and rear side marker
lamps.**
21
W21W
Reversing lamps.*
27/7
3157
Reversing lamps.**
360
Super Duty (TFE) Canada/United States of America, enUSA, Edition date: 201709, Second Printing MaintenanceE163830
Page 364 of 660
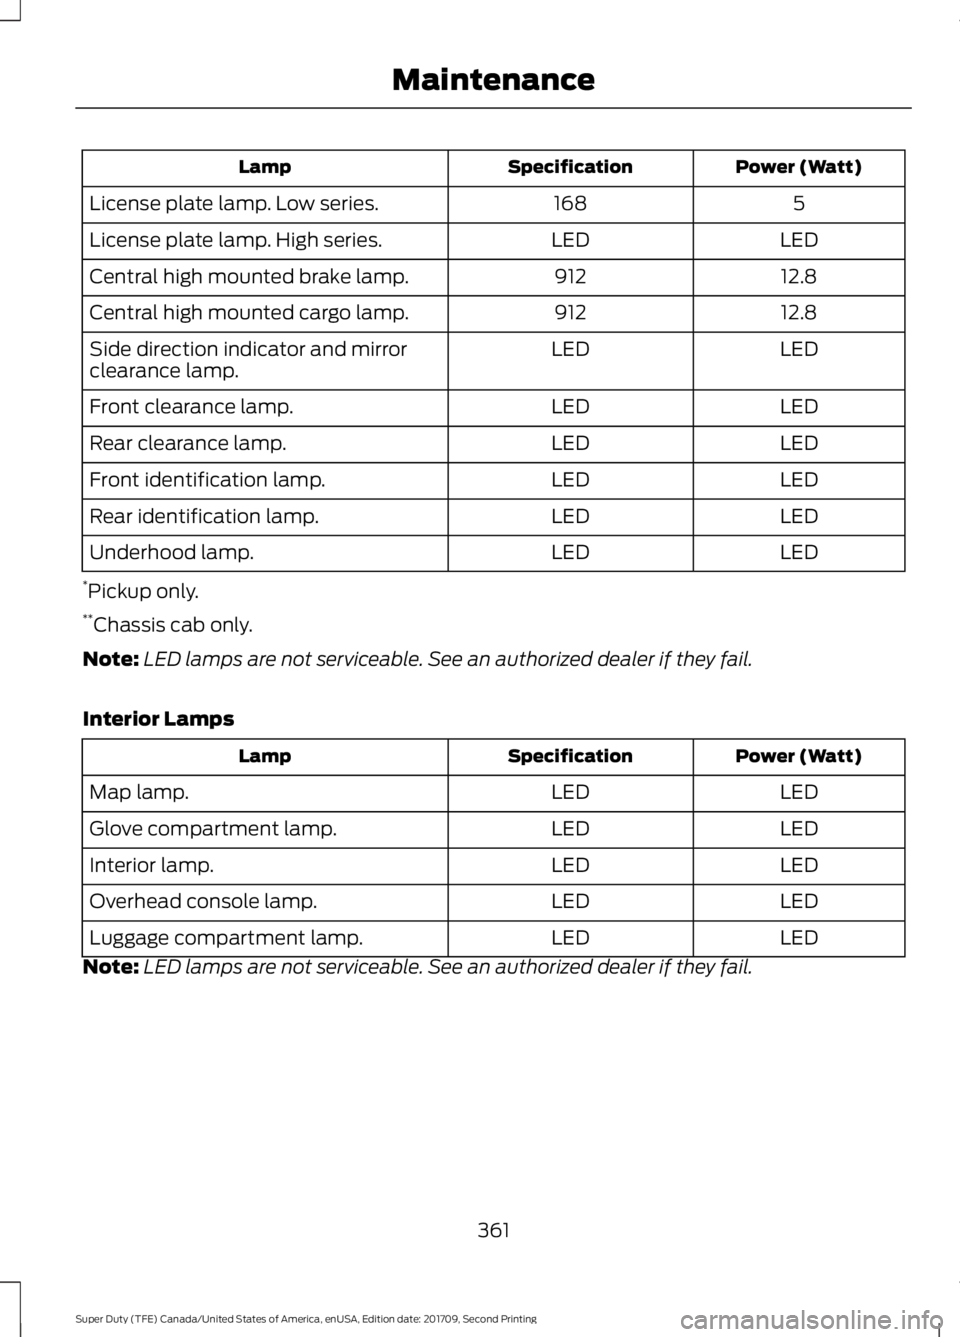
Power (Watt)
Specification
Lamp
5
168
License plate lamp. Low series.
LED
LED
License plate lamp. High series.
12.8
912
Central high mounted brake lamp.
12.8
912
Central high mounted cargo lamp.
LED
LED
Side direction indicator and mirror
clearance lamp.
LED
LED
Front clearance lamp.
LED
LED
Rear clearance lamp.
LED
LED
Front identification lamp.
LED
LED
Rear identification lamp.
LED
LED
Underhood lamp.
* Pickup only.
** Chassis cab only.
Note: LED lamps are not serviceable. See an authorized dealer if they fail.
Interior Lamps Power (Watt)
Specification
Lamp
LED
LED
Map lamp.
LED
LED
Glove compartment lamp.
LED
LED
Interior lamp.
LED
LED
Overhead console lamp.
LED
LED
Luggage compartment lamp.
Note: LED lamps are not serviceable. See an authorized dealer if they fail.
361
Super Duty (TFE) Canada/United States of America, enUSA, Edition date: 201709, Second Printing Maintenance
Page 380 of 660
REPAIRING MINOR PAINT
DAMAGE
Authorized dealers have touch-up paint to
match your vehicle
’s color. Your vehicle
color code is printed on a sticker on the
front, left-hand side door jamb. Take your
color code to your authorized dealer to
make sure you get the correct color.
Before repairing minor paint damage, use
a cleaner such as Motorcraft Bug and Tar
Remover to remove particles such as bird
droppings, tree sap, insect deposits, tar
spots, road salt and industrial fallout.
Always read the instructions before using
cleaning products.
CLEANING THE WHEELS (If
Equipped)
1. Regularly clean them with a wheel cleaner. We recommend that you use
Ford approved wheel cleaner if
available.
2. Remove dirt and brake dust with a sponge.
3. Remove tar and grease with a bug and
tar remover. We recommend that you
use Ford approved bug and tar remover
if available.
4. Thoroughly rinse the wheels with water
after cleaning.
If you intend on parking your vehicle for an
extended period after cleaning the wheels
with a wheel cleaner, drive your vehicle for
a few minutes before doing so. This
reduces the risk of corrosion of the brake
discs, brake pads and linings.
Do not clean the wheels when they are hot.
Note: Some car washes could damage
wheel rims and covers. Note:
Using non-recommended cleaners,
harsh cleaning products, chrome wheel
cleaners or abrasive materials could
damage wheel rims and covers.
VEHICLE STORAGE
If you plan on storing your vehicle for 30
days or more, read the following
maintenance recommendations to make
sure your vehicle stays in good operating
condition.
We engineer and test all motor vehicles
and their components for reliable, regular
driving. Under various conditions,
long-term storage may lead to degraded
engine performance or failure unless you
use specific precautions to preserve engine
components.
General
• Store all vehicles in a dry, ventilated
place.
• Protect from sunlight, if possible.
• If vehicles are stored outside, they
require regular maintenance to protect
against rust and damage.
Body
• Wash your vehicle thoroughly to
remove dirt, grease, oil, tar or mud from
exterior surfaces, rear-wheel housing
and the underside of front fenders.
• Periodically wash your vehicle if it is
stored in exposed locations.
• Touch-up exposed or primed metal to
prevent rust.
• Cover chrome and stainless steel parts
with a thick coat of auto wax to prevent
discoloration. Re-wax as necessary
when you wash your vehicle.
• Lubricate all hood, door and luggage
compartment hinges and latches with
a light grade oil.
377
Super Duty (TFE) Canada/United States of America, enUSA, Edition date: 201709, Second Printing Vehicle Care
Page 381 of 660
•
Cover interior trim to prevent fading.
• Keep all rubber parts free from oil and
solvents.
Engine
• Change the engine oil and filter prior to
storage because used engine oil
contains contaminates which may
cause engine damage.
• Start the engine every 15 days for a
minimum of 15 minutes. Run at fast idle
with the climate controls set to defrost
until the engine reaches normal
operating temperature.
• With your foot on the brake, shift
through all the gears while the engine
is running.
• We recommend that you change the
engine oil before you use your vehicle
again.
Fuel system
• Fill the fuel tank with high-quality fuel
until the first automatic shutoff of the
fuel pump nozzle.
Cooling system
• Protect against freezing temperatures.
• When removing your vehicle from
storage, check coolant fluid level.
Confirm that there are no cooling
system leaks and that fluid is at the
recommended level.
Battery
• Check and recharge as necessary. Keep
connections clean.
• If storing your vehicle for more than 30
days without recharging the battery,
we recommend that you disconnect
the battery cables to maintain battery
charge for quick starting. Note:
It is necessary to reset memory
features if battery cables are disconnected.
Brakes
• Make sure the brakes and parking brake
release fully.
Tires
• Maintain recommended air pressure.
Miscellaneous
• Make sure all linkages, cables, levers
and pins under your vehicle are covered
with grease to prevent rust.
• Move vehicles at least 25 ft (7.5 m)
every 15 days to lubricate working parts
and prevent corrosion.
Removing Vehicle From Storage
When your vehicle is ready to come out of
storage, do the following:
• Wash your vehicle to remove any dirt
or grease film build-up on window
surfaces.
• Check windshield wipers for any
deterioration.
• Check under the hood for any foreign
material that may have collected
during storage such as mice or squirrel
nests.
• Check the exhaust for any foreign
material that may have collected
during storage.
• Check tire pressures and set tire
inflation per the Tire Label.
• Check brake pedal operation. Drive
your vehicle
15 ft (4.5 m) back and
forth to remove rust build-up.
378
Super Duty (TFE) Canada/United States of America, enUSA, Edition date: 201709, Second Printing Vehicle Care