2018 FORD F-450 transmission
[x] Cancel search: transmissionPage 140 of 660

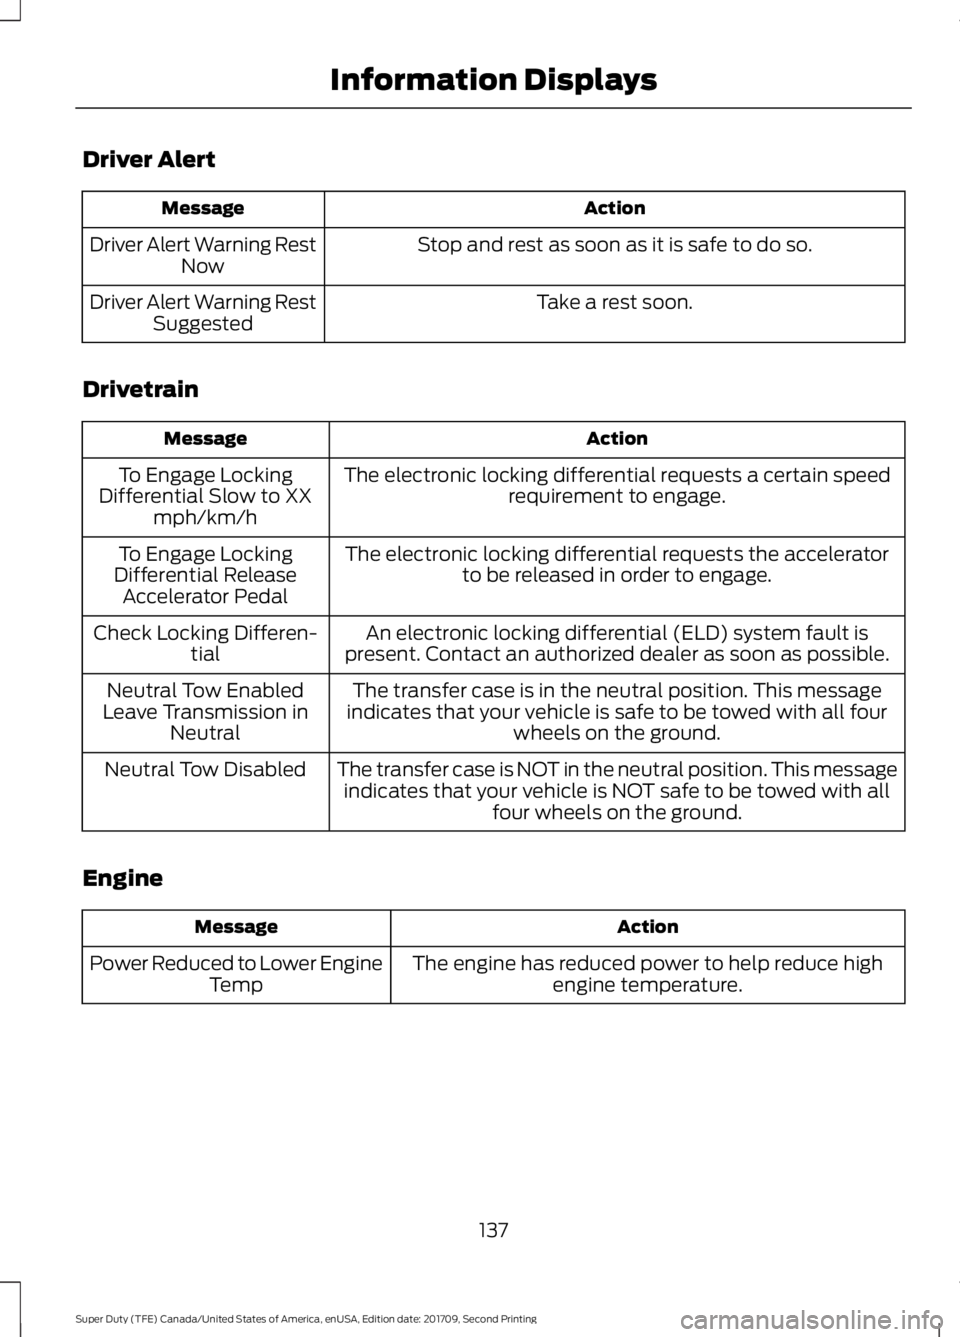
Driver Alert
Action
Message
Stop and rest as soon as it is safe to do so.
Driver Alert Warning Rest
Now
Take a rest soon.
Driver Alert Warning Rest
Suggested
Drivetrain Action
Message
The electronic locking differential requests a certain speedrequirement to engage.
To Engage Locking
Differential Slow to XX mph/km/h
The electronic locking differential requests the acceleratorto be released in order to engage.
To Engage Locking
Differential Release Accelerator Pedal
An electronic locking differential (ELD) system fault is
present. Contact an authorized dealer as soon as possible.
Check Locking Differen-
tial
The transfer case is in the neutral position. This message
indicates that your vehicle is safe to be towed with all four wheels on the ground.
Neutral Tow Enabled
Leave Transmission in Neutral
The transfer case is NOT in the neutral position. This messageindicates that your vehicle is NOT safe to be towed with all four wheels on the ground.
Neutral Tow Disabled
Engine Action
Message
The engine has reduced power to help reduce highengine temperature.
Power Reduced to Lower Engine
Temp
137
Super Duty (TFE) Canada/United States of America, enUSA, Edition date: 201709, Second Printing Information Displays
Page 143 of 660

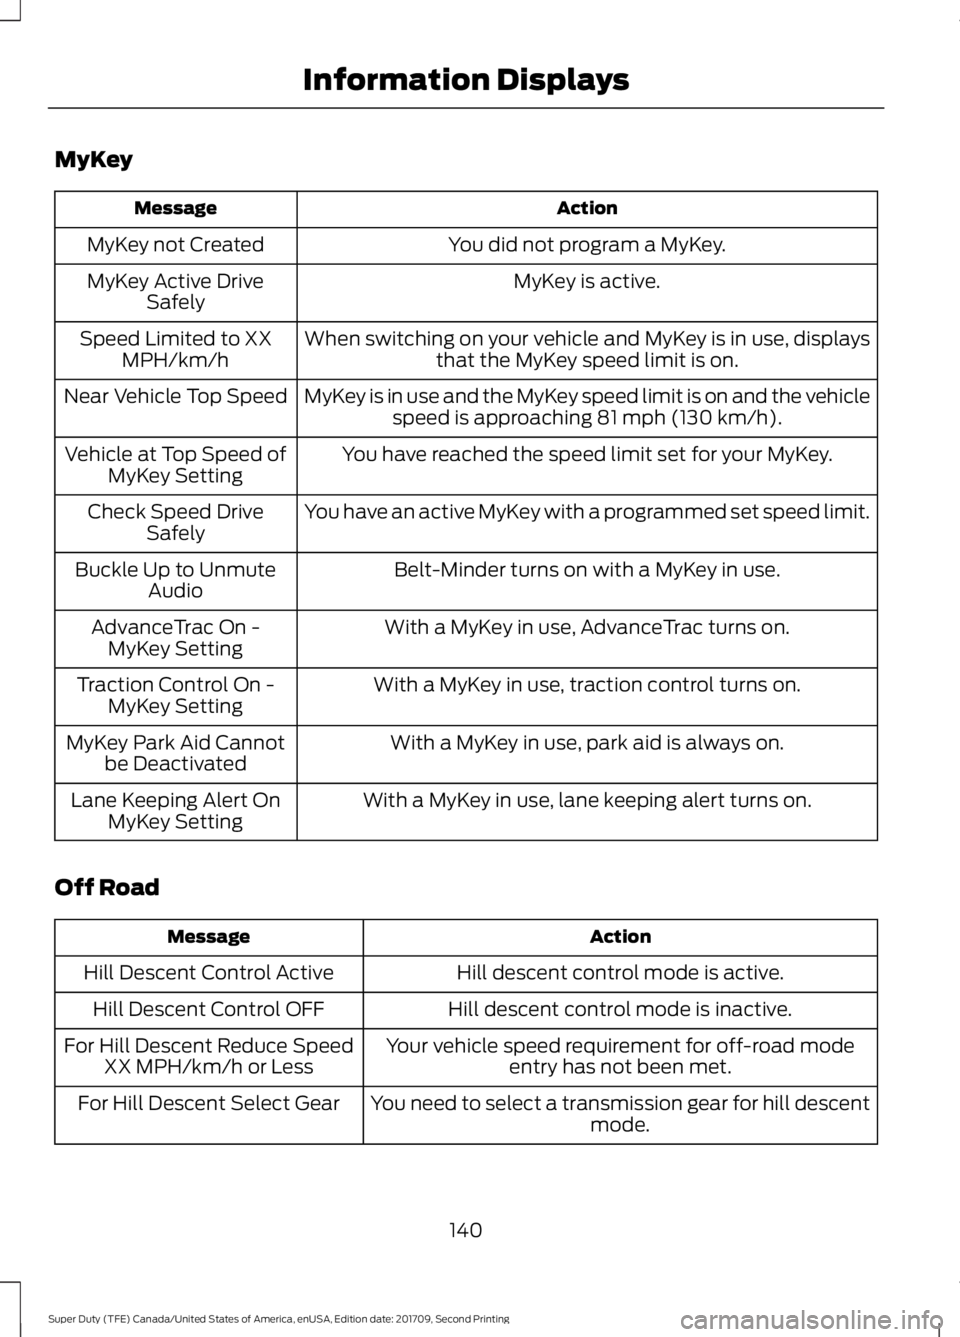
MyKey
Action
Message
You did not program a MyKey.
MyKey not Created
MyKey is active.
MyKey Active Drive
Safely
When switching on your vehicle and MyKey is in use, displaysthat the MyKey speed limit is on.
Speed Limited to XX
MPH/km/h
MyKey is in use and the MyKey speed limit is on and the vehiclespeed is approaching 81 mph (130 km/h).
Near Vehicle Top Speed
You have reached the speed limit set for your MyKey.
Vehicle at Top Speed of
MyKey Setting
You have an active MyKey with a programmed set speed limit.
Check Speed Drive
Safely
Belt-Minder turns on with a MyKey in use.
Buckle Up to Unmute
Audio
With a MyKey in use, AdvanceTrac turns on.
AdvanceTrac On -
MyKey Setting
With a MyKey in use, traction control turns on.
Traction Control On -
MyKey Setting
With a MyKey in use, park aid is always on.
MyKey Park Aid Cannot
be Deactivated
With a MyKey in use, lane keeping alert turns on.
Lane Keeping Alert On
MyKey Setting
Off Road Action
Message
Hill descent control mode is active.
Hill Descent Control Active
Hill descent control mode is inactive.
Hill Descent Control OFF
Your vehicle speed requirement for off-road modeentry has not been met.
For Hill Descent Reduce Speed
XX MPH/km/h or Less
You need to select a transmission gear for hill descentmode.
For Hill Descent Select Gear
140
Super Duty (TFE) Canada/United States of America, enUSA, Edition date: 201709, Second Printing Information Displays
Page 163 of 660

Saving a Preset Position
1. Switch the ignition on.
2.
Adjust the features to the positions you
desire.
3. Press and hold the preset button until you hear a single tone.
Note: You can save up to three preset
memory positions.
Note: You can save a memory preset at any
time.
Recalling a Preset Position
1. Switch the ignition on.
2. Press and release the preset button associated with your desired driving
position. The seat and mirrors move to
the position stored for that preset.
Note: You can only recall preset memory
positions when you switch the ignition off,
or when the transmission is in park (P) or
neutral (N) if you switch the ignition on.
Note: You can also recall a preset memory
position by pressing the unlock button on
your remote control if it is linked to a preset
position.
Note: Using a linked key fob to recall your
memory position when the ignition is off
moves the seat to the easy entry position. Note:
Pressing any active memory feature
control - power seat, mirror (or any memory
button) during a memory recall cancels the
operation.
Linking a PreSet Position to your
Remote Control or Intelligent
Access Key Fob
Your vehicle can save the preset memory
positions for up to two remote controls.
1. With the ignition on, move the memory
positions to the positions you desire.
2. Press and hold the desired preset button for about five seconds. A tone
sounds after about two seconds.
Continue holding until you hear a
second tone.
3. Within three seconds, press the lock button on the remote control you are
linking.
To unlink a remote control, follow the
same procedure – except in step 3, press
the unlock button on the remote control.
Note: If more than one linked remote
control or intelligent access key is in range,
the memory function moves to the settings
of the first key to initiate a memory recall.
Easy Entry and Exit Feature (If
Equipped)
If you enable the easy entry and exit
feature, it automatically moves the driver
seat rearward up to
2 in (5 cm) when you
put the transmission in park (P) and
remove the key from the ignition.
The driver seat returns to the previous
position when you put the key in the
ignition.
You can enable or disable this feature
through the information display. See
Information Displays
(page 113).
160
Super Duty (TFE) Canada/United States of America, enUSA, Edition date: 201709, Second Printing SeatsE142554
Page 169 of 660

HomeLink Wireless Control
System
WARNINGS
Make sure that the garage door and
security device are free from
obstruction when you are
programming. Do not program the system
with the vehicle in the garage. Do not use the system with any
garage door opener that does not
have the safety stop and reverse
feature as required by U.S. Federal Safety
Standards (this includes any garage door
opener manufactured before April 1, 1982).
A garage door opener which cannot detect
an object, signaling the door to stop and
reverse, does not meet current federal
safety standards. Using a garage door
opener without these features increases
the risk of serious injury or death. Note:
Make sure you keep the original
remote control transmitter for use in other
vehicles as well as for future system
programming.
Note: We recommend that upon the sale
or lease termination of your vehicle, you
erase the programmed function buttons for
security reasons. See Erasing the Function
Button Codes later in this section.
Note: You can program a maximum of
three devices. To change or replace any of
the three devices after it has been initially
programmed, you must first erase the
current settings. See Erasing the Function
Button Codes
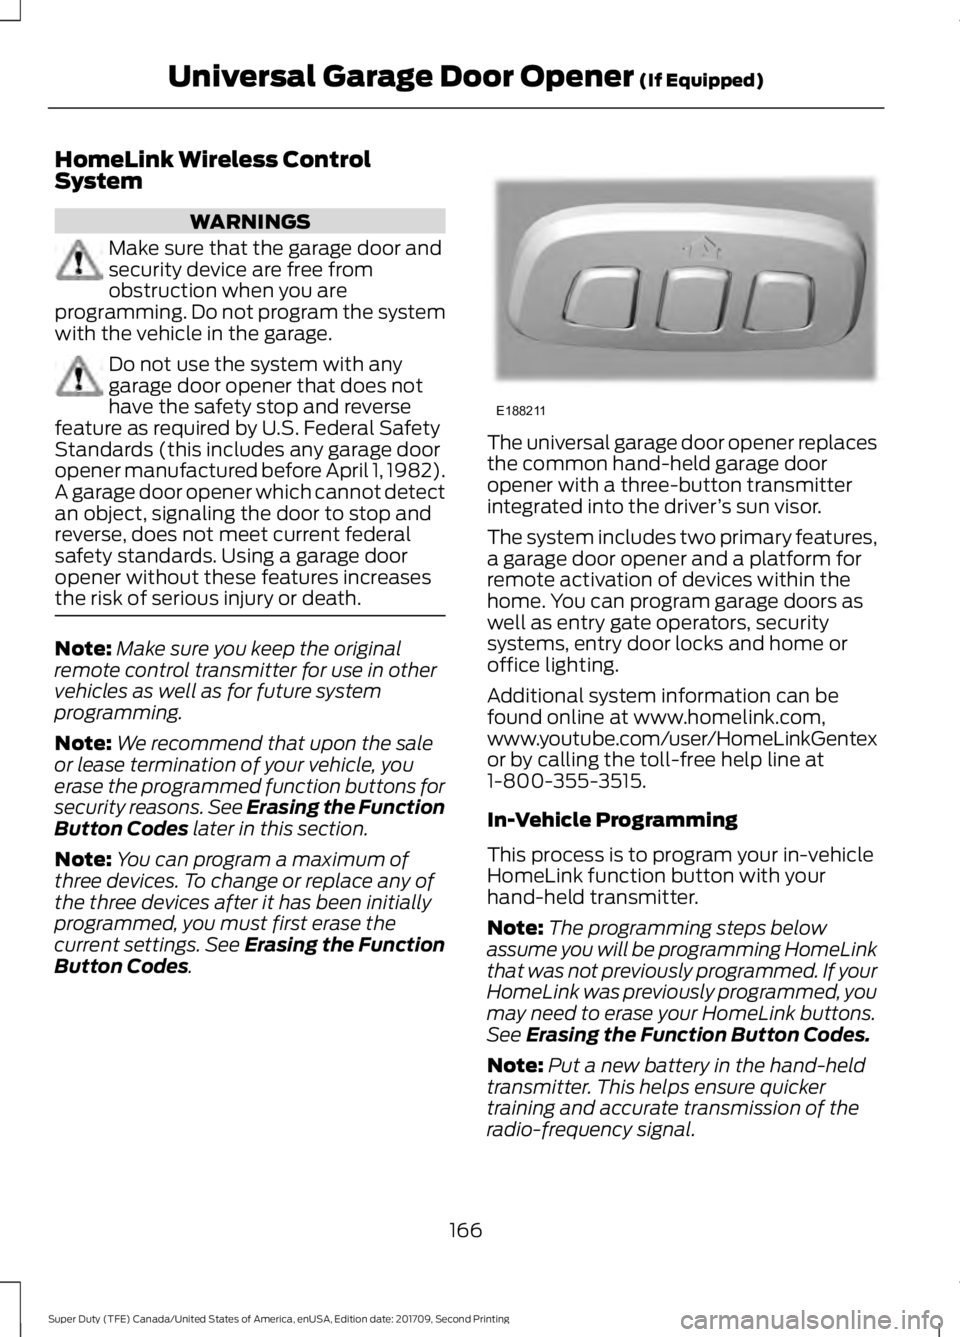
. The universal garage door opener replaces
the common hand-held garage door
opener with a three-button transmitter
integrated into the driver
’s sun visor.
The system includes two primary features,
a garage door opener and a platform for
remote activation of devices within the
home. You can program garage doors as
well as entry gate operators, security
systems, entry door locks and home or
office lighting.
Additional system information can be
found online at www.homelink.com,
www.youtube.com/user/HomeLinkGentex
or by calling the toll-free help line at
1-800-355-3515.
In-Vehicle Programming
This process is to program your in-vehicle
HomeLink function button with your
hand-held transmitter.
Note: The programming steps below
assume you will be programming HomeLink
that was not previously programmed. If your
HomeLink was previously programmed, you
may need to erase your HomeLink buttons.
See
Erasing the Function Button Codes.
Note: Put a new battery in the hand-held
transmitter. This helps ensure quicker
training and accurate transmission of the
radio-frequency signal.
166
Super Duty (TFE) Canada/United States of America, enUSA, Edition date: 201709, Second Printing Universal Garage Door Opener
(If Equipped)E188211
Page 171 of 660

3.
Press and hold the function button you
want to program for 2 seconds, then
release. Repeat this step. Depending
on your brand of garage door opener,
you may need to repeat this sequence
a third time.
Gate Operator / Canadian
Programming
Canadian radio-frequency laws require
transmitter signals to “time-out” (or quit)
after several seconds of transmission –
which may not be long enough for
HomeLink to pick up the signal during
programming. Similar to this Canadian law,
some U.S. gate operators are designed to
“time-out” in the same manner.
Note: If programming a garage door opener
or gate operator, it is advised to unplug the
device during the “cycling” process to
prevent possible overheating.
1. Press and release, every two seconds,
your hand-held transmitter until the
HomeLink indicator light changes to a
rapidly blinking or continuously on light.
2. Release the hand-held transmitter button.
3. Continue programing HomeLink. See In-Vehicle Programming, Step 4.
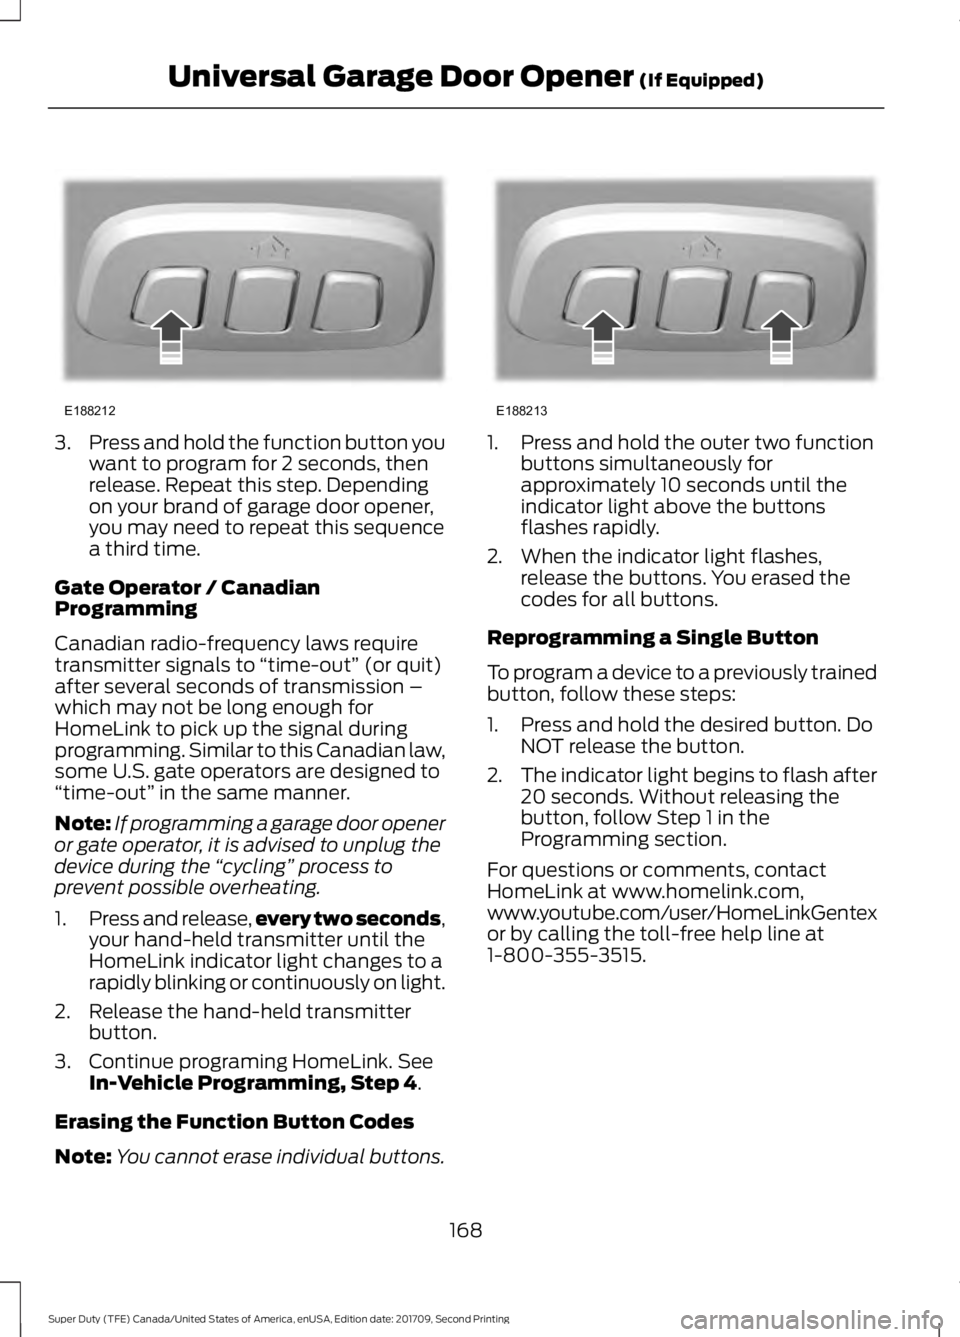
Erasing the Function Button Codes
Note: You cannot erase individual buttons. 1. Press and hold the outer two function
buttons simultaneously for
approximately 10 seconds until the
indicator light above the buttons
flashes rapidly.
2. When the indicator light flashes, release the buttons. You erased the
codes for all buttons.
Reprogramming a Single Button
To program a device to a previously trained
button, follow these steps:
1. Press and hold the desired button. Do NOT release the button.
2. The indicator light begins to flash after
20 seconds. Without releasing the
button, follow Step 1 in the
Programming section.
For questions or comments, contact
HomeLink at www.homelink.com,
www.youtube.com/user/HomeLinkGentex
or by calling the toll-free help line at
1-800-355-3515.
168
Super Duty (TFE) Canada/United States of America, enUSA, Edition date: 201709, Second Printing Universal Garage Door Opener
(If Equipped)E188212 E188213
Page 179 of 660

D (start) - Cranks the engine.
KEYLESS STARTING
Note: The system may not function if the
intelligent access key is close to metal
objects or electronic devices, for example
keys or a cell phone.
Note: A valid intelligent access key must
be located inside your vehicle to switch the
ignition on and start your vehicle.
Ignition Modes The keyless starting system has three
modes:
Off:
Turns the ignition off.
• Without applying the brake pedal,
press and release the button once
when the ignition is in the on mode, or
when your vehicle is running but is not
moving.
On:
All electrical circuits are operational
and the warning lamps and indicators
illuminate.
• Without applying the brake pedal,
press and release the button once.
Start:
Starts your vehicle. The engine may
not start when your vehicle starts. •
Press the brake pedal, and then press
the button for any length of time. An
indicator light on the button illuminates
when the ignition is on and when your
vehicle starts.
STARTING A GASOLINE
ENGINE - 6.2L/6.8L
When you start the engine, the idle speed
increases. This helps to warm up the
engine.
If the engine idle speed does not slow
down automatically, have your vehicle
checked by an authorized dealer.
Before starting the engine check the
following:
• Make sure all occupants have fastened
their safety belts.
• Make sure the headlamps and
electrical accessories are off.
• Make sure the parking brake is on.
• Move the transmission selector lever
to position P.
• Turn the ignition key to the on position.
Note: Do not touch the accelerator pedal.
1. Fully depress the brake pedal.
2. Turn the key to the start position to start your vehicle.
3. When the engine starts, release the key
and then gradually release the brake
pedal as the engine speed increases.
Note: The engine may continue cranking
for up to 15 seconds or until it starts.
Note: If you cannot start the engine on the
first try, wait for a short period and try again.
Vehicles with an Ignition Key
Note: Do not touch the accelerator pedal.
1. Fully depress the brake pedal.
176
Super Duty (TFE) Canada/United States of America, enUSA, Edition date: 201709, Second Printing Starting and Stopping the EngineE144447
Page 180 of 660

2. Turn the key to position D to start the
engine.
3. When the engine starts, release the brake pedal.
Do not crank the engine for more than 10
seconds as starter damage may occur. If
the engine does not start, switch the
ignition off and wait 30 seconds before
trying again.
Vehicles with Keyless Start
Note: Do not touch the accelerator pedal.
Note: If the push button ignition switch is
pressed again prior to the engine starting
the ignition will switch to accessory mode
and will not start.
Note: If the brake pedal is released before
the engine has started, follow the engine
start sequence again.
1. Fully depress the brake pedal.
2. Press the center of the push button ignition switch.
3. When the engine starts, release the brake pedal.
Failure to Start
If you cannot start the engine after three
attempts, wait 10 seconds and follow this
procedure:
1. Fully depress the brake pedal.
2. Fully press the accelerator pedal and hold it there.
3. Start the engine.
Stopping the Engine When Your
Vehicle is Stationary
1. When your vehicle has stopped, shift into park (P) and switch the ignition
off.
2. Apply the parking brake. Stopping the Engine When Your
Vehicle is Moving WARNING
Switching off the engine when your
vehicle is still moving results in a
significant decrease in braking
assistance. Higher effort is required to
apply the brakes and to stop your vehicle.
A significant decrease in steering
assistance could also occur. The steering
does not lock, but higher effort could be
required to steer your vehicle. When you
switch the ignition off, some electrical
circuits, for example airbags, also turn off.
If you unintentionally switch the ignition
off, shift into neutral (N) and restart the
engine. 1. Put the transmission into neutral (N)
and use the brakes to bring your vehicle
to a safe stop.
2. When your vehicle has stopped, shift into park (P) and switch the ignition
off.
3. Apply the parking brake.
Automatic Engine Shutdown
If your vehicle is equipped with a keyless
ignition, it has a feature that automatically
shuts down the engine if it has been idling
for an extended period of time. The ignition
also turns off in order to save battery
power. Before the engine shuts down, a
message appears in the information
display showing a timer counting down
from 30 seconds. If you do not intervene
within 30 seconds, the engine shuts down.
Another message appears in the
information display to inform you that the
engine has shut down in order to save fuel.
Start your vehicle as you normally do.
177
Super Duty (TFE) Canada/United States of America, enUSA, Edition date: 201709, Second Printing Starting and Stopping the Engine
Page 182 of 660

preventing engine damage due to lack of
proper lubrication. After the 30 second
warm-up period, the accelerator pedal will
be operational again and a message
appears informing you the vehicle is ok to
drive.
When you start the engine in extremely
cold temperatures -15°F (-26°C), we
recommend that you allow the engine to
idle for several minutes before you drive
the vehicle.
Before starting the engine check the
following:
• Make sure all occupants have fastened
their seatbelts.
• Make sure the headlamps and
electrical accessories are off.
• Make sure the parking brake is on.
• Make sure the transmission is in park
(P).
Note: Do not press the accelerator during
starting.
Vehicles with an Ignition Key
Note: Do not touch the accelerator pedal.
1. Fully depress the brake pedal.
2. Turn the key to position
C
Note: A message will appear Engine Start
Pending, Please Wait.
3. Wait until the engine glow-plug indicator turns off.
4. Turn the key to position
D to start the
engine.
5. When the engine starts, release the brake pedal.
Do not crank the engine for more than 10
seconds as starter damage may occur. If
the engine does not start, switch the
ignition off and wait 30 seconds before
trying again. Vehicles with Keyless Start
Note:
Do not touch the accelerator pedal.
Note: If the push button ignition switch is
pressed again prior to the engine starting
the ignition will switch to accessory mode
and will not start.
Note: If the brake pedal is released before
the engine has started, follow the engine
start sequence again.
1. Fully depress the brake pedal.
2. Press the center of the push button ignition switch.
Note: A message will appear Engine Start
Pending, Please Wait.
3. When the engine starts, release the brake pedal.
Diesel Engine Fast Start Glow Plug
System
The diesel engine glow system consists of:
• Eight glow plugs (one per cylinder)
• Glow Plug Control Module
• Engine Coolant Temperature sensor
• Barometric pressure sensor
• Environmental temperature sensor
The powertrain and glow plug control
modules electronically control the glow
plug system. After you switch the ignition
on, the glow plug control module
immediately energizes the glow plugs. The
glow plug control module uses the engine
coolant temperature, barometric pressure
sensor and environmental temperature
sensor to determine how long the glow
plugs stay energized. The required time for
the glow plugs to be energized decreases
as the coolant temperature, barometric
pressure and environmental temperature
increase.
179
Super Duty (TFE) Canada/United States of America, enUSA, Edition date: 201709, Second Printing Starting and Stopping the Engine