2018 FORD F-150 seat adjustment
[x] Cancel search: seat adjustmentPage 4 of 641

Introduction
About This Manual
..........................................7
Symbols Glossary ............................................
7
Data Recording .................................................
9
Perchlorate ........................................................
11
Ford Credit .........................................................
11
Replacement Parts Recommendation ........................................................................\
....
12
Special Notices ...............................................
12
Mobile Communications Equipment ........................................................................\
....
13
Export Unique Options ................................
14
Environment
Protecting the Environment .......................
15
At a Glance
Instrument Panel Overview .......................
16
Child Safety
General Information ......................................
18
Installing Child Restraints ...........................
19
Booster Seats ..................................................
31
Child Restraint Positioning ........................
33
Child Safety Locks ........................................
35
Seatbelts
Principle of Operation .................................
36
Fastening the Seatbelts ..............................
37
Seatbelt Height Adjustment ......................
41
Seatbelt Warning Lamp and Indicator Chime .............................................................
41
Seatbelt Reminder ........................................
42
Child Restraint and Seatbelt Maintenance ...............................................
44
Seatbelt Extension .......................................
44
Personal Safety System ™
Personal Safety System ™........................
46 Supplementary Restraints
System
Principle of Operation ..................................
47
Driver and Passenger Airbags ..................
48
Front Passenger Sensing System ...........
49
Side Airbags .....................................................
51
Safety Canopy ™............................................
52
Crash Sensors and Airbag Indicator .......
54
Airbag Disposal ..............................................
55
Keys and Remote Controls
General Information on Radio Frequencies .................................................
56
Remote Control .............................................
56
Replacing a Lost Key or Remote Control ........................................................................\
..
62
MyKey ™
Principle of Operation .................................
63
Creating a MyKey ..........................................
64
Clearing All MyKeys ......................................
65
Checking MyKey System Status ..............
65
Using MyKey With Remote Start Systems ........................................................
66
MyKey — Troubleshooting .........................
66
Doors and Locks
Locking and Unlocking ...............................
68
Keyless Entry ....................................................
71
Tailgate
Tailgate Lock ....................................................
73
Manual Tailgate ..............................................
73
Electronic Tailgate .........................................
73
Removing the Tailgate .................................
74
Tailgate Step ...................................................
75
Bed Extender ...................................................
76
Security
Passive Anti-Theft System ........................
78
1
F-150 (TFC) Canada/United States of America, enUSA, Edition date: 201709, Fifth-Printing Table of Contents
Page 42 of 641
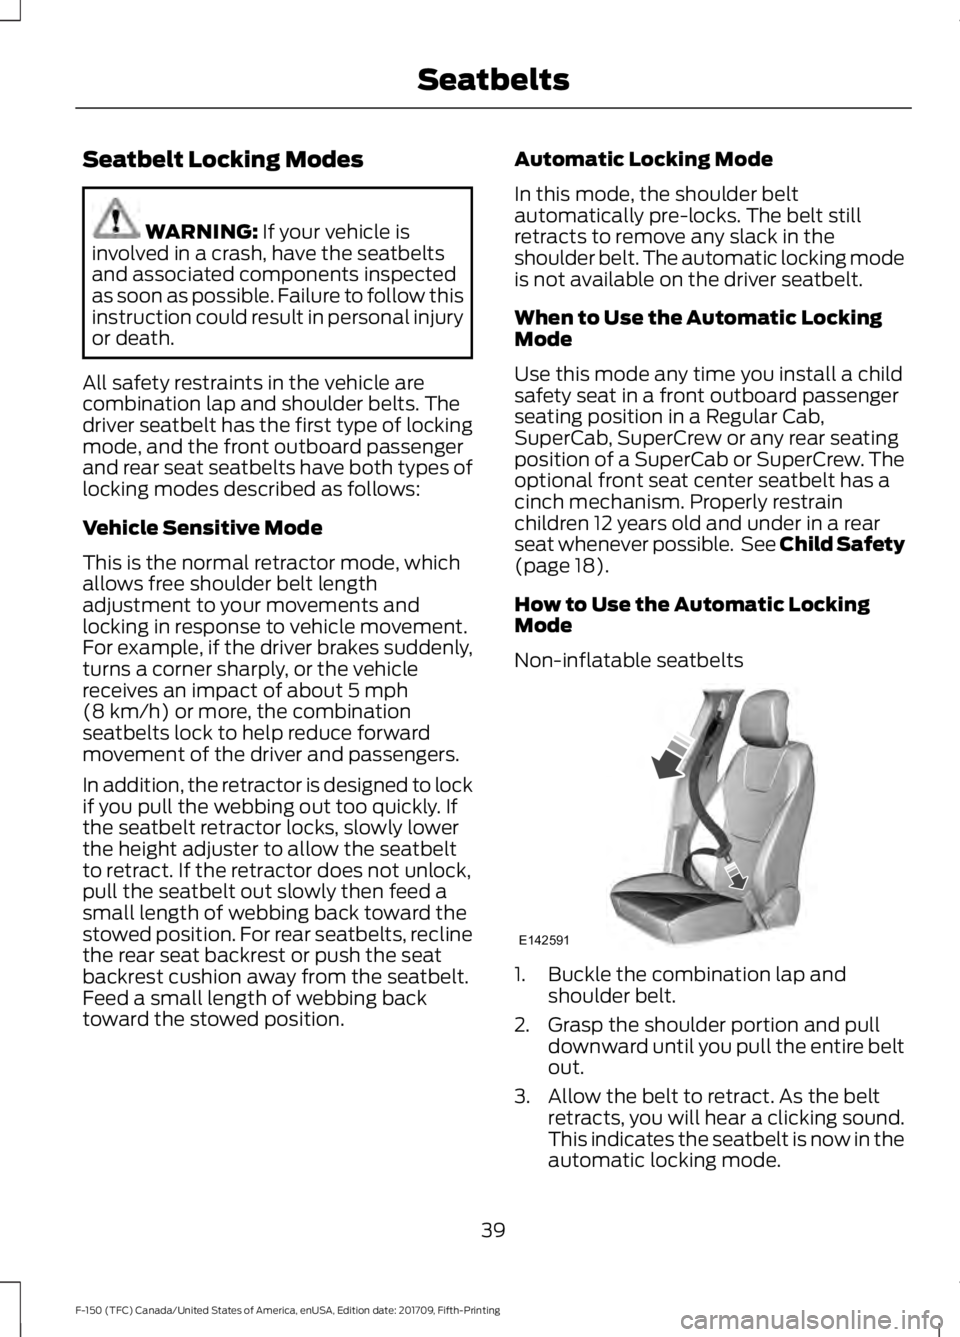
Seatbelt Locking Modes
WARNING: If your vehicle is
involved in a crash, have the seatbelts
and associated components inspected
as soon as possible. Failure to follow this
instruction could result in personal injury
or death.
All safety restraints in the vehicle are
combination lap and shoulder belts. The
driver seatbelt has the first type of locking
mode, and the front outboard passenger
and rear seat seatbelts have both types of
locking modes described as follows:
Vehicle Sensitive Mode
This is the normal retractor mode, which
allows free shoulder belt length
adjustment to your movements and
locking in response to vehicle movement.
For example, if the driver brakes suddenly,
turns a corner sharply, or the vehicle
receives an impact of about
5 mph
(8 km/h) or more, the combination
seatbelts lock to help reduce forward
movement of the driver and passengers.
In addition, the retractor is designed to lock
if you pull the webbing out too quickly. If
the seatbelt retractor locks, slowly lower
the height adjuster to allow the seatbelt
to retract. If the retractor does not unlock,
pull the seatbelt out slowly then feed a
small length of webbing back toward the
stowed position. For rear seatbelts, recline
the rear seat backrest or push the seat
backrest cushion away from the seatbelt.
Feed a small length of webbing back
toward the stowed position. Automatic Locking Mode
In this mode, the shoulder belt
automatically pre-locks. The belt still
retracts to remove any slack in the
shoulder belt. The automatic locking mode
is not available on the driver seatbelt.
When to Use the Automatic Locking
Mode
Use this mode any time you install a child
safety seat in a front outboard passenger
seating position in a Regular Cab,
SuperCab, SuperCrew or any rear seating
position of a SuperCab or SuperCrew. The
optional front seat center seatbelt has a
cinch mechanism. Properly restrain
children 12 years old and under in a rear
seat whenever possible. See
Child Safety
(page 18).
How to Use the Automatic Locking
Mode
Non-inflatable seatbelts 1. Buckle the combination lap and
shoulder belt.
2. Grasp the shoulder portion and pull downward until you pull the entire belt
out.
3. Allow the belt to retract. As the belt retracts, you will hear a clicking sound.
This indicates the seatbelt is now in the
automatic locking mode.
39
F-150 (TFC) Canada/United States of America, enUSA, Edition date: 201709, Fifth-Printing SeatbeltsE142591
Page 44 of 641

During a crash of sufficient force, the
inflatable belt inflates from inside the
webbing.
The fully inflated belt's increased diameter
more effectively holds the occupant in the
appropriate seating position, and spreads
crash forces over more area of the body
than regular seatbelts. This helps reduce
pressure on the chest and helps control
head and neck motion for passengers.
The rear inflatable seatbelts are designed
to inflate in frontal or near-frontal crashes,
rollovers and some side impact crashes.
The fact that the rear inflatable seatbelt
did not inflate in a crash does not mean
that something is wrong with the system.
Rather, it means the forces were not of the
type sufficient to cause activation. SEATBELT HEIGHT
ADJUSTMENT WARNING: Position the safety belt
height adjuster so that the belt rests
across the middle of your shoulder.
Failure to adjust the safety belt properly
could reduce the effectiveness of the
safety belt and increase the risk of injury
in a crash. Adjust the height of the shoulder belt so
the belt rests across the middle of your
shoulder.
To adjust the shoulder belt height:
1. Pull the button and slide the height
adjuster up or down.
2. Release the button and pull down on the height adjuster to make sure it is
locked in place.
SEATBELT WARNING LAMP
AND INDICATOR CHIME This lamp illuminates and an
indicator chime will sound if the
driver seatbelt has not been
fastened when the vehicle's ignition is
turned on.
41
F-150 (TFC) Canada/United States of America, enUSA, Edition date: 201709, Fifth-Printing SeatbeltsE146364 E146365 E145664 E71880
Page 51 of 641

properly restrained or are otherwise out of
position at the time of airbag deployment.
Thus, it is extremely important that
occupants be properly restrained as far
away from the airbag module as possible
while maintaining vehicle control.
Routine maintenance of the airbags is not
required.
DRIVER AND PASSENGER
AIRBAGS
WARNING: Never place your arm
or any objects over an airbag module.
Placing your arm over a deploying airbag
can result in serious arm fractures or
other injuries. Objects placed on or over
the airbag inflation area may cause those
objects to be propelled by the airbag into
your face and torso causing serious
injury. WARNING:
Airbags can kill or
injure a child in a child seat. Never place
a rear-facing child seat in front of an
active airbag. If you must use a
forward-facing child seat in the front
seat, move the vehicle seat upon which
the child seat is installed all the way
back. The driver and front passenger airbags will
deploy during significant frontal and near
frontal crashes.
The driver and passenger front airbag
system consists of:
•
driver and passenger airbag modules.
• front passenger sensing system. · crash sensors and monitoring
system with readiness indicator.
See Crash Sensors and Airbag
Indicator
(page 54).
Proper Driver and Front Passenger
Seating Adjustment WARNING:
The National Highway
Traffic Safety Administration
recommends a minimum distance of at
least 10 inches (25 centimeters)
between an occupant’ s chest and the
driver airbag module.
To properly position yourself away from
the airbag:
• Move your seat to the rear as far as you
can while still reaching the pedals
comfortably.
• Recline the seat slightly (one or two
degrees) from the upright position.
After all occupants have adjusted their
seats and put on safety belts, it is very
important that they continue to sit
properly. Properly seated occupants sit
upright, lean against the seat back, and
center themselves on the seat cushion,
with their feet comfortably extended on
the floor. Sitting improperly can increase
the chance of injury in a crash event. For
example, if an occupant slouches, lies
down, turns sideways, sits forward, leans
forward or sideways, or puts one or both
feet up, the chance of injury during a crash
is greatly increased.
48
F-150 (TFC) Canada/United States of America, enUSA, Edition date: 201709, Fifth-Printing Supplementary Restraints SystemE151127 E67017
Page 155 of 641
WARNING: The head restraint is
a safety device. Whenever possible it
should be installed and properly
adjusted when the seat is occupied.
Failure to adjust the head restraint
properly could reduce its effectiveness
during certain impacts.
Note: Adjust the seat backrest to an upright
driving position before adjusting the head
restraint. Adjust the head restraint so that
the top of it is level with the top of your head
and as far forward as possible. Make sure
that you remain comfortable. If you are
extremely tall, adjust the head restraint to
its highest position.
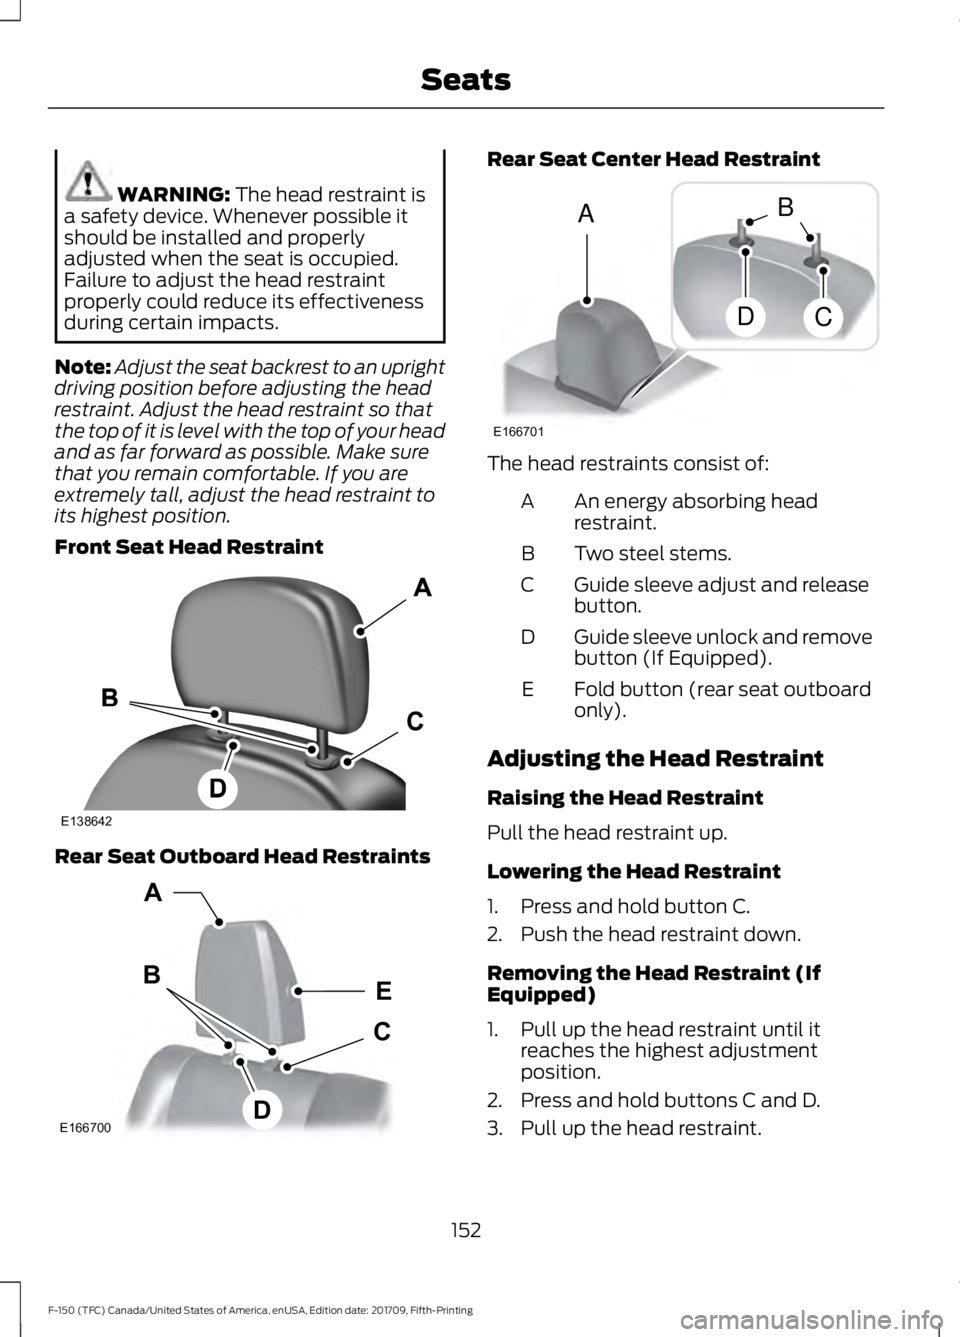
Front Seat Head Restraint Rear Seat Outboard Head Restraints Rear Seat Center Head Restraint
The head restraints consist of:
An energy absorbing head
restraint.
A
Two steel stems.
B
Guide sleeve adjust and release
button.
C
Guide sleeve unlock and remove
button (If Equipped).
D
Fold button (rear seat outboard
only).
E
Adjusting the Head Restraint
Raising the Head Restraint
Pull the head restraint up.
Lowering the Head Restraint
1. Press and hold button C.
2. Push the head restraint down.
Removing the Head Restraint (If
Equipped)
1. Pull up the head restraint until it reaches the highest adjustment
position.
2. Press and hold buttons C and D.
3. Pull up the head restraint.
152
F-150 (TFC) Canada/United States of America, enUSA, Edition date: 201709, Fifth-Printing SeatsE138642 E166700
E
D
C
B
A E166701
A
DC
B
Page 157 of 641
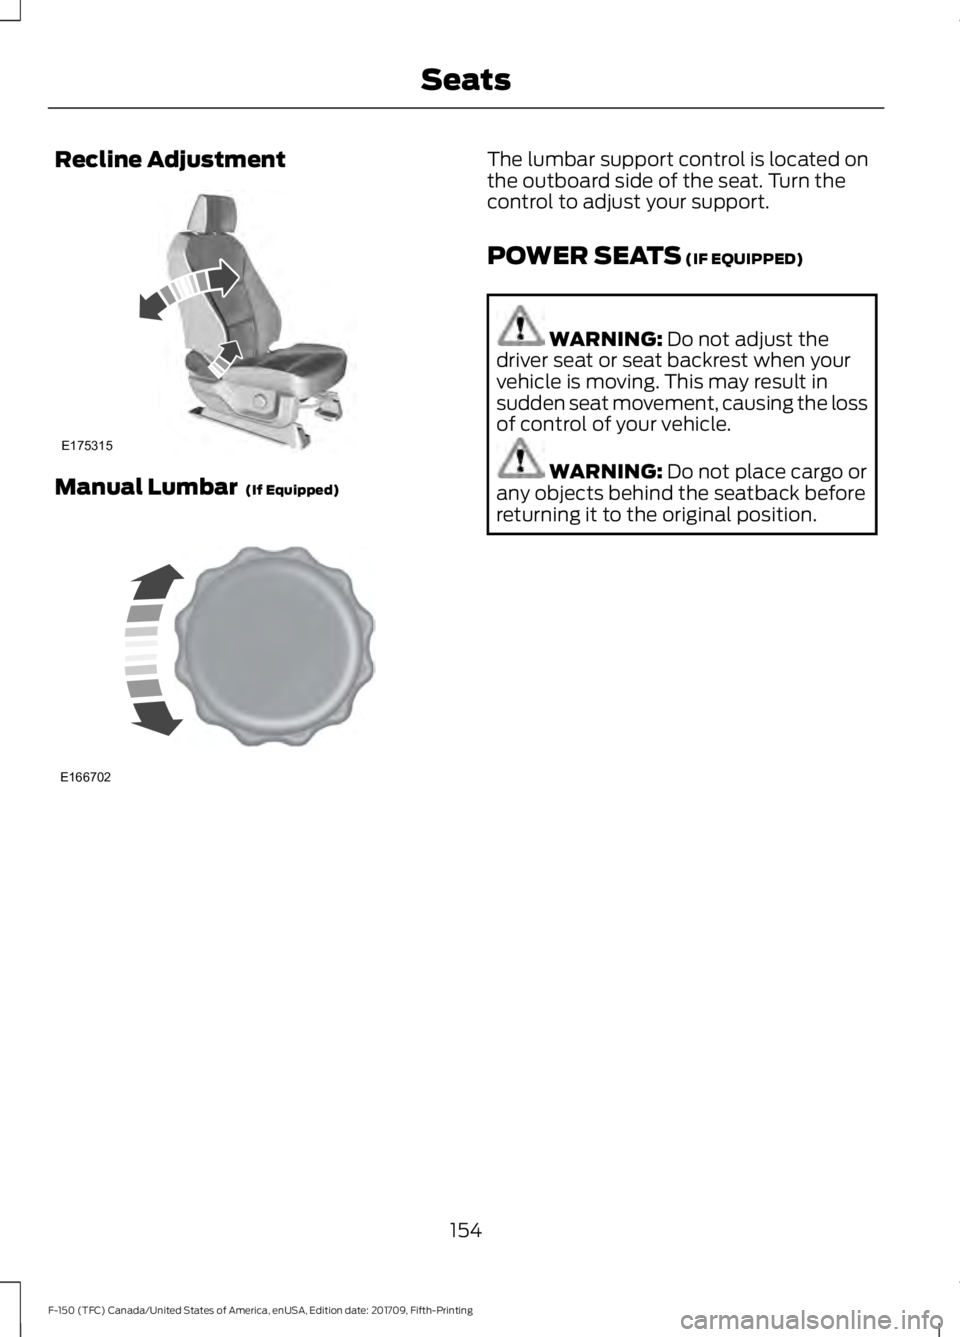
Recline Adjustment
Manual Lumbar (If Equipped) The lumbar support control is located on
the outboard side of the seat. Turn the
control to adjust your support.
POWER SEATS
(IF EQUIPPED)
WARNING:
Do not adjust the
driver seat or seat backrest when your
vehicle is moving. This may result in
sudden seat movement, causing the loss
of control of your vehicle. WARNING:
Do not place cargo or
any objects behind the seatback before
returning it to the original position.
154
F-150 (TFC) Canada/United States of America, enUSA, Edition date: 201709, Fifth-Printing SeatsE175315 E166702
Page 159 of 641
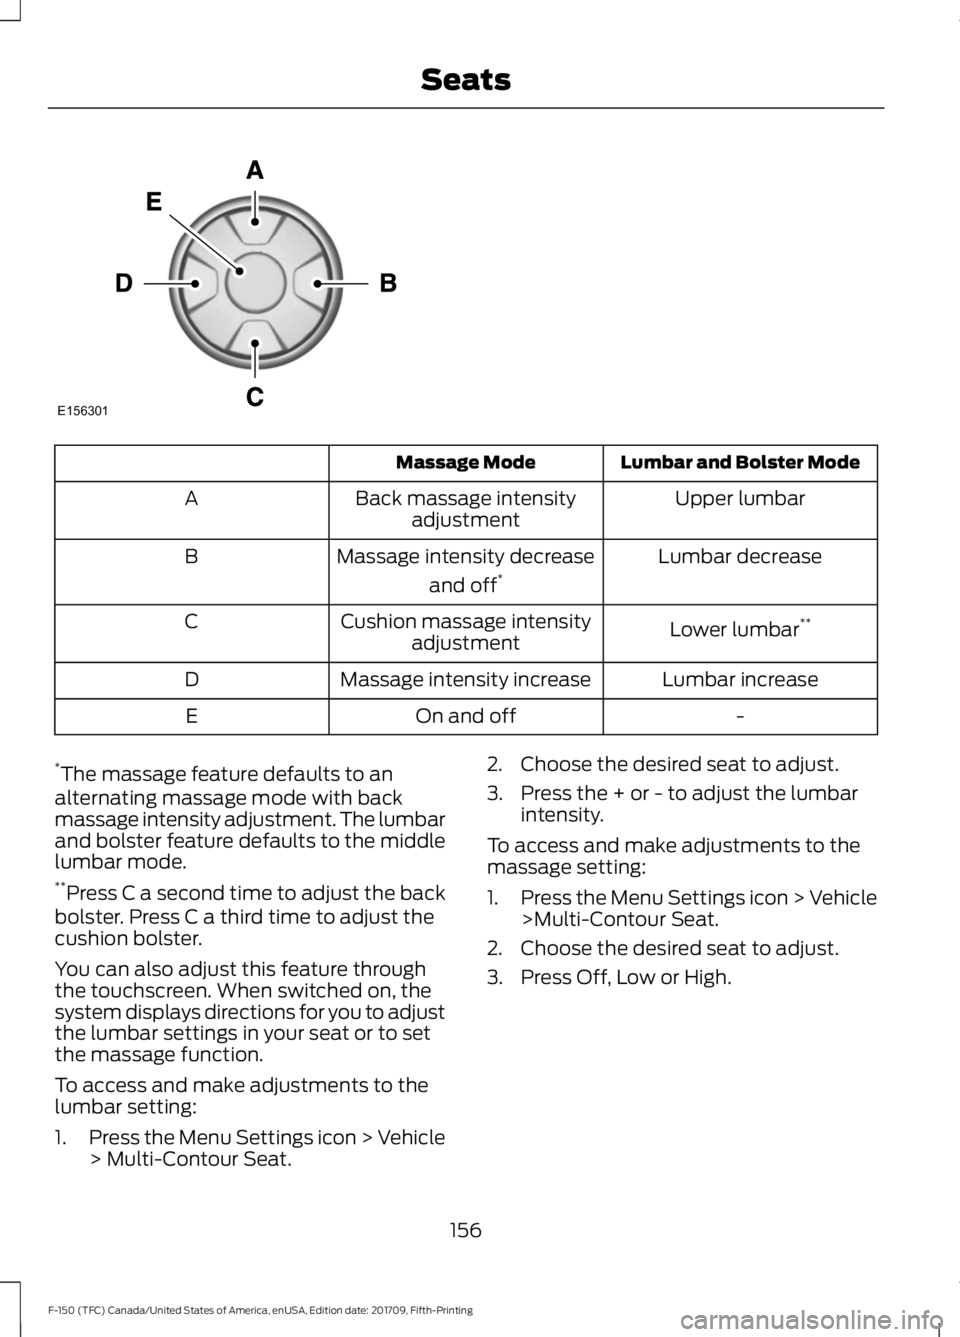
Lumbar and Bolster Mode
Massage Mode
Upper lumbar
Back massage intensity
adjustment
A
Lumbar decrease
Massage intensity decrease
and off*
B
Lower lumbar**
Cushion massage intensity
adjustment
C
Lumbar increase
Massage intensity increase
D
-
On and off
E
* The massage feature defaults to an
alternating massage mode with back
massage intensity adjustment. The lumbar
and bolster feature defaults to the middle
lumbar mode.
** Press C a second time to adjust the back
bolster. Press C a third time to adjust the
cushion bolster.
You can also adjust this feature through
the touchscreen. When switched on, the
system displays directions for you to adjust
the lumbar settings in your seat or to set
the massage function.
To access and make adjustments to the
lumbar setting:
1. Press the Menu Settings icon > Vehicle
> Multi-Contour Seat. 2. Choose the desired seat to adjust.
3. Press the + or - to adjust the lumbar
intensity.
To access and make adjustments to the
massage setting:
1. Press the Menu Settings icon > Vehicle
>Multi-Contour Seat.
2. Choose the desired seat to adjust.
3. Press Off, Low or High.
156
F-150 (TFC) Canada/United States of America, enUSA, Edition date: 201709, Fifth-Printing SeatsE156301
Page 321 of 641
SNOWPLOWING
We recommend the four-wheel drive F-150
in XL, XLT or Lariat trim levels with the 5.0L
engine and snowplow option for residential
snowplowing only. We do not recommend
the F-150 with the automatic four-wheel
drive system for snowplowing.
Do not use F-150 vehicles equipped with
the 2.7L, 3.0L, 3.3L or 3.5L engines for
snowplowing.
Installing the Snowplow
Weight limits and guidelines for selecting
and installing the snowplow are in the Ford
Truck Body Builders Layout Book,
snowplow section, found at
www.fleet.ford.com/truckbbas.
A typical installation affects the following:
•
Certification to government safety laws
such as occupant protection and airbag
deployment, braking, and lighting. Look
for an Alterer ’s Label on your vehicle
from the snowplow installer certifying
that the installation meets all
applicable Federal Motor Vehicle
Safety Standards (FMVSS).
• The Front Gross Axle Weight Rating
(GAWR) is on the upper left side of the
vehicle ’s Safety Compliance
Certification Label. This is the total
weight that front axle supports, which
includes the vehicle weight plus any
auxiliary equipment such as snowplow
frame-mounted hardware that can be
added to the vehicle and satisfy Ford
compliance certification to FMVSS. Do
not exceed FGAWR or Gross Vehicle
Weight Rating (GVWR).
• Rear ballast weight behind the rear
axle may be required to prevent
exceeding the FGAWR, and provide
front-to-rear weight balance for proper
braking and steering. •
Front wheel toe may require
re-adjustment to prevent premature
uneven tire wear. Specifications are in
the Ford Workshop Manual.
• Headlight aim may require adjustment.
• The tire air pressures recommended
for general driving are on the vehicle ’s
Safety Certification Label. The
maximum cold inflation pressure for
the tire and associated load rating are
on the tire sidewall. Tire air pressure
may require re-adjustment within these
pressure limits to accommodate the
additional weight of the snowplow
installation.
• Federal and some local regulations
require additional exterior lamps for
snowplow-equipped vehicles. Contact
an authorized dealer for additional
information.
Snowplow Mode (If Equipped)
Press the snowplow button on the
instrument panel to switch on snowplow
mode. The button illuminates when in
snowplow mode. A message appears in
the information display indicating that
features are turned off when in snowplow
mode.
The following features are disabled when
in snowplow mode:
• 110V inverter.
• Fog lamps.
• Heated steering wheel.
• Heated front and rear seats.
• Massaging seats.
The body module also activates the
snowplow relay that provides power to
aftermarket snowplow controls.
Switch off snowplow mode by pressing
the snowplow button or switching off the
ignition. The snowplow button is no longer
illuminated and features are turned on.
318
F-150 (TFC) Canada/United States of America, enUSA, Edition date: 201709, Fifth-Printing Driving Hints