2018 FORD F-150 service
[x] Cancel search: servicePage 358 of 641

It is very important to use prediluted
coolant approved to the correct
specification in order to avoid plugging the
small passageways in the engine cooling
system. See Capacities and
Specifications (page 415). Do not mix
different colors or types of coolant in your
vehicle. Mixing of engine coolants or using
an incorrect coolant may harm the engine
or cooling system components and may
not be covered by the vehicle Warranty.
Note: If prediluted coolant is not available,
use the approved concentrated coolant
diluting it to 50/50 with distilled water. See
Capacities and Specifications (page 415).
Using water that has not been deionised
may contribute to deposit formation,
corrosion and plugging of the small cooling
system passageways.
Note: Coolants marketed for all makes and
models may not be approved to our
specifications and may cause damage to
the cooling system. Resulting component
damage may not be covered by the vehicle
Warranty.
If the coolant level is at or below the
minimum mark, add prediluted coolant
immediately.
To top up the coolant level do the
following:
1. Unscrew the cap slowly. Any pressure escapes as you unscrew the cap.
2. Add prediluted coolant approved to the correct specification. See
Capacities and Specifications (page
415
).
3. Add enough prediluted coolant to reach the correct level.
4. Replace the coolant reservoir cap, turn
it clockwise until you feel a strong
resistance. 5. Check the coolant level in the coolant
reservoir the next few times you drive
your vehicle. If necessary, add enough
prediluted engine coolant to bring the
coolant level to the correct level.
If you have to add more than
1.1 qt (1 L) of
engine coolant per month, have your
vehicle checked as soon as possible.
Operating an engine with a low level of
coolant can result in engine overheating
and possible engine damage.
Note: During normal vehicle operation, the
coolant may change color from orange to
pink or light red. As long as the coolant is
clear and uncontaminated, this color change
does not indicate the coolant has degraded
nor does it require the coolant to be drained,
the system to be flushed, or the coolant to
be replaced.
In case of emergency, you can add a large
amount of water without engine coolant
in order to reach a vehicle service location.
In this instance, qualified personnel:
1. Must drain the cooling system.
2. Chemically clean the coolant system.
3. Refill with engine coolant as soon as possible.
Water alone, without engine coolant, can
cause engine damage from corrosion,
overheating or freezing.
Do not use the following as a coolant
substitute:
• Alcohol.
• Methanol.
• Brine.
• Any coolant mixed with alcohol or
methanol antifreeze.
Alcohol and other liquids can cause engine
damage from overheating or freezing.
355
F-150 (TFC) Canada/United States of America, enUSA, Edition date: 201709, Fifth-Printing Maintenance
Page 360 of 641
When Fail-Safe Mode Is Activated
WARNING: Fail-safe mode is for
use during emergencies only. Operate
your vehicle in fail-safe mode only as
long as necessary to bring your vehicle
to rest in a safe location and seek
immediate repairs. When in fail-safe
mode, your vehicle will have limited
power, will not be able to maintain
high-speed operation, and may
completely shut down without warning,
potentially losing engine power, power
steering assist, and power brake assist,
which may increase the possibility of a
crash resulting in serious injury. WARNING:
Do not remove the
coolant reservoir cap when the engine is
on or the cooling system is hot. Wait 10
minutes for the cooling system to cool
down. Cover the coolant reservoir cap
with a thick cloth to prevent the
possibility of scalding and slowly remove
the cap. Failure to follow this instruction
could result in personal injury.
Your vehicle has limited engine power
when in the fail-safe mode, drive your
vehicle with caution. Your vehicle does not
maintain high-speed operation and the
engine may operate poorly.
Remember that the engine is capable of
automatically shutting down to prevent
engine damage. In this situation:
1. Pull off the road as soon as safely possible and switch the engine off.
2. If you are a member of a roadside assistance program, we recommend
that you contact your roadside
assistance service provider.
3. If this is not possible, wait for a short period of time for the engine to cool. 4. Check the coolant level. If the coolant
level is at or below the minimum mark,
add prediluted coolant immediately.
5. When the engine temperature cools, you can re-start the engine. Have your
vehicle checked as soon as possible to
minimize engine damage.
Note: Driving your vehicle without repair
increases the chance of engine damage.
Engine Coolant Temperature
Management
(If Equipped) WARNING:
To reduce the risk of
crash and injury, be prepared that the
vehicle speed may reduce and the
vehicle may not be able to accelerate
with full power until the coolant
temperature reduces.
If you tow a trailer with your vehicle, the
engine may temporarily reach a higher
temperature during severe operating
conditions, for example ascending a long
or steep grade in high ambient
temperatures.
At this time, you may notice the coolant
temperature gauge moves toward the red
zone and a message may appear in the
information display.
You may notice a reduction in vehicle
speed caused by reduced engine power in
order to manage the engine coolant
temperature. Your vehicle may enter this
mode if certain high-temperature and
high-load conditions take place. The
amount of speed reduction depends on
vehicle loading, grade and ambient
temperature. If this occurs, there is no
need to stop your vehicle. You can
continue to drive.
357
F-150 (TFC) Canada/United States of America, enUSA, Edition date: 201709, Fifth-Printing Maintenance
Page 361 of 641
The air conditioning may automatically
turn on and off during severe operating
conditions to protect the engine from
overheating. When the coolant
temperature decreases to the normal
operating temperature, the air conditioning
turns on.
If the coolant temperature gauge moves
fully into the red zone, or if the coolant
temperature warning or service engine
soon messages appear in your information
display, do the following:
1. Stop your vehicle as soon as it is safe
to do so. Fully apply the parking brake,
shift into park (P) or neutral (N).
2. Leave the engine running until the coolant temperature gauge needle
returns to the normal position. If the
temperature does not drop after
several minutes, follow the remaining
steps.
3. Switch the engine off and wait for it to
cool. Check the coolant level.
4. If the coolant level is at or below the minimum mark, add prediluted coolant
immediately.
5. If the coolant level is normal, restart the engine and continue.
AUTOMATIC TRANSMISSION
FLUID CHECK
If required, have an authorized dealer check
and change the transmission fluid at the
correct service interval. See Scheduled
Maintenance (page 561).
The automatic transmission does not have
a transmission fluid dipstick. Refer to your scheduled maintenance
information for scheduled intervals for fluid
checks and changes. Your transmission
does not consume fluid. However, if the
transmission slips, shifts slowly or if you
notice a sign of leaking fluid, contact an
authorized dealer.
Do not use supplemental transmission
fluid additives, treatments or cleaning
agents. The use of these materials may
affect transmission operation and result
in damage to internal transmission
components.
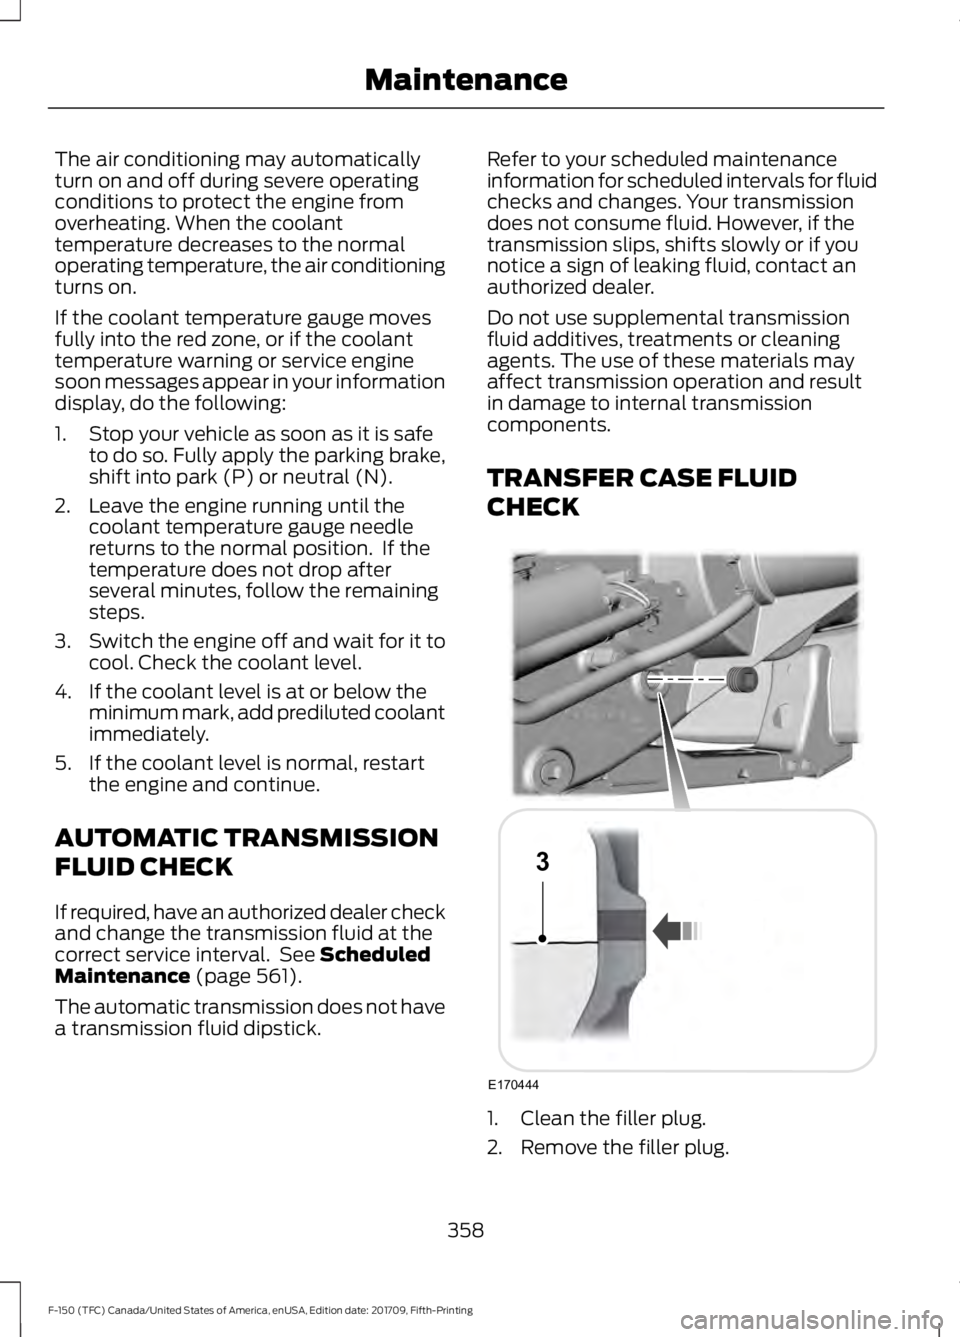
TRANSFER CASE FLUID
CHECK
1. Clean the filler plug.
2. Remove the filler plug.
358
F-150 (TFC) Canada/United States of America, enUSA, Edition date: 201709, Fifth-Printing MaintenanceE170444
3
Page 363 of 641

DRAINING THE FUEL FILTER
WATER TRAP
WARNING: Do not dispose of fuel
in the household refuse or the public
sewage system. Use an authorized waste
disposal facility.
Note: Only add fuel that meets the Ford
specification. See
Fuel Quality (page 187).
Note: The in-tank pump will turn off
automatically after approximately 30
seconds.
The fuel water trap is above the frame rail
under the driver side of the vehicle. Front of Vehicle.
A
1. Switch the ignition off.
2. Loosen the drain plug approximately one and a half turns.
3. Allow the water to drain.
4. Tighten the drain plug until you feel a strong resistance.
5. Key on for 30 seconds then key off. Repeat twice.
6. Start the engine.
7. Check for leaks. Note:
The water-in-fuel indicator lamp will
go out after approximately 2 seconds, with
the engine running.
FUEL FILTER - DIESEL
Your fuel filters must be changed at the
correct service interval or when you see the
low fuel pressure message appear. See
Scheduled Maintenance
(page 561).
FUEL FILTER - GASOLINE
Your vehicle is equipped with a lifetime
fuel filter that is integrated with the fuel
tank. Regular maintenance or replacement
is not needed.
CHANGING THE 12V BATTERY WARNING:
Batteries normally
produce explosive gases which can
cause personal injury. Therefore, do not
allow flames, sparks or lighted
substances to come near the battery.
When working near the battery, always
shield your face and protect your eyes.
Always provide correct ventilation. WARNING:
When lifting a
plastic-cased battery, excessive pressure
on the end walls could cause acid to flow
through the vent caps, resulting in
personal injury and damage to the
vehicle or battery. Lift the battery with a
battery carrier or with your hands on
opposite corners.
360
F-150 (TFC) Canada/United States of America, enUSA, Edition date: 201709, Fifth-Printing MaintenanceE254226
Page 372 of 641
Exterior Lamps
Power (Watt)
Specification
Lamp
21/5W
7444NA
Front direction indicator and parking lamps.
LED
LED
Daytime running lamps.
65W
9005
Headlamp high beam.
55W
H11
Headlamp low beam.
55W
9140
Front fog lamps.
5W
W5W
Front side marker lamps.
LED
LED
Side direction indicator.
LED
LED
Puddle lamp.
27/8W
3157
Rear lamps, brake lamps, rear direction indicator
and rear side marker lamps. 1
16W
921
Central high mounted brake lamp. 1
LED
LED
Central high mounted brake lamp.Vehicles with
cargo box lamp.
27W
3156K
Reversing lamps.
5W
168
License plate lamp.
1 May have optional LED lamps.
Note: LED lamps are not serviceable. See an authorized dealer if they fail.
Interior Lamps Power (Watt)
Specification
Lamp
LED
LED
Glove compartment lamp.
LED
LED
Map lamp.
LED
LED
Rear dome and courtesy lamps.
LED
LED
Rear cargo box lamps.
Note: LED lamps are not serviceable. See an authorized dealer if they fail.
369
F-150 (TFC) Canada/United States of America, enUSA, Edition date: 201709, Fifth-Printing Maintenance
Page 374 of 641
Note:
Failure to use the correct air filter
element may result in severe engine
damage. Resulting component damage
may not be covered by the vehicle Warranty.
Change the air filter element at the correct
service interval. See Scheduled
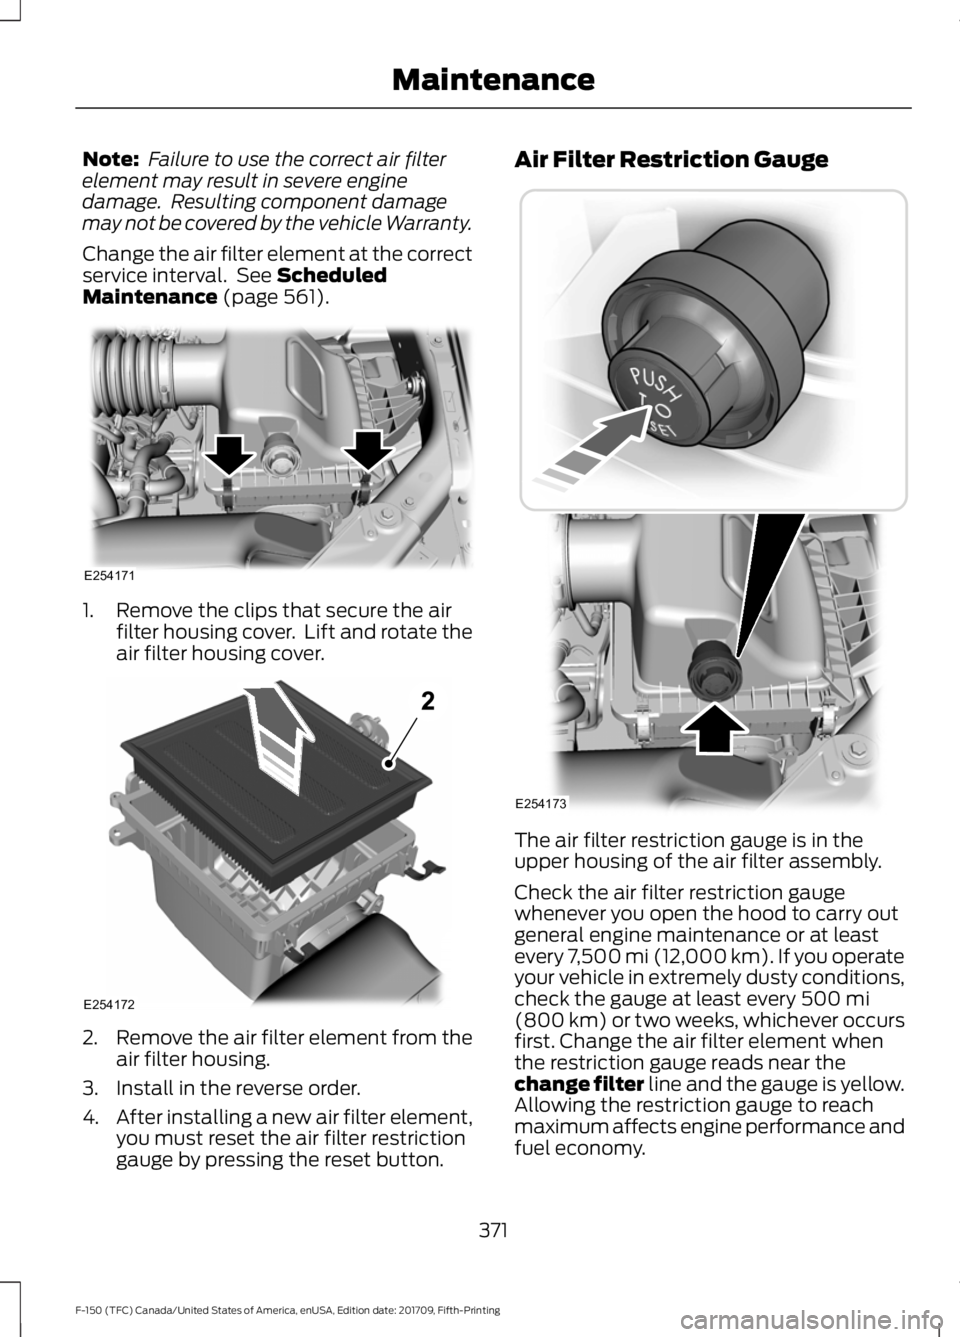
Maintenance (page 561). 1. Remove the clips that secure the air
filter housing cover. Lift and rotate the
air filter housing cover. 2.
Remove the air filter element from the
air filter housing.
3. Install in the reverse order.
4. After installing a new air filter element,
you must reset the air filter restriction
gauge by pressing the reset button. Air Filter Restriction Gauge
The air filter restriction gauge is in the
upper housing of the air filter assembly.
Check the air filter restriction gauge
whenever you open the hood to carry out
general engine maintenance or at least
every 7,500 mi (12,000 km). If you operate
your vehicle in extremely dusty conditions,
check the gauge at least every
500 mi
(800 km) or two weeks, whichever occurs
first. Change the air filter element when
the restriction gauge reads near the
change filter line and the gauge is yellow.
Allowing the restriction gauge to reach
maximum affects engine performance and
fuel economy.
371
F-150 (TFC) Canada/United States of America, enUSA, Edition date: 201709, Fifth-Printing MaintenanceE254171 E254172 E254173
Page 387 of 641
As a result of the above dimensional
differences, Sport utility vehicles and
trucks often will have a higher center of
gravity and a greater difference in center
of gravity between the loaded and
unloaded condition. These differences that
make your vehicle so versatile also make
it handle differently than an ordinary
passenger car.
TIRE CARE
Information About Uniform
Tire Quality Grading
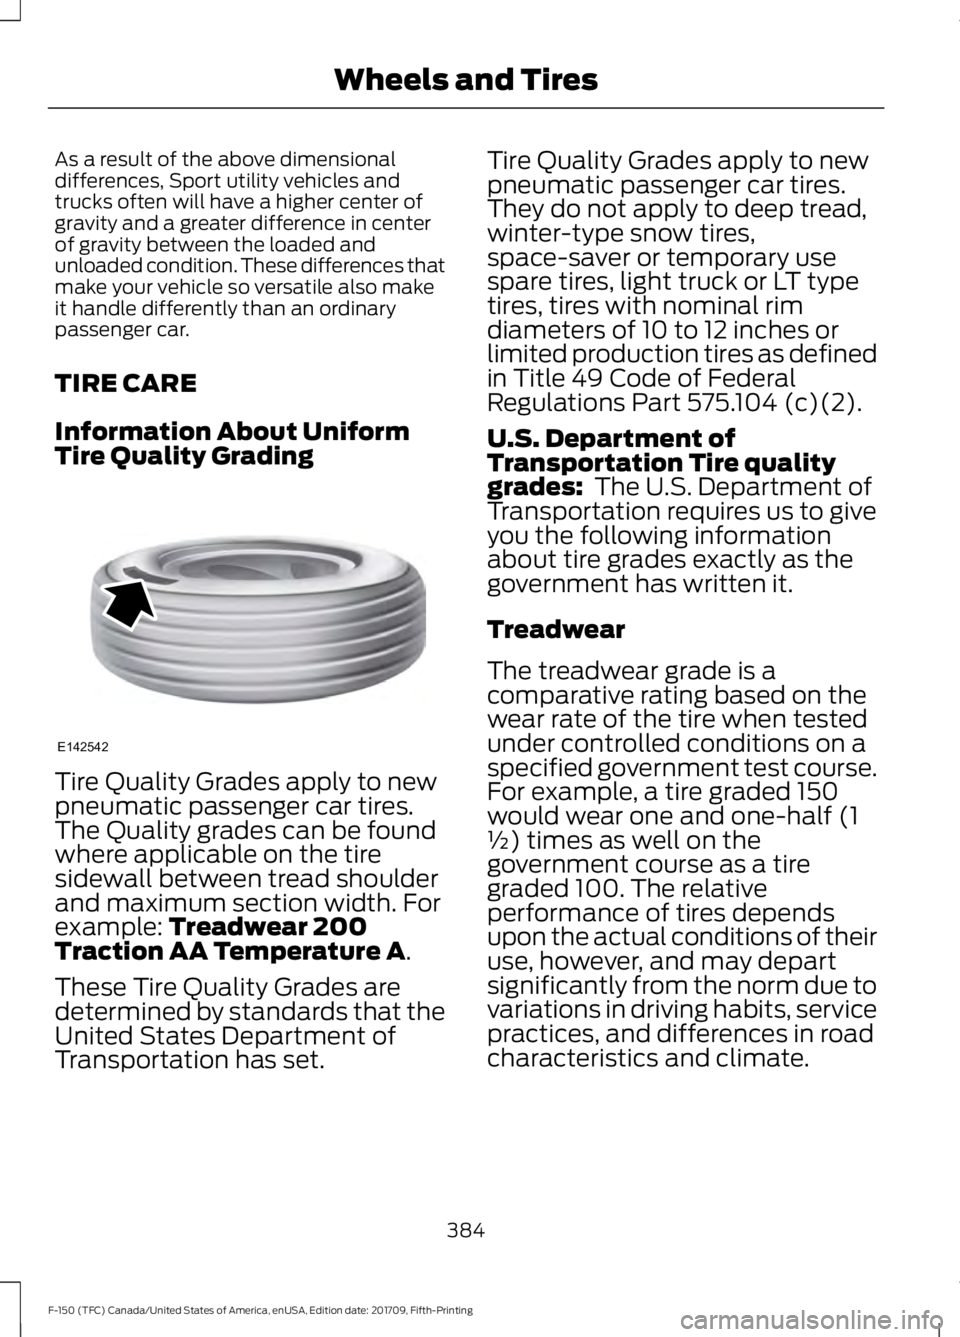
Tire Quality Grades apply to new
pneumatic passenger car tires.
The Quality grades can be found
where applicable on the tire
sidewall between tread shoulder
and maximum section width. For
example: Treadwear 200
Traction AA Temperature A.
These Tire Quality Grades are
determined by standards that the
United States Department of
Transportation has set. Tire Quality Grades apply to new
pneumatic passenger car tires.
They do not apply to deep tread,
winter-type snow tires,
space-saver or temporary use
spare tires, light truck or LT type
tires, tires with nominal rim
diameters of 10 to 12 inches or
limited production tires as defined
in Title 49 Code of Federal
Regulations Part 575.104 (c)(2).
U.S. Department of
Transportation Tire quality
grades:
The U.S. Department of
Transportation requires us to give
you the following information
about tire grades exactly as the
government has written it.
Treadwear
The treadwear grade is a
comparative rating based on the
wear rate of the tire when tested
under controlled conditions on a
specified government test course.
For example, a tire graded 150
would wear one and one-half (1
½) times as well on the
government course as a tire
graded 100. The relative
performance of tires depends
upon the actual conditions of their
use, however, and may depart
significantly from the norm due to
variations in driving habits, service
practices, and differences in road
characteristics and climate.
384
F-150 (TFC) Canada/United States of America, enUSA, Edition date: 201709, Fifth-Printing Wheels and TiresE142542
Page 390 of 641
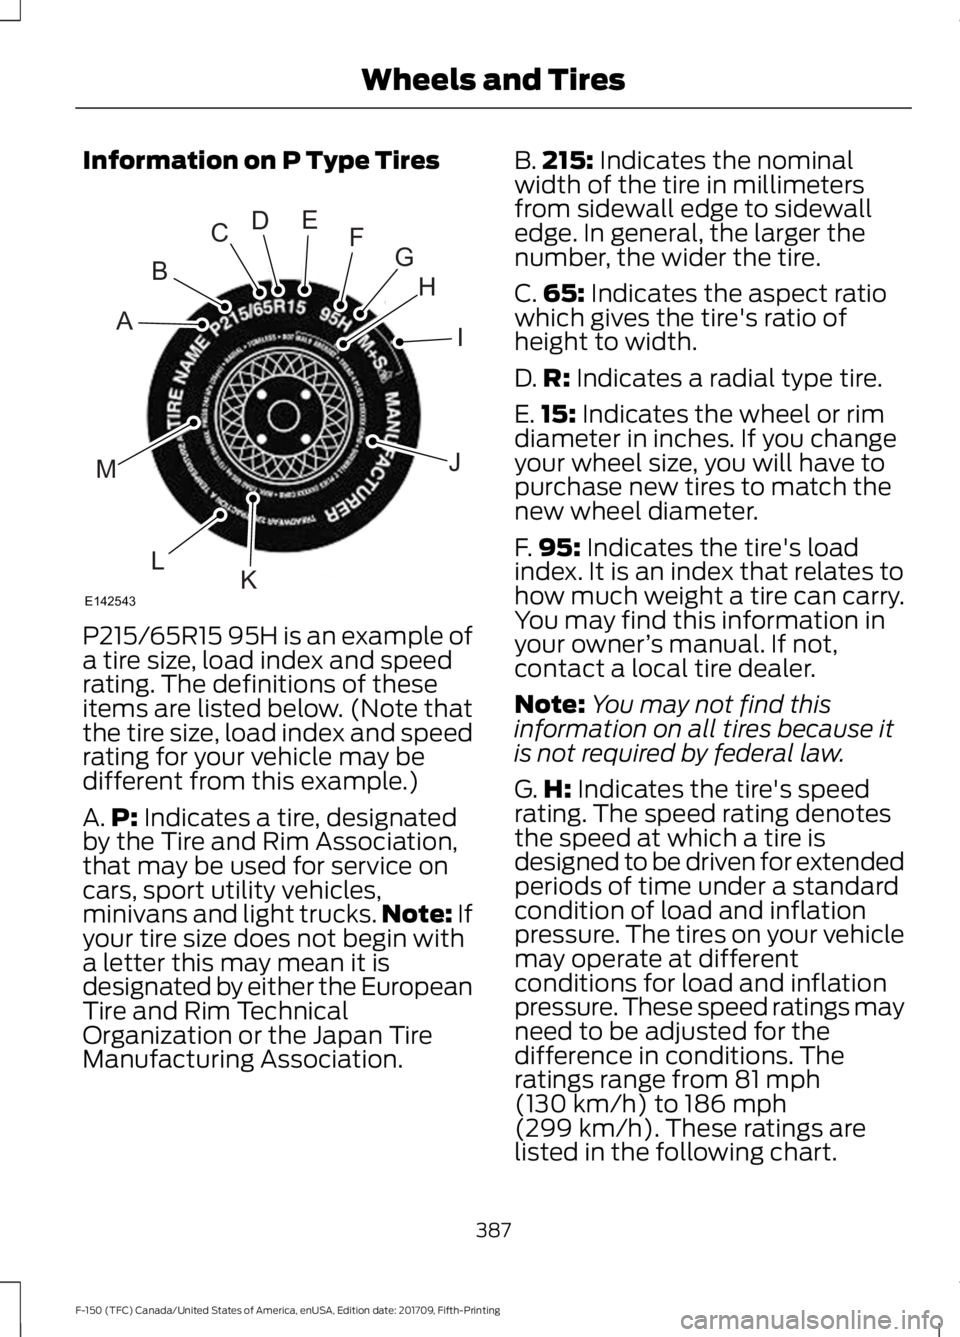
Information on P Type Tires
P215/65R15 95H is an example of
a tire size, load index and speed
rating. The definitions of these
items are listed below. (Note that
the tire size, load index and speed
rating for your vehicle may be
different from this example.)
A.
P: Indicates a tire, designated
by the Tire and Rim Association,
that may be used for service on
cars, sport utility vehicles,
minivans and light trucks. Note:
If
your tire size does not begin with
a letter this may mean it is
designated by either the European
Tire and Rim Technical
Organization or the Japan Tire
Manufacturing Association. B.
215:
Indicates the nominal
width of the tire in millimeters
from sidewall edge to sidewall
edge. In general, the larger the
number, the wider the tire.
C. 65:
Indicates the aspect ratio
which gives the tire's ratio of
height to width.
D. R:
Indicates a radial type tire.
E. 15:
Indicates the wheel or rim
diameter in inches. If you change
your wheel size, you will have to
purchase new tires to match the
new wheel diameter.
F. 95:
Indicates the tire's load
index. It is an index that relates to
how much weight a tire can carry.
You may find this information in
your owner ’s manual. If not,
contact a local tire dealer.
Note: You may not find this
information on all tires because it
is not required by federal law.
G. H:
Indicates the tire's speed
rating. The speed rating denotes
the speed at which a tire is
designed to be driven for extended
periods of time under a standard
condition of load and inflation
pressure. The tires on your vehicle
may operate at different
conditions for load and inflation
pressure. These speed ratings may
need to be adjusted for the
difference in conditions. The
ratings range from
81 mph
(130 km/h) to 186 mph
(299 km/h)
. These ratings are
listed in the following chart.
387
F-150 (TFC) Canada/United States of America, enUSA, Edition date: 201709, Fifth-Printing Wheels and TiresH
I
J
KL
M
A
B
CDEFG
E142543