2018 FORD F-150 parking brake
[x] Cancel search: parking brakePage 316 of 641
1.
With your vehicle still properly secured
to the tow vehicle, put the ignition in
the on position, but do not start the
engine. If your vehicle has an ignition
key, turn the key to on. If your vehicle
has intelligent access, press the engine
START/STOP button once without
pressing the brake pedal.
2. Press and hold the brake pedal.
3. Place the transmission back into park (P).
4. Release the brake pedal.
Note: If completed successfully, the
instrument cluster displays
4X2, and
Neutral Tow Disabled.
Note: If the indicator light and message do
not display, you must perform the procedure
again from the beginning.
Note: You may hear an audible noise as the
transfer case shifts out of its neutral
position, this is normal.
Note: If
Shift Delayed Pull Forward
displays in the instrument cluster, transfer
case gear tooth blockage is present. See the
instructions following this section.
5. Apply the parking brake, then disconnect your vehicle from the tow
vehicle.
6. Release the parking brake, start the engine, and shift the transmission into
drive (D) to make sure the transfer
case is out of the neutral tow position.
7. If the transfer case does not successfully shift out of neutral (N),
set the parking brake until you can have
your vehicle serviced.
Resolving the
Shift Delayed Pull Forward
Message
If the instrument cluster displays
Shift
Delayed Pull Forward, perform the
following:
1. Press and hold the brake pedal. 2. Put the transmission into neutral (N),
then start the engine.
3. With the engine running, shift the transmission into drive (D) and let the
vehicle roll forward, up to
3 ft (1 m).
You may hear an audible noise as the
transfer case shifts out of its neutral
position. This is normal.
4. Make sure the instrument cluster displays
Neutral Tow Disabled.
313
F-150 (TFC) Canada/United States of America, enUSA, Edition date: 201709, Fifth-Printing Towing
Page 342 of 641
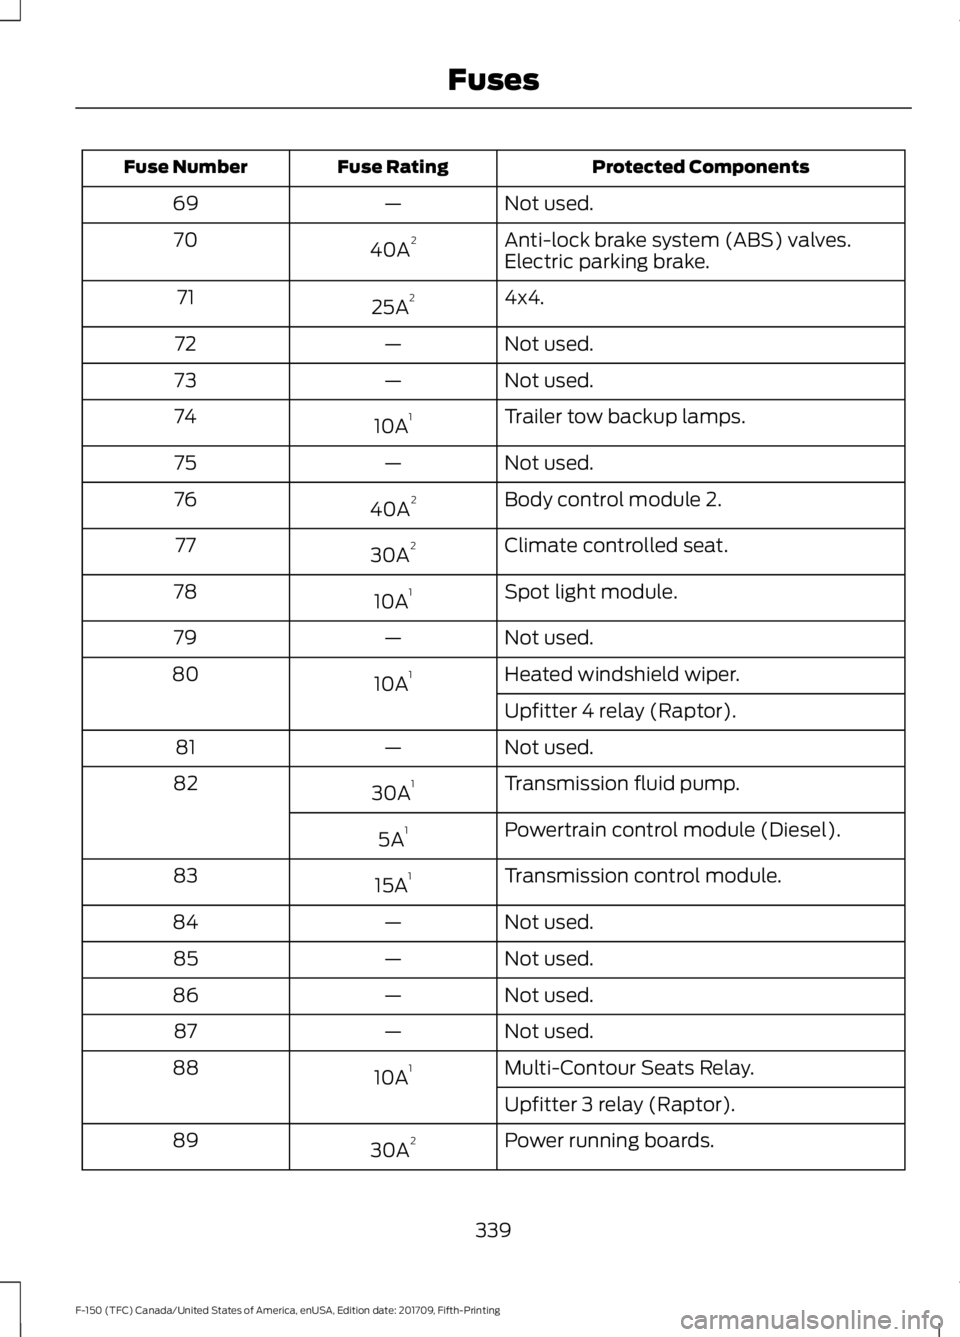
Protected Components
Fuse Rating
Fuse Number
Not used.
—
69
Anti-lock brake system (ABS) valves.
40A 2
70
Electric parking brake.
4x4.
25A 2
71
Not used.
—
72
Not used.
—
73
Trailer tow backup lamps.
10A 1
74
Not used.
—
75
Body control module 2.
40A 2
76
Climate controlled seat.
30A 2
77
Spot light module.
10A 1
78
Not used.
—
79
Heated windshield wiper.
10A 1
80
Upfitter 4 relay (Raptor).
Not used.
—
81
Transmission fluid pump.
30A 1
82
Powertrain control module (Diesel).
5A 1
Transmission control module.
15A 1
83
Not used.
—
84
Not used.
—
85
Not used.
—
86
Not used.
—
87
Multi-Contour Seats Relay.
10A 1
88
Upfitter 3 relay (Raptor).
Power running boards.
30A 2
89
339
F-150 (TFC) Canada/United States of America, enUSA, Edition date: 201709, Fifth-Printing Fuses
Page 348 of 641

GENERAL INFORMATION
Have your vehicle serviced regularly to help
maintain its roadworthiness and resale
value. There is a large network of
authorized dealers that are there to help
you with their professional servicing
expertise. We believe that their specially
trained technicians are best qualified to
service your vehicle properly and expertly.
They are supported by a wide range of
highly specialized tools developed
specifically for servicing your vehicle.
If your vehicle requires professional service,
an authorized dealer can provide the
necessary parts and service. Check your
warranty information to find out which
parts and services are covered.
Use only recommended fuels, lubricants,
fluids and service parts conforming to
specifications. Motorcraft® parts are
designed and built to provide the best
performance in your vehicle.
Precautions
•
Do not work on a hot engine.
• Make sure that nothing gets caught in
moving parts.
• Do not work on a vehicle with the
engine running in an enclosed space,
unless you are sure you have enough
ventilation.
• Keep all open flames and other burning
material (such as cigarettes) away
from the battery and all fuel related
parts.
Working with the Engine Off
1. Set the parking brake and shift the transmission to park (P).
2. Switch off the engine.
3. Block the wheels. Working with the Engine On WARNING: To reduce the risk of
vehicle damage and personal burn
injuries, do not start your engine with the
air cleaner removed and do not remove
it while the engine is running.
1. Set the parking brake and shift the transmission to park (P).
2. Block the wheels.
OPENING AND CLOSING THE
HOOD
1. Inside the vehicle, pull the hood release
handle located under the left hand side
of the instrument panel. 2. Go to the front of your vehicle and
locate the secondary release lever
under the front of the hood near the
center of your vehicle.
345
F-150 (TFC) Canada/United States of America, enUSA, Edition date: 201709, Fifth-Printing MaintenanceE166491
Page 354 of 641
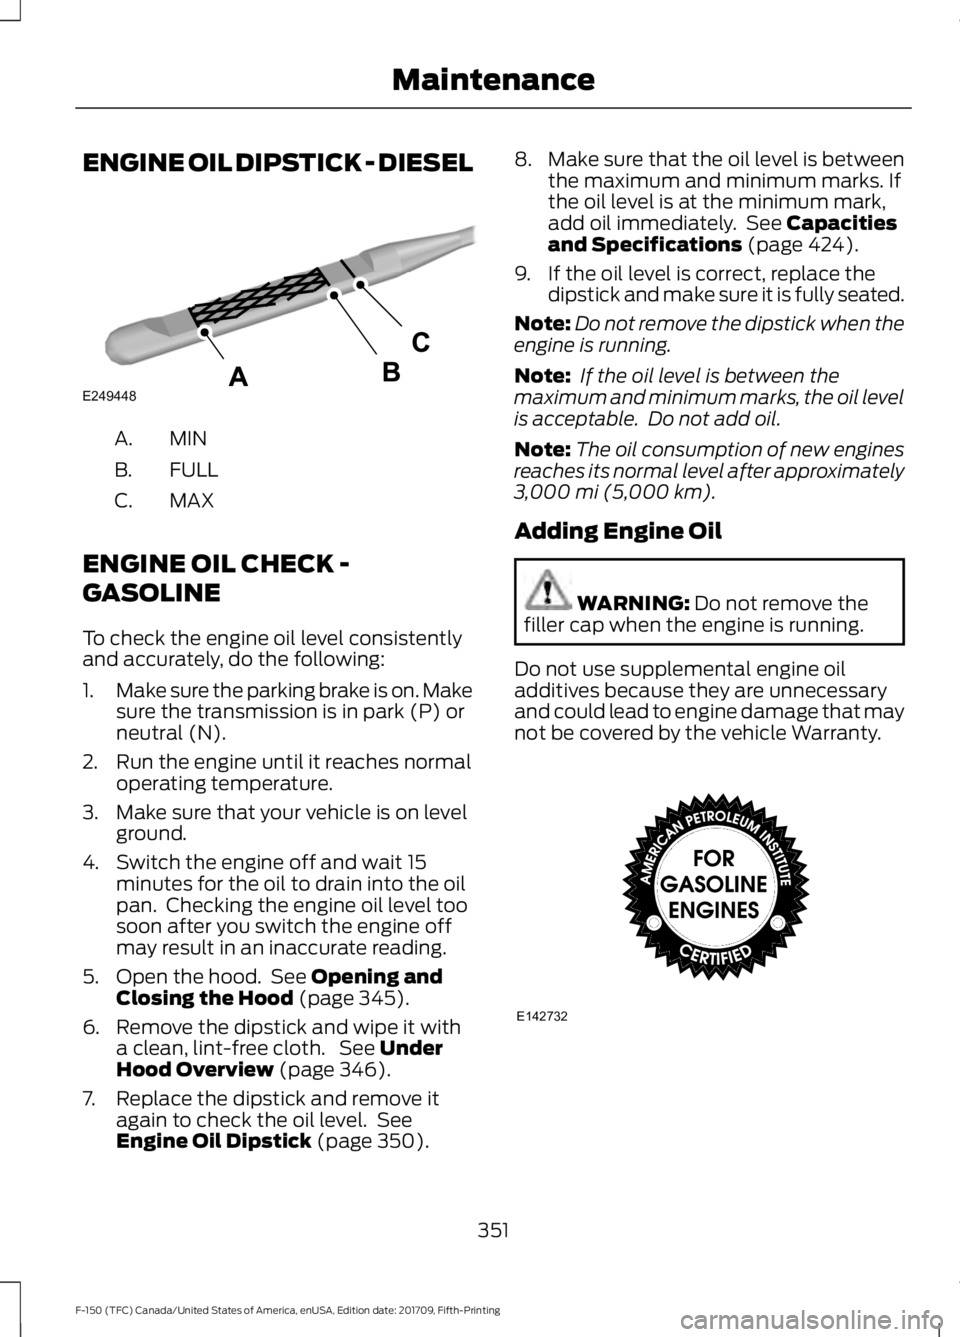
ENGINE OIL DIPSTICK - DIESEL
MINA.
FULL
B.
MAX
C.
ENGINE OIL CHECK -
GASOLINE
To check the engine oil level consistently
and accurately, do the following:
1. Make sure the parking brake is on. Make
sure the transmission is in park (P) or
neutral (N).
2. Run the engine until it reaches normal operating temperature.
3. Make sure that your vehicle is on level ground.
4. Switch the engine off and wait 15 minutes for the oil to drain into the oil
pan. Checking the engine oil level too
soon after you switch the engine off
may result in an inaccurate reading.
5. Open the hood. See Opening and
Closing the Hood (page 345).
6. Remove the dipstick and wipe it with a clean, lint-free cloth. See
Under
Hood Overview (page 346).
7. Replace the dipstick and remove it again to check the oil level. See
Engine Oil Dipstick
(page 350). 8.
Make sure that the oil level is between
the maximum and minimum marks. If
the oil level is at the minimum mark,
add oil immediately. See
Capacities
and Specifications (page 424).
9. If the oil level is correct, replace the dipstick and make sure it is fully seated.
Note: Do not remove the dipstick when the
engine is running.
Note: If the oil level is between the
maximum and minimum marks, the oil level
is acceptable. Do not add oil.
Note: The oil consumption of new engines
reaches its normal level after approximately
3,000 mi (5,000 km)
.
Adding Engine Oil WARNING:
Do not remove the
filler cap when the engine is running.
Do not use supplemental engine oil
additives because they are unnecessary
and could lead to engine damage that may
not be covered by the vehicle Warranty. 351
F-150 (TFC) Canada/United States of America, enUSA, Edition date: 201709, Fifth-Printing MaintenanceE249448 E142732
Page 355 of 641
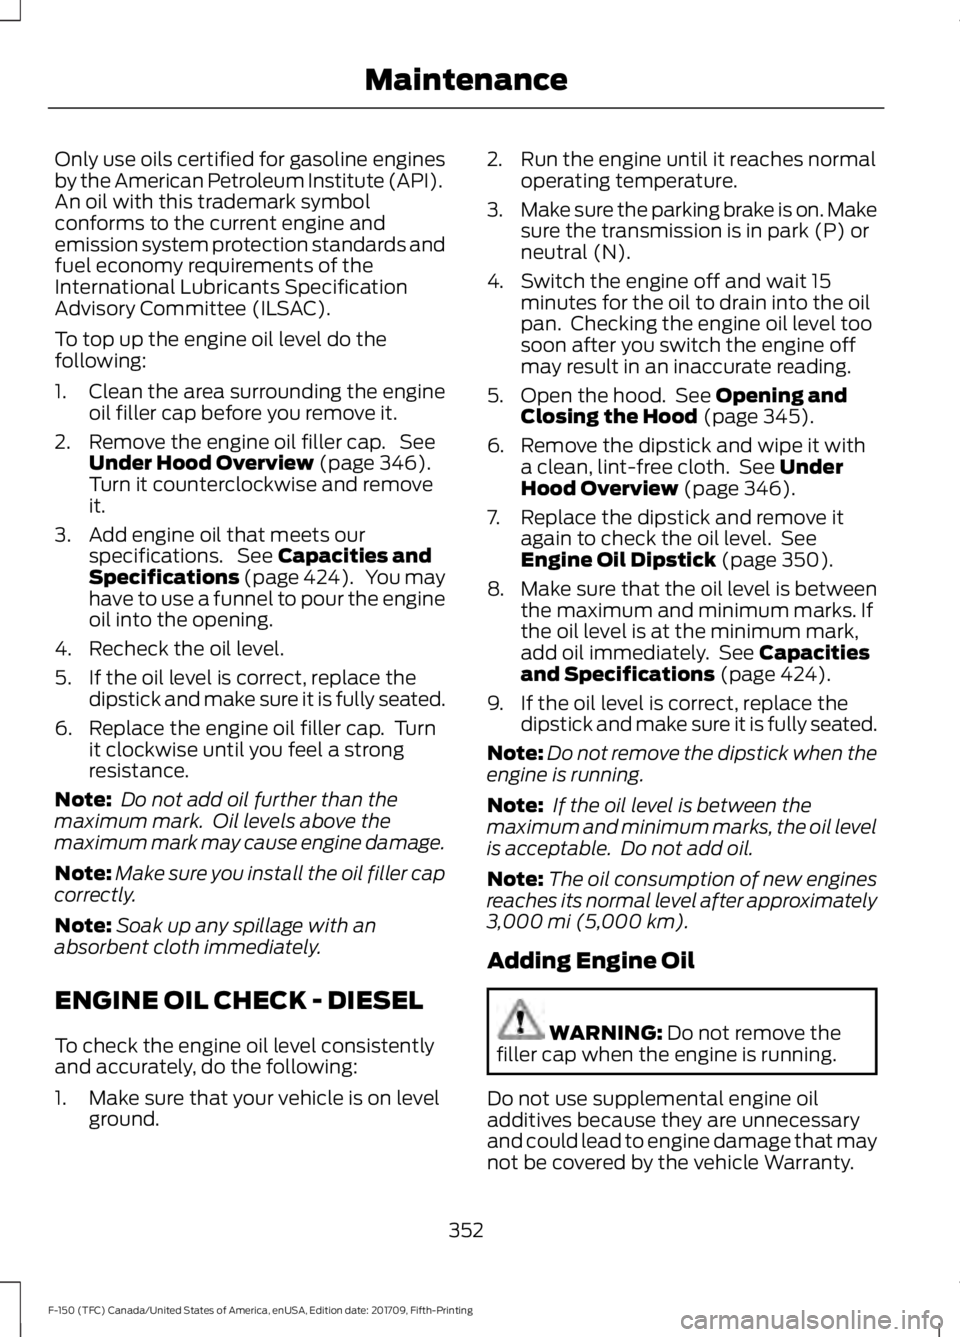
Only use oils certified for gasoline engines
by the American Petroleum Institute (API).
An oil with this trademark symbol
conforms to the current engine and
emission system protection standards and
fuel economy requirements of the
International Lubricants Specification
Advisory Committee (ILSAC).
To top up the engine oil level do the
following:
1. Clean the area surrounding the engine
oil filler cap before you remove it.
2. Remove the engine oil filler cap. See Under Hood Overview (page 346).
Turn it counterclockwise and remove
it.
3. Add engine oil that meets our specifications. See
Capacities and
Specifications (page 424). You may
have to use a funnel to pour the engine
oil into the opening.
4. Recheck the oil level.
5. If the oil level is correct, replace the dipstick and make sure it is fully seated.
6. Replace the engine oil filler cap. Turn it clockwise until you feel a strong
resistance.
Note: Do not add oil further than the
maximum mark. Oil levels above the
maximum mark may cause engine damage.
Note: Make sure you install the oil filler cap
correctly.
Note: Soak up any spillage with an
absorbent cloth immediately.
ENGINE OIL CHECK - DIESEL
To check the engine oil level consistently
and accurately, do the following:
1. Make sure that your vehicle is on level ground. 2. Run the engine until it reaches normal
operating temperature.
3. Make sure the parking brake is on. Make
sure the transmission is in park (P) or
neutral (N).
4. Switch the engine off and wait 15 minutes for the oil to drain into the oil
pan. Checking the engine oil level too
soon after you switch the engine off
may result in an inaccurate reading.
5. Open the hood. See
Opening and
Closing the Hood (page 345).
6. Remove the dipstick and wipe it with a clean, lint-free cloth. See
Under
Hood Overview (page 346).
7. Replace the dipstick and remove it again to check the oil level. See
Engine Oil Dipstick
(page 350).
8. Make sure that the oil level is between
the maximum and minimum marks. If
the oil level is at the minimum mark,
add oil immediately. See
Capacities
and Specifications (page 424).
9. If the oil level is correct, replace the dipstick and make sure it is fully seated.
Note: Do not remove the dipstick when the
engine is running.
Note: If the oil level is between the
maximum and minimum marks, the oil level
is acceptable. Do not add oil.
Note: The oil consumption of new engines
reaches its normal level after approximately
3,000 mi (5,000 km)
.
Adding Engine Oil WARNING:
Do not remove the
filler cap when the engine is running.
Do not use supplemental engine oil
additives because they are unnecessary
and could lead to engine damage that may
not be covered by the vehicle Warranty.
352
F-150 (TFC) Canada/United States of America, enUSA, Edition date: 201709, Fifth-Printing Maintenance
Page 361 of 641
The air conditioning may automatically
turn on and off during severe operating
conditions to protect the engine from
overheating. When the coolant
temperature decreases to the normal
operating temperature, the air conditioning
turns on.
If the coolant temperature gauge moves
fully into the red zone, or if the coolant
temperature warning or service engine
soon messages appear in your information
display, do the following:
1. Stop your vehicle as soon as it is safe
to do so. Fully apply the parking brake,
shift into park (P) or neutral (N).
2. Leave the engine running until the coolant temperature gauge needle
returns to the normal position. If the
temperature does not drop after
several minutes, follow the remaining
steps.
3. Switch the engine off and wait for it to
cool. Check the coolant level.
4. If the coolant level is at or below the minimum mark, add prediluted coolant
immediately.
5. If the coolant level is normal, restart the engine and continue.
AUTOMATIC TRANSMISSION
FLUID CHECK
If required, have an authorized dealer check
and change the transmission fluid at the
correct service interval. See Scheduled
Maintenance (page 561).
The automatic transmission does not have
a transmission fluid dipstick. Refer to your scheduled maintenance
information for scheduled intervals for fluid
checks and changes. Your transmission
does not consume fluid. However, if the
transmission slips, shifts slowly or if you
notice a sign of leaking fluid, contact an
authorized dealer.
Do not use supplemental transmission
fluid additives, treatments or cleaning
agents. The use of these materials may
affect transmission operation and result
in damage to internal transmission
components.
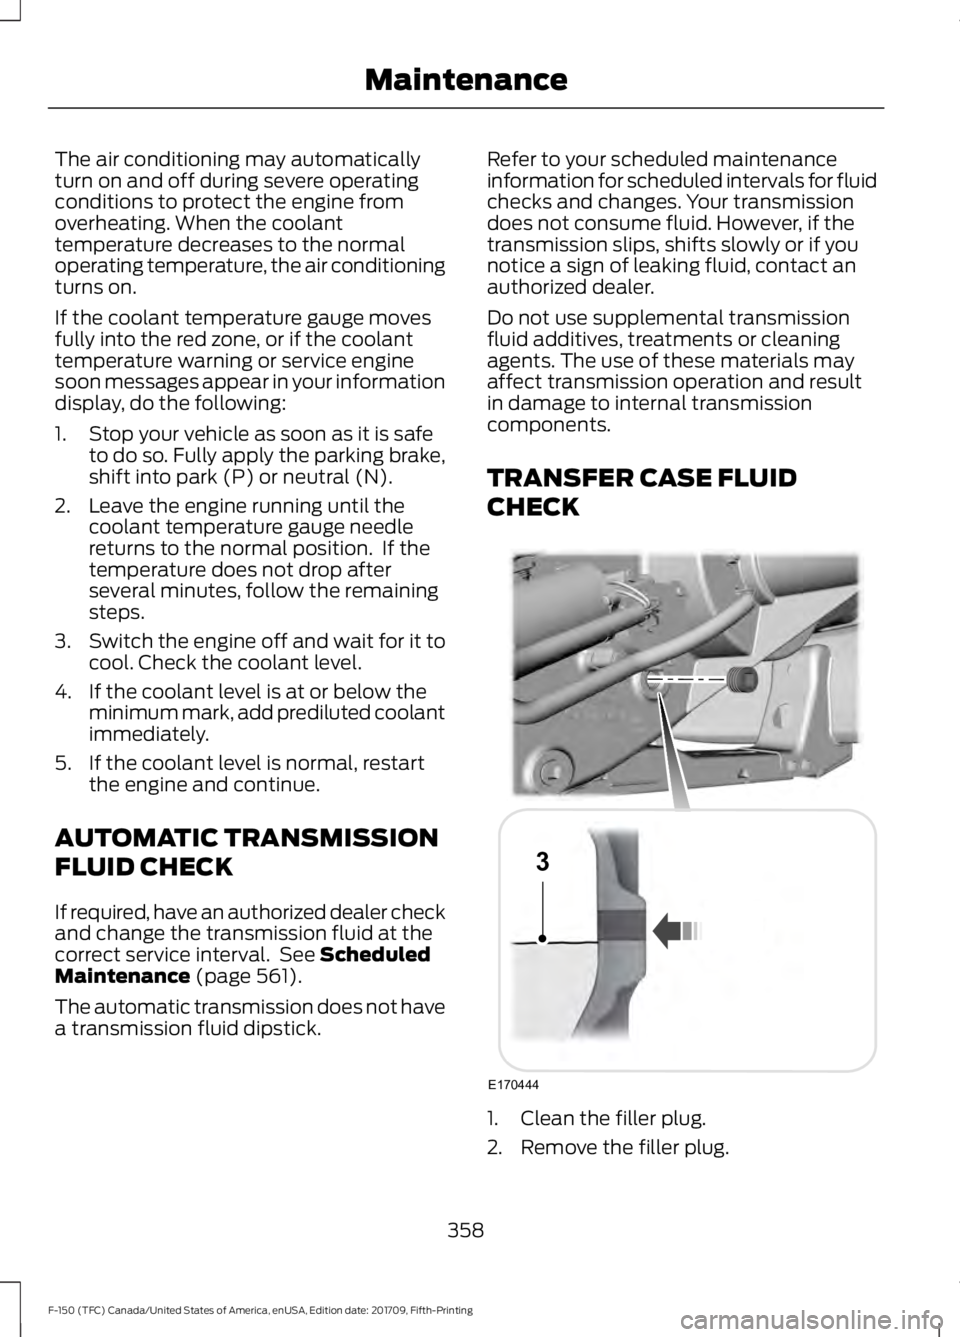
TRANSFER CASE FLUID
CHECK
1. Clean the filler plug.
2. Remove the filler plug.
358
F-150 (TFC) Canada/United States of America, enUSA, Edition date: 201709, Fifth-Printing MaintenanceE170444
3
Page 364 of 641

WARNING: Keep batteries out of
reach of children. Batteries contain
sulfuric acid. Avoid contact with skin,
eyes or clothing. Shield your eyes when
working near the battery to protect
against possible splashing of acid
solution. In case of acid contact with skin
or eyes, flush immediately with water for
a minimum of 15 minutes and get prompt
medical attention. If acid is swallowed,
call a physician immediately. WARNING:
Battery posts,
terminals and related accessories
contain lead and lead compounds,
chemicals known to the State of
California to cause cancer and
reproductive harm. Wash your hands
after handling
. WARNING: This vehicle may have
more than one battery. Removing the
battery cables from only one battery
does not disconnect your vehicle
electrical system. Make sure you
disconnect the battery cables from all
batteries when disconnecting power.
Failure to do so may cause serious
personal injury or property damage.
Your vehicle is fitted with a Motorcraft
maintenance-free battery which normally
does not require additional water.
When a battery replacement is required,
you must use a recommended
replacement battery that matches the
electrical requirements of the vehicle.
Note: After cleaning or replacing the
battery, make sure you reinstall the battery
cover or shield. Note:
If you add electrical accessories or
components to the vehicle, it may adversely
affect the low voltage battery performance
and durability. This may also affect the
performance of other electrical systems in
the vehicle.
For longer, trouble-free operation, keep the
top of the battery clean and dry.
If you see any corrosion on the battery or
terminals, remove the cables from the
terminals and clean with a wire brush. You
can neutralize the acid with a solution of
baking soda and water.
Because your vehicle ’s engine is
electronically controlled by a computer,
some control conditions are maintained
by power from the battery. When the
battery is disconnected or a new battery
is installed, the engine must relearn its idle
and fuel trim strategy for optimum
driveability and performance. Flexible fuel
vehicles (FFV) must also relearn the
ethanol content of the fuel for optimum
driveability and performance.
To restore the settings, do the following:
1. Apply the parking brake.
2. Shift into park (P) or neutral (N).
3. Switch off all accessories.
4. Press the brake pedal and start your vehicle.
5. Run the engine until it reaches normal operating temperature. While the
engine is warming up, complete the
following: Reset the clock. Reset the
power windows bounce-back feature.
See Windows and Mirrors (page 98).
Reset the radio station presets. See
Audio System
(page 448).
6. Allow the engine to idle for at least one
minute.
7. Drive the vehicle at least 10 mi (16 km)
to completely relearn the idle trim and
fuel trim strategy.
361
F-150 (TFC) Canada/United States of America, enUSA, Edition date: 201709, Fifth-Printing Maintenance
Page 372 of 641
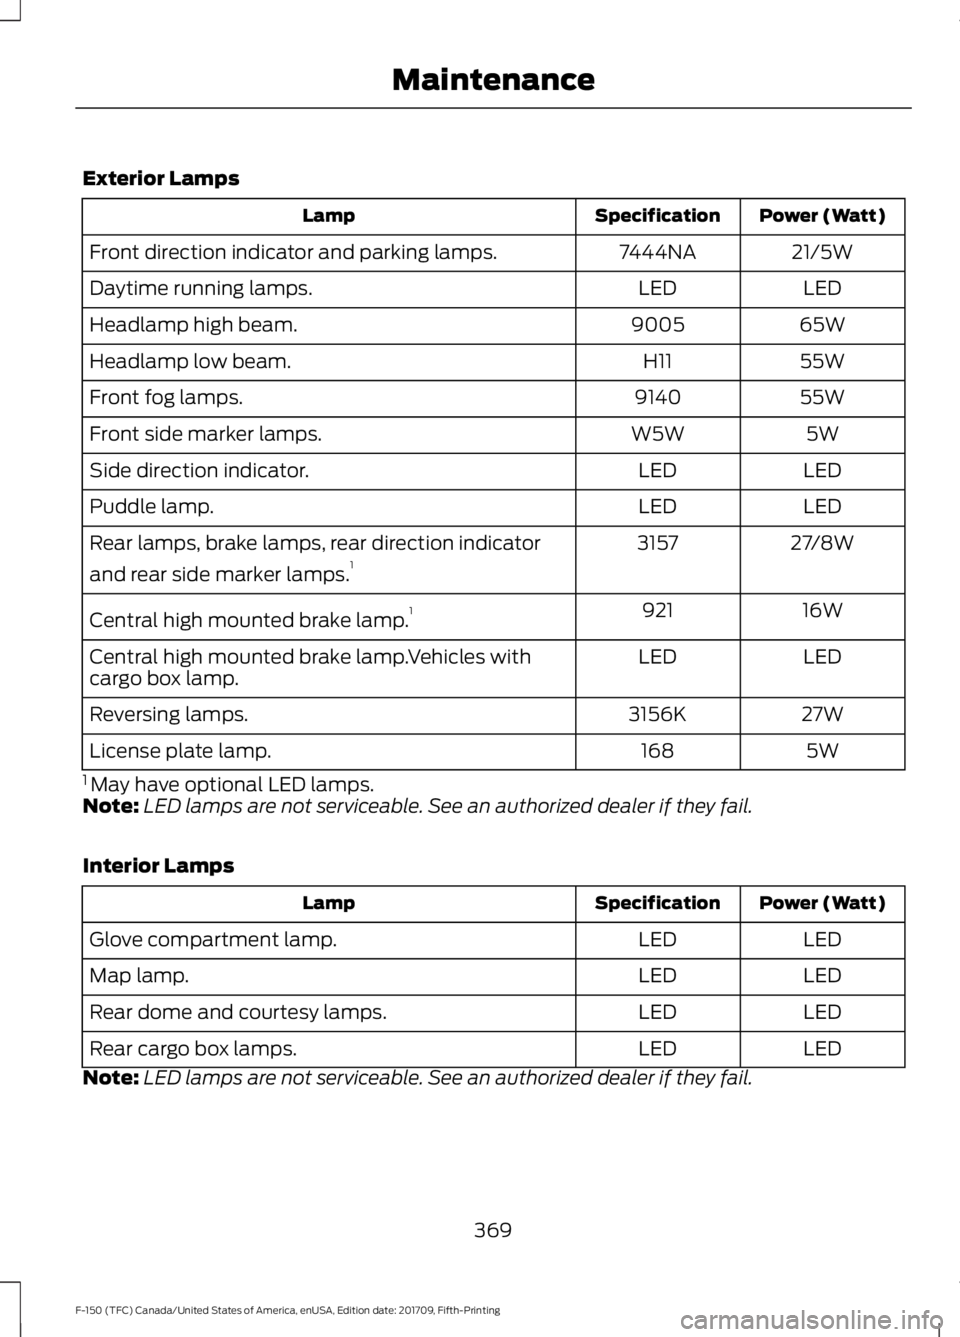
Exterior Lamps
Power (Watt)
Specification
Lamp
21/5W
7444NA
Front direction indicator and parking lamps.
LED
LED
Daytime running lamps.
65W
9005
Headlamp high beam.
55W
H11
Headlamp low beam.
55W
9140
Front fog lamps.
5W
W5W
Front side marker lamps.
LED
LED
Side direction indicator.
LED
LED
Puddle lamp.
27/8W
3157
Rear lamps, brake lamps, rear direction indicator
and rear side marker lamps. 1
16W
921
Central high mounted brake lamp. 1
LED
LED
Central high mounted brake lamp.Vehicles with
cargo box lamp.
27W
3156K
Reversing lamps.
5W
168
License plate lamp.
1 May have optional LED lamps.
Note: LED lamps are not serviceable. See an authorized dealer if they fail.
Interior Lamps Power (Watt)
Specification
Lamp
LED
LED
Glove compartment lamp.
LED
LED
Map lamp.
LED
LED
Rear dome and courtesy lamps.
LED
LED
Rear cargo box lamps.
Note: LED lamps are not serviceable. See an authorized dealer if they fail.
369
F-150 (TFC) Canada/United States of America, enUSA, Edition date: 201709, Fifth-Printing Maintenance