2018 FORD F-150 buttons
[x] Cancel search: buttonsPage 310 of 641
The controller user interface consists of
the following:
A: + and - (Gain adjustment buttons):
Pressing these buttons adjusts the
controller's power output to the trailer
brakes in 0.5 increments. You can increase
the gain setting to 10.0 (maximum trailer
braking) or decrease it to 0 (no trailer
braking). The gain setting displays in the
message center.
The controller shows gain setting, output
bar graph, and trailer connectivity status
in the information display. They appear in
the information display as follows:
• Trailer Brake Controller Gain (without
trailer connected): Shows the current
gain setting during a given ignition cycle
and when adjusting the gain. This also
displays if you use the manual control
lever or make gain adjustments with
no trailer connected.
• Trailer Brake Controller Gain Output:
Displays when you push your vehicle's
brake pedal, or upon use of the manual
control. Bar indicators illuminate in the
information display to indicate the
amount of power going to the trailer
brakes relative to the brake pedal or
manual control input. One bar indicates
the least amount of output; six bars
indicate maximum output.
• Trailer Connected: Displays when the
system senses a correct trailer wiring
connection (a trailer with electric trailer
brakes) during a given ignition cycle.
• Trailer Disconnected: Displays,
accompanied by a single audible time,
when the system senses a trailer
connection and then a disconnection,
either intentional or unintentional,
during a given ignition cycle. It also
displays if a truck or trailer-wiring fault
occurs causing the trailer to appear
disconnected. This message can also
display if you use the manual control lever without a trailer connected. After
disconnecting the trailer connector,
press the brake pedal for
approximately five seconds to allow
the system to detect and update the
trailer status.
B:
Manual control lever: Slide the control
lever to the left to turn on the trailer's
electric brakes independent of the tow
vehicle's. See the following Procedure for
adjusting gain section for instructions on
proper use of this feature. If you use the
manual control while the brake is also
applied, the greater of the two inputs
determines the power sent to the trailer
brakes.
• Stop lamps: Using the manual control
lever illuminates both the trailer brake
lamps and your vehicle brake lamps
except the center high-mount stop
lamp, if you make the proper electrical
connection to the trailer. Pressing your
vehicle brake pedal also illuminates
both trailer and vehicle brake lamps.
Procedure for Setting Trailer Brake
Controller Mode
Select the correct option using the
information display. Choose electric for
trailers with electromagnetic drum brakes
or EOH for trailers with electric over
hydraulic brake systems. See Information
Displays
(page 113).
Trailer Brake Effort Setting
The trailer brake controller allows the user
to customize how aggressively the trailer
brakes engage. The default value is "Low"
and is the recommended setting for most
trailers. If your trailer's brakes require more
initial voltage, or if you prefer more
aggressive trailer braking, then select either
the "Medium" or the "High" setting.
307
F-150 (TFC) Canada/United States of America, enUSA, Edition date: 201709, Fifth-Printing Towing
Page 311 of 641
Procedure for Adjusting Gain
Note:
Only perform this procedure in a
traffic-free environment at speeds of
approximately 20– 25 mph (30–40 km/h).
The gain setting sets the trailer brake
controller for the specific towing condition.
You should change the setting as towing
conditions change. Changes to towing
conditions include trailer load, vehicle load,
road conditions and weather.
The gain should be set to provide the
maximum trailer braking assistance while
making sure the trailer wheels do not lock
when using the brakes. Locked trailer
wheels may lead to trailer instability.
1. Make sure the trailer brakes are in good
working condition, functioning normally
and properly adjusted. See your trailer
dealer if necessary.
2. Hook up the trailer and make the electrical connections according to the
trailer manufacturer's instructions.
3. When you plug in a trailer with electric or electric-over-hydraulic brakes, a
message confirming connection
appears in the information display.
4. Use the gain adjustment (+ and -) buttons to increase or decrease the
gain setting to the desired starting
point. A gain setting of 6.0 is a good
starting point for heavier loads.
5. In a traffic-free environment, tow the trailer on a dry, level surface at a speed
of
20– 25 mph (30–40 km/h) and
squeeze the manual control lever
completely. 6. If the trailer wheels lock up, indicated
by squealing tires, reduce the gain
setting. If the trailer wheels turn freely,
increase the gain setting. Repeat Steps
5 and 6 until the gain setting is at a
point just below trailer wheel lock-up.
If towing a heavier trailer, trailer wheel
lock-up may not be attainable even
with the maximum gain setting of 10.
Explanation of Information Display
Warning Messages
Note: An authorized dealer can diagnose
the trailer brake controller to determine
exactly which trailer fault has occurred.
However, your Ford warranty does not cover
this diagnosis if the fault is with the trailer.
A message indicating a trailer brake
module fault may display in response to
faults sensed by the trailer brake controller,
accompanied by a single tone. If this
message appears, contact an authorized
dealer as soon as possible for diagnosis
and repair. The controller may still
function, but performance may be
degraded.
A message indicating a trailer wiring fault
may display when there is a short circuit
on the electric brake output wire. If this
message displays, accompanied by a
single tone, with no trailer connected, the
problem is with your vehicle wiring
between the trailer brake controller and
the 7-pin connector at the bumper. If the
message only displays with a trailer
connected, the problem is with the trailer
wiring. Consult your trailer dealer for
assistance. This can be a short to ground
(such as a chaffed wire), short to voltage
(such as a pulled pin on trailer emergency
breakaway battery) or the trailer brakes
may be drawing too much current.
308
F-150 (TFC) Canada/United States of America, enUSA, Edition date: 201709, Fifth-Printing Towing
Page 453 of 641
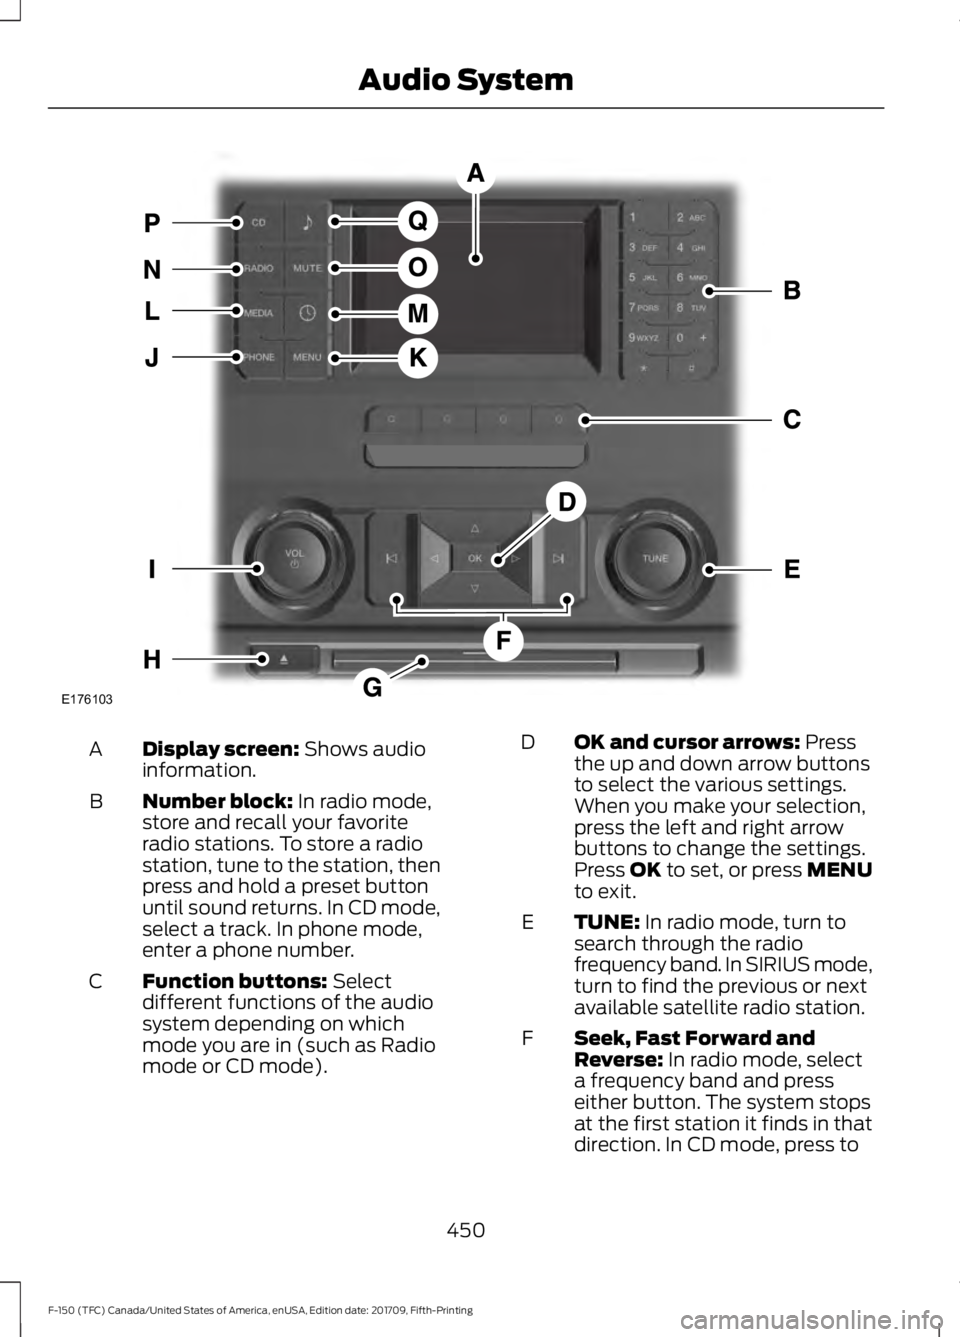
Display screen: Shows audio
information.
A
Number block:
In radio mode,
store and recall your favorite
radio stations. To store a radio
station, tune to the station, then
press and hold a preset button
until sound returns. In CD mode,
select a track. In phone mode,
enter a phone number.
B
Function buttons:
Select
different functions of the audio
system depending on which
mode you are in (such as Radio
mode or CD mode).
C OK and cursor arrows:
Press
the up and down arrow buttons
to select the various settings.
When you make your selection,
press the left and right arrow
buttons to change the settings.
Press OK to set, or press MENU
to exit.
D
TUNE:
In radio mode, turn to
search through the radio
frequency band. In SIRIUS mode,
turn to find the previous or next
available satellite radio station.
E
Seek, Fast Forward and
Reverse:
In radio mode, select
a frequency band and press
either button. The system stops
at the first station it finds in that
direction. In CD mode, press to
F
450
F-150 (TFC) Canada/United States of America, enUSA, Edition date: 201709, Fifth-Printing Audio SystemE176103
Page 454 of 641

select the next or previous track.
Press and hold to move quickly
forward or backward through the
current track. In satellite mode,
press to select the next or
previous satellite radio station.
If you select a specific category
(such as jazz, rock or news),
press to find the next or previous
station in the category you
select.
CD slot: Insert a CD.
G
Eject:
Press to eject a CD.
H
Vol and Power:
Turn to adjust
the volume. Press to switch the
system on and off.
I
PHONE:
Press to access the
phone features.
J
MENU: Press to access different
audio system features. See
Menu Structure
.
K
MEDIA
Press to open the media
source menu. You can press this
multiple times to change to CD
or scroll through the media
sources using the arrow buttons.
Press
OK to select a source.
L
CLOCK
Press to access the
clock setting. Use the center
arrow controls to change the
hours and minutes. You can also
set the clock by pressing MENU
and scrolling to Clock Settings.
M RADIO
Press to listen to the
radio or change radio stations.
Press the function buttons
below the radio screen to select
different radio functions. Press
and hold to select the autostore
function. Press to return to the
main screen of the active radio
band.
N
MUTE
Press to mute the playing
audio.
O
CD
Press to listen to a CD. Press
the function buttons below the
radio screen to select on-screen
options of Repeat or Shuffle.
P
SOUND:
Press to access
settings for Treble, Midrange,
Bass, Fade and Balance. Use the
up and down arrow buttons to
select the various settings. When
you make your selection, press
Q
the left and right arrow buttons
to change the settings. Press OK
to set or press
MENU to exit.
Sound settings can be set for
each audio source
independently.
Menu Structure
Note: Depending on your system, some
options may appear slightly different.
Press
MENU.
Press the up and down arrow buttons to
scroll through the options.
Press the right arrow to enter a menu.
Press the left arrow to exit a menu.
Press
OK to confirm a selection.
451
F-150 (TFC) Canada/United States of America, enUSA, Edition date: 201709, Fifth-Printing Audio System
Page 470 of 641
7. When prompted on your cell phone
’s
display, confirm that the PIN provided
by SYNC matches the PIN displayed
on your cell phone. Your phone is now
paired and the display indicates that
the pairing was successful. If you are
prompted to enter a PIN on your device,
enter the PIN displayed on the screen.
The display indicates when the pairing
is successful.
Depending on your phone's capability and
your market, the system may prompt you
with questions, such as setting the current
phone as the primary phone and
downloading your phonebook.
Using Voice Commands Make sure to switch on your
phone's Bluetooth feature
before starting the search. See
your device's manual if necessary.
Press the voice button and when
prompted say: Action and Descrip-
tion
Voice Command
Follow the instruc-
tions on the audio
display.
Pair Phone
Phone Voice Commands Press the voice button. You can
do things like place a phone call
and access text messages.
When prompted, say a command. See the
following table for example commands. Voice Command
___ List of Commands
Help
Call ___
Dial ___
Text Messages
__ is a dynamic listing, meaning that it
could be the name of anything, such as a
contact or phone number.
Phone Controls
Use the phone buttons on your steering
wheel to answer, reject, or hang up a call.
Accessing Features through the
Phone Menu
You can access your call history,
phonebook, sent text messages, as well
as access phone and system settings.
1. Press the PHONE button to enter the
phone menu.
2. Scroll through the menu to view contacts, text messages, and the
phone dialer.
SYNC™ APPLICATIONS AND
SERVICES
• 911 Assist: Can alert 911 in the event of
an emergency.
• SYNC AppLink: Allows you to connect
to and use certain applications (if your
phone is compatible).
These features may require activation.
Available AppLink enabled apps vary by
market.
467
F-150 (TFC) Canada/United States of America, enUSA, Edition date: 201709, Fifth-Printing SYNC™
(If Equipped)E142599 E142599
Page 478 of 641
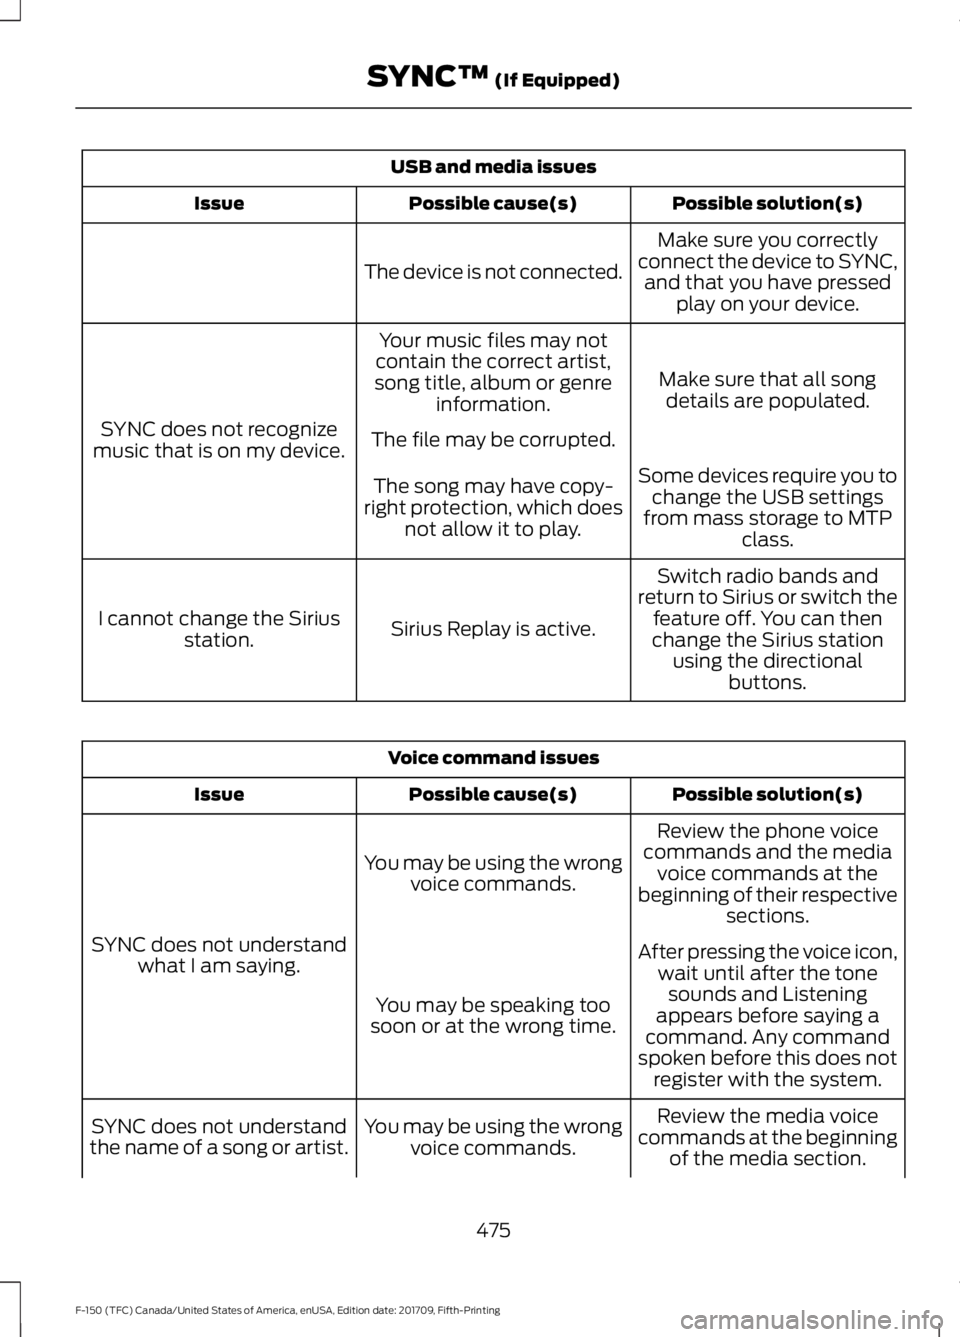
USB and media issues
Possible solution(s)
Possible cause(s)
Issue
Make sure you correctly
connect the device to SYNC, and that you have pressed play on your device.
The device is not connected.
Make sure that all songdetails are populated.
Your music files may not
contain the correct artist,
song title, album or genre information.
SYNC does not recognize
music that is on my device. The file may be corrupted.
Some devices require you tochange the USB settings
from mass storage to MTP class.
The song may have copy-
right protection, which does not allow it to play.
Switch radio bands and
return to Sirius or switch the feature off. You can then
change the Sirius station using the directional buttons.
Sirius Replay is active.
I cannot change the Sirius
station. Voice command issues
Possible solution(s)
Possible cause(s)
Issue
Review the phone voice
commands and the media voice commands at the
beginning of their respective sections.
You may be using the wrong
voice commands.
SYNC does not understand what I am saying. After pressing the voice icon,
wait until after the tonesounds and Listening
appears before saying a
command. Any command
spoken before this does not register with the system.
You may be speaking too
soon or at the wrong time.
Review the media voice
commands at the beginning of the media section.
You may be using the wrong
voice commands.
SYNC does not understand
the name of a song or artist.
475
F-150 (TFC) Canada/United States of America, enUSA, Edition date: 201709, Fifth-Printing SYNC™ (If Equipped)
Page 482 of 641
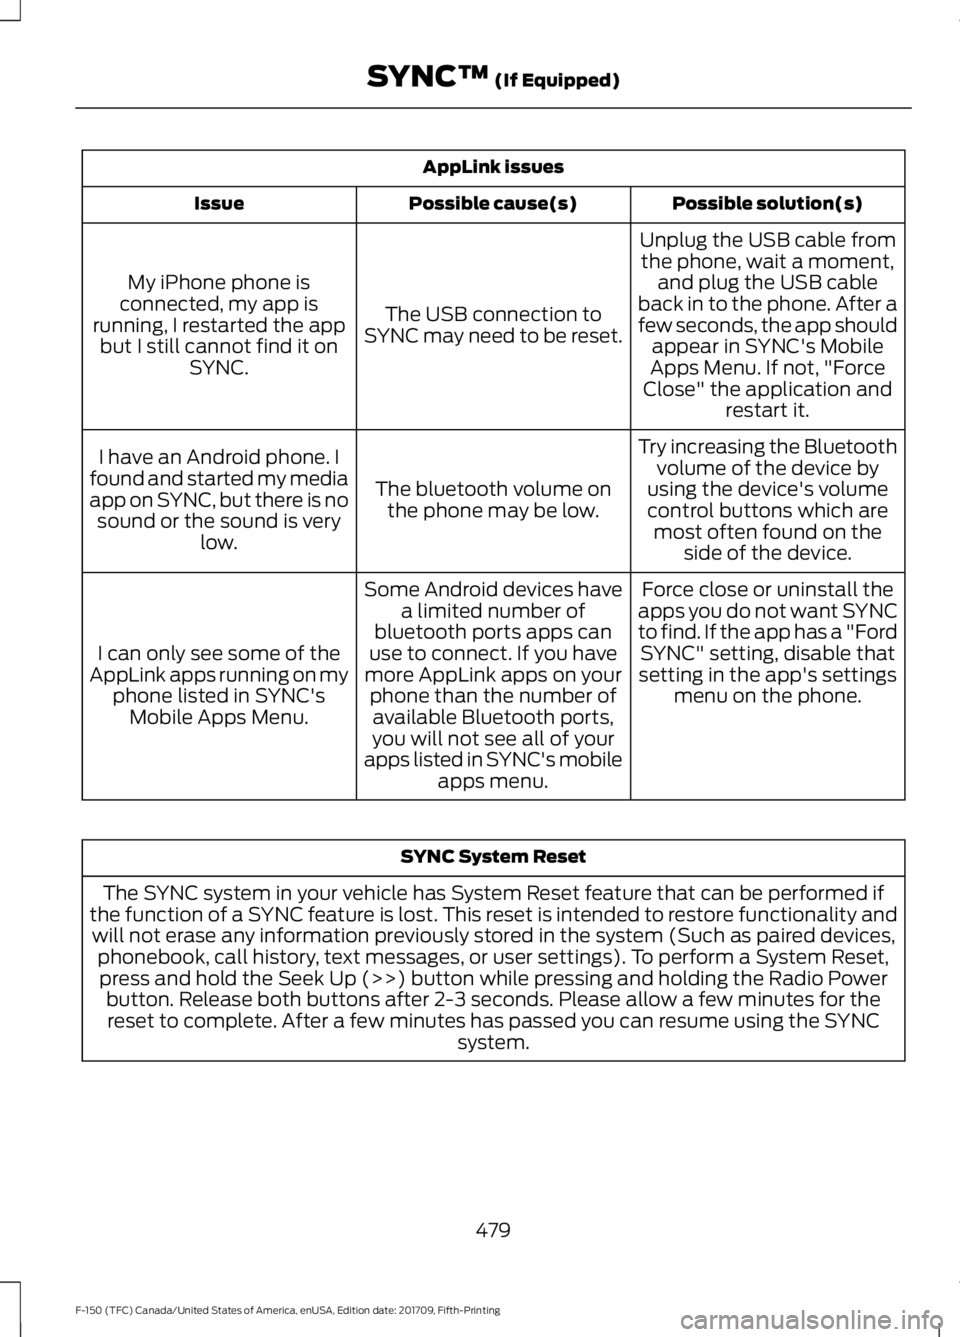
AppLink issues
Possible solution(s)
Possible cause(s)
Issue
Unplug the USB cable fromthe phone, wait a moment, and plug the USB cable
back in to the phone. After a
few seconds, the app should appear in SYNC's Mobile
Apps Menu. If not, "Force
Close" the application and restart it.
The USB connection to
SYNC may need to be reset.
My iPhone phone is
connected, my app is
running, I restarted the app but I still cannot find it on SYNC.
Try increasing the Bluetoothvolume of the device by
using the device's volume control buttons which are most often found on the side of the device.
The bluetooth volume on
the phone may be low.
I have an Android phone. I
found and started my media
app on SYNC, but there is no sound or the sound is very low.
Force close or uninstall the
apps you do not want SYNC
to find. If the app has a "Ford SYNC" setting, disable that
setting in the app's settings menu on the phone.
Some Android devices have
a limited number of
bluetooth ports apps can
use to connect. If you have
more AppLink apps on your phone than the number ofavailable Bluetooth ports,
you will not see all of your
apps listed in SYNC's mobile apps menu.
I can only see some of the
AppLink apps running on my phone listed in SYNC'sMobile Apps Menu. SYNC System Reset
The SYNC system in your vehicle has System Reset feature that can be performed if
the function of a SYNC feature is lost. This reset is intended to restore functionality and will not erase any information previously stored in the system (Such as paired devices, phonebook, call history, text messages, or user settings). To perform a System Reset,press and hold the Seek Up (>>) button while pressing and holding the Radio Power button. Release both buttons after 2-3 seconds. Please allow a few minutes for thereset to complete. After a few minutes has passed you can resume using the SYNC system.
479
F-150 (TFC) Canada/United States of America, enUSA, Edition date: 201709, Fifth-Printing SYNC™ (If Equipped)
Page 484 of 641

Action and Description
Menu Item
Item
This bar displays icons and messages pertaining to current
system activities including climate settings, voice
commands and phone functions such as text messages.
Status Bar
A
This button is available on the main screens. Pressing it
takes you to the home screen view.
Home
B
This shows the current time. You can set the clock manually
or have it controlled by the vehicle's GPS location. See
Settings (page 528).
Clock
C
This displays the current outside temperature.
Outside
Temperature
D
You can touch any of the buttons on this bar to select a
feature.
Feature Bar
E
The touchscreen allows you quick access
to all of your comfort, navigation,
communication and entertainment
options. Using the status and feature bar
you can quickly select the feature you want
to use.
Note: Your system is equipped with a
feature that allows you to access and
control audio features for 10 minutes after
you switch the ignition off (and no doors
open). The Status Bar
Additional icons also display in the status
bar depending on market, vehicle options
and current operation. If a feature is not
active, the icon does not display. Certain
icons may move to the left or right
depending on what options are active.
481
F-150 (TFC) Canada/United States of America, enUSA, Edition date: 201709, Fifth-Printing SYNC™ 3
(If Equipped)