2018 FORD F-150 engine
[x] Cancel search: enginePage 382 of 641

Conditioning
Bottles of King Ranch Leather Conditioner
are available at the King Ranch Saddle
Shop. Visit the website at
www.krsaddleshop.com, or call
1–800–
282–KING (5464) in the United
States. If you are unable to obtain King
Ranch Leather Conditioner, use another
premium leather conditioner.
• Clean the surfaces using the steps
outlined in the Cleaning section.
• Make sure the leather is dry then apply
a nickel-sized amount of conditioner
to a clean, dry cloth.
• Rub the conditioner into the leather
until it disappears. Allow the
conditioner to dry, then repeat the
process for the entire interior. If a film
appears, wipe it off with a dry, clean
cloth.
REPAIRING MINOR PAINT
DAMAGE
Authorized dealers have touch-up paint to
match your vehicle ’s color. Your vehicle
color code is printed on a sticker on the
front, left-hand side door jamb. Take your
color code to your authorized dealer to
make sure you get the correct color.
Before repairing minor paint damage, use
a cleaner such as Motorcraft Bug and Tar
Remover to remove particles such as bird
droppings, tree sap, insect deposits, tar
spots, road salt and industrial fallout.
Always read the instructions before using
cleaning products. CLEANING THE WHEELS (IF
EQUIPPED)
1. Regularly clean them with a wheel cleaner. We recommend that you use
Ford approved wheel cleaner if
available.
2. Remove dirt and brake dust with a sponge.
3. Remove tar and grease with a bug and
tar remover. We recommend that you
use Ford approved bug and tar remover
if available.
4. Thoroughly rinse the wheels with water
after cleaning.
If you intend on parking your vehicle for an
extended period after cleaning the wheels
with a wheel cleaner, drive your vehicle for
a few minutes before doing so. This
reduces the risk of corrosion of the brake
discs, brake pads and linings.
Do not clean the wheels when they are hot.
Note: Some car washes could damage
wheel rims and covers.
Note: Using non-recommended cleaners,
harsh cleaning products, chrome wheel
cleaners or abrasive materials could
damage wheel rims and covers.
VEHICLE STORAGE
If you plan on storing your vehicle for 30
days or more, read the following
maintenance recommendations to make
sure your vehicle stays in good operating
condition.
We engineer and test all motor vehicles
and their components for reliable, regular
driving. Under various conditions,
long-term storage may lead to degraded
engine performance or failure unless you
use specific precautions to preserve engine
components.
379
F-150 (TFC) Canada/United States of America, enUSA, Edition date: 201709, Fifth-Printing Vehicle Care
Page 383 of 641

General
•
Store all vehicles in a dry, ventilated
place.
• Protect from sunlight, if possible.
• If vehicles are stored outside, they
require regular maintenance to protect
against rust and damage.
Body
• Wash your vehicle thoroughly to
remove dirt, grease, oil, tar or mud from
exterior surfaces, rear-wheel housing
and the underside of front fenders.
• Periodically wash your vehicle if it is
stored in exposed locations.
• Touch-up exposed or primed metal to
prevent rust.
• Cover chrome and stainless steel parts
with a thick coat of auto wax to prevent
discoloration. Re-wax as necessary
when you wash your vehicle.
• Lubricate all hood, door and luggage
compartment hinges and latches with
a light grade oil.
• Cover interior trim to prevent fading.
• Keep all rubber parts free from oil and
solvents.
Engine
• Change the engine oil and filter prior to
storage because used engine oil
contains contaminates which may
cause engine damage.
• Start the engine every 15 days for a
minimum of 15 minutes. Run at fast idle
with the climate controls set to defrost
until the engine reaches normal
operating temperature. •
With your foot on the brake, shift
through all the gears while the engine
is running.
• We recommend that you change the
engine oil before you use your vehicle
again.
Fuel system
• Fill the fuel tank with high-quality fuel
until the first automatic shutoff of the
fuel pump nozzle.
Cooling system
• Protect against freezing temperatures.
• When removing your vehicle from
storage, check coolant fluid level.
Confirm that there are no cooling
system leaks and that fluid is at the
recommended level.
Battery
• Check and recharge as necessary. Keep
connections clean.
• If storing your vehicle for more than 30
days without recharging the battery,
we recommend that you disconnect
the battery cables to maintain battery
charge for quick starting.
Note: It is necessary to reset memory
features if battery cables are disconnected.
Brakes
• Make sure the brakes and parking brake
release fully.
Tires
• Maintain recommended air pressure.
380
F-150 (TFC) Canada/United States of America, enUSA, Edition date: 201709, Fifth-Printing Vehicle Care
Page 407 of 641

System reset tips:
•
To reduce the chances of interference
from another vehicle, perform the
system reset procedure at least three
feet, one meter, away from another
Ford Motor Company vehicle
undergoing the system reset procedure
at the same time.
• Do not wait more than two minutes
between resetting each tire sensor or
the system can time-out and you need
to repeat the entire procedure on all
four wheels.
• A double horn sounds indicating the
need to repeat the procedure.
Performing the System Reset Procedure
Read the entire procedure before
attempting.
1. Drive the vehicle above 20 mph
(32 km/h) for at least two minutes,
then park in a safe location where you
can easily get to all four tires and have
access to an air pump.
2. Place the ignition in the off position and
keep the key in the ignition.
3. Cycle the ignition to the on position with the engine off.
4. Switch the hazard flashers on then off three times. You must accomplish this
within 10 seconds. If you successfully
enter the reset mode, the horn sounds
once, the system indicator flashes and
a message shows in the information
display. If this does not occur, please
try again starting at Step 2. If after
repeated attempts to enter the reset
mode, the horn does not sound, the
system indicator does not flash and no
message shows in the information
display, seek service from your
authorized dealer. 5. Train the tire pressure monitoring
system sensors in the tires using the
following system reset sequence
starting with the left front tire in the
following clockwise order: Left front -
driver side front tire, Right front -
passenger side front tire, Right rear -
passenger side rear tire - Left rear,
driver side rear tire.
6. Remove the valve cap from the valve stem on the left front tire. Decrease the
air pressure until the horn sounds.
Note: The single horn tone confirms that
the sensor identification code has been
learned by the module for this position. If a
double horn is heard, the reset procedure
was unsuccessful, and you must repeat it.
7. Remove the valve cap from the valve stem on the right front tire. Decrease
the air pressure until the horn sounds.
8. Remove the valve cap from the valve stem on the right rear tire. Decrease the
air pressure until the horn sounds.
9. Remove the valve cap from the valve stem on the left rear tire. Decrease the
air pressure until the horn sounds.
Training is complete after the horn
sounds for the last tire trained, driver
side rear tire, the system indicator
stops flashing, and a message shows
in the information display.
10. Turn the ignition off. If two short horn
beeps are heard, the reset procedure
was unsuccessful and you must
repeat it. If after repeating the
procedure and two short beeps are
heard when the ignition is turned to
off, seek assistance from your
authorized dealer.
404
F-150 (TFC) Canada/United States of America, enUSA, Edition date: 201709, Fifth-Printing Wheels and Tires
Page 410 of 641

WARNING: The jack should be
used on level firm ground wherever
possible. WARNING:
Check that the vehicle
jack is not damaged or deformed and
the thread is lubricated and clean. WARNING:
Never place anything
between the vehicle jack and the ground. WARNING:
Never place anything
between the vehicle jack and your
vehicle. WARNING:
It is recommended
that the wheels of the vehicle be
chocked, and that no person should
remain in a vehicle that is being jacked. WARNING:
Switch off the running
boards before jacking or placing any
object under your vehicle. Never place
your hand between the extended running
board and your vehicle. A moving running
board may cause injury.
Note: Only use the spare tire carrier to stow
the tire and wheel combination provided
with your vehicle. Other tire and wheel
combinations can cause the tire carrier to
fail.
Note: Do not use impact tools or power
tools operating at over 200 RPM on the
spare tire carrier, this may cause a winch
malfunction and prevent a secure fit.
Override the winch at least three times,
there's an audible click each time, to make
sure the wheel and tire have been tightened
securely.
Note: Passengers should not remain in the
vehicle when the vehicle is being jacked. Park on a level surface, activate the hazard
flashers and set the parking brake. Then,
place the transmission in park (P) and turn
the engine off.
Remove the Vehicle Jack and Tool
Bag
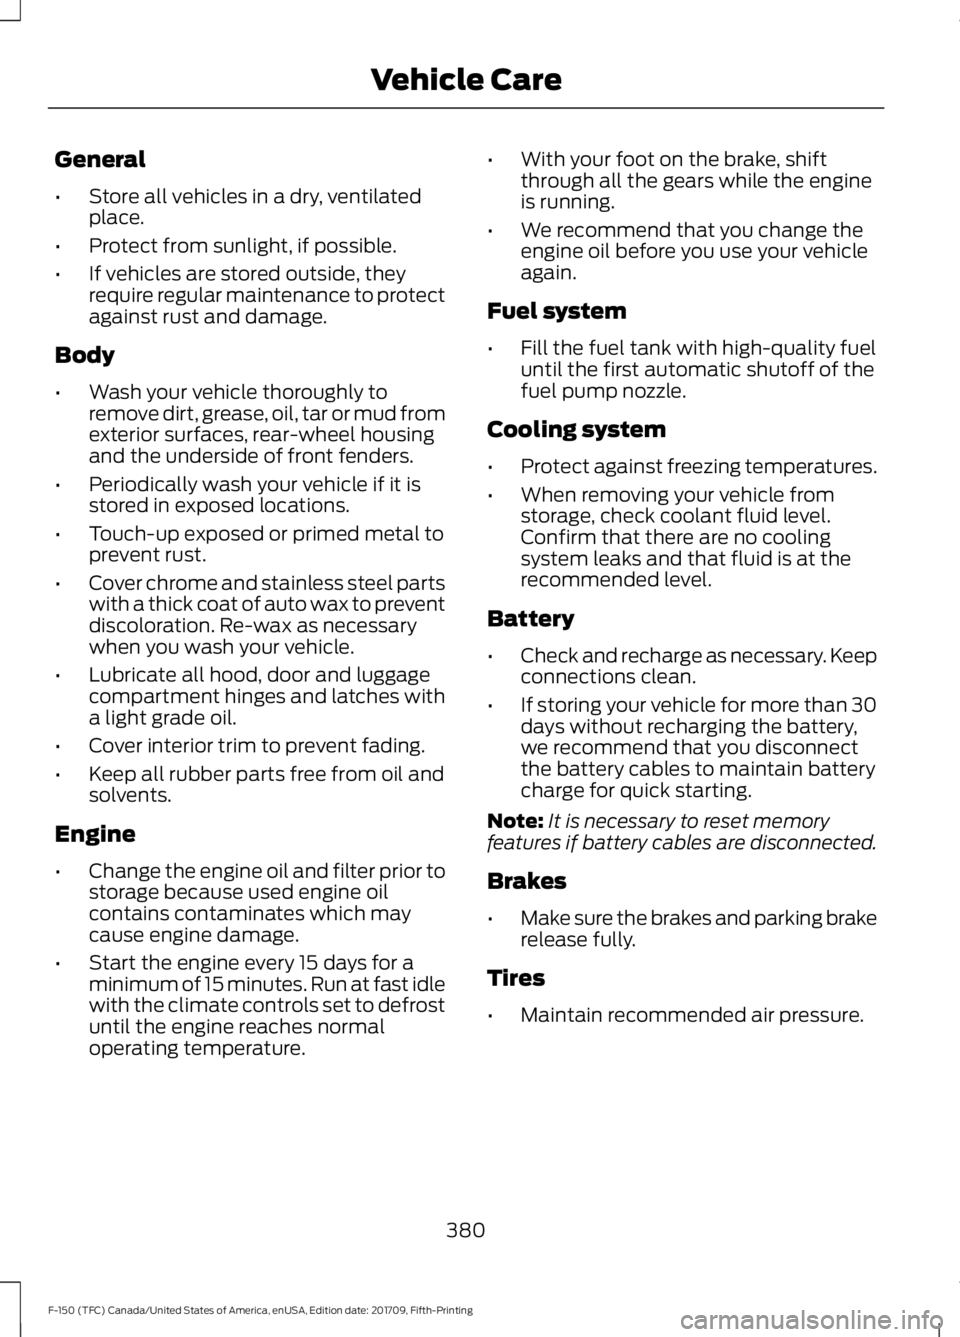
The vehicle jack and tool bag are on the
rear passenger side of your vehicle, behind
the passenger seat.
1. Remove the foam top.
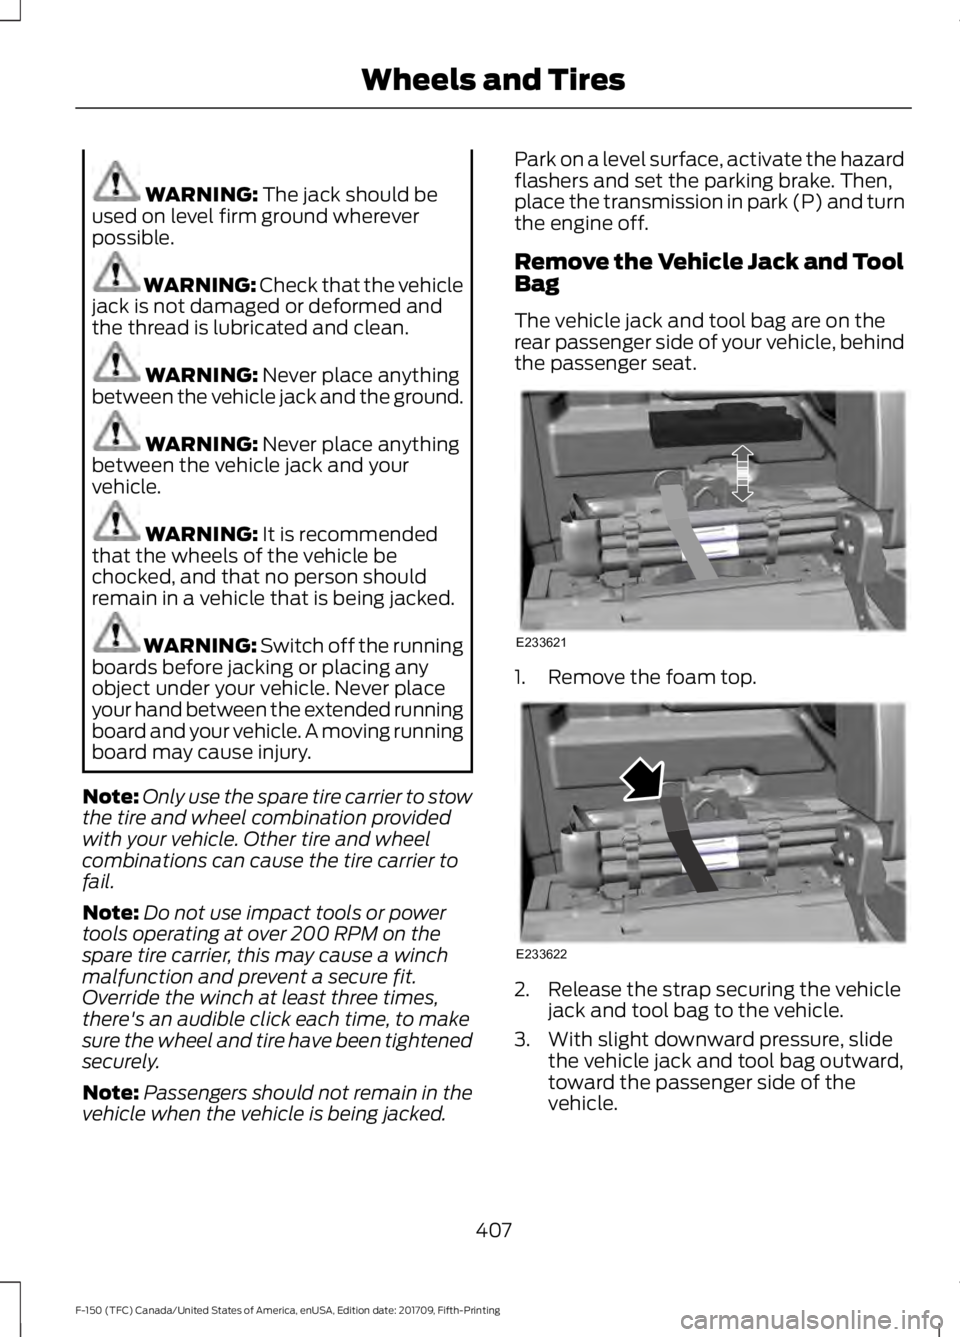
2. Release the strap securing the vehicle
jack and tool bag to the vehicle.
3. With slight downward pressure, slide the vehicle jack and tool bag outward,
toward the passenger side of the
vehicle.
407
F-150 (TFC) Canada/United States of America, enUSA, Edition date: 201709, Fifth-Printing Wheels and TiresE233621 E233622
Page 418 of 641

ENGINE SPECIFICATIONS - 2.7L ECOBOOST™
Specification
Measurement
164
Cubic inches
1-4-2-5-3-6
Firing order
Coil on plug
Ignition system
.028-.031 in. (0.7 - 0.8 mm)
Spark plug gap
10.3:1
Compression ratio
Drivebelt Routing ENGINE SPECIFICATIONS - 3.0L V6, DIESEL
Specification
Measurement
183
Cubic inches
Ultra Low Sulfur Diesel
Required Fuel
1-4-2-5-3-6
Firing order
16:1
Compression ratio
415
F-150 (TFC) Canada/United States of America, enUSA, Edition date: 201709, Fifth-Printing Capacities and SpecificationsE176088
Page 419 of 641

Drivebelt Routing
ENGINE SPECIFICATIONS - 3.3L DURATEC - V6
Specification
Measurement
201
Cubic inches
1-4-2-5-3-6
Firing order
Coil on plug
Ignition system
.049-.053 in. (1.25 - 1.35 mm)
Spark plug gap
12:1
Compression ratio
Drivebelt Routing ENGINE SPECIFICATIONS - 3.5L ECOBOOST™
416
F-150 (TFC) Canada/United States of America, enUSA, Edition date: 201709, Fifth-Printing Capacities and SpecificationsE249449 E167467
Page 420 of 641

Specification
Measurement
213
Cubic inches
1-4-2-5-3-6
Firing order
Coil on plug
Ignition system
.030-.033 in. (0.75 - 0.85 mm)
Spark plug gap
10.5:1
Compression ratio
Drivebelt Routing ENGINE SPECIFICATIONS - 5.0L MODULAR - V8
Specification
Measurement
307
Cubic inches
1-3-7-2-6-5-4-8
Firing order
Coil on plug, coil near plug
Ignition system
.049-.053 in. (1.25 - 1.35 mm)
Spark plug gap
12:1
Compression ratio
417
F-150 (TFC) Canada/United States of America, enUSA, Edition date: 201709, Fifth-Printing Capacities and SpecificationsE263466
Page 421 of 641

Drivebelt Routing
MOTORCRAFT PARTS - 2.7L ECOBOOST™
Part Number
Component
FA-1883
Air filter element.
FL-2062
Oil filter.
FT-188
Transmission oil filter.
BAGM-48H6-760
Battery.
BAGM-94RH7-800SP-542
Spark plugs.
WW-2247
Windshield wiper blade.
FP-79
Cabin air filter.
For scheduled maintenance, we
recommend Motorcraft® replacement
parts available at your authorized dealer
or at fordparts.com. The parts engineered
for your vehicle meet or exceed our
specifications. Use of other parts may
impact vehicle performance, emissions
and durability. Your warranty may be void
for any damage related to use of other
parts. If a Motorcraft® oil filter is not available,
use an oil filter that meets industry
performance specification
SAE/USCAR-36.
For spark plug replacement, contact an
authorized dealer. Replace the spark plugs
at the appropriate intervals. See
Scheduled Maintenance (page 561).
MOTORCRAFT PARTS - 3.0L V6, DIESEL 418
F-150 (TFC) Canada/United States of America, enUSA, Edition date: 201709, Fifth-Printing Capacities and SpecificationsE249450