2018 FORD F-150 fuel
[x] Cancel search: fuelPage 383 of 641
General
•
Store all vehicles in a dry, ventilated
place.
• Protect from sunlight, if possible.
• If vehicles are stored outside, they
require regular maintenance to protect
against rust and damage.
Body
• Wash your vehicle thoroughly to
remove dirt, grease, oil, tar or mud from
exterior surfaces, rear-wheel housing
and the underside of front fenders.
• Periodically wash your vehicle if it is
stored in exposed locations.
• Touch-up exposed or primed metal to
prevent rust.
• Cover chrome and stainless steel parts
with a thick coat of auto wax to prevent
discoloration. Re-wax as necessary
when you wash your vehicle.
• Lubricate all hood, door and luggage
compartment hinges and latches with
a light grade oil.
• Cover interior trim to prevent fading.
• Keep all rubber parts free from oil and
solvents.
Engine
• Change the engine oil and filter prior to
storage because used engine oil
contains contaminates which may
cause engine damage.
• Start the engine every 15 days for a
minimum of 15 minutes. Run at fast idle
with the climate controls set to defrost
until the engine reaches normal
operating temperature. •
With your foot on the brake, shift
through all the gears while the engine
is running.
• We recommend that you change the
engine oil before you use your vehicle
again.
Fuel system
• Fill the fuel tank with high-quality fuel
until the first automatic shutoff of the
fuel pump nozzle.
Cooling system
• Protect against freezing temperatures.
• When removing your vehicle from
storage, check coolant fluid level.
Confirm that there are no cooling
system leaks and that fluid is at the
recommended level.
Battery
• Check and recharge as necessary. Keep
connections clean.
• If storing your vehicle for more than 30
days without recharging the battery,
we recommend that you disconnect
the battery cables to maintain battery
charge for quick starting.
Note: It is necessary to reset memory
features if battery cables are disconnected.
Brakes
• Make sure the brakes and parking brake
release fully.
Tires
• Maintain recommended air pressure.
380
F-150 (TFC) Canada/United States of America, enUSA, Edition date: 201709, Fifth-Printing Vehicle Care
Page 402 of 641
Compliance Certification Label (on the
door hinge pillar, door latch post or the
door edge that meets the door latch
post, next to the driver seat), or Tire
Label on the B-Pillar or the edge of the
driver door. Failure to follow the tire
pressure recommendations can cause
uneven treadwear patterns and
adversely affect the way your vehicle
handles.
Note: The suspension insulation and
bumpers will help prevent vehicle damage.
Do not remove these components from your
vehicle when using snow tires and chains.
The tires on your vehicle have all-weather
treads to provide traction in rain and snow.
However, in some climates, you may need
to use snow tires and cables. If you need
to use cables, it is recommended that steel
wheels (of the same size and
specifications) be used, as cables may chip
aluminum wheels.
Follow these guidelines when using snow
tires and chains:
• If possible, avoid fully loading your
vehicle.
• Conventional link type chains may
contact and cause damage to the
vehicle's wheel house and/or body.
• Do not install chains on the front tires
as this may interfere with suspension
components.
• Only certain snow cables or chains
have been approved by Ford/Lincoln
as safe for use on your vehicle with the
following tires: 245/70R17,
LT245/70R17, 265/70R17 and
265/60R18.
• You should install snow cables or
chains that have been rated as SAE
Class S. •
Install chains securely, verifying that
the chains do not touch any wiring,
brake lines, or fuel lines.
• Do not exceed 30 mph (48 km/h) or
less if recommended by the chain
manufacturer while using snow chains.
• Drive cautiously. If you hear the chains
rub or bang against your vehicle, stop
and retighten the chains. If this does
not work, remove the chains to prevent
damage to your vehicle.
• Remove the tire chains when they are
no longer needed. Do not use tire
chains on dry roads.
• Purchase chains or cables from a
manufacturer that clearly labels body
to tire dimension restrictions. The snow
chains or cables must be mounted in
pairs on the rear tires only.
If you have any questions regarding snow
chains or cables, please contact your
authorized dealer.
TIRE PRESSURE MONITORING
SYSTEM WARNING:
The tire pressure
monitoring system is not a substitute for
manually checking tire pressures. You
should periodically check tire pressures
using a pressure gauge. Failure to
correctly maintain tire pressures could
increase the risk of tire failure, loss of
control, vehicle rollover and personal
injury.
399
F-150 (TFC) Canada/United States of America, enUSA, Edition date: 201709, Fifth-Printing Wheels and Tires
Page 403 of 641

Check each tire, including the
spare if applicable, monthly,
when cold and inflate to the
inflation pressure recommended by the
vehicle manufacturer on the vehicle
placard or tire inflation pressure label. If
your vehicle has tires of a different size
than the size indicated on the vehicle
placard or tire inflation pressure label, you
should determine the proper tire inflation
pressure for those tires.
As an added safety feature, your vehicle
has been equipped with a Tire Pressure
Monitoring System (TPMS) that
illuminates a low tire pressure telltale
when one or more of your tires is
significantly under-inflated. Accordingly,
when the low tire pressure telltale
illuminates, you should stop and check
your tires as soon as possible, and inflate
them to the proper pressure. Driving on a
significantly under-inflated tire causes the
tire to overheat and can lead to tire failure.
Under-inflation also reduces fuel efficiency
and tire tread life, and may affect the
vehicle ’s handling and stopping ability.
Please note that the TPMS is not a
substitute for proper tire maintenance, and
it is the driver ’s responsibility to maintain
correct tire pressure, even if under-inflation
has not reached the level to trigger
illumination of the TPMS low tire pressure
telltale.
Your vehicle has also been equipped with
a TPMS malfunction indicator to indicate
when the system is not operating properly.
The TPMS malfunction indicator is
combined with the low tire pressure
telltale. When the system detects a
malfunction, the telltale flashes for
approximately one minute and then
remains continuously illuminated. This
sequence continues upon subsequent
vehicle start-ups as long as the
malfunction exists. When the malfunction indicator is
illuminated, the system may not be able
to detect or signal low tire pressure as
intended. TPMS malfunctions may occur
for a variety of reasons, including the
installation of replacement or alternate
tires or wheels on the vehicle that prevent
the TPMS from functioning properly.
Always check the TPMS malfunction
telltale after replacing one or more tires or
wheels on your vehicle to ensure that the
replacement or alternate tires and wheels
allow the TPMS to continue to function
properly.
This device complies with part 15 of the
FCC Rules and with Licence exempt RSS
Standards of Industry Canada. Operation
is subject to the following two conditions:
•
This device may not cause harmful
interference.
• This device must accept any
interference received, including
interference that may cause undesired
operation. WARNING: Changes or
modifications not expressively approved
by the party responsible for compliance
could void the user's authority to operate
the equipment. The term "IC:" before the
radio certification number only signifies
that Industry Canada technical
specifications were met.
400
F-150 (TFC) Canada/United States of America, enUSA, Edition date: 201709, Fifth-Printing Wheels and Tires
Page 411 of 641
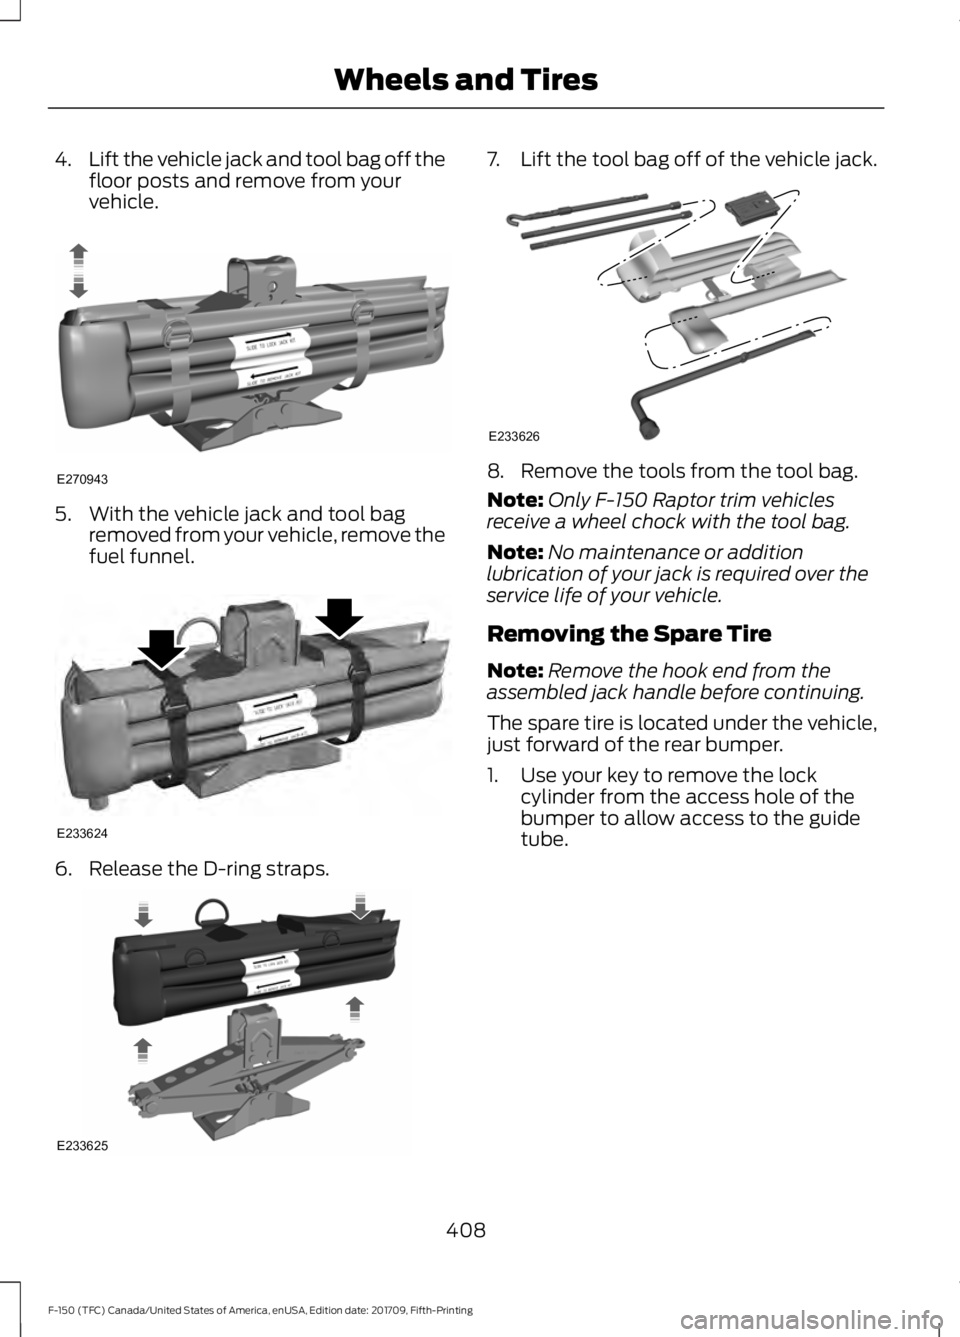
4.
Lift the vehicle jack and tool bag off the
floor posts and remove from your
vehicle. 5. With the vehicle jack and tool bag
removed from your vehicle, remove the
fuel funnel. 6. Release the D-ring straps. 7.
Lift the tool bag off of the vehicle jack. 8. Remove the tools from the tool bag.
Note:
Only F-150 Raptor trim vehicles
receive a wheel chock with the tool bag.
Note: No maintenance or addition
lubrication of your jack is required over the
service life of your vehicle.
Removing the Spare Tire
Note: Remove the hook end from the
assembled jack handle before continuing.
The spare tire is located under the vehicle,
just forward of the rear bumper.
1. Use your key to remove the lock cylinder from the access hole of the
bumper to allow access to the guide
tube.
408
F-150 (TFC) Canada/United States of America, enUSA, Edition date: 201709, Fifth-Printing Wheels and TiresE270943 E233624 E233625 E233626
Page 415 of 641
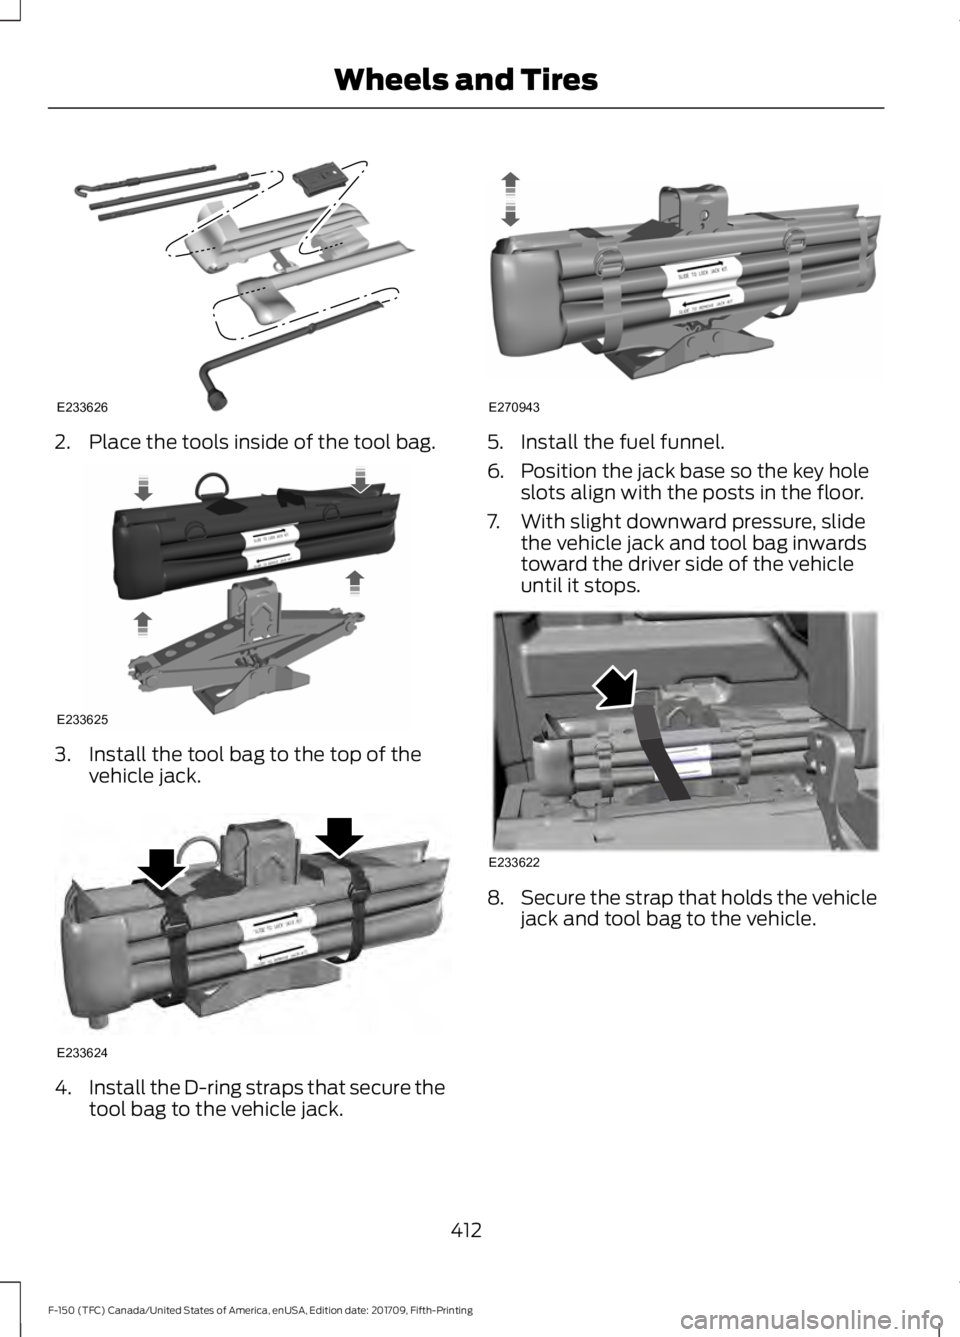
2. Place the tools inside of the tool bag.
3. Install the tool bag to the top of the
vehicle jack. 4.
Install the D-ring straps that secure the
tool bag to the vehicle jack. 5. Install the fuel funnel.
6. Position the jack base so the key hole
slots align with the posts in the floor.
7. With slight downward pressure, slide the vehicle jack and tool bag inwards
toward the driver side of the vehicle
until it stops. 8.
Secure the strap that holds the vehicle
jack and tool bag to the vehicle.
412
F-150 (TFC) Canada/United States of America, enUSA, Edition date: 201709, Fifth-Printing Wheels and TiresE233626 E233625 E233624 E270943 E233622
Page 418 of 641

ENGINE SPECIFICATIONS - 2.7L ECOBOOST™
Specification
Measurement
164
Cubic inches
1-4-2-5-3-6
Firing order
Coil on plug
Ignition system
.028-.031 in. (0.7 - 0.8 mm)
Spark plug gap
10.3:1
Compression ratio
Drivebelt Routing ENGINE SPECIFICATIONS - 3.0L V6, DIESEL
Specification
Measurement
183
Cubic inches
Ultra Low Sulfur Diesel
Required Fuel
1-4-2-5-3-6
Firing order
16:1
Compression ratio
415
F-150 (TFC) Canada/United States of America, enUSA, Edition date: 201709, Fifth-Printing Capacities and SpecificationsE176088
Page 422 of 641

Part Number
Component
FA-1883
Air filter element.
FL-2081
Oil filter.
BAGM-49H8-850
Battery.
ZD-22
Glow plugs.
WW-2247
Windshield wiper blade.
FP-79
Cabin air filter.
FD-4627
Fuel filter kit
For scheduled maintenance, we
recommend Motorcraft® replacement
parts available at your authorized dealer
or at fordparts.com. The parts engineered
for your vehicle meet or exceed our
specifications. Use of other parts may
impact vehicle performance, emissions
and durability. Your warranty may be void
for any damage related to use of other
parts. If a Motorcraft® oil filter is not available,
use an oil filter that meets industry
performance specification
SAE/USCAR-36.
For glow plug replacement, contact an
authorized dealer. See Scheduled
Maintenance (page 561).
MOTORCRAFT PARTS - 3.3L DURATEC - V6 Part Number
Component
FA-1883
Air filter element.
FL-500-S
Oil filter.
BAGM-48H6-760
Battery.
BAGM-94RH7-800SP-520
Spark plugs.
WW-2247
Windshield wiper blade.
FP-79
Cabin air filter.
419
F-150 (TFC) Canada/United States of America, enUSA, Edition date: 201709, Fifth-Printing Capacities and Specifications
Page 427 of 641
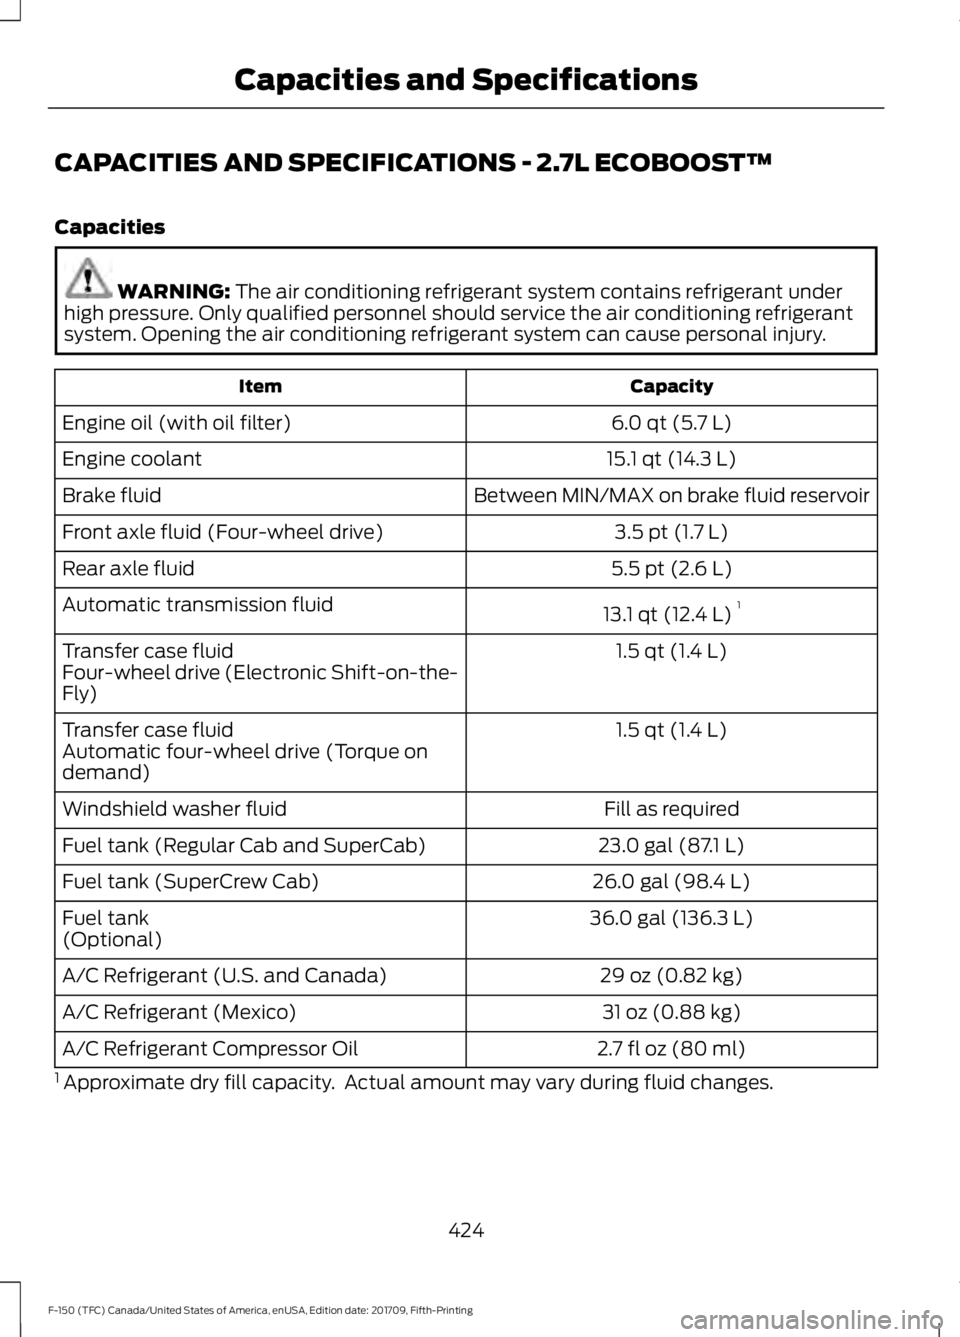
CAPACITIES AND SPECIFICATIONS - 2.7L ECOBOOST™
Capacities
WARNING: The air conditioning refrigerant system contains refrigerant under
high pressure. Only qualified personnel should service the air conditioning refrigerant
system. Opening the air conditioning refrigerant system can cause personal injury. Capacity
Item
6.0 qt (5.7 L)
Engine oil (with oil filter)
15.1 qt (14.3 L)
Engine coolant
Between MIN/MAX on brake fluid reservoir
Brake fluid
3.5 pt (1.7 L)
Front axle fluid (Four-wheel drive)
5.5 pt (2.6 L)
Rear axle fluid
13.1 qt (12.4 L)1
Automatic transmission fluid
1.5 qt (1.4 L)
Transfer case fluid
Four-wheel drive (Electronic Shift-on-the-
Fly)
1.5 qt (1.4 L)
Transfer case fluid
Automatic four-wheel drive (Torque on
demand)
Fill as required
Windshield washer fluid
23.0 gal (87.1 L)
Fuel tank (Regular Cab and SuperCab)
26.0 gal (98.4 L)
Fuel tank (SuperCrew Cab)
36.0 gal (136.3 L)
Fuel tank
(Optional)
29 oz (0.82 kg)
A/C Refrigerant (U.S. and Canada)
31 oz (0.88 kg)
A/C Refrigerant (Mexico)
2.7 fl oz (80 ml)
A/C Refrigerant Compressor Oil
1 Approximate dry fill capacity. Actual amount may vary during fluid changes.
424
F-150 (TFC) Canada/United States of America, enUSA, Edition date: 201709, Fifth-Printing Capacities and Specifications