2018 FORD F-150 change wheel
[x] Cancel search: change wheelPage 8 of 641

Engine Oil Dipstick - Gasoline
...............350
Engine Oil Dipstick - Diesel ......................
351
Engine Oil Check - Gasoline ....................
351
Engine Oil Check - Diesel .........................
352
Oil Change Indicator Reset .....................
353
Engine Coolant Check ..............................
354
Automatic Transmission Fluid Check ........................................................................\
358
Transfer Case Fluid Check ......................
358
Brake Fluid Check .......................................
359
Power Steering Fluid Check ...................
359
Washer Fluid Check ...................................
359
Draining the Fuel Filter Water Trap ......
360
Fuel Filter - Diesel ......................................
360
Fuel Filter - Gasoline .................................
360
Changing the 12V Battery .......................
360
Checking the Wiper Blades .....................
362
Changing the Wiper Blades ....................
363
Adjusting the Headlamps .......................
363
Changing a Bulb .........................................
364
Bulb Specification Chart .........................
368
Changing the Engine Air Filter - Gasoline ........................................................................\
370
Changing the Engine Air Filter - Diesel ........................................................................\
370
Vehicle Care
General Information ...................................
373
Cleaning Products ......................................
373
Cleaning the Exterior ..................................
373
Waxing ............................................................
375
Cleaning the Engine ...................................
375
Cleaning the Exhaust ................................
375
Cleaning the Windows and Wiper Blades ........................................................................\
376
Cleaning the Interior ..................................
376
Cleaning the Instrument Panel and Instrument Cluster Lens .......................
377
Cleaning Leather Seats ............................
378
Repairing Minor Paint Damage ..............
379Cleaning the Wheels
.................................
379
Vehicle Storage ............................................
379
Body Styling Kits ..........................................
381
Wheels and Tires
General Information ..................................
382
Tire Care .........................................................
384
Using Snow Chains ...................................
398
Tire Pressure Monitoring System .........
399
Changing a Road Wheel ..........................
405
Technical Specifications ...........................
413
Capacities and Specifications
Engine Specifications - 2.7L EcoBoost™ ........................................................................\
.
415
Engine Specifications - 3.0L V6, Diesel ........................................................................\
.
415
Engine Specifications - 3.3L Duratec - V6 ..................................................................
416
Engine Specifications - 3.5L Ecoboost™ ........................................................................\
.
416
Engine Specifications - 5.0L Modular - V8 ..................................................................
417
Motorcraft Parts - 2.7L EcoBoost™ ......
418
Motorcraft Parts - 3.0L V6, Diesel ........
418
Motorcraft Parts - 3.3L Duratec - V6 ........................................................................\
.
419
Motorcraft Parts - 3.5L Ecoboost™ .....
420
Motorcraft Parts - 5.0L Modular - V8 ........................................................................\
420
Vehicle Identification Number ................
421
Vehicle Certification Label ......................
422
Transmission Code Designation ...........
423
Capacities and Specifications - 2.7L EcoBoost™ ...............................................
424
Capacities and Specifications - 3.0L V6, Diesel ..........................................................
428
Capacities and Specifications - 3.3L Duratec - V6 .............................................
432
Capacities and Specifications - 3.5L Ecoboost™ ...............................................
437
5
F-150 (TFC) Canada/United States of America, enUSA, Edition date: 201709, Fifth-Printing Table of Contents
Page 67 of 641

•
Various vehicle speed reminders so you
know when your vehicle approaches
the limits. Warnings appear in the
information display and an audible
warning sounds when you exceed the
limit.
• Audio system maximum volume of
45%. A message will be shown in the
display when you attempt to exceed
the limited volume. Also, the
speed-sensitive or compensated
automatic volume control will be
disabled.
• Always on setting. When this is
selected, you will not be able to turn
off Advance Trac or traction control,
911 Assist or Emergency Assistance, or
Do Not Disturb (if your vehicle is
equipped with these features).
CREATING A MYKEY
Use the information display to create a
MyKey.
To create a MyKey:
1. Place your key into the ignition or, if your vehicle is equipped with keyless
start, place your transmitter into the
backup position. Details on the backup
position's location are in another
chapter. See Passive Anti-Theft
System (page 78).
2. Switch the ignition on.
3. Access the main menu using your left-hand-side steering wheel controls.
4. Depending on your display options, select either
Settings or Advanced
Settings, then MyKey and finally
Create MyKey.
5. When the menu reads
Hold OK to
Create MyKey, press and hold the OK
button to program a MyKey.
6. The display then prompts you to program the Configurable settings. You can program the configurable features
now or at any time. You can advance
through the settings without programming
them by pressing the
OK button. MyKey
then keeps all of the default settings.
When you finish programming your MyKey,
the Type 3 information display adds a
confirmation screen, New MyKey Has
Been Created
. The programmed
restrictions apply when you key off, open
and close the driver door and restart your
vehicle with the programmed key or
transmitter.
Programming/Changing
Configurable Settings
Use the information display to program or
change your configurable MyKey settings.
1. Place your admin key into the ignition or, if your vehicle is equipped with
keyless start, place your admin
transmitter into the backup position.
Details on the backup position's
location are in another chapter. See
Passive Anti-Theft System
(page
78).
2. Depending on your display options, select either
Settings or Advanced
Settings, then MyKey and finally to
various configurable features.
3. Scroll down through the choices, and then highlight the feature you want to
configure.
Note: You can clear or change your MyKey
settings at any time during the same key
cycle as you created the MyKey. Once you
have switched the engine off, however, you
will need an admin key to change or clear
your MyKey settings.
The programmed restrictions apply when
you key off, open and close the driver door
and restart your vehicle with the
programmed key or transmitter.
64
F-150 (TFC) Canada/United States of America, enUSA, Edition date: 201709, Fifth-Printing MyKey
™
(If Equipped)
Page 122 of 641
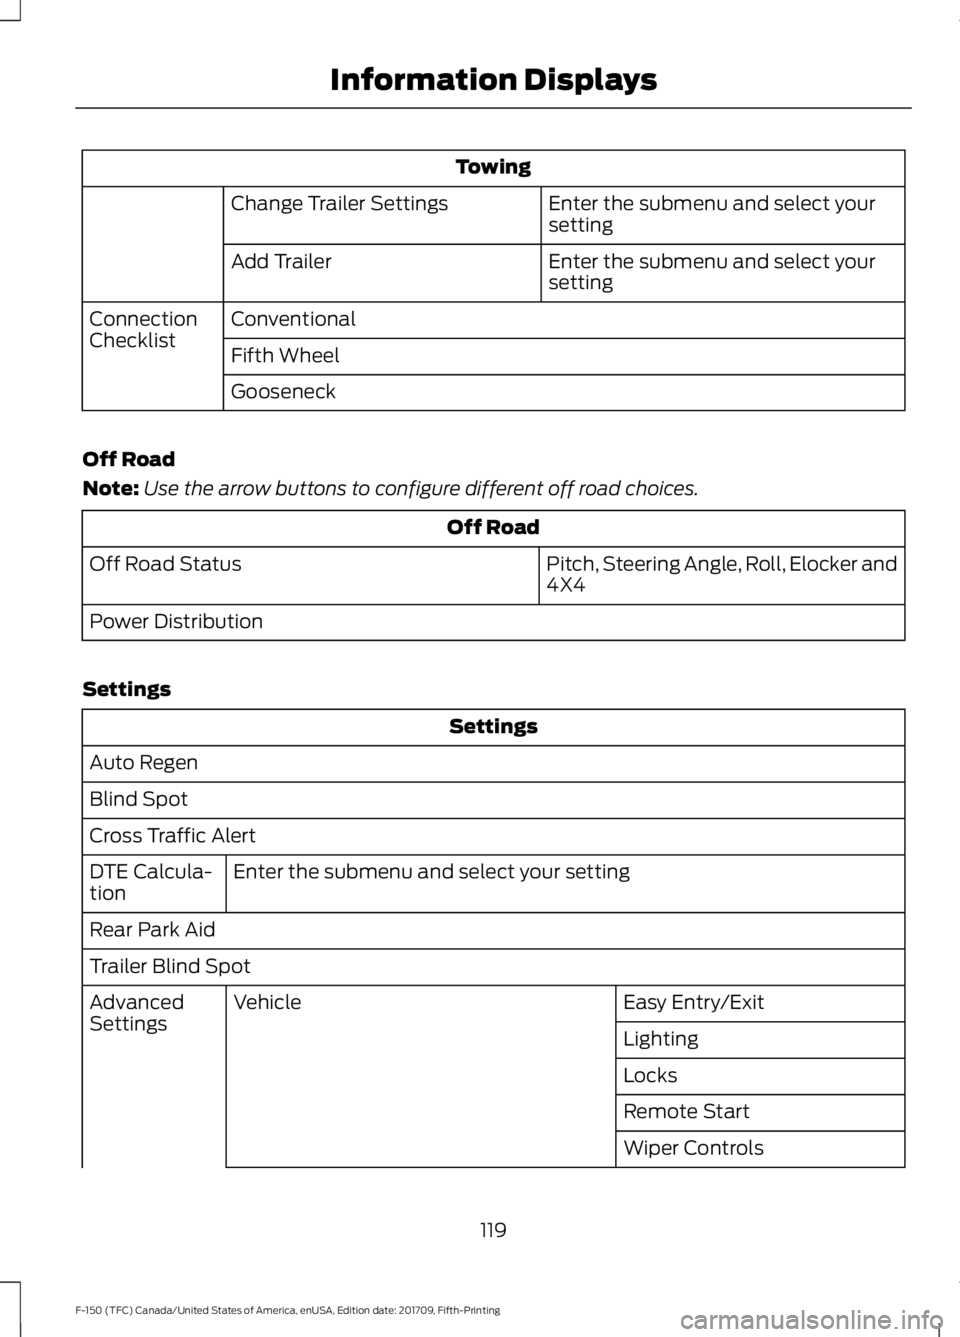
Towing
Enter the submenu and select your
setting
Change Trailer Settings
Enter the submenu and select your
setting
Add Trailer
Conventional
Connection
Checklist
Fifth Wheel
Gooseneck
Off Road
Note: Use the arrow buttons to configure different off road choices. Off Road
Pitch, Steering Angle, Roll, Elocker and
4X4
Off Road Status
Power Distribution
Settings Settings
Auto Regen
Blind Spot
Cross Traffic Alert Enter the submenu and select your setting
DTE Calcula-
tion
Rear Park Aid
Trailer Blind Spot
Easy Entry/Exit
Vehicle
Advanced
Settings
Lighting
Locks
Remote Start
Wiper Controls
119
F-150 (TFC) Canada/United States of America, enUSA, Edition date: 201709, Fifth-Printing Information Displays
Page 137 of 641
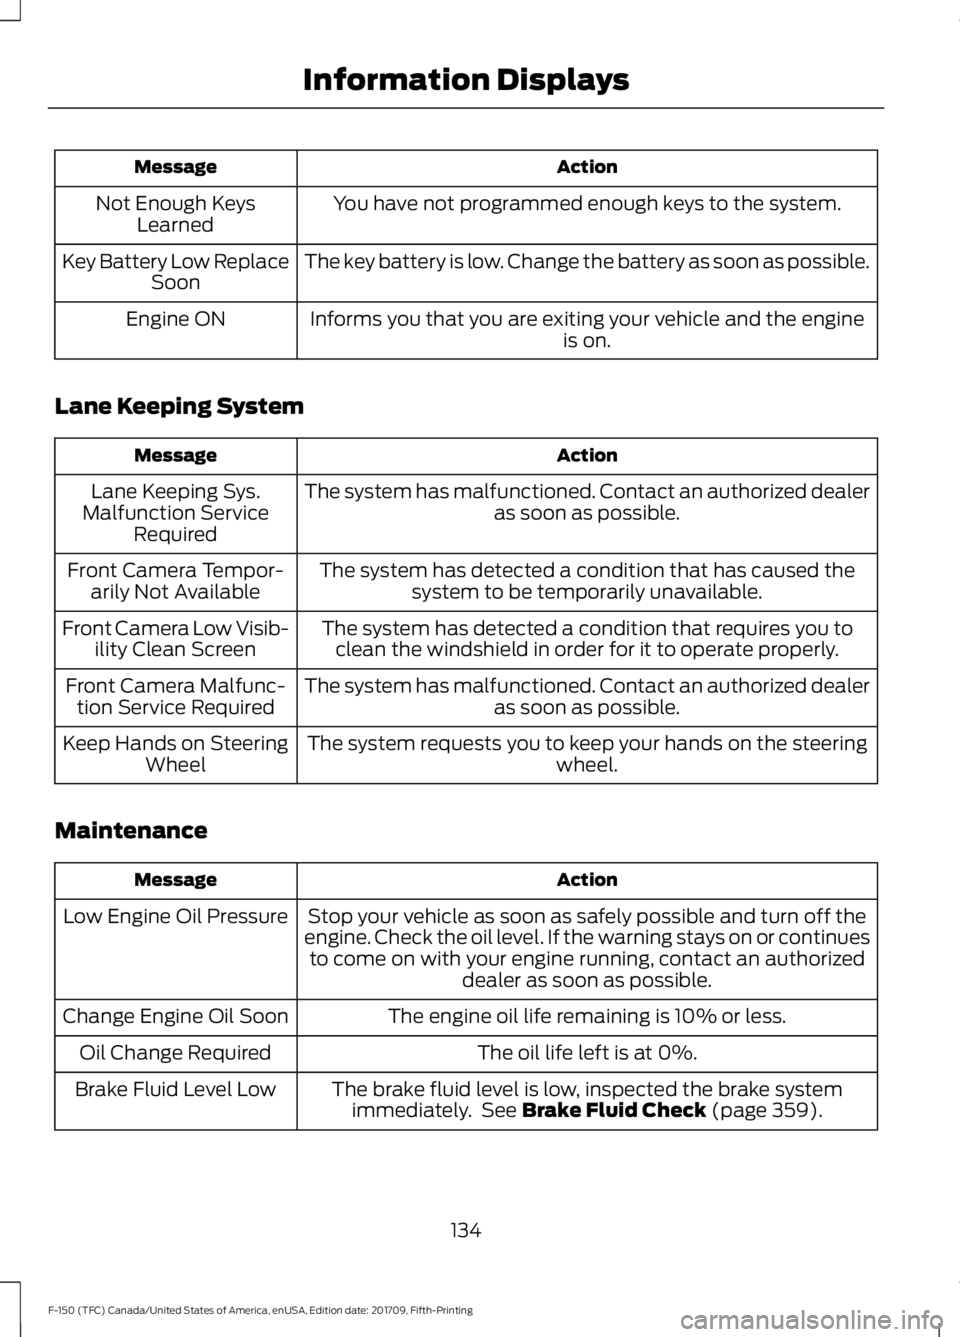
Action
Message
You have not programmed enough keys to the system.
Not Enough Keys
Learned
The key battery is low. Change the battery as soon as possible.
Key Battery Low Replace
Soon
Informs you that you are exiting your vehicle and the engine is on.
Engine ON
Lane Keeping System Action
Message
The system has malfunctioned. Contact an authorized dealer as soon as possible.
Lane Keeping Sys.
Malfunction Service Required
The system has detected a condition that has caused thesystem to be temporarily unavailable.
Front Camera Tempor-
arily Not Available
The system has detected a condition that requires you toclean the windshield in order for it to operate properly.
Front Camera Low Visib-
ility Clean Screen
The system has malfunctioned. Contact an authorized dealeras soon as possible.
Front Camera Malfunc-
tion Service Required
The system requests you to keep your hands on the steering wheel.
Keep Hands on Steering
Wheel
Maintenance Action
Message
Stop your vehicle as soon as safely possible and turn off the
engine. Check the oil level. If the warning stays on or continues to come on with your engine running, contact an authorized dealer as soon as possible.
Low Engine Oil Pressure
The engine oil life remaining is 10% or less.
Change Engine Oil Soon
The oil life left is at 0%.
Oil Change Required
The brake fluid level is low, inspected the brake systemimmediately. See Brake Fluid Check (page 359).
Brake Fluid Level Low
134
F-150 (TFC) Canada/United States of America, enUSA, Edition date: 201709, Fifth-Printing Information Displays
Page 208 of 641
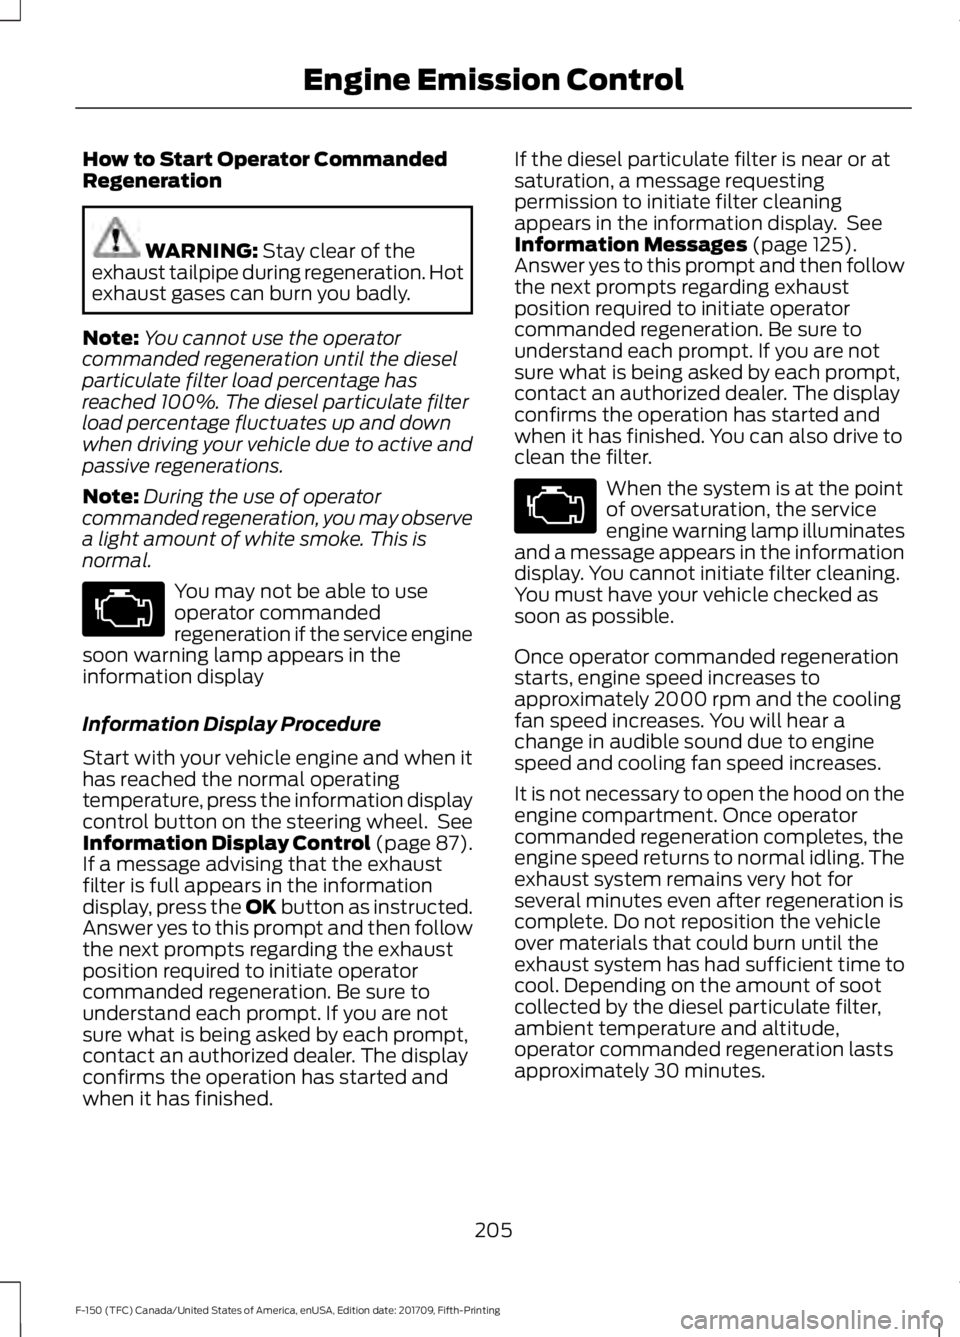
How to Start Operator Commanded
Regeneration
WARNING: Stay clear of the
exhaust tailpipe during regeneration. Hot
exhaust gases can burn you badly.
Note: You cannot use the operator
commanded regeneration until the diesel
particulate filter load percentage has
reached 100%. The diesel particulate filter
load percentage fluctuates up and down
when driving your vehicle due to active and
passive regenerations.
Note: During the use of operator
commanded regeneration, you may observe
a light amount of white smoke. This is
normal. You may not be able to use
operator commanded
regeneration if the service engine
soon warning lamp appears in the
information display
Information Display Procedure
Start with your vehicle engine and when it
has reached the normal operating
temperature, press the information display
control button on the steering wheel. See
Information Display Control
(page 87).
If a message advising that the exhaust
filter is full appears in the information
display, press the OK button as instructed.
Answer yes to this prompt and then follow
the next prompts regarding the exhaust
position required to initiate operator
commanded regeneration. Be sure to
understand each prompt. If you are not
sure what is being asked by each prompt,
contact an authorized dealer. The display
confirms the operation has started and
when it has finished. If the diesel particulate filter is near or at
saturation, a message requesting
permission to initiate filter cleaning
appears in the information display. See
Information Messages
(page 125).
Answer yes to this prompt and then follow
the next prompts regarding exhaust
position required to initiate operator
commanded regeneration. Be sure to
understand each prompt. If you are not
sure what is being asked by each prompt,
contact an authorized dealer. The display
confirms the operation has started and
when it has finished. You can also drive to
clean the filter. When the system is at the point
of oversaturation, the service
engine warning lamp illuminates
and a message appears in the information
display. You cannot initiate filter cleaning.
You must have your vehicle checked as
soon as possible.
Once operator commanded regeneration
starts, engine speed increases to
approximately 2000 rpm and the cooling
fan speed increases. You will hear a
change in audible sound due to engine
speed and cooling fan speed increases.
It is not necessary to open the hood on the
engine compartment. Once operator
commanded regeneration completes, the
engine speed returns to normal idling. The
exhaust system remains very hot for
several minutes even after regeneration is
complete. Do not reposition the vehicle
over materials that could burn until the
exhaust system has had sufficient time to
cool. Depending on the amount of soot
collected by the diesel particulate filter,
ambient temperature and altitude,
operator commanded regeneration lasts
approximately 30 minutes.
205
F-150 (TFC) Canada/United States of America, enUSA, Edition date: 201709, Fifth-Printing Engine Emission Control
Page 212 of 641
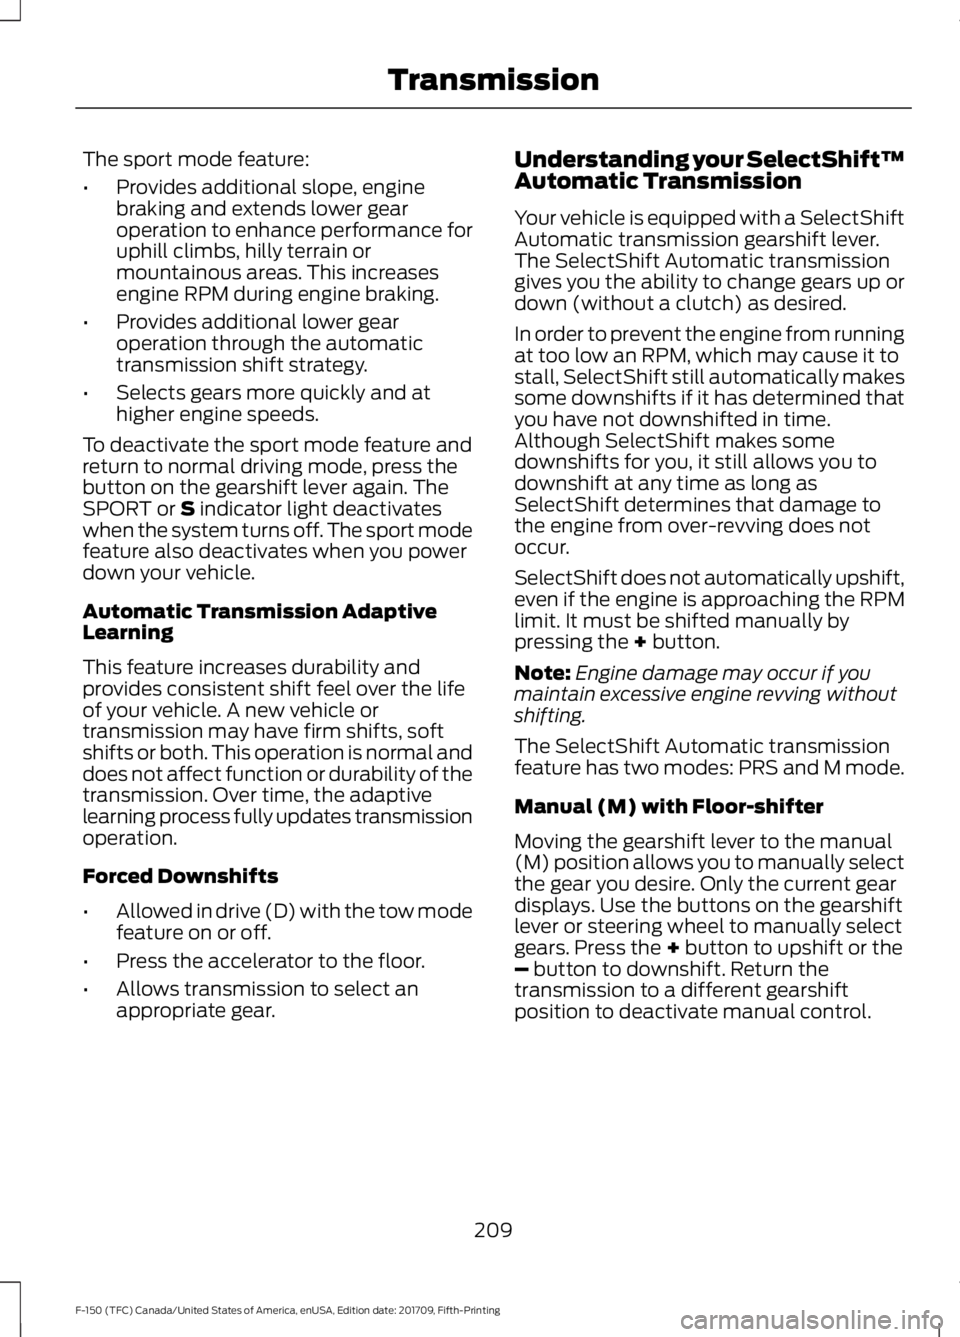
The sport mode feature:
•
Provides additional slope, engine
braking and extends lower gear
operation to enhance performance for
uphill climbs, hilly terrain or
mountainous areas. This increases
engine RPM during engine braking.
• Provides additional lower gear
operation through the automatic
transmission shift strategy.
• Selects gears more quickly and at
higher engine speeds.
To deactivate the sport mode feature and
return to normal driving mode, press the
button on the gearshift lever again. The
SPORT or S indicator light deactivates
when the system turns off. The sport mode
feature also deactivates when you power
down your vehicle.
Automatic Transmission Adaptive
Learning
This feature increases durability and
provides consistent shift feel over the life
of your vehicle. A new vehicle or
transmission may have firm shifts, soft
shifts or both. This operation is normal and
does not affect function or durability of the
transmission. Over time, the adaptive
learning process fully updates transmission
operation.
Forced Downshifts
• Allowed in drive (D) with the tow mode
feature on or off.
• Press the accelerator to the floor.
• Allows transmission to select an
appropriate gear. Understanding your SelectShift™
Automatic Transmission
Your vehicle is equipped with a SelectShift
Automatic transmission gearshift lever.
The SelectShift Automatic transmission
gives you the ability to change gears up or
down (without a clutch) as desired.
In order to prevent the engine from running
at too low an RPM, which may cause it to
stall, SelectShift still automatically makes
some downshifts if it has determined that
you have not downshifted in time.
Although SelectShift makes some
downshifts for you, it still allows you to
downshift at any time as long as
SelectShift determines that damage to
the engine from over-revving does not
occur.
SelectShift does not automatically upshift,
even if the engine is approaching the RPM
limit. It must be shifted manually by
pressing the
+ button.
Note: Engine damage may occur if you
maintain excessive engine revving without
shifting.
The SelectShift Automatic transmission
feature has two modes: PRS and M mode.
Manual (M) with Floor-shifter
Moving the gearshift lever to the manual
(M) position allows you to manually select
the gear you desire. Only the current gear
displays. Use the buttons on the gearshift
lever or steering wheel to manually select
gears. Press the
+ button to upshift or the
– button to downshift. Return the
transmission to a different gearshift
position to deactivate manual control.
209
F-150 (TFC) Canada/United States of America, enUSA, Edition date: 201709, Fifth-Printing Transmission
Page 219 of 641
The information display can display a
message indicating a 4X4 shift is in
progress. The information display can then
display the system mode selected. If any
of the above shift conditions are not
present, the shift should not occur and the
information display can display
information guiding the driver through the
proper shifting procedures.
If Shift Delayed Pull Forward displays in
the information display, a transfer case
gear tooth blockage is present. To alleviate
this condition, place the transmission in a
forward gear, move your vehicle forward
approximately
5 ft (1.5 m), and shift the
transmission back to neutral (N) to allow
the transfer case to complete the range
shift.
Operating 4WD vehicles with spare or
mismatched tires
On four-wheel drive vehicles, the size of
the spare tire can affect the 4X4 system.
If there is a significant difference between
the size of the spare tire and the remaining
tires, you may have limited four-wheel
drive functionality.
When driving with the full-size dissimilar
spare wheel and tire assembly, it is
recommended that you do not:
• Exceed
50 mph (80 km/h) with a 4WD
mode turned on.
• Turn on a 4WD mode unless the
vehicle is stationary.
• Use a 4WD mode on dry pavement.
When driving with the full-size dissimilar
spare wheel and tire assembly, 4WD
functionality may be limited, especially
when driving in a mechanically locked 4WD
mode. You may experience the following:
• Additional noise from the transfer case
or other drive components.
• Difficulty shifting out of a mechanically
locked 4WD mode. Use of a dissimilar spare wheel and tire
assembly may lead to impairment of the
following:
•
Comfort and noise.
• Winter weather driving capability.
• Wet driving capability.
• Four-wheel drive capability.
How Your Vehicle Differs From
Other Vehicles WARNING: Vehicles with a higher
center of gravity (utility and four-wheel
drive vehicles) handle differently than
vehicles with a lower center of gravity
(passenger cars). Avoid sharp turns,
excessive speed and abrupt steering in
these vehicles. Failure to drive cautiously
increases the risk of losing control of your
vehicle, vehicle rollover, personal injury
and death.
Truck and utility vehicles can differ from
some other vehicles. Your vehicle may be
higher to allow it to travel over rough
terrain without getting hung up or
damaging underbody components.
The differences that make your vehicle so
versatile also make it handle differently
than an ordinary passenger car.
Maintain steering wheel control at all
times, especially in rough terrain. Since
sudden changes in terrain can result in
abrupt steering wheel motion, make sure
you grip the steering wheel from the
outside. Do not grip the spokes.
Drive cautiously to avoid vehicle damage
from concealed objects such as rocks and
stumps.
216
F-150 (TFC) Canada/United States of America, enUSA, Edition date: 201709, Fifth-Printing Four-Wheel Drive
(If Equipped)
Page 221 of 641

It may be less risky to strike small objects,
such as freeway reflectors, with minor
damage to your vehicle rather than
attempt a sudden return to the road which
could cause your vehicle to slide sideways
out of control or roll over. Remember, your
safety and the safety of others should be
your primary concern.
Emergency Maneuvers
In an unavoidable emergency situation
where a sudden sharp turn must be made,
remember to avoid over-driving your
vehicle (i.e. turn the steering wheel only as
rapidly and as far as required to avoid the
emergency). Excessive steering can result
in loss of vehicle control. Apply smooth
pressure to the accelerator pedal or brake
pedal when changes in vehicle speed are
required. Avoid abrupt steering,
acceleration and braking. This could result
in an increased risk of vehicle roll over, loss
of vehicle control and personal injury. Use
all available road surface to bring your
vehicle to a safe direction of travel.
In the event of an emergency stop, avoid
skidding the tires and do not attempt any
sharp steering wheel movements.
If your vehicle goes from one type of
surface to another (i.e. from concrete to
gravel) there can be a change in the way
your vehicle responds to a maneuver (i.e.
steering, acceleration or braking).
Sand
When driving over sand, try to keep all four
wheels on the most solid area of the trail.
Avoid reducing the tire pressures but shift
to a lower gear and drive steadily through
the terrain. Apply the accelerator slowly
and avoid excessive wheel slip.
When driving at slow speeds in deep sand
under high outside temperatures, use a low
gear when possible. Low gear operation
can maximize the engine and transmission
cooling capability.
Avoid driving at excessive speeds, this
causes vehicle momentum to work against
you and your vehicle could become stuck
to the point that assistance may be
required from another vehicle. Remember,
you may be able to back out the way you
came if you proceed with caution.
Mud and Water
Mud
Be cautious of sudden changes in vehicle
speed or direction when you are driving in
mud. Even four-wheel drive vehicles can
lose traction in slick mud. If your vehicle
does slide, steer in the direction of the slide
until you regain control of your vehicle.
After driving through mud, clean off residue
stuck to rotating driveshafts and tires.
Excess mud stuck on tires and rotating
driveshafts can cause an imbalance that
could damage drive components.
Water
If you must drive through high water, drive
slowly. Traction or brake capability may
be limited.
When driving through water, determine the
depth and avoid water higher than the
bottom of the hubs. If the ignition system
gets wet, your vehicle may stall.
Once through water, try the brakes. Wet
brakes do not stop your vehicle as
effectively as dry brakes. Drying improves
by applying light pressure to the brake
pedal while moving slowly.
Note:
Driving through deep water may
damage the transmission. If the front or rear
axle is submerged in water, the axle
lubricant and power transfer unit lubricant
should be checked and changed if
necessary.
218
F-150 (TFC) Canada/United States of America, enUSA, Edition date: 201709, Fifth-Printing Four-Wheel Drive (If Equipped)