2018 FORD EXPLORER steering
[x] Cancel search: steeringPage 258 of 571

Front-wheel drive vehicles CANNOT be
flat-towed (all wheels on the ground) as
vehicle or transmission damage may occur.
You must place the front wheels on a
two-wheel tow dolly. If you are using a tow
dolly, follow the instructions specified by
the equipment provider.
Four-wheel drive vehicles
CANNOT be
flat-towed (all wheels on the ground), as
vehicle or transmission damage may occur.
It is recommended to tow your vehicle with
all four (4) wheels off the ground such as
when using a car-hauling trailer. Otherwise,
you cannot recreational tow your vehicle.
TOWING THE VEHICLE ON
FOUR WHEELS - 3.5L
DURATEC/3.5L ECOBOOST™ WARNING:
If your vehicle has a
steering wheel lock make sure the ignition
is in the accessory or on position when
being towed.
Emergency Towing
If your vehicle becomes inoperable
(without access to wheel dollies or vehicle
transport trailer), it can be flat-towed (all
wheels on the ground, regardless of the
powertrain and transmission
configuration) under the following
conditions:
• Your vehicle is facing forward for
towing in a forward direction.
• Shift into neutral (N). If you cannot
shift into neutral (N), you may need to
override it. See
Transmission (page
187).
• Maximum speed is 35 mph (56 km/h).
• Maximum distance is
50 mi (80 km). Recreational Towing
Note:
Put your climate control system in
recirculated air mode to prevent exhaust
fumes from entering the vehicle. See
Climate Control
(page 133).
Follow these guidelines if you have a need
for recreational (RV) towing. An example
of recreational towing would be towing
your vehicle behind a motorhome. We
designed these guidelines to prevent
damage to your transmission.
You can tow your vehicle with all four
wheels on the ground.
If you tow your vehicle with all four wheels
on the ground:
• Tow only in the forward direction.
• Release the parking brake.
Vehicles with Keyless Start
1. Start the vehicle by pressing the brake pedal, and then pressing the keyless
start button until the vehicle starts.
2. Press the brake pedal and shift the gearshift into neutral (N).
3. Switch the vehicle off by pressing the keyless start button once.
4. Disconnect the negative (black) cable from the battery. You need the door
key to lock and unlock doors when the
battery cable is disconnected. See
Changing the 12V Battery (page 298).
Note: The anti-theft system does not work
until you reconnect the battery cable.
Start the engine within 15 minutes of
reconnecting the battery cable.
Vehicles with an Ignition Key
1. Start the vehicle by pressing the brake pedal, and then turning the ignition key
until the vehicle starts.
2. Press the brake pedal and shift the transmission into neutral (N).
255
Explorer (TUB) Canada/United States of America, enUSA, Edition date: 201711, Fourth-Printing Towing
Page 261 of 571

•
Transmissions give their best fuel
economy when operated in the top
cruise gear and with steady pressure
on the gas pedal.
• Four-wheel-drive operation (if
equipped) is less fuel efficient than
two-wheel-drive operation.
• Close the windows for high-speed
driving.
DRIVING THROUGH WATER WARNING: Do not drive through
flowing or deep water as you may lose
control of your vehicle.
Note: Driving through standing water can
cause vehicle damage.
Note: Engine damage can occur if water
enters the air filter.
Before driving through standing water,
check the depth. Never drive through water
that is higher than the bottom of the front
rocker area of your vehicle. When driving through standing water, drive
very slowly and do not stop your vehicle.
Your brake performance and traction may
be limited. After driving through water and
as soon as it is safe to do so: •
Lightly press the brake pedal to dry the
brakes and to check that they work.
• Check that the horn works.
• Check that the exterior lights work.
• Turn the steering wheel to check that
the steering power assist works.
FLOOR MATS WARNING: Use a floor mat designed
to fit the footwell of your vehicle that does
not obstruct the pedal area. Failure to
follow this instruction could result in the
loss of control of your vehicle, personal
injury or death. WARNING:
Pedals that cannot
move freely can cause loss of vehicle
control and increase the risk of serious
personal injury. WARNING:
Secure the floor mat to
both retention devices so that it cannot
slip out of position and interfere with the
pedals. Failure to follow this instruction
could result in the loss of control of your
vehicle, personal injury or death. WARNING:
Do not place additional
floor mats or any other covering on top of
the original floor mats. This could result in
the floor mat interfering with the operation
of the pedals. Failure to follow this
instruction could result in the loss of
control of your vehicle, personal injury or
death. WARNING:
Always make sure that
objects cannot fall into the driver foot well
while your vehicle is moving. Objects that
are loose can become trapped under the
pedals causing a loss of vehicle control.
258
Explorer (TUB) Canada/United States of America, enUSA, Edition date: 201711, Fourth-Printing Driving HintsE266447
Page 278 of 571

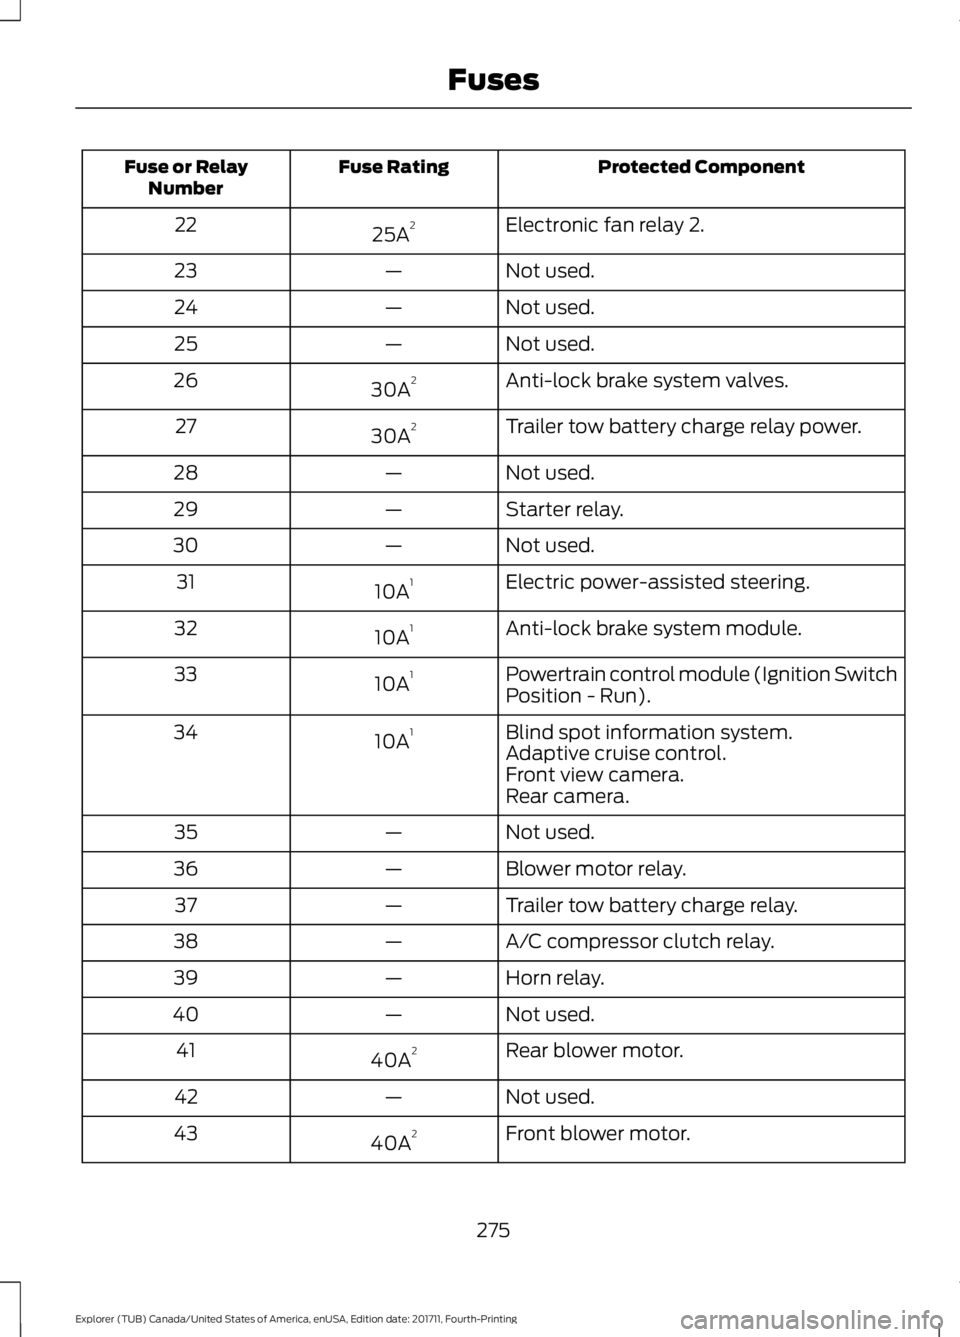
Protected Component
Fuse Rating
Fuse or Relay
Number
Electronic fan relay 2.
25A 2
22
Not used.
—
23
Not used.
—
24
Not used.
—
25
Anti-lock brake system valves.
30A 2
26
Trailer tow battery charge relay power.
30A 2
27
Not used.
—
28
Starter relay.
—
29
Not used.
—
30
Electric power-assisted steering.
10A 1
31
Anti-lock brake system module.
10A 1
32
Powertrain control module (Ignition Switch
Position - Run).
10A 1
33
Blind spot information system.
10A 1
34
Adaptive cruise control.
Front view camera.
Rear camera.
Not used.
—
35
Blower motor relay.
—
36
Trailer tow battery charge relay.
—
37
A/C compressor clutch relay.
—
38
Horn relay.
—
39
Not used.
—
40
Rear blower motor.
40A 2
41
Not used.
—
42
Front blower motor.
40A 2
43
275
Explorer (TUB) Canada/United States of America, enUSA, Edition date: 201711, Fourth-Printing Fuses
Page 280 of 571

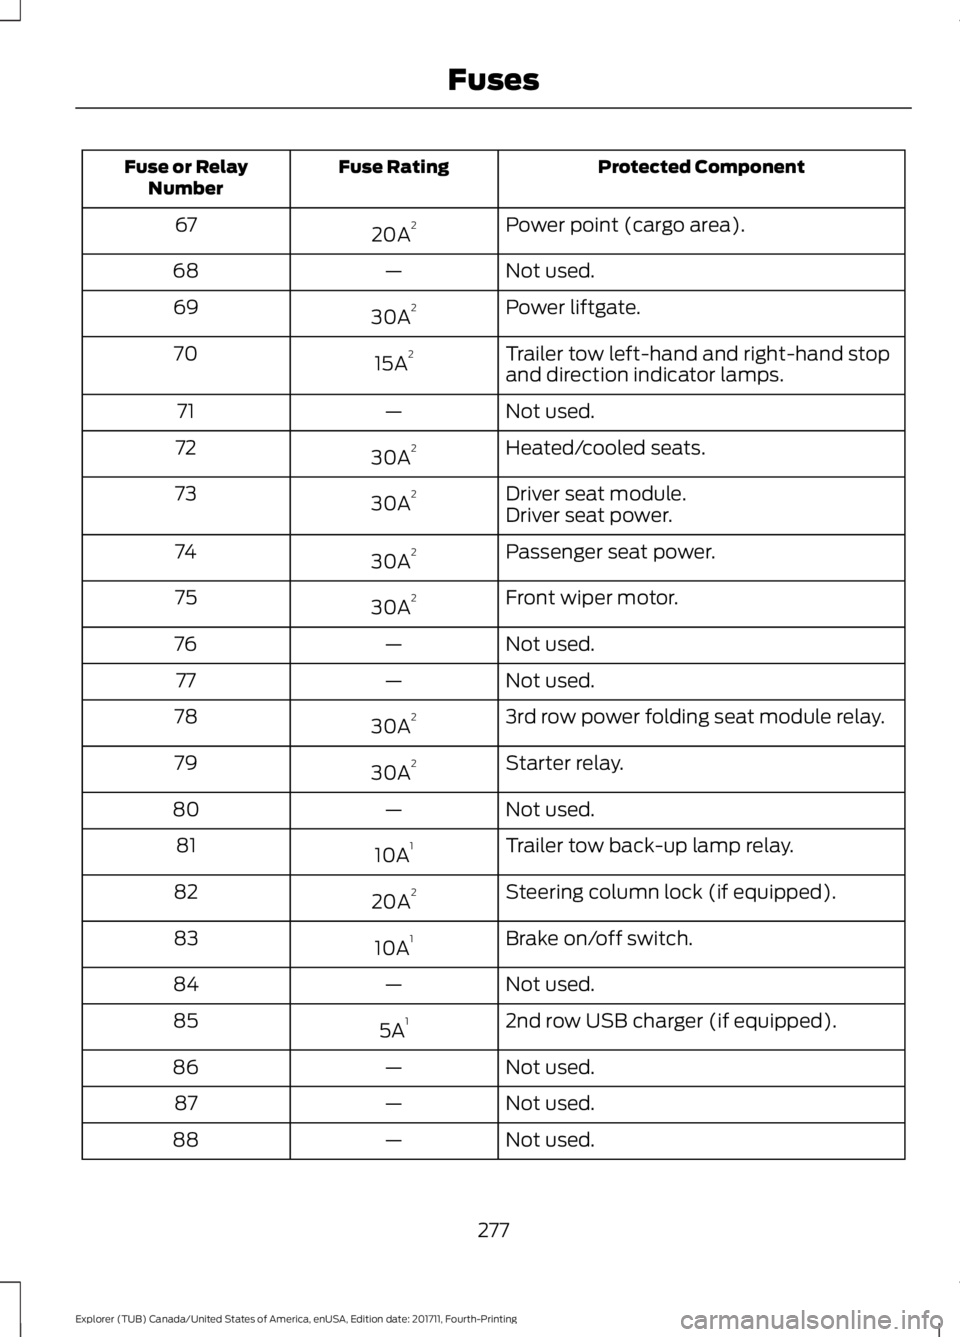
Protected Component
Fuse Rating
Fuse or Relay
Number
Power point (cargo area).
20A 2
67
Not used.
—
68
Power liftgate.
30A 2
69
Trailer tow left-hand and right-hand stop
and direction indicator lamps.
15A 2
70
Not used.
—
71
Heated/cooled seats.
30A 2
72
Driver seat module.
30A 2
73
Driver seat power.
Passenger seat power.
30A 2
74
Front wiper motor.
30A 2
75
Not used.
—
76
Not used.
—
77
3rd row power folding seat module relay.
30A 2
78
Starter relay.
30A 2
79
Not used.
—
80
Trailer tow back-up lamp relay.
10A 1
81
Steering column lock (if equipped).
20A 2
82
Brake on/off switch.
10A 1
83
Not used.
—
84
2nd row USB charger (if equipped).
5A 1
85
Not used.
—
86
Not used.
—
87
Not used.
—
88
277
Explorer (TUB) Canada/United States of America, enUSA, Edition date: 201711, Fourth-Printing Fuses
Page 281 of 571

Protected Component
Fuse Rating
Fuse or Relay
Number
Not used.
—
89
Not used.
—
90
Not used.
—
91
Multi-contour seat module relay.
15A 1
92
Alternator sense.
10A 1
93
Rear washer relay.
15A 1
94
Rear wiper relay.
15A 1
95
Powertrain control module relay coil
power.
10A 1
96
Rain sensor.
5A 1
97
2nd row seat motors.
20A 1
98
Trailer tow parking lamp relay.
20A 1
99
1 Micro 2 fuse.
2 M-case fuse.
3 J-case fuse.
Passenger Compartment Fuse
Panel
The fuse panel is located under the
instrument panel to the left of the steering
column. Note:
It may be easier to access the fuse
panel if you remove the finish trim piece.
278
Explorer (TUB) Canada/United States of America, enUSA, Edition date: 201711, Fourth-Printing Fuses
Page 283 of 571

Protected Components
Fuse Rating
Fuse or Relay
Number
Front climate control module.
7.5A 2
12
Instrument cluster.
7.5A 2
13
Smart data link.
Steering column control module.
Extended power module.
10A 2
14
Smart datalink connector power.
10A 2
15
Heads up display.
Not used.
—
16
Electronic finish panel.
5A 2
17
Push button start switch.
5A 2
18
Ignition switch.
Key inhibit.
Transmission control switch.
7.5A 2
19
Not used.
—
20
Terrain management switch.
5A 2
21
Heads up display.
Humidity sensor.
Occupant classification sensor.
5A 2
22
Delayed accessory power.
10A 1
23
Power windows.
Moonroof.
Folding mirror relay.
DC inverter.
Window/moonroof switch illumination.
Central lock relay.
20A 1
24
Left-hand front smart window motor.
30A 1
25
Door zone module.
Right-hand front smart window motor.
30A 1
26
Door zone module.
Moonroof.
30A 1
27
280
Explorer (TUB) Canada/United States of America, enUSA, Edition date: 201711, Fourth-Printing Fuses
Page 284 of 571

Protected Components
Fuse Rating
Fuse or Relay
Number
Sony amplifier - 10 channel.
20A 1
28
Sony amplifier - 14 channel.
30A 1
29
Not used.
—
30
Not used.
—
31
SYNC module.
10A 1
32
GPS module.
Display.
Radio frequency receiver.
Radio.
20A 1
33
Starter relay.
30A 1
34
Restraints control module.
5A 1
35
Extended power module.
Lane departure warning module.
15A 1
36
Auto high beam.
EC mirrors.
Rear heated seats.
Heated steering wheel.
20A 1
37
Left-hand front window motor.
30A 3
38
Rear power window motors.
1 Micro 2 fuse.
2 Micro 3 fuse.
3 Circuit breaker.
281
Explorer (TUB) Canada/United States of America, enUSA, Edition date: 201711, Fourth-Printing Fuses
Page 293 of 571

Only use oils certified for gasoline engines
by the American Petroleum Institute (API).
An oil with this trademark symbol
conforms to the current engine and
emission system protection standards and
fuel economy requirements of the
International Lubricants Specification
Advisory Committee (ILSAC).
To top up the engine oil level do the
following:
1. Clean the area surrounding the engine
oil filler cap before you remove it.
2. Remove the engine oil filler cap. See Under Hood Overview (page 285).
Turn it counterclockwise and remove
it.
3. Add engine oil that meets Ford specifications. See
Capacities and
Specifications (page 354). You may
have to use a funnel to pour the engine
oil into the opening.
4. Recheck the oil level.
5. If the oil level is correct, replace the dipstick and make sure it is fully seated.
6. Replace the engine oil filler cap. Turn it clockwise until you feel a strong
resistance.
Note: Do not add oil further than the
maximum mark. Oil levels above the
maximum mark may cause engine damage.
Note: Make sure you install the oil filler cap
correctly.
Note: Soak up any spillage with an
absorbent cloth immediately.
OIL CHANGE INDICATOR
RESET
Use the information display controls on
the steering wheel to reset the oil change
indicator. From the main menu scroll to: Action and description
Message
Press the right arrow button,
then from this menu scroll
to the following message.
Settings
Press the right arrow button,
then from this menu scroll
to the following message.
Vehicle
Press the right arrow button,
then from this menu scroll
to the following message.
Oil Life
Press and hold the
OK
button until the instrument
cluster displays the
following message.
Hold OK to
Reset
Reset Successful
When the oil change indic-
ator resets the instrument
cluster displays 100%.
Remaining Life
{00}%
If the instrument cluster
displays one of the following
messages, repeat the
process.
Not Reset
Reset Cancelled
290
Explorer (TUB) Canada/United States of America, enUSA, Edition date: 201711, Fourth-Printing Maintenance