2018 FORD ESCAPE back seat down
[x] Cancel search: back seat downPage 25 of 517
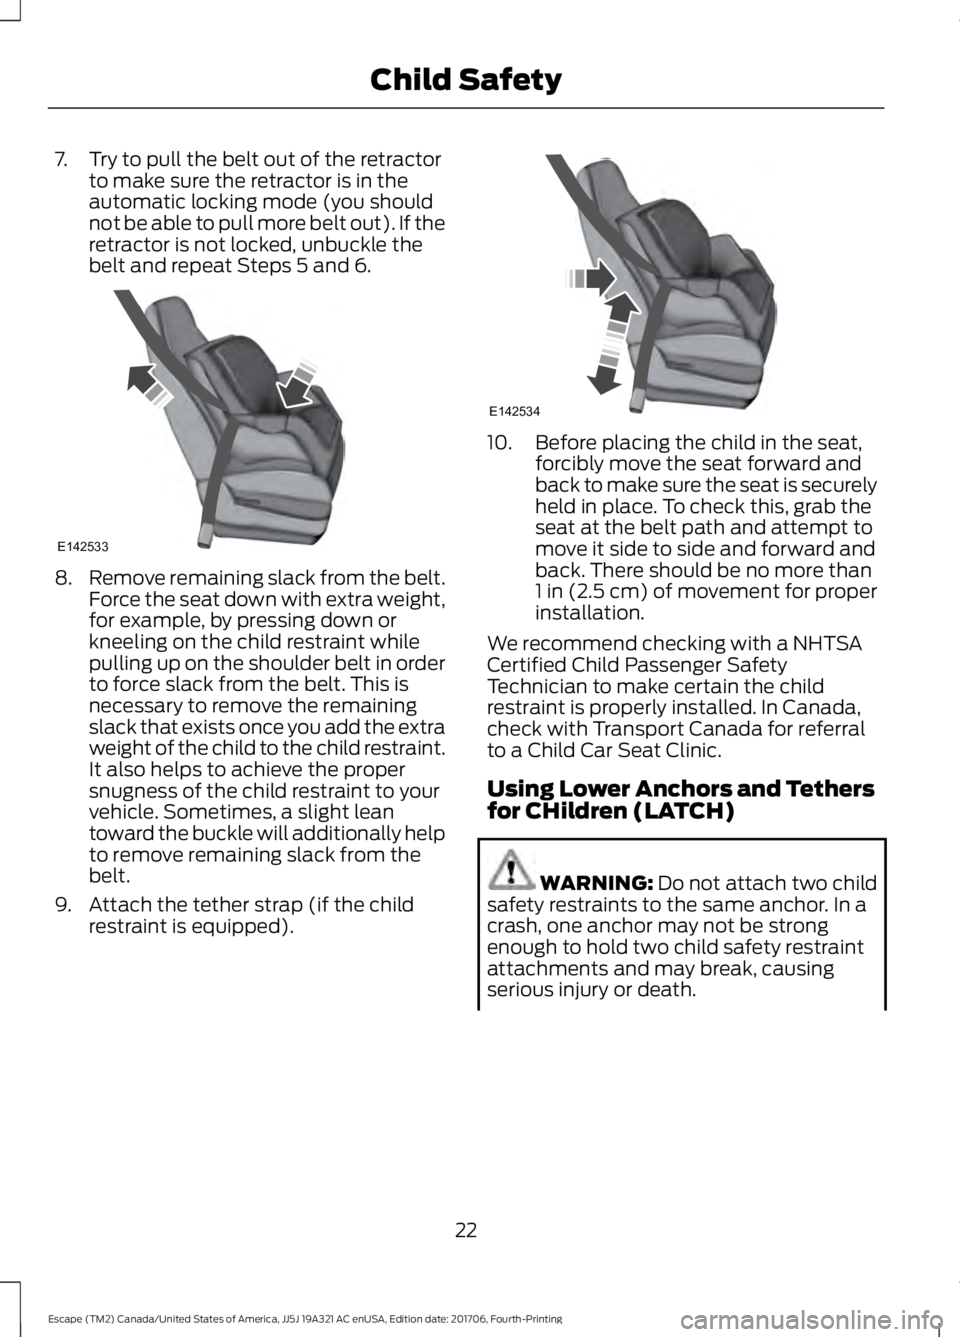
7. Try to pull the belt out of the retractor
to make sure the retractor is in the
automatic locking mode (you should
not be able to pull more belt out). If the
retractor is not locked, unbuckle the
belt and repeat Steps 5 and 6. 8.
Remove remaining slack from the belt.
Force the seat down with extra weight,
for example, by pressing down or
kneeling on the child restraint while
pulling up on the shoulder belt in order
to force slack from the belt. This is
necessary to remove the remaining
slack that exists once you add the extra
weight of the child to the child restraint.
It also helps to achieve the proper
snugness of the child restraint to your
vehicle. Sometimes, a slight lean
toward the buckle will additionally help
to remove remaining slack from the
belt.
9. Attach the tether strap (if the child restraint is equipped). 10. Before placing the child in the seat,
forcibly move the seat forward and
back to make sure the seat is securely
held in place. To check this, grab the
seat at the belt path and attempt to
move it side to side and forward and
back. There should be no more than
1 in (2.5 cm) of movement for proper
installation.
We recommend checking with a NHTSA
Certified Child Passenger Safety
Technician to make certain the child
restraint is properly installed. In Canada,
check with Transport Canada for referral
to a Child Car Seat Clinic.
Using Lower Anchors and Tethers
for CHildren (LATCH) WARNING: Do not attach two child
safety restraints to the same anchor. In a
crash, one anchor may not be strong
enough to hold two child safety restraint
attachments and may break, causing
serious injury or death.
22
Escape (TM2) Canada/United States of America, JJ5J 19A321 AC enUSA, Edition date: 201706, Fourth-Printing Child SafetyE142533 E142534
Page 37 of 517
How to Use the Automatic Locking
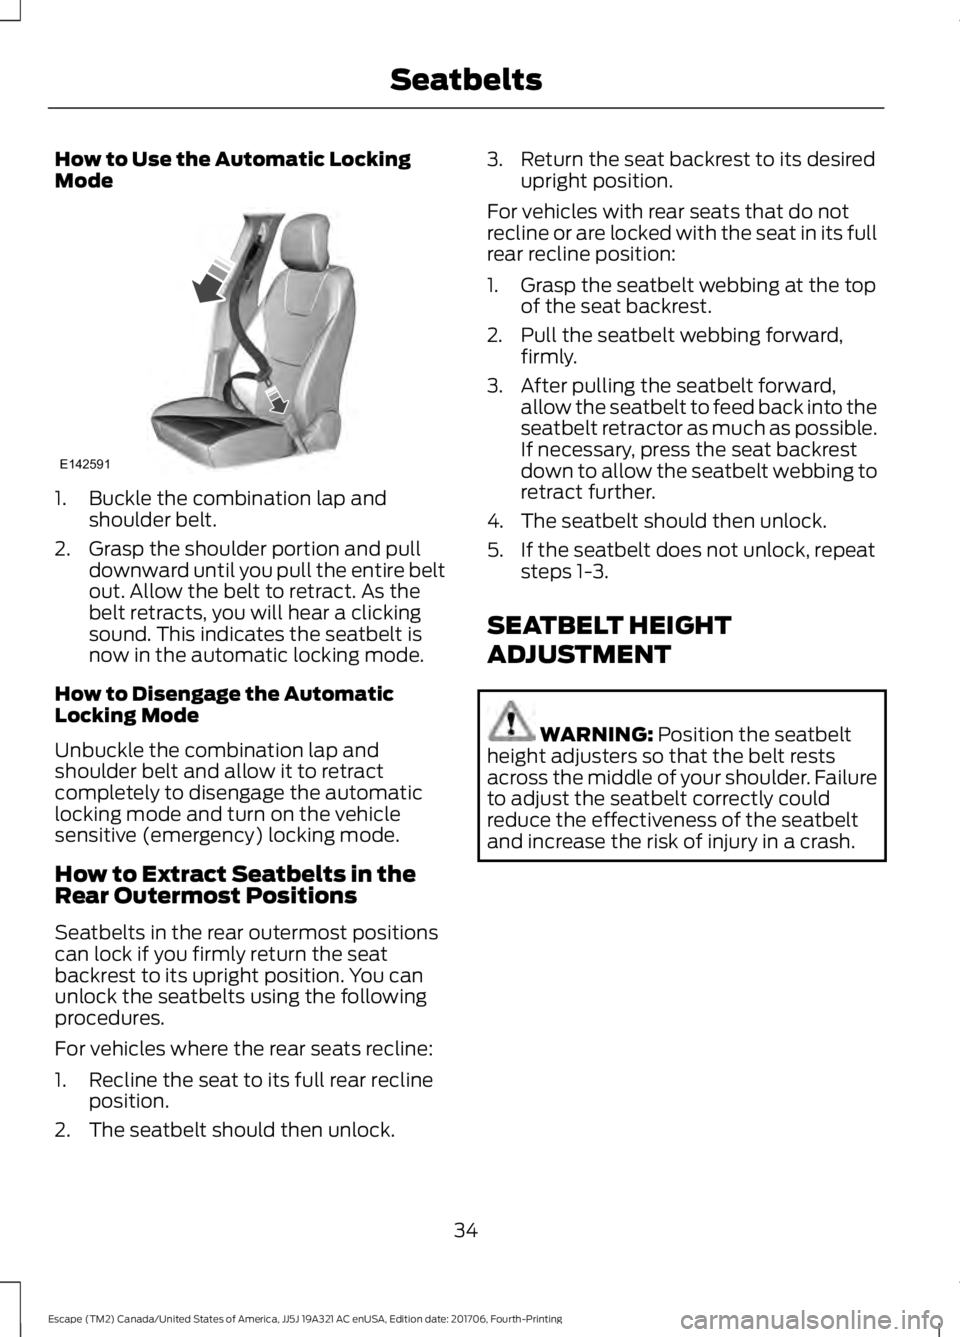
Mode
1. Buckle the combination lap and
shoulder belt.
2. Grasp the shoulder portion and pull downward until you pull the entire belt
out. Allow the belt to retract. As the
belt retracts, you will hear a clicking
sound. This indicates the seatbelt is
now in the automatic locking mode.
How to Disengage the Automatic
Locking Mode
Unbuckle the combination lap and
shoulder belt and allow it to retract
completely to disengage the automatic
locking mode and turn on the vehicle
sensitive (emergency) locking mode.
How to Extract Seatbelts in the
Rear Outermost Positions
Seatbelts in the rear outermost positions
can lock if you firmly return the seat
backrest to its upright position. You can
unlock the seatbelts using the following
procedures.
For vehicles where the rear seats recline:
1. Recline the seat to its full rear recline position.
2. The seatbelt should then unlock. 3. Return the seat backrest to its desired
upright position.
For vehicles with rear seats that do not
recline or are locked with the seat in its full
rear recline position:
1. Grasp the seatbelt webbing at the top of the seat backrest.
2. Pull the seatbelt webbing forward, firmly.
3. After pulling the seatbelt forward, allow the seatbelt to feed back into the
seatbelt retractor as much as possible.
If necessary, press the seat backrest
down to allow the seatbelt webbing to
retract further.
4. The seatbelt should then unlock.
5. If the seatbelt does not unlock, repeat steps 1-3.
SEATBELT HEIGHT
ADJUSTMENT WARNING: Position the seatbelt
height adjusters so that the belt rests
across the middle of your shoulder. Failure
to adjust the seatbelt correctly could
reduce the effectiveness of the seatbelt
and increase the risk of injury in a crash.
34
Escape (TM2) Canada/United States of America, JJ5J 19A321 AC enUSA, Edition date: 201706, Fourth-Printing SeatbeltsE142591
Page 44 of 517

After all occupants have adjusted their
seats and put on seatbelts, it is very
important that they continue to sit
properly. A properly seated occupant sits
upright, leaning against the seatback, and
centered on the seat cushion, with their
feet comfortably extended on the floor.
Sitting improperly can increase the chance
of injury in a crash event. For example, if
an occupant slouches, lies down, turns
sideways, sits forward, leans forward or
sideways, or puts one or both feet up, the
chance of injury during a crash is greatly
increased.
Children and Airbags
WARNING: Airbags can kill or injure
a child in a child restraint. Never place a
rear-facing child restraint in front of an
active airbag. If you must use a
forward-facing child restraint in the front
seat, move the seat upon which the child
restraint is installed all the way back. Children must always be properly
restrained. Accident statistics suggest that
children are safer when properly restrained
in the rear seating positions than in the
front seating position. Failure to follow
these instructions may increase the risk of
injury in a crash. FRONT PASSENGER SENSING
SYSTEM WARNING:
Even with advanced
restraints systems, properly restrain
children 12 and under in a rear seating
position. Failure to follow this could
seriously increase the risk of injury or death. WARNING:
Sitting improperly, out
of position or with the seatback reclined
too far can take weight off the seat cushion
and affect the decision of the passenger
sensing system, resulting in serious injury
or death in the event of a crash. Always sit
upright against your seat back, with your
feet on the floor. WARNING:
Always sit upright
against your seatback with your feet on
the floor. WARNING:
Any alteration or
modification to the front passenger seat
may affect the performance of the front
passenger sensing system. This could
seriously increase the risk of injury or death.
This system works with sensors that are
part of the front passenger seat and
seatbelt to detect the presence of a
properly-seated occupant and determine
if the front passenger frontal airbag should
be enabled (may inflate) or not. The indicators are on the center stack of
the instrument panel.
41
Escape (TM2) Canada/United States of America, JJ5J 19A321 AC enUSA, Edition date: 201706, Fourth-Printing Supplementary Restraints SystemE142846 E225141
Page 46 of 517

Passenger Airbag
Passenger Airbag Status
Indicator
Occupant
ON: Unlit Enabled
OFF: Unlit
Adult
ON: Lit
Note: When the passenger airbag status
off indicator illuminates, the passenger side
airbag (seat mounted) may be disabled to
avoid the risk of airbag deployment injuries.
After all occupants have adjusted their
seats and put on seatbelts, it is very
important that they continue to sit
properly. A properly seated occupant sits
upright, leaning against the seat backrest,
and centered on the seat cushion, with
their feet comfortably extended on the
floor. Sitting improperly can increase the
chance of injury in a crash event. For
example, if an occupant slouches, lies
down, turns sideways, sits forward, leans
forward or sideways, or puts one or both
feet up, the chance of injury during a crash
greatly increases.
If you think that the status of the passenger
airbag off indicator is incorrect, check for
the following:
• Objects lodged underneath the seat.
• Objects between the seat cushion and
the center console.
• Objects hanging off the seat backrest.
• Objects stowed in the seat backrest
map pocket.
• Objects placed on the occupant's lap.
• Cargo interference with the seat.
• Other passengers pushing or pulling on
the seat.
• Rear passenger feet and knees resting
or pushing on the seat. The conditions listed above may cause the
weight of a properly seated occupant to
be incorrectly interpreted by the passenger
sensing system. The person in the front
passenger seat may appear heavier or
lighter due to the conditions described in
the list above. Make sure the front passenger
sensing system is operating
properly. See Crash Sensors
and Airbag Indicator (page 46).
Do not attempt to repair or service the
system. Take your vehicle immediately to
an authorized dealer.
If it is necessary to modify an advanced
front airbag system to accommodate a
person with disabilities, contact your
authorized dealer.
SIDE AIRBAGS WARNING:
Do not place objects or
mount equipment on or near the airbag
cover, on the side of the seatbacks (of the
front seats), or in front seat areas that may
come into contact with a deploying airbag.
Failure to follow these instructions may
increase the risk of personal injury in the
event of a crash.
43
Escape (TM2) Canada/United States of America, JJ5J 19A321 AC enUSA, Edition date: 201706, Fourth-Printing Supplementary Restraints SystemE67017
Page 49 of 517

The system consists of the following:
•
Safety Canopy curtain airbags above
the trim panels over the front and rear
side windows identified by a label or
wording on the headliner or roof-pillar
trim.
• A flexible headliner which opens above
the side doors to allow air curtain
deployment · Crash sensors and monitoring
system with a readiness
indicator. See Crash Sensors
and Airbag Indicator (page 46).
Properly restrain children 12 years old and
under in the rear seats. The Safety Canopy
will not interfere with children restrained
using a properly installed child or booster
seat because it is designed to inflate
downward from the headliner above the
doors along the side window opening.
The design and development of the Safety
Canopy included recommended testing
procedures that were developed by a
group of automotive safety experts known
as the Side Airbag Technical Working
Group. These recommended testing
procedures help reduce the risk of injuries
related to the deployment of side airbags
(including the Safety Canopy). CRASH SENSORS AND
AIRBAG INDICATOR WARNING:
Modifying or adding
equipment to the front end of your vehicle
(including hood, bumper system, frame,
front end body structure, tow hooks and
hood pins) may affect the performance of
the airbag system, increasing the risk of
injury. Do not modify or add equipment to
the front end of your vehicle.
Your vehicle has a collection of crash and
occupant sensors which provide
information to the restraints control
module. The restraints control module
deploys (activates) the front seatbelt
pretensioners, driver airbag, passenger
airbag, knee airbag(s), seat mounted side
airbags and Safety Canopy airbags. Based
on the type of crash, the restraints control
module will deploy the appropriate safety
devices.
The restraints control module also
monitors the readiness of the above safety
devices plus the crash and occupant
sensors. The readiness of the safety
system is indicated by a warning indicator
light in the instrument cluster or by a
backup tone if the warning light is not
working. Routine maintenance of the
airbag is not required.
A difficulty with the system is indicated by
one or more of the following: The readiness light will not
illuminate immediately after you
switch the ignition on.
• The readiness light either flashes or
stays lit.
• You will hear a series of five beeps. The
tone pattern repeats periodically until
the problem, the light or both are
repaired.
46
Escape (TM2) Canada/United States of America, JJ5J 19A321 AC enUSA, Edition date: 201706, Fourth-Printing Supplementary Restraints SystemE75004 E67017 E67017
Page 121 of 517

The rear center head restraint consists of:
An energy absorbing head
restraint.
A
Two steel stems.
B
Guide sleeve unlock and remove
button.
C
Adjusting the Head Restraint
Raising the Head Restraint
Pull the head restraint up.
Lowering the Head Restraint
1. Press and hold button C.
2. Push the head restraint down.
Removing the Head Restraint
1. Pull the head restraint up until it reaches its highest position.
2. Press and hold buttons C and D.
3. Pull the head restraint up.
Installing the Head Restraint
Align the steel stems into the guide sleeves
and push the head restraint down until it
locks.
Folding the Head Restraint
1. Press and hold button E.
2. Pull the head restraint back up to reset.
Tilting Head Restraints
The front head restraints tilt for extra
comfort. To tilt the head restraint, do the
following: 1. Adjust the seatback to an upright
driving or riding position.
2. Pivot the head restraint forward toward
your head to the desired position.
After the head restraint reaches the
forward-most tilt position, pivot it forward
again to release it to the rearward, un-tilted
position.
MANUAL SEATS (If Equipped) WARNING:
Do not adjust the driver
seat or seat backrest when your vehicle is
moving. This may result in sudden seat
movement, causing the loss of control of
your vehicle.
Moving the Seat Backward and
Forward WARNING: Make sure the seat fully
locks into place by rocking it backward and
forward.
118
Escape (TM2) Canada/United States of America, JJ5J 19A321 AC enUSA, Edition date: 201706, Fourth-Printing SeatsE144727
Page 302 of 517

14.
Remove the jack and fully tighten the
lug nuts in the order shown. See
Technical Specifications (page
299).
Stowing the flat tire
1. Put the jack and lug wrench away. Make sure the jack is fastened so it
does not rattle when you drive.
2. Unblock the wheels.
3. Stow the flat tire on the floor in the cargo area. Secure with the flat tire
retainer strap by following the next
steps: 4. Locate the cargo tie-down near the
seatback. Push the loop of the retainer
strap through the tie-down. Thread the
non-loop end through the loop. 5. Weave the retainer strap through the
wheel openings.
6. Locate the front cargo tie-down at the
opposite corner of the cargo area to
the tie-down used in Step 4. Thread
the retainer strap through the tie-down
and pull tight.
7. Secure by tying a 2-half hitch knot. TECHNICAL SPECIFICATIONS
299
Escape (TM2) Canada/United States of America, JJ5J 19A321 AC enUSA, Edition date: 201706, Fourth-Printing Wheels and TiresE142906 E157926 E143746