2018 FORD EDGE ECU
[x] Cancel search: ECUPage 78 of 557

2. Open the center console lid. With the
buttons facing upward and the unlock
button facing the front of your vehicle,
place the first intelligent access key
into the backup slot.
3. Press the push button ignition switch.
4. Wait five seconds and then press the push button ignition switch again.
5. Remove the intelligent access key.
6. Within 10 seconds, place a second programmed intelligent access key in
the backup slot and press the push
button ignition switch.
7. Wait five seconds and then press the push button ignition switch again.
8. Remove the intelligent access key. 9. Wait five seconds, then place the
unprogrammed intelligent access key
in the backup slot and press the push
button ignition switch.
Programming is now complete. Check that
the remote control functions operate and
your vehicle starts with the new intelligent
access key.
If programming was unsuccessful, wait 10
seconds and repeat steps 1 through 7. If it
still does not work, take your vehicle to an
authorized dealer.
ANTI-THEFT ALARM
The system will warn you of an
unauthorized entry to your vehicle. It will
be triggered if any door, the luggage
compartment or the hood is opened
without using the key, remote control or
keyless entry keypad.
The direction indicators will flash and the
horn will sound if unauthorized entry is
attempted while the alarm is armed.
Take all remote controls to an authorized
dealer if there is any potential alarm
problem with your vehicle.
Arming the Alarm
The alarm is ready to arm when there is
not a key in your vehicle. Electronically lock
your vehicle to arm the alarm.
Disarming the Alarm
Disarm the alarm by any of the following
actions:
75
Edge (CDQ) Canada/United States of America, enUSA, Edition date: 201706, Third-Printing- SecurityE260239
Page 79 of 557

•
Unlock the doors or luggage
compartment with the remote control
or keyless entry keypad.
• Switch your vehicle on or start your
vehicle.
• Use a key in the driver door to unlock
your vehicle, then switch your vehicle
on within 12 seconds.
Note: Pressing the panic button on the
remote control will stop the horn and signal
indicators, but will not disarm the system.
76
Edge (CDQ) Canada/United States of America, enUSA, Edition date: 201706, Third-Printing- Security
Page 121 of 557

Blind Spot Information and Cross Traffic Alert System
Action
Message
A fault with the system has occurred. Contact an authorizeddealer as soon as possible.
Blindspot System Fault
The system sensors are blocked. See Cross Traffic Alert
(page 223).
Blindspot Not Available
Sensor Blocked See Manual
The system detects a vehicle. See Cross Traffic Alert (page 223
).
Cross Traffic Vehicle
Coming From X
The system sensors are blocked. See
Cross Traffic Alert
(page 223).
Cross Traffic Not Avail-
able Sensor Blocked See Manual
A fault with the system has occurred. Contact an authorized dealer.
Cross Traffic System
Fault
Doors and Locks Action
Message
The door listed is not completely closed.
Driver Door Ajar
The door listed is not completely closed.
Passenger Door Ajar
The door listed is not completely closed.
Rear Left Door Ajar
The door listed is not completely closed.
Rear Right Door Ajar
The door listed is not completely closed.
Liftgate Ajar
The hood is not completely closed.
Hood Ajar
The system has disabled the door switches.
Switches Inhibited
Security Mode
The factory keypad code displays in the information displayafter system resets the keypad. See
Keyless Entry (page
67).
Factory Keypad Code {X
X X X X}
118
Edge (CDQ) Canada/United States of America, enUSA, Edition date: 201706, Third-Printing- Information Displays
Page 145 of 557

1. Adjust the seat backrest to an upright
driving or riding position.
2. Pivot the head restraint forward toward
your head to the desired position.
After the head restraint reaches the
forward-most tilt position, pivoting it
forward again will then release it to the
rearward, un-tilted position.
MANUAL SEATS (If Equipped) WARNING:
Do not adjust the driver
seat or seat backrest when your vehicle is
moving. This may result in sudden seat
movement, causing the loss of control of
your vehicle. WARNING: Make sure the seat fully
locks into place by rocking it backward and
forward. Not securing the seat into the
locked position can be dangerous in a
crash and could cause serious personal
injury or death. WARNING:
Reclining the seatback
can cause an occupant to slide under the
seat's seatbelt, resulting in severe personal
injuries in the event of a crash.
The driver and passenger manual seats
may consist of: A bar to move the seat backward
and forward.
A
A control to adjust the lumbar of
the seatback (driver seat only).
B
A lever to adjust the height of the
seat (driver seat only).
C
A lever to adjust the angle of the
seatback.
D
POWER SEATS WARNING:
Do not adjust the driver
seat when your vehicle is moving. WARNING:
Do not place cargo or
any objects behind the seatback before
returning it to the original position.
Note: Driver seat shown, passenger seat
similar.
142
Edge (CDQ) Canada/United States of America, enUSA, Edition date: 201706, Third-Printing- SeatsE144727 ABCD
E144631
Page 154 of 557

HomeLink Wireless Control
System
WARNING: Do not use the system
with any garage door opener that does not
have the safety stop and reverse feature
as required by U.S. Federal Safety
Standards (this includes any garage door
opener manufactured before April 1, 1982).
A garage door opener which cannot detect
an object, signaling the door to stop and
reverse, does not meet current federal
safety standards. Using a garage door
opener without these features increases
the risk of serious injury or death.
Note: Make sure that the garage door and
security device are free from obstruction
when you are programming. Do not program
the system with the vehicle in the garage.
Note: Make sure you keep the original
remote control transmitter for use in other
vehicles as well as for future system
programming.
Note: We recommend that upon the sale
or lease termination of your vehicle, you
erase the programmed function buttons for
security reasons. See Erasing the Function
Button Codes
.
Note: You can program a maximum of
three devices. To change or replace any of
the three devices after it has been initially
programmed, you must first erase the
current settings. See Erasing the Function
Button Codes
. The universal garage door opener replaces
the common hand-held garage door
opener with a three-button transmitter
that is integrated into the driver
’s sun visor.
The system includes two primary features,
a garage door opener and a platform for
remote activation of devices within the
home. As well as being programmed for
garage doors, the system transmitter can
be programmed to operate entry gate
operators, security systems, entry door
locks and home or office lighting.
Additional system information can be
found online at www.homelink.com,
www.youtube.com/HomeLinkGentex or
by calling the toll-free help line on
1-800-355-3515.
In-Vehicle Programming
This process is to program your hand-held
transmitter and your in-vehicle HomeLink
button.
Note: The programming steps below
assume you will be programming HomeLink
that was not previously programmed.
Note: Put a new battery in the hand-held
transmitter. This will ensure quicker training
and accurate transmission of the
radio-frequency signal. 1.
With your vehicle parked outside of the
garage, turn your ignition to the
on
position, but do not start your vehicle.
151
Edge (CDQ) Canada/United States of America, enUSA, Edition date: 201706, Third-Printing- Universal Garage Door Opener
(If Equipped)E142657 E142658
Page 180 of 557

AUTOMATIC TRANSMISSION
WARNING: Always fully apply the
parking brake and make sure you shift into
park (P). Failure to follow this instruction
could result in personal injury or death. WARNING:
Do not apply the brake
pedal and accelerator pedal
simultaneously. Applying both pedals
simultaneously for more than a few
seconds will limit engine performance,
which may result in difficulty maintaining
speed in traffic and could lead to serious
injury. WARNING:
Hold the brake pedal
down when moving the gearshift lever. If
you do not hold down the brake pedal, the
vehicle may move unexpectedly, resulting
in property damage, personal injury or
death.
Note: You may not be able to shift out of
park (P) unless the intelligent access key is
inside your vehicle.
Understanding the Positions of
Your Automatic Transmission
Putting your vehicle in or out of gear:
1. Fully press down on the brake pedal.
2. Move the gearshift lever into the desired gear.
3. When you are finished driving, come to
a complete stop.
4. Move the gearshift lever and securely latch it in park (P). Park (P)
This position locks the transmission and
prevents the wheels from turning.
Reverse (R)
With the gearshift lever in reverse (R), your
vehicle moves backward. Always come to
a complete stop before shifting into and
out of reverse (R).
Neutral (N)
With the gearshift lever in neutral (N), your
vehicle can be started and is free to roll.
Hold the brake pedal down while in this
position.
Drive (D)
Drive (D) is the normal driving position for
the best fuel economy. The overdrive
function allows automatic upshifts and
downshifts through gears one through six.
177
Edge (CDQ) Canada/United States of America, enUSA, Edition date: 201706, Third-Printing- TransmissionPRNDS
E142628
Page 234 of 557

REAR UNDER FLOOR
STORAGE
Cargo Management System
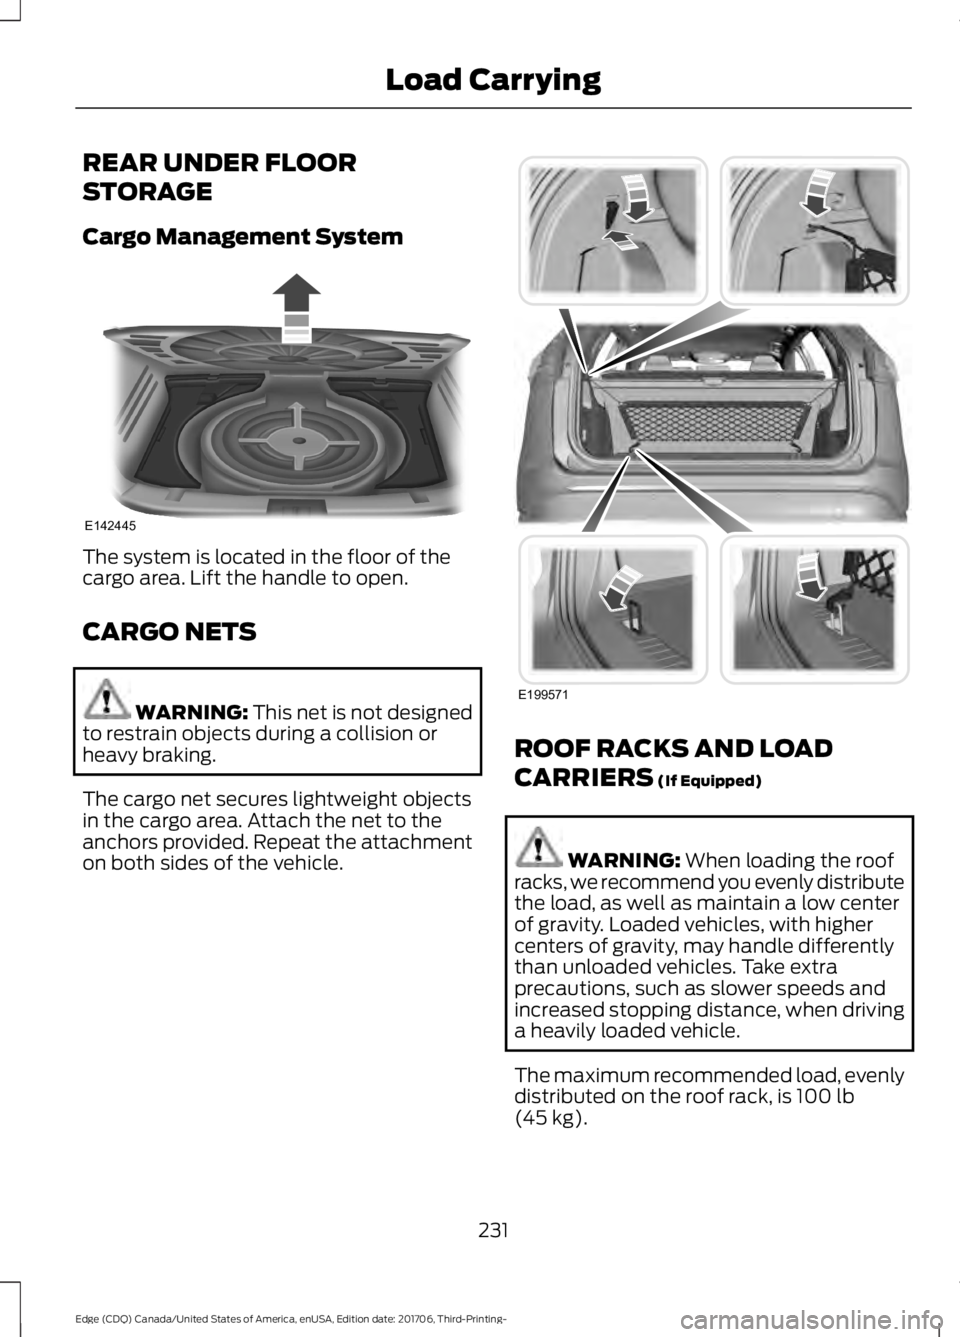
The system is located in the floor of the
cargo area. Lift the handle to open.
CARGO NETS
WARNING: This net is not designed
to restrain objects during a collision or
heavy braking.
The cargo net secures lightweight objects
in the cargo area. Attach the net to the
anchors provided. Repeat the attachment
on both sides of the vehicle. ROOF RACKS AND LOAD
CARRIERS
(If Equipped)
WARNING:
When loading the roof
racks, we recommend you evenly distribute
the load, as well as maintain a low center
of gravity. Loaded vehicles, with higher
centers of gravity, may handle differently
than unloaded vehicles. Take extra
precautions, such as slower speeds and
increased stopping distance, when driving
a heavily loaded vehicle.
The maximum recommended load, evenly
distributed on the roof rack, is
100 lb
(45 kg).
231
Edge (CDQ) Canada/United States of America, enUSA, Edition date: 201706, Third-Printing- Load CarryingE142445 E199571
Page 235 of 557

Note:
Never place loads directly on the roof
panel. The roof panel is not designed to
directly carry a load.
For correct roof rack system function, you
must place loads directly on crossbars
affixed to the roof rack side rails. When
using the roof rack system, we recommend
you use Ford Genuine Accessory crossbars
designed specifically for your vehicle.
Make sure that you securely fasten the
load. Check the tightness of the load
before driving and at each fuel stop.
LOAD LIMIT
Vehicle Loading - with and
without a Trailer
This section guides you in the
proper loading of your vehicle,
trailer, or both. Keep your loaded
vehicle weight within its design
rating capability, with or without
a trailer. Properly loading your
vehicle provides maximum return
of vehicle design performance.
Before you load your vehicle,
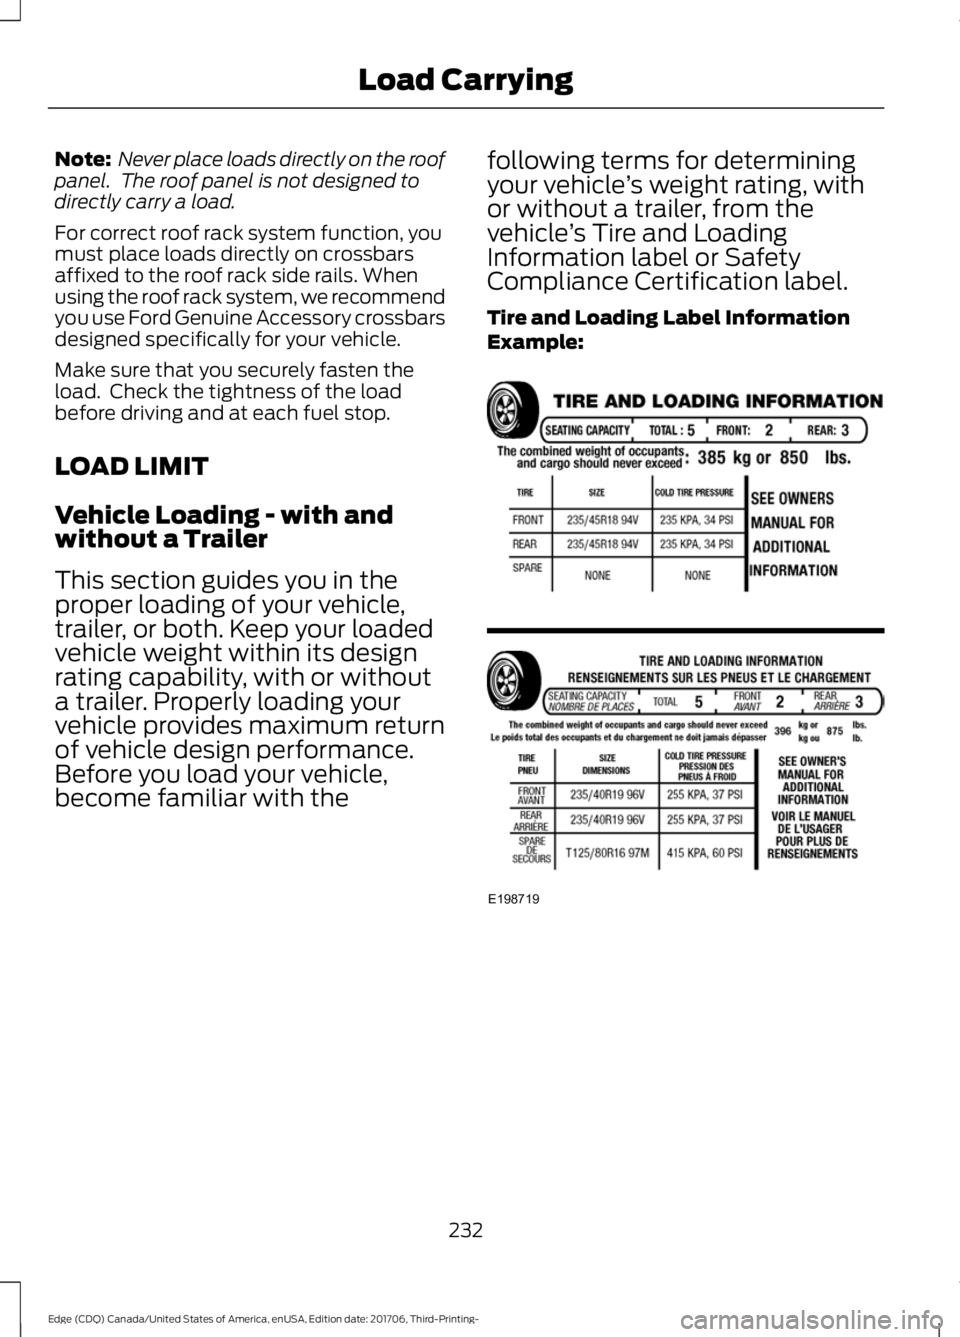
become familiar with the following terms for determining
your vehicle
’s weight rating, with
or without a trailer, from the
vehicle ’s Tire and Loading
Information label or Safety
Compliance Certification label.
Tire and Loading Label Information
Example: 232
Edge (CDQ) Canada/United States of America, enUSA, Edition date: 201706, Third-Printing- Load CarryingE198719