2018 FORD ECOSPORT headlamp
[x] Cancel search: headlampPage 96 of 452

Keyless Vehicle
ActionMessage
Displayed if the key is not detected by the system. SeePush Button Ignition Switch (page 120).No Key Detected
Displayed as a reminder to turn off the vehicle. SeePush Button Ignition Switch (page 120).Switch ignition off.
Displayed as a reminder to press the brake whilestarting the vehicle.To START Press Brake
Displayed when a valid key is not detected within thevehicle. See Push Button Ignition Switch (page 120).Key Not Inside vehicle
Displays when the key battery is low. Change thebattery as soon as possible. See Remote Control(page 45).
Key Battery low Replace soon
Lighting
ActionMessage
Displays if an electrical malfunction occurs with theheadlamp system. Have your vehicle checked as soonas possible.
Check Headlamp System Seemanual
Maintenance
ActionMessage
Indicates the brake fluid level is low and the brakesystem should be inspected immediately. See BrakeFluid Check (page 212).
Brake fluid level low Servicenow
Indicates that the vehicle sold date has beensuccessful updated. If this date has not been set,contact your authorized dealer.
Maintenance Set initial date
Displays when the date and time are not set.Maintenance Set date
92EcoSport (CBW) Canada/United States of America, Vehicles Built From: 14-08-2017, GN15-19G219-ZFB enUSA, First PrintingInformation Displays
Page 126 of 452

•Move the transmission selector leverto the neutral position (vehicles with amanual transmission) or position N(vehicles with an automatictransmission) and use the brakes tobring your vehicle to a safe stop.
•When your vehicle has stopped, movethe transmission selector lever to theneutral position (vehicles with amanual transmission) or position N(vehicles with an automatictransmission) and switch the ignitionoff.
STARTING A GASOLINE
ENGINE
Before starting the engine, check thefollowing:
•Make sure all occupants have fastenedtheir seatbelts.
•Make sure the headlamps andelectrical accessories are off.
•Make sure the parking brake is on.
•Shift into park (P) or neutral.
Note:You can only attempt to start theengine for a limited amount of time beforethe starting system temporarily disables. Ifyou exceed the starting time limit, amessage may appear and you cannotattempt to start the engine for at least 15minutes.
Cold or Hot Engine
Vehicles with Manual Transmission
Note:Do not touch the accelerator pedal.
Note:Releasing the clutch pedal duringengine starting stops the engine fromcranking.
1.Fully depress the clutch pedal.
2.Start the engine.
Vehicles with Automatic Transmission
Note:Do not touch the accelerator pedal.
1.Fully depress the brake pedal.
2.Shift into park (P) or neutral (N).
3.Start the engine.
All Vehicles
If the engine does not start within 10seconds, wait for a short period and tryagain.
If the engine does not start after threeattempts, wait ten seconds and follow theflooded engine procedure.
If you have difficulty starting the enginewhen the temperature is below -13.0°F(-25°C), press the accelerator pedal to themid-way point of its travel and try again.
Fuel Flooded Engine
Vehicles with Manual Transmission
1.Fully depress the clutch pedal.
2.Fully depress the accelerator pedal andhold it there.
3.Start the engine.
Vehicles with Automatic Transmission
1.Fully depress the brake pedal.
2.Shift into park (P) or neutral (N).
3.Fully depress the accelerator pedal andhold it there.
4.Start the engine.
All Vehicles
If the engine does not start, repeat the coldor hot engine procedure.
122EcoSport (CBW) Canada/United States of America, Vehicles Built From: 14-08-2017, GN15-19G219-ZFB enUSA, First PrintingStarting and Stopping the Engine
Page 220 of 452

ADJUSTING THE HEADLAMPS
Vertical Aim Adjustment
The headlamps on your vehicle areproperly aimed at the assembly plant. Ifyour vehicle has been in an accident, thealignment of your headlamps should bechecked by your authorized dealer.
8 feet (2.4 meters)A
Center height of lamp to groundB
25 feet (7.6 meters)C
Horizontal reference lineD
Vehicles With Halogen Headlamps
1.Park the vehicle directly in front of awall or screen on a level surface,approximately 25 feet (7.6 meters)away.
2.Measure the height of the headlampbulb center from the ground and markan 8 foot (2.4 meter) horizontalreference line on the vertical wall orscreen at this height.
Note:To see a clearer light pattern foradjusting, you may want to block the lightfrom one headlamp while adjusting theother.
3.Turn on the low beam headlamps toilluminate the wall or screen and openthe hood.
4.On the wall or screen you will observea flat zone of high intensity lightlocated at the top of the right handportion of the beam pattern. If the topedge of the high intensity light zone isnot at the horizontal reference line, theheadlamp will need to be adjusted.
5.Locate the vertical adjuster on eachheadlamp. Using a Phillips #2screwdriver, turn the adjuster eitherclockwise or counterclockwise in orderto aim the headlamp. The horizontaledge of the brighter light should touchthe horizontal reference line.
6.Close the hood and turn off the lamps.
Vehicles With High Intensity DischargeHeadlamps
1.Park the vehicle directly in front of awall or screen on a level surface,approximately 25 feet (7.6 meters)away.
216EcoSport (CBW) Canada/United States of America, Vehicles Built From: 14-08-2017, GN15-19G219-ZFB enUSA, First PrintingMaintenance
Page 221 of 452

2.Measure the height of the headlampbulb center from the ground and markan 8 foot (2.4 meter) horizontalreference line on the vertical wall orscreen at this height.
Note:To see a clearer light pattern foradjusting, you may want to block the lightfrom one headlamp while adjusting theother.
3.Turn on the low beam headlamps toilluminate the wall or screen and openthe hood.
4.There is a distinct cut-off (change fromlight to dark) in the left portion of thebeam pattern. The top edge of thiscut-off should be positioned twoinches (5 centimeters) below thehorizontal reference line.
5.Locate the vertical adjuster on eachheadlamp. Using a Phillips #2screwdriver, turn the adjuster eitherclockwise or counterclockwise in orderto aim the headlamp.
6.Close the hood and turn off the lamps.
Horizontal Aim Adjustment
Horizontal aim is not required for thisvehicle and is non-adjustable.
REMOVING A HEADLAMP
Open the hood. See Opening andClosing the Hood (page 202).
217EcoSport (CBW) Canada/United States of America, Vehicles Built From: 14-08-2017, GN15-19G219-ZFB enUSA, First PrintingMaintenance
Page 222 of 452

Disconnect the electrical connector.
Note:When fitting the headlamp, makesure that you reconnect the electricalconnector correctly.
Note:When fitting the headlamp, makesure that you fully engage the headlamp inthe lower fixing point.
CHANGING A BULB
Note:Handle a halogen headlamp bulbcarefully and keep out of children’s reach.Grasp the bulb by only its plastic base anddo not touch the glass. The oil from yourhand could cause the bulb to break the nexttime the headlamps are operated.
WARNING
Bulbs can become hot. Let the bulbcool down before removing it. Failureto do so could result in personalinjury.
Note:Switch the lights and the ignition off.
Note:Do not touch the bulb glass.
Note:Only fit bulbs of the correctspecification.
Note:The following instructions describehow to remove the bulbs. Fit replacementsin the reverse order unless otherwise stated.
Headlamp
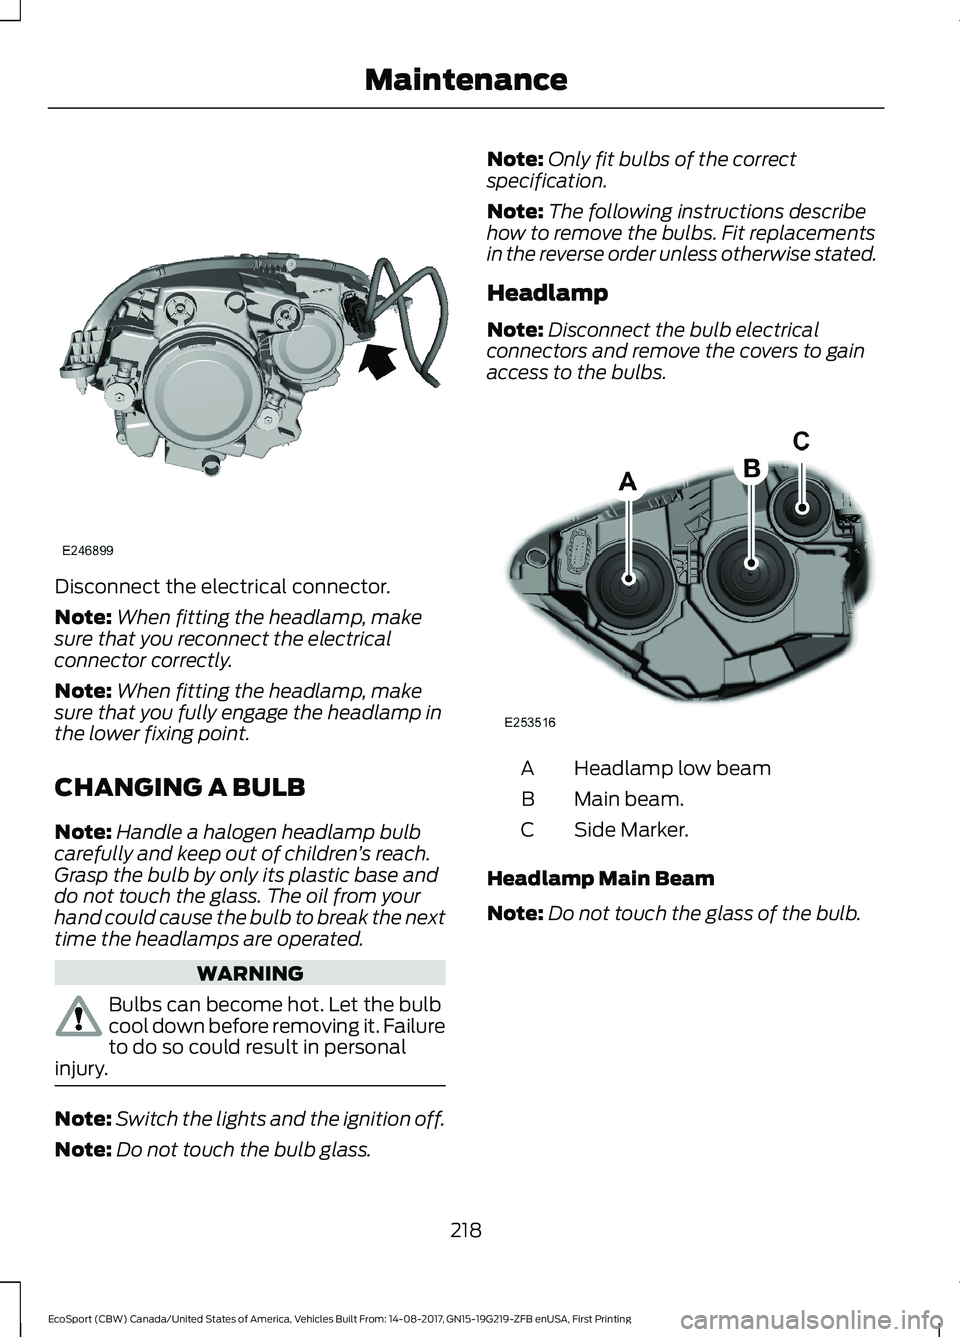
Note:Disconnect the bulb electricalconnectors and remove the covers to gainaccess to the bulbs.
Headlamp low beamA
Main beam.B
Side Marker.C
Headlamp Main Beam
Note:Do not touch the glass of the bulb.
218EcoSport (CBW) Canada/United States of America, Vehicles Built From: 14-08-2017, GN15-19G219-ZFB enUSA, First PrintingMaintenance
Page 223 of 452

1.Open the hood.
2.Carefully remove the cover.
3.Disconnect the electrical connector.
4.Release the clip and remove the bulb.
Headlamp Low Beam
Note:Do not touch the glass of the bulb.
1.Open the hood.
2.Carefully remove the cover.
3.Disconnect the electrical connector.
4.Release the clip and remove the bulb.
Side Marker
1.Carefully remove the cover.
2.Disconnect the electrical connector.
3.Release the clip and remove the bulb.
219EcoSport (CBW) Canada/United States of America, Vehicles Built From: 14-08-2017, GN15-19G219-ZFB enUSA, First PrintingMaintenance
Page 231 of 452

Power (watt)SpecificationLamp
21P21WReversing lamps.
5W5WNumber plate lamp.
5W5WLuggage compartment lamp.
5W5WVanity lamp.
-LEDDaytime running lamps.
Low Series
Power (watt)SpecificationLamp
60HB3Headlamp high beam.
55H11Headlamp lown beam.
Mid Series
Power (watt)SpecificationLamp
60HB3Headlamp high beam.
55H11Headlamp lown beam.
Note:On some vehicles the lamps are LED.These are not serviceable items, pleaseconsult your dealer if they fail.
CHANGING THE ENGINE AIR
FILTER
WARNING
To reduce the risk of vehicle damageand personal burn injuries, do notstart your engine with the air cleanerremoved and do not remove it while theengine is running.
Note:Failure to use the correct air filterelement may result in severe enginedamage.
Changing the Air Filter Element
1.Remove the two clips that secure theair filter housing cover.
2.Carefully separate the two halves ofthe air filter housing.
3.Remove the air filter element from theair filter housing.
4.Wipe the air filter housing and coverclean to remove any dirt or debris andto ensure good sealing.
5.Install a new air filter element. Becareful not to crimp the filter elementedges between the air filter housingand cover. This could cause filterdamage and allow unfiltered air toenter the engine if not properly seated.
227EcoSport (CBW) Canada/United States of America, Vehicles Built From: 14-08-2017, GN15-19G219-ZFB enUSA, First PrintingMaintenance
Page 234 of 452

SpecificationName
(Canada)ZC-14 (U.S.)
ESR-M14P5-AMotorcraft® Ultra-Clear Spray Glass Cleaner (U.S.)Motorcraft® Premium Glass Cleaner / Nettoie-vitres de qualitésupérieure Motorcraft® (Canada)ZC-23 (U.S.)CXC-100 (Canada)
-Motorcraft® Wheel and Tire Cleaner (U.S.)Motorcraft® Wheel and Tire Cleaner / Nettoyant pour roues et pneusMotorcraft® (Canada)ZC-37-A (U.S. & Canada)
CLEANING THE EXTERIOR
Wash your vehicle regularly with cool orlukewarm water and a neutral pHshampoo, we recommend MotorcraftDetail Wash.
•Never use strong household detergentsor soap, for example dish washing orlaundry liquid. These products candiscolor and spot painted surfaces.
•Never wash your vehicle when it is hotto the touch, or during strong or directsunlight.
•Dry your vehicle with a chamois or softterry cloth towel to eliminate waterspotting.
•Immediately remove fuel spillages, birddroppings, insect deposits and road tar.These may cause damage to yourvehicle’s paintwork or trim over time.We recommend Motorcraft Bug andTar Remover.
•Remove any exterior accessories, forexample antennas, before entering acar wash.
•When filling with AdBlue®, remove anyresidue on painted surfacesimmediately.
Note:Suntan lotions and insect repellentscan damage painted surfaces. If thesesubstances come in contact with yourvehicle, wash the affected area as soon aspossible.
Cleaning the Headlamps
Note:Do not scrape the headlamp lensesor use abrasives, alcoholic solvents orchemical solvents to clean them.
Note:Do not wipe the headlamps whenthey are dry.
Exterior Chrome Parts
•Apply a high quality-cleaning productto bumpers and other chrome parts.Follow the manufacturer’s instructions.We recommend Motorcraft CustomBright Metal Cleaner.
•Do not apply the cleaning product tohot surfaces. Do not leave the cleaningproduct on chrome surfaces longerthan the time recommended.
•Using non-recommended cleaners canresult in severe and permanentcosmetic damage.
Note:Never use abrasive materials, forexample steel wool or plastic pads as theycan scratch the chrome surface.
Note:Do not use chrome cleaner, metalcleaner or polish on wheels or wheel covers.
230EcoSport (CBW) Canada/United States of America, Vehicles Built From: 14-08-2017, GN15-19G219-ZFB enUSA, First PrintingVehicle Care