2018 FORD E-450 tow
[x] Cancel search: towPage 5 of 323

Audible Warnings and Indicators
............55
Information Displays
General Information .....................................
56
Information Messages .................................
61
Climate Control
Manual Climate Control .............................
64
Hints on Controlling the Interior Climate ........................................................................\
..
65
Rear Passenger Climate Controls ...........
66
Seats
Sitting in the Correct Position ..................
68
Head Restraints .............................................
68
Manual Seats .................................................
69
Power Seats ....................................................
69
Auxiliary Power Points
Auxiliary Power Points ..................................
71
Starting and Stopping the Engine
General Information .....................................
73
Ignition Switch ................................................
73
Starting a Gasoline Engine .........................
73
Engine Block Heater .....................................
75
Fuel and Refueling
Safety Precautions .......................................
76
Fuel Quality - E85 .........................................
76
Fuel Quality - Gasoline ................................
78
Running Out of Fuel .....................................
78
Refueling ...........................................................
79
Fuel Consumption ........................................
80
Engine Emission Control
Emission Law ..................................................
82
Catalytic Converter .......................................
83Transmission
Automatic Transmission
............................
86
Rear Axle
Limited Slip Differential .............................
89
Brakes
General Information ....................................
90
Hints on Driving With Anti-Lock Brakes ........................................................................\
..
90
Parking Brake ...................................................
91
Traction Control
Principle of Operation .................................
92
Using Traction Control ................................
92
Parking Aids
Rear View Camera ........................................
93
Cruise Control
Principle of Operation .................................
95
Using Cruise Control ....................................
95
Driving Aids
Steering ............................................................
96
Load Carrying
Load Limit ........................................................
97
Towing
Towing a Trailer ............................................
102
Trailer Sway Control ...................................
103
Recommended Towing Weights ...........
103
Essential Towing Checks ..........................
107
Towing the Vehicle on Four Wheels ......
113
Driving Hints
Breaking-In ......................................................
114
Reduced Engine Performance .................
114
2
E-Series (TE4) Canada/United States of America, enUSA, Edition date: 201712, Second Printing Table of Contents
Page 16 of 323

PROTECTING THE
ENVIRONMENT
You should play your part in protecting the
environment. Correct vehicle usage and
the authorized disposal of waste, cleaning
and lubrication materials are significant
steps toward this aim.
For details about Ford Motor
Company's sustainability progress and
initiatives visit:
Web Address
www.sustainability.ford.com
13
E-Series (TE4) Canada/United States of America, enUSA, Edition date: 201712, Second Printing Environment
Page 17 of 323

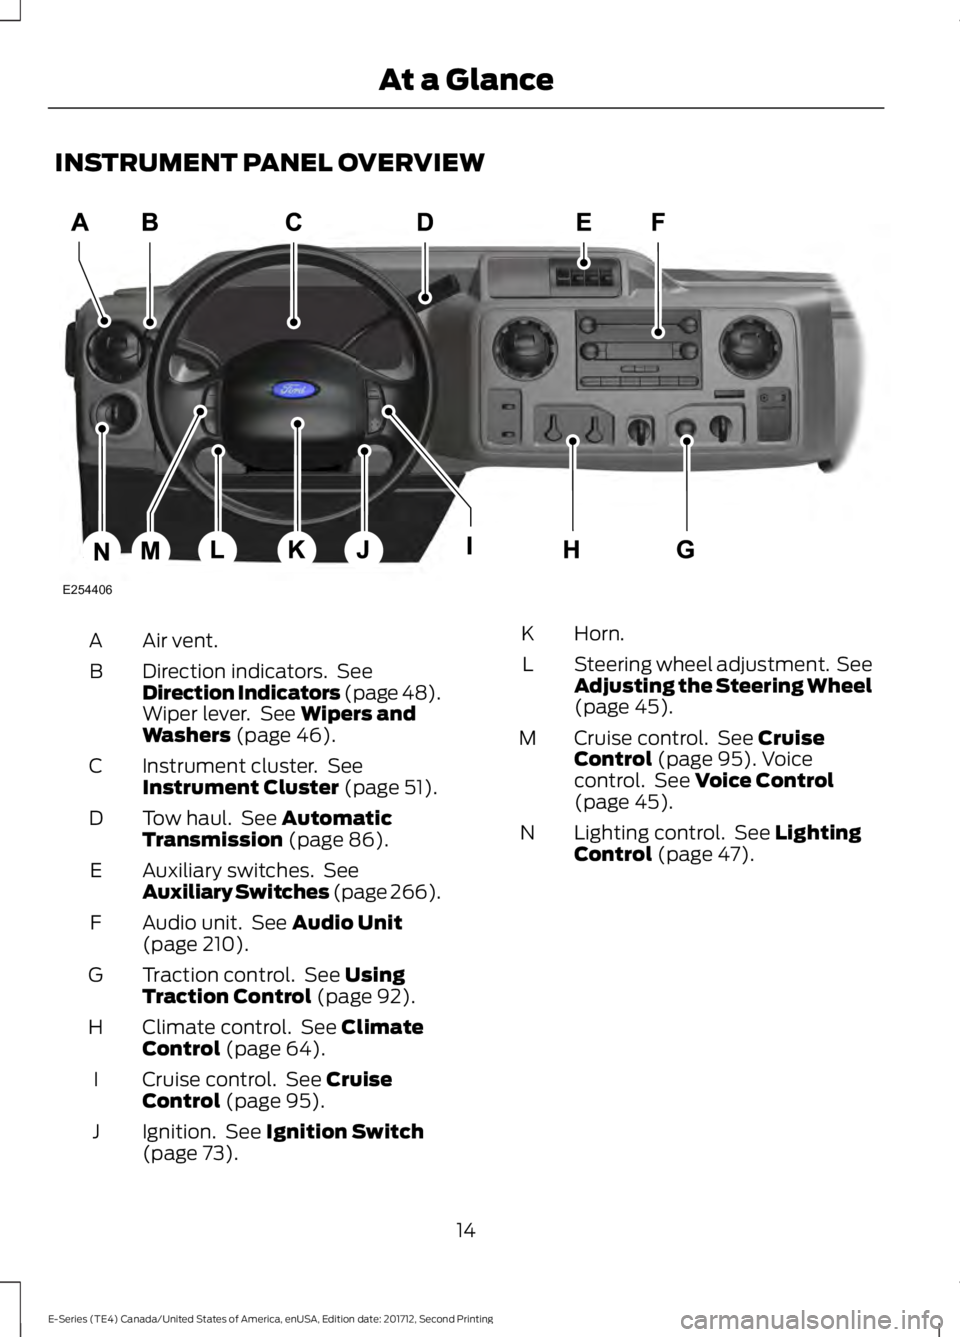
INSTRUMENT PANEL OVERVIEW
Air vent.
A
Direction indicators. See
Direction Indicators (page 48).
Wiper lever. See Wipers and
Washers (page 46).
B
Instrument cluster. See
Instrument Cluster
(page 51).
C
Tow haul. See
Automatic
Transmission (page 86).
D
Auxiliary switches. See
Auxiliary Switches (page 266).
E
Audio unit. See
Audio Unit
(page 210).
F
Traction control. See
Using
Traction Control (page 92).
G
Climate control. See
Climate
Control (page 64).
H
Cruise control. See
Cruise
Control (page 95).
I
Ignition. See
Ignition Switch
(page 73).
J Horn.
K
Steering wheel adjustment. See
Adjusting the Steering Wheel
(page
45).
L
Cruise control. See
Cruise
Control (page 95). Voice
control. See Voice Control
(page 45).
M
Lighting control. See
Lighting
Control (page 47).
N
14
E-Series (TE4) Canada/United States of America, enUSA, Edition date: 201712, Second Printing At a GlanceE254406
Page 22 of 323

necessary to remove the remaining
slack that will exist once the extra
weight of the child is added to the child
restraint. It also helps to achieve the
proper snugness of the child seat to
your vehicle. Sometimes, a slight lean
toward the buckle will help to remove
remaining slack from the belt.
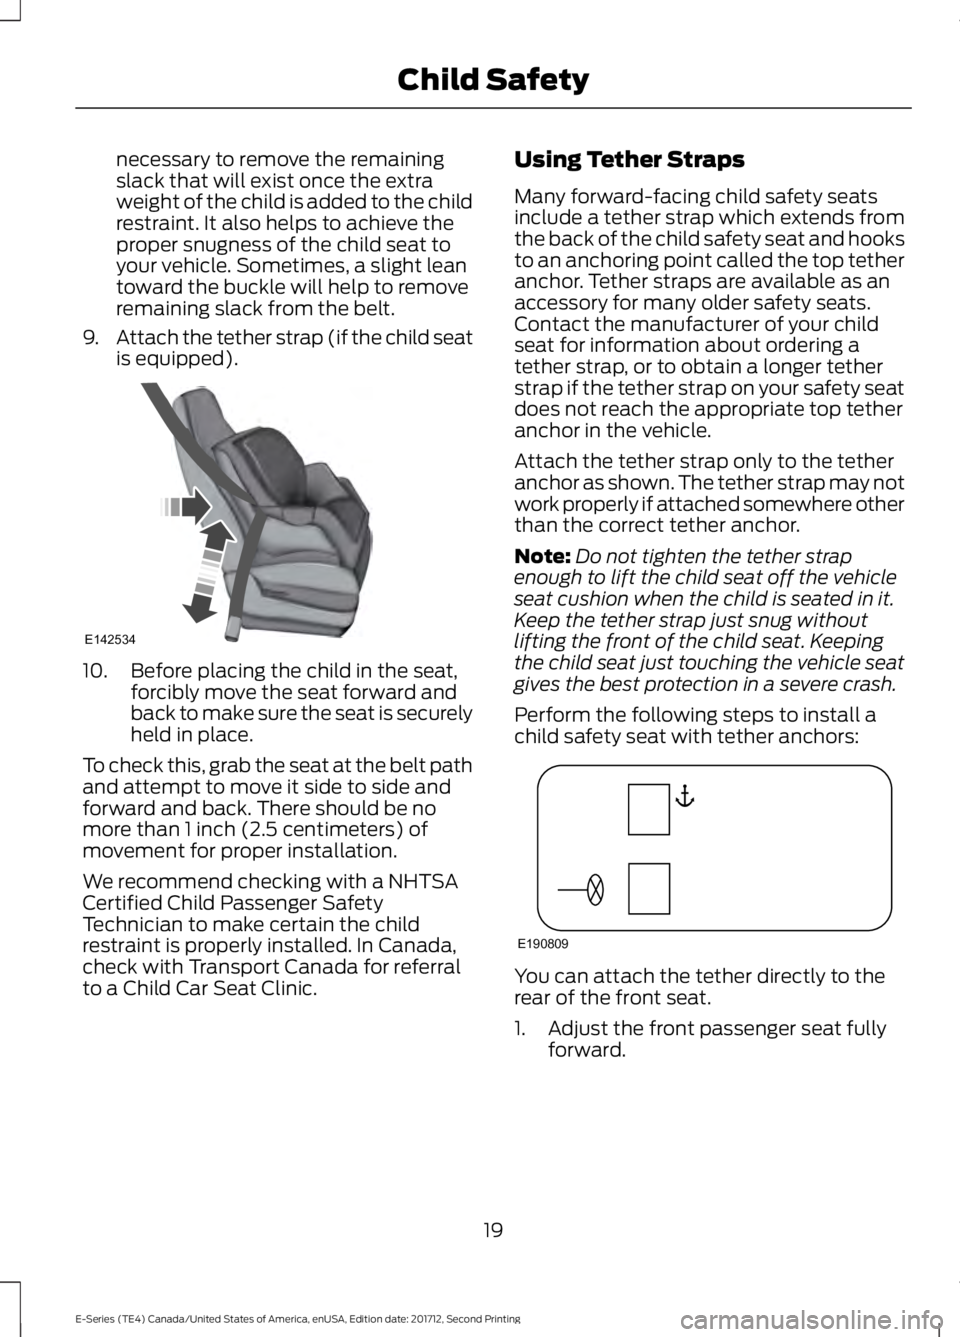
9. Attach the tether strap (if the child seat
is equipped). 10. Before placing the child in the seat,
forcibly move the seat forward and
back to make sure the seat is securely
held in place.
To check this, grab the seat at the belt path
and attempt to move it side to side and
forward and back. There should be no
more than 1 inch (2.5 centimeters) of
movement for proper installation.
We recommend checking with a NHTSA
Certified Child Passenger Safety
Technician to make certain the child
restraint is properly installed. In Canada,
check with Transport Canada for referral
to a Child Car Seat Clinic. Using Tether Straps
Many forward-facing child safety seats
include a tether strap which extends from
the back of the child safety seat and hooks
to an anchoring point called the top tether
anchor. Tether straps are available as an
accessory for many older safety seats.
Contact the manufacturer of your child
seat for information about ordering a
tether strap, or to obtain a longer tether
strap if the tether strap on your safety seat
does not reach the appropriate top tether
anchor in the vehicle.
Attach the tether strap only to the tether
anchor as shown. The tether strap may not
work properly if attached somewhere other
than the correct tether anchor.
Note:
Do not tighten the tether strap
enough to lift the child seat off the vehicle
seat cushion when the child is seated in it.
Keep the tether strap just snug without
lifting the front of the child seat. Keeping
the child seat just touching the vehicle seat
gives the best protection in a severe crash.
Perform the following steps to install a
child safety seat with tether anchors: You can attach the tether directly to the
rear of the front seat.
1. Adjust the front passenger seat fully
forward.
19
E-Series (TE4) Canada/United States of America, enUSA, Edition date: 201712, Second Printing Child SafetyE142534 E190809
Page 26 of 323

WARNINGS
Always carefully follow the
instructions and warnings provided
by the manufacturer of any child
restraint to determine if the restraint device
is appropriate for your child's size, height,
weight, or age. Follow the child restraint
manufacturer's instructions and warnings
provided for installation and use in
conjunction with the instructions and
warnings provided by your vehicle
manufacturer. A safety seat that is
improperly installed or utilized, is
inappropriate for your child's height, age,
or weight or does not properly fit the child
may increase the risk of serious injury or
death. Never let a passenger hold a child on
his or her lap while the vehicle is
moving. The passenger cannot
protect the child from injury in a crash. WARNINGS
Do not use pillows, books or towels
to boost your child's height.
Always restrain an unoccupied child
seat or booster seat. They may
become projectiles in a crash or
sudden stop, which may increase the risk
of serious injury. Do not put the shoulder section of
the seatbelt or allow the child to put
the shoulder section of the seatbelt
under their arm or behind their back. Failure
to follow this instruction could reduce the
effectiveness of the seatbelt and increase
the risk of injury in a crash. Do not leave children or pets
unattended in your vehicle. Failure
to follow this instruction could result
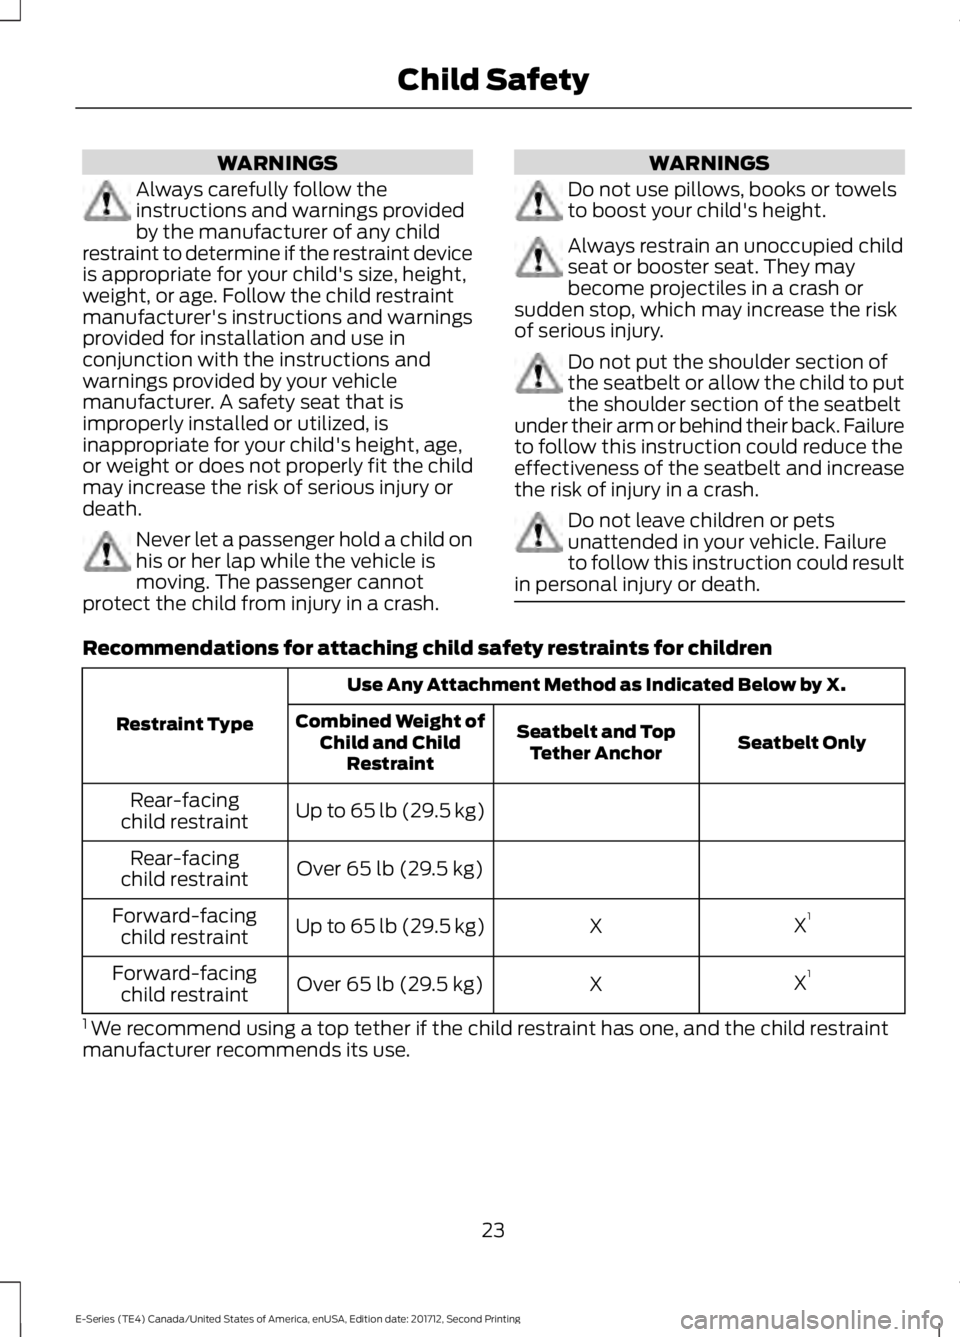
in personal injury or death. Recommendations for attaching child safety restraints for children
Use Any Attachment Method as Indicated Below by X.
Restraint Type Seatbelt Only
Seatbelt and Top
Tether Anchor
Combined Weight of
Child and Child Restraint
Up to 65 lb (29.5 kg)
Rear-facing
child restraint
Over 65 lb (29.5 kg)
Rear-facing
child restraint
X1
X
Up to 65 lb (29.5 kg)
Forward-facing
child restraint
X1
X
Over
65 lb (29.5 kg)
Forward-facing
child restraint
1 We recommend using a top tether if the child restraint has one, and the child restraint
manufacturer recommends its use.
23
E-Series (TE4) Canada/United States of America, enUSA, Edition date: 201712, Second Printing Child Safety
Page 30 of 323

All safety restraints in the vehicle are
combination lap and shoulder belts. The
driver seatbelt has the first type of locking
mode. The front outboard passenger
seatbelt has both types of locking modes
described as follows:
Vehicle Sensitive Mode
This is the normal retractor mode, which
allows free shoulder belt length
adjustment to your movements and
locking in response to vehicle movement.
For example, if the driver brakes suddenly
or turns a corner sharply, or the vehicle
receives an impact of about 5 mph
(8 km/h) or more, the combination
seatbelts lock to help reduce forward
movement of the driver and passengers.
In addition, the retractor is designed to lock
if you pull the webbing out too quickly. If
the seatbelt retractor locks, slowly lower
the height adjuster to allow the seatbelt
to retract. If the retractor does not unlock,
pull the seatbelt out slowly then feed a
small length of webbing back toward the
stowed position. For rear seatbelts, recline
the rear seat backrest or push the seat
backrest cushion away from the seatbelt.
Feed a small length of webbing back
toward the stowed position.
Automatic Locking Mode
In this mode, the shoulder belt
automatically pre-locks. The belt will still
retract to remove any slack in the shoulder
belt. The automatic locking mode is not
available on the driver seatbelt.
When to Use the Automatic Locking
Mode
Use this mode any time a child safety seat,
except a booster, is installed in the
passenger front seating position. See
Child Safety
(page 15). How to Use the Automatic Locking
Mode
1. Buckle the combination lap and
shoulder belt.
2. Grasp the shoulder portion and pull downward until the entire belt is pulled
out.
3. Allow the belt to retract. As the belt retracts, you will hear a clicking sound.
This indicates the seatbelt is now in the
automatic locking mode.
How to Disengage the Automatic
Locking Mode
Unbuckle the combination lap and
shoulder belt and allow it to retract
completely to disengage the automatic
locking mode and activate the vehicle
sensitive (emergency) locking mode.
SEATBELT HEIGHT
ADJUSTMENT WARNING
Position the safety belt height
adjuster so that the belt rests across
the middle of your shoulder. Failure
to adjust the safety belt properly could
reduce the effectiveness of the safety belt
and increase the risk of injury in a crash. 27
E-Series (TE4) Canada/United States of America, enUSA, Edition date: 201712, Second Printing SeatbeltsE142591
Page 39 of 323

CRASH SENSORS AND
AIRBAG INDICATOR (If Equipped)
WARNING
Modifying or adding equipment to
the front end of the vehicle (including
frame, bumper, front end body
structure and tow hooks) may affect the
performance of the airbag system,
increasing the risk of injury. Do not modify
the front end of the vehicle. Your vehicle has a collection of crash and
occupant sensors which provide
information to the restraints control
module. The restraints control module
deploys (activates) the front safety belt
pretensioners, driver airbag and passenger
airbag. Based on the type of accident, the
restraints control module will deploy the
appropriate safety devices.
The restraints control module also
monitors the readiness of the above safety
devices plus the crash sensors. The
readiness of the safety system is indicated
by a warning indicator light in the
instrument cluster or by a backup tone if
the warning light is not working. See
Instrument Cluster
(page 51). Routine
maintenance of the airbag is not required.
A difficulty with the system is indicated by
one or more of the following: The readiness light will not
illuminate immediately after the
ignition is turned on.
• The readiness light will either flash or
stay lit.
• A series of five beeps will be heard. The
tone pattern will repeat periodically
until the problem, the light or both are
repaired. If any of these things happen, even
intermittently, have the supplemental
restraint system serviced at an authorized
dealer immediately. Unless serviced, the
system may not function properly in the
event of a crash.
The safety belt pretensioners and the
airbag supplemental restraint system are
designed to activate when the vehicle
sustains frontal deceleration sufficient to
cause the restraints control module to
deploy a safety device.
The fact that the safety belt pretensioners
or airbags did not activate in a crash does
not mean that something is wrong with the
system. Rather, it means the restraints
control module determined the accident
conditions (such as crash severity, belt
usage) were not appropriate to activate
these safety devices.
•
The design of the front airbags is to
activate only in frontal and near-frontal
crashes (not rollovers, side impacts or
rear impacts) unless the crash causes
sufficient frontal deceleration.
• The design of the safety belt
pretensioners is to activate in frontal
or near-frontal crashes and may deploy
in rollovers if the vehicle is equipped
with roll stability control.
AIRBAG DISPOSAL
Contact your authorized dealer as soon as
possible. Airbags must be disposed of by
qualified personnel.
36
E-Series (TE4) Canada/United States of America, enUSA, Edition date: 201712, Second Printing Supplementary Restraints SystemE67017
Page 40 of 323

GENERAL INFORMATION ON
RADIO FREQUENCIES
This device complies with Part 15 of the
FCC Rules and with Licence exempt RSS
Standards of Industry Canada. Operation
is subject to the following two conditions:
•
This device may not cause harmful
interference, and
• This device must accept any
interference received, including
interference that may cause undesired
operation. WARNING
Changes or modifications not
expressively approved by the party
responsible for compliance could
void the user's authority to operate the
equipment. The term "IC:" before the radio
certification number only signifies that
Industry Canada technical specifications
were met. The typical operating range for your
transmitter is approximately 33 ft (10 m).
Vehicles with the remote start feature will
have a greater range. One of the following
could cause a decrease in operating range:
• Weather conditions.
• Nearby radio towers.
• Structures around the vehicle.
• Other vehicles parked next to your
vehicle.
Other short distance radio transmissions,
for example amateur radios, medical
equipment, wireless headphones, remote
controls and alarm systems can also use
the radio frequency used by your remote
control. If the frequencies are jammed, you
will not be able to use your remote control.
You can lock and unlock the doors with the
key. Note:
Make sure to lock your vehicle before
leaving it unattended.
Note: If you are in range, the remote control
will operate if you press any button
unintentionally.
Note: The remote control contains sensitive
electrical components. Exposure to moisture
or impact may cause permanent damage.
REMOTE CONTROL
(If Equipped) Note:
If there are problems with the remote
entry system, make sure to take all remote
entry transmitters with you to an authorized
dealer in order to aid in troubleshooting the
problem.
Note: If your vehicle is fitted with the
E-Guard Cargo Protection System ™, the
remote transmitter unlock command only
unlocks the front doors. The side or rear
cargo doors can only be unlocked from
outside your vehicle using the key.
37
E-Series (TE4) Canada/United States of America, enUSA, Edition date: 201712, Second Printing Keys and Remote ControlsE195660