2018 FORD E-450 set clock
[x] Cancel search: set clockPage 83 of 323

WARNINGS
If you do not use the proper fuel filler
cap, excessive pressure or vacuum
in the fuel tank may damage the fuel
system or cause the fuel cap to disengage
in a collision, which may result in possible
personal injury. Note:
If you must replace the fuel filler cap,
replace it with a fuel filler cap that is
designed for your vehicle. The customer
warranty may be void for any damage to the
fuel tank or fuel system if the correct
genuine Ford, Motorcraft or other certified
fuel filler cap is not used.
Your fuel tank filler cap has an indexed
design with a 1/4th turn on and off feature.
When fueling your vehicle:
1. Put your vehicle in park (P).
2. Switch the engine off.
3. Carefully turn the filler cap counterclockwise until it spins off.
4. Pull to remove the cap from the fuel filler pipe.
5. To install the cap, align the tabs on the
cap with the notches on the filler pipe.
6. Turn the filler cap clockwise 1/4 of a turn clockwise until it clicks at least
once.
If the Check Fuel Cap light or a Check Fuel
Cap message appears in the instrument
cluster and stays on after you start the
engine, you may not have installed the fuel
filler properly. If the fuel cap light remains on, at the next
opportunity, safely pull off of the road,
remove the fuel filler cap, align the cap
properly and reinstall it. The check fuel cap
light or Check fuel cap message may not
reset immediately. It may take several
driving cycles for the indicators to turn off.
A driving cycle consists of an engine
start-up (after four or more hours with the
engine off) followed by normal city and
highway driving.
FUEL CONSUMPTION
The advertised capacity is the maximum
amount of fuel that you can add to the fuel
tank after running out of fuel. Included in
the advertised capacity is an empty
reserve. The empty reserve is an
unspecified amount of fuel that remains
in the fuel tank when the fuel gauge
indicates empty.
Note:
The amount of fuel in the empty
reserve varies and should not be relied upon
to increase driving range.
Fuel Economy
Your vehicle calculates fuel economy
figures through the trip computer average
fuel function. See General Information
(page 56).
The first
1,000 mi (1,500 km) of driving is
the break-in period of the engine. A more
accurate measurement is obtained after
2,000 mi (3,000 km)
.
Impacting Fuel Economy
• Incorrect tire inflation pressures. See
Technical Specifications (page 192).
• Fully loading your vehicle.
• Carrying unnecessary weight.
80
E-Series (TE4) Canada/United States of America, enUSA, Edition date: 201712, Second Printing Fuel and Refueling
Page 145 of 323

Only use oils certified for gasoline engines
by the American Petroleum Institute (API).
An oil with this trademark symbol
conforms to the current engine and
emission system protection standards and
fuel economy requirements of the
International Lubricants Specification
Advisory Committee (ILSAC).
To top up the engine oil level do the
following:
1. Clean the area surrounding the engine
oil filler cap before you remove it.
2. Remove the engine oil filler cap. See Under Hood Overview (page 139).
Turn it counterclockwise and remove
it.
3. Add engine oil that meets Ford specifications. See
Capacities and
Specifications (page 199). You may
have to use a funnel to pour the engine
oil into the opening.
4. Recheck the oil level.
5. If the oil level is correct, replace the dipstick and make sure it is fully seated.
6. Replace the engine oil filler cap. Turn it clockwise until you feel a strong
resistance.
Note: Do not add oil further than the
maximum mark. Oil levels above the
maximum mark may cause engine damage.
Note: Make sure you install the oil filler cap
correctly.
Note: Soak up any spillage with an
absorbent cloth immediately.
OIL CHANGE INDICATOR
RESET
(If Equipped)
Resetting the Oil Life Monitoring
System
Only reset the oil life monitoring system
after changing the engine oil and oil filter. To reset the oil life monitoring system do
the following:
1.
Switch the ignition on. Do not start the
engine.
2. Fully press the accelerator and brake pedals at the same time.
3. Keep the accelerator and brake pedals
fully pressed.
4. After three seconds, a message displays confirming the reset procedure
is in progress.
5. After 25 seconds, a message displays confirming the reset procedure is
complete.
6. Release the accelerator and brake pedals.
7. Switch the ignition off.
ENGINE COOLANT CHECK WARNINGS
Never remove the coolant reservoir
cap when the engine is running or
hot.
Do not put coolant in the windshield
washer reservoir. If sprayed on the
windshield, coolant could make it
difficult to see through the windshield. To reduce the risk of personal injury,
make sure the engine is cool before
unscrewing the coolant pressure
relief cap. The cooling system is under
pressure. Steam and hot liquid can come
out forcefully when you loosen the cap
slightly. Do not add coolant further than the
MAX mark.
When the engine is cold, check the
concentration and level of the coolant at
the intervals listed in the scheduled
maintenance information. See Scheduled
Maintenance
(page 270).
142
E-Series (TE4) Canada/United States of America, enUSA, Edition date: 201712, Second Printing Maintenance
Page 194 of 323

WARNINGS
To help prevent your vehicle from
moving when changing a wheel, shift
the transmission into park (P), set
the parking brake and use an appropriate
block or wheel chock to secure the wheel
diagonally opposite to the wheel being
changed. For example, when changing the
front left wheel, place an appropriate block
or wheel chock on the right rear wheel. Do not get under a vehicle that is
supported by a jack.
Do not attempt to change a tire on
the side of the vehicle close to
moving traffic. Pull far enough off the
road to avoid the danger of being hit when
operating the jack or changing the wheel. Always use the jack provided as
original equipment with your vehicle.
If using a jack other than the one
provided, make sure the jack capacity is
adequate for the vehicle weight, including
any vehicle cargo or modifications. If you
are unsure if the jack capacity is adequate,
contact the authorized dealer. Note:
Passengers should not remain in your
vehicle when the vehicle is being jacked.
Removing the flat wheel and tire
1. Park on a level surface, set the parking
brake and activate the hazard flashers.
2. Place the transmission in park (P) and
turn the engine off. 3.
Block both directions of the wheel that
is diagonally opposite to the wheel that
is being lifted.
4. Remove the spare tire and jack from the storage location.
5. Remove the wheel trim (if equipped) by inserting the tapered end of the lug
nut wrench behind the wheel cover or
hubcap and twist it off.
6. Loosen each wheel lug nut one-half turn counterclockwise, but do not
remove them until the wheel is raise
off the ground.
Jacking location Front axle jacking point: Place the jack
under the pin on the front surface of the
front axle.
191
E-Series (TE4) Canada/United States of America, enUSA, Edition date: 201712, Second Printing Wheels and TiresE142551 E201348
Page 214 of 323

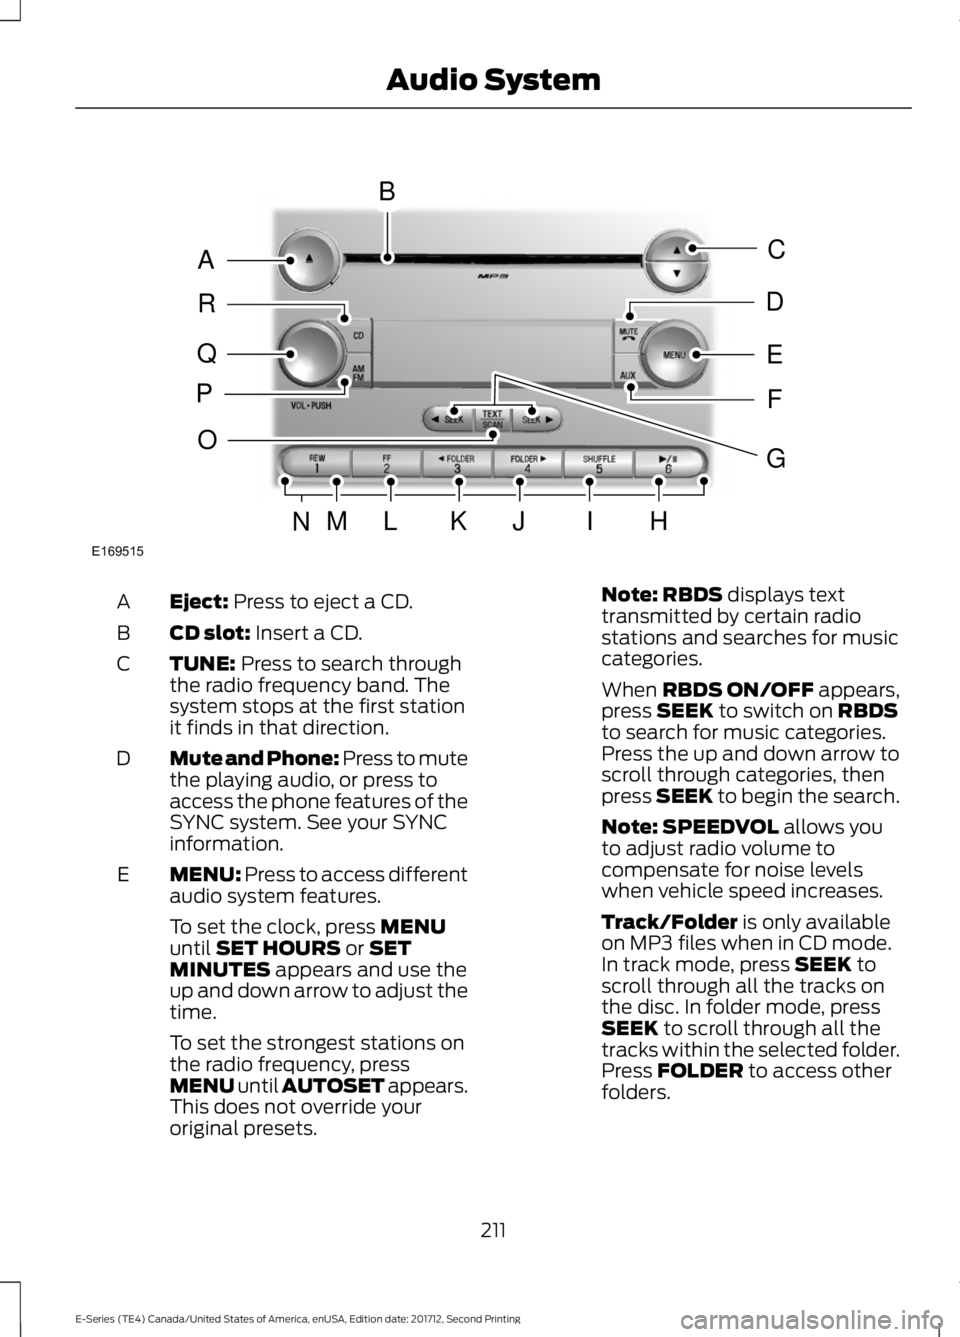
Eject: Press to eject a CD.
A
CD slot:
Insert a CD.
B
TUNE:
Press to search through
the radio frequency band. The
system stops at the first station
it finds in that direction.
C
Mute and Phone: Press to mute
the playing audio, or press to
access the phone features of the
SYNC system. See your SYNC
information.
D
MENU: Press to access different
audio system features.
E
To set the clock, press
MENU
until SET HOURS or SET
MINUTES appears and use the
up and down arrow to adjust the
time.
To set the strongest stations on
the radio frequency, press
MENU until AUTOSET appears.
This does not override your
original presets. Note:
RBDS displays text
transmitted by certain radio
stations and searches for music
categories.
When
RBDS ON/OFF appears,
press SEEK to switch on RBDS
to search for music categories.
Press the up and down arrow to
scroll through categories, then
press
SEEK to begin the search.
Note:
SPEEDVOL allows you
to adjust radio volume to
compensate for noise levels
when vehicle speed increases.
Track/Folder
is only available
on MP3 files when in CD mode.
In track mode, press
SEEK to
scroll through all the tracks on
the disc. In folder mode, press
SEEK
to scroll through all the
tracks within the selected folder.
Press
FOLDER to access other
folders.
211
E-Series (TE4) Canada/United States of America, enUSA, Edition date: 201712, Second Printing Audio SystemE169515
B
A
Q
R
P
C
E
D
F
O
MLKJIHN
G
Page 216 of 323

CLOCK: Press to display the
clock. To set the time, press and
hold until the hours start to flash.
Press the arrow buttons to
adjust the hours, then repeat to
set the minutes. Press again to
exit clock mode.
A
TUNE:
Press to search through
the radio frequency band.
B
AUDIO: Press to access settings
for Treble, Midrange, Bass, Fade
or Balance.
C
Seek:
Press to select a
frequency band. The system
stops at the first station it finds
in that direction.
D
Memory presets:
Store your
favorite radio stations. To store
a radio station, tune to the
station, then press and hold a
preset button until sound
returns.
E AM/FM:
Press to access
different audio modes, for
example AM, FM and auxiliary
input jack.
F
Vol and Power:
Turn to adjust
the volume. Press to switch the
system on and off.
G
DIGITAL RADIO
(If Equipped)
Note: HD Radio broadcasts are not
available in all markets.
HD Radio technology is the digital
evolution of analog AM/FM radio. Your
system has a special receiver that allows
it to receive digital broadcasts (where
available) in addition to the analog
broadcasts, it already receives. Digital
broadcasts provide a better sound quality
than analog broadcasts with free,
crystal-clear audio and no static or
distortion. For more information, and a
guide to available stations and
programming, please visit
www.hdradio.com.
213
E-Series (TE4) Canada/United States of America, enUSA, Edition date: 201712, Second Printing Audio SystemE163157