2018 FORD E-450 ESP
[x] Cancel search: ESPPage 59 of 323

GENERAL INFORMATION
WARNING
Driving while distracted can result in
loss of vehicle control, crash and
injury. We strongly recommend that
you use extreme caution when using any
device that may take your focus off the
road. Your primary responsibility is the safe
operation of your vehicle. We recommend
against the use of any hand-held device
while driving and encourage the use of
voice-operated systems when possible.
Make sure you are aware of all applicable
local laws that may affect the use of
electronic devices while driving. You can control various systems on your
vehicle using the information display
control by the speedometer. The
corresponding information is appears in
the information display.
Base Information Display Control Press and release the SELECT/RESET
stem, by the speedometer, to choose
settings and confirm messages. Select or
reset the function by holding the
SELECT/RESET stem for more than two
seconds.
Info
TRIP A or B On or Off
ALOC
On or Off
AUnLOC
TRIP A or B
Registers the distance of individual
journeys. Optional Information Display
Control
56
E-Series (TE4) Canada/United States of America, enUSA, Edition date: 201712, Second Printing Information DisplaysE194389 E194389
Page 66 of 323

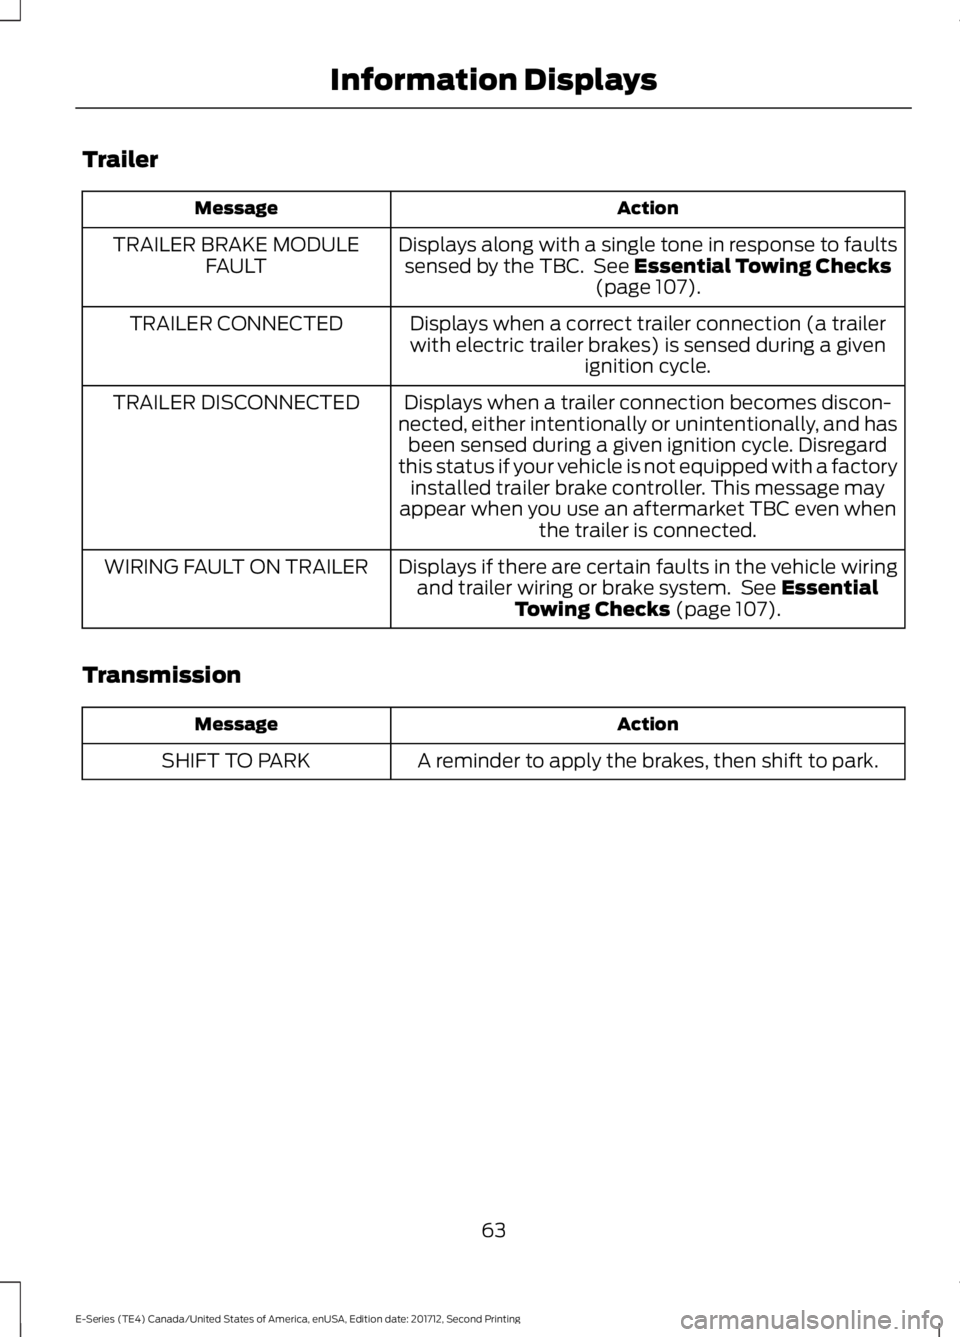
Trailer
Action
Message
Displays along with a single tone in response to faultssensed by the TBC. See Essential Towing Checks
(page 107).
TRAILER BRAKE MODULE
FAULT
Displays when a correct trailer connection (a trailerwith electric trailer brakes) is sensed during a given ignition cycle.
TRAILER CONNECTED
Displays when a trailer connection becomes discon-
nected, either intentionally or unintentionally, and has been sensed during a given ignition cycle. Disregard
this status if your vehicle is not equipped with a factory installed trailer brake controller. This message may
appear when you use an aftermarket TBC even when the trailer is connected.
TRAILER DISCONNECTED
Displays if there are certain faults in the vehicle wiringand trailer wiring or brake system. See
Essential
Towing Checks (page 107).
WIRING FAULT ON TRAILER
Transmission Action
Message
A reminder to apply the brakes, then shift to park.
SHIFT TO PARK
63
E-Series (TE4) Canada/United States of America, enUSA, Edition date: 201712, Second Printing Information Displays
Page 78 of 323

ENGINE BLOCK HEATER (If
Equipped) WARNINGS
Failure to follow engine block heater
instructions could result in property
damage or serious personal injury.
Do not use your heater with
ungrounded electrical systems or
two-pronged adapters. There is a risk
of electrical shock. Do not fully close the hood, or allow
it to drop under its own weight when
using the engine block heater. This
could damage the power cable and may
cause an electrical short resulting in fire,
injury and property damage. Note:
The heater is most effective when
outdoor temperatures are below
0°F
(-18°C).
The heater acts as a starting aid by
warming the engine coolant. This allows
the climate control system to respond
quickly. The equipment includes a heater
element (installed in the engine block) and
a wire harness. You can connect the
system to a grounded 120-volt AC
electrical source.
We recommend that you do the following
for a safe and correct operation:
• Use a 16-gauge outdoor extension cord
that is product certified by
Underwriter ’s Laboratory (UL) or
Canadian Standards Association
(CSA). This extension cord must be
suitable for use outdoors, in cold temperatures, and be clearly marked
Suitable for Use with Outdoor
Appliances. Do not use an indoor
extension cord outdoors. This could
result in an electric shock or become a
fire hazard.
• Use as short an extension cord as
possible.
• Do not use multiple extension cords.
• Make sure that when in operation, the
extension cord plug and heater cord
plug connections are free and clear of
water. This could cause an electric
shock or fire.
• Make sure your vehicle is parked in a
clean area, clear of combustibles.
• Make sure the heater, heater cord and
extension cord are firmly connected.
• Check for heat anywhere in the
electrical hookup once the system has
been operating for approximately 30
minutes.
• Make sure the system is unplugged and
properly stowed before starting and
driving your vehicle. Make sure the
protective cover seals the prongs of the
block heater cord plug when not in use.
• Make sure the heater system is
checked for proper operation before
winter.
Using the Engine Block Heater
Make sure the receptacle terminals are
clean and dry prior to use. Clean them with
a dry cloth if necessary.
The heater uses 0.4 to 1.0 kilowatt-hours
of energy per hour of use. The system does
not have a thermostat. It achieves
maximum temperature after
approximately three hours of operation.
Using the heater longer than three hours
does not improve system performance and
unnecessarily uses electricity.
75
E-Series (TE4) Canada/United States of America, enUSA, Edition date: 201712, Second Printing Starting and Stopping the Engine
Page 79 of 323

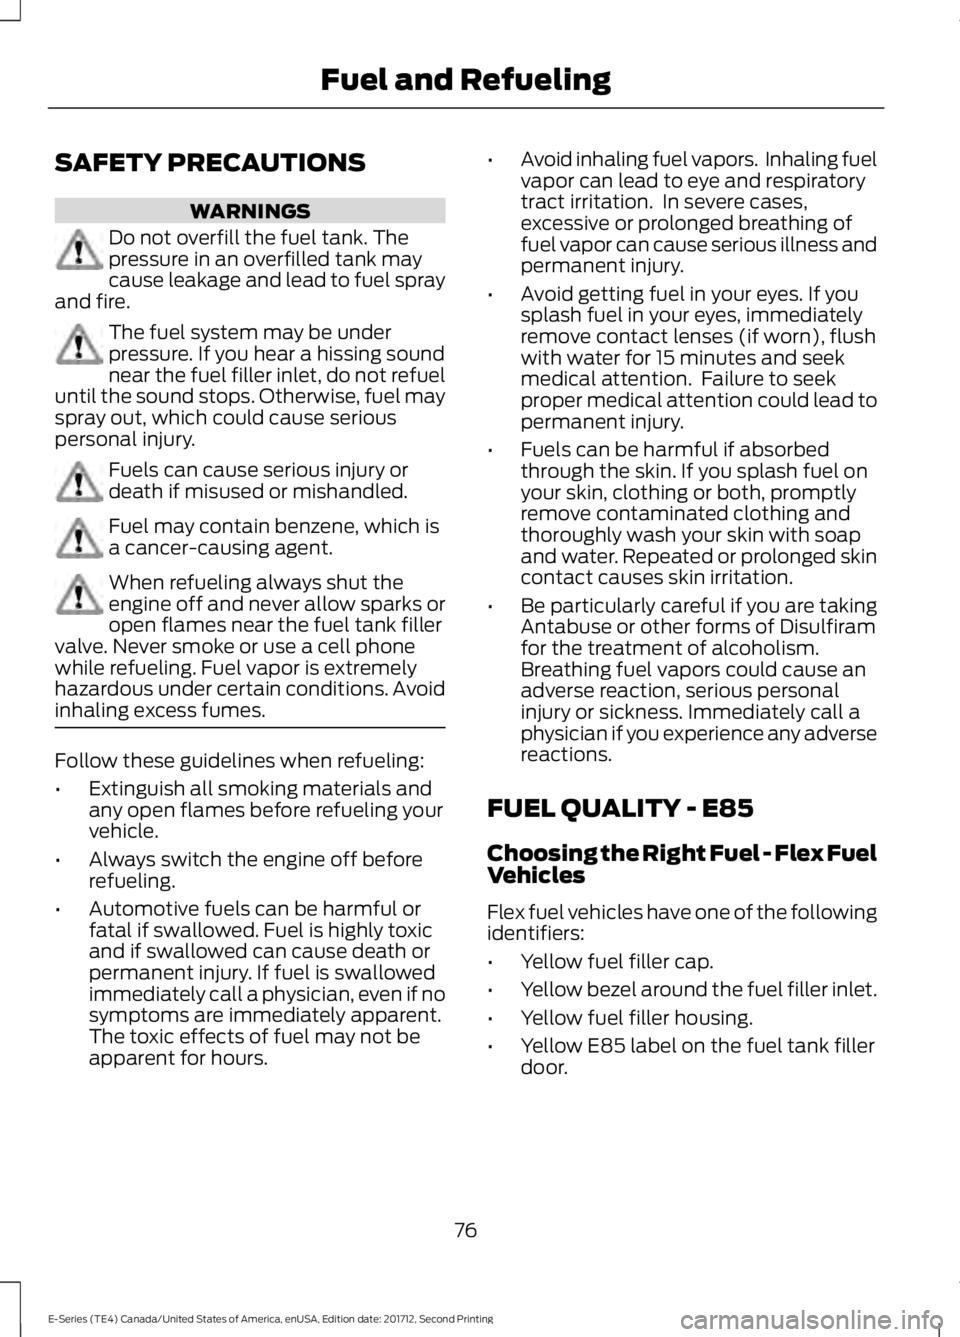
SAFETY PRECAUTIONS
WARNINGS
Do not overfill the fuel tank. The
pressure in an overfilled tank may
cause leakage and lead to fuel spray
and fire. The fuel system may be under
pressure. If you hear a hissing sound
near the fuel filler inlet, do not refuel
until the sound stops. Otherwise, fuel may
spray out, which could cause serious
personal injury. Fuels can cause serious injury or
death if misused or mishandled.
Fuel may contain benzene, which is
a cancer-causing agent.
When refueling always shut the
engine off and never allow sparks or
open flames near the fuel tank filler
valve. Never smoke or use a cell phone
while refueling. Fuel vapor is extremely
hazardous under certain conditions. Avoid
inhaling excess fumes. Follow these guidelines when refueling:
•
Extinguish all smoking materials and
any open flames before refueling your
vehicle.
• Always switch the engine off before
refueling.
• Automotive fuels can be harmful or
fatal if swallowed. Fuel is highly toxic
and if swallowed can cause death or
permanent injury. If fuel is swallowed
immediately call a physician, even if no
symptoms are immediately apparent.
The toxic effects of fuel may not be
apparent for hours. •
Avoid inhaling fuel vapors. Inhaling fuel
vapor can lead to eye and respiratory
tract irritation. In severe cases,
excessive or prolonged breathing of
fuel vapor can cause serious illness and
permanent injury.
• Avoid getting fuel in your eyes. If you
splash fuel in your eyes, immediately
remove contact lenses (if worn), flush
with water for 15 minutes and seek
medical attention. Failure to seek
proper medical attention could lead to
permanent injury.
• Fuels can be harmful if absorbed
through the skin. If you splash fuel on
your skin, clothing or both, promptly
remove contaminated clothing and
thoroughly wash your skin with soap
and water. Repeated or prolonged skin
contact causes skin irritation.
• Be particularly careful if you are taking
Antabuse or other forms of Disulfiram
for the treatment of alcoholism.
Breathing fuel vapors could cause an
adverse reaction, serious personal
injury or sickness. Immediately call a
physician if you experience any adverse
reactions.
FUEL QUALITY - E85
Choosing the Right Fuel - Flex Fuel
Vehicles
Flex fuel vehicles have one of the following
identifiers:
• Yellow fuel filler cap.
• Yellow bezel around the fuel filler inlet.
• Yellow fuel filler housing.
• Yellow E85 label on the fuel tank filler
door.
76
E-Series (TE4) Canada/United States of America, enUSA, Edition date: 201712, Second Printing Fuel and Refueling
Page 93 of 323

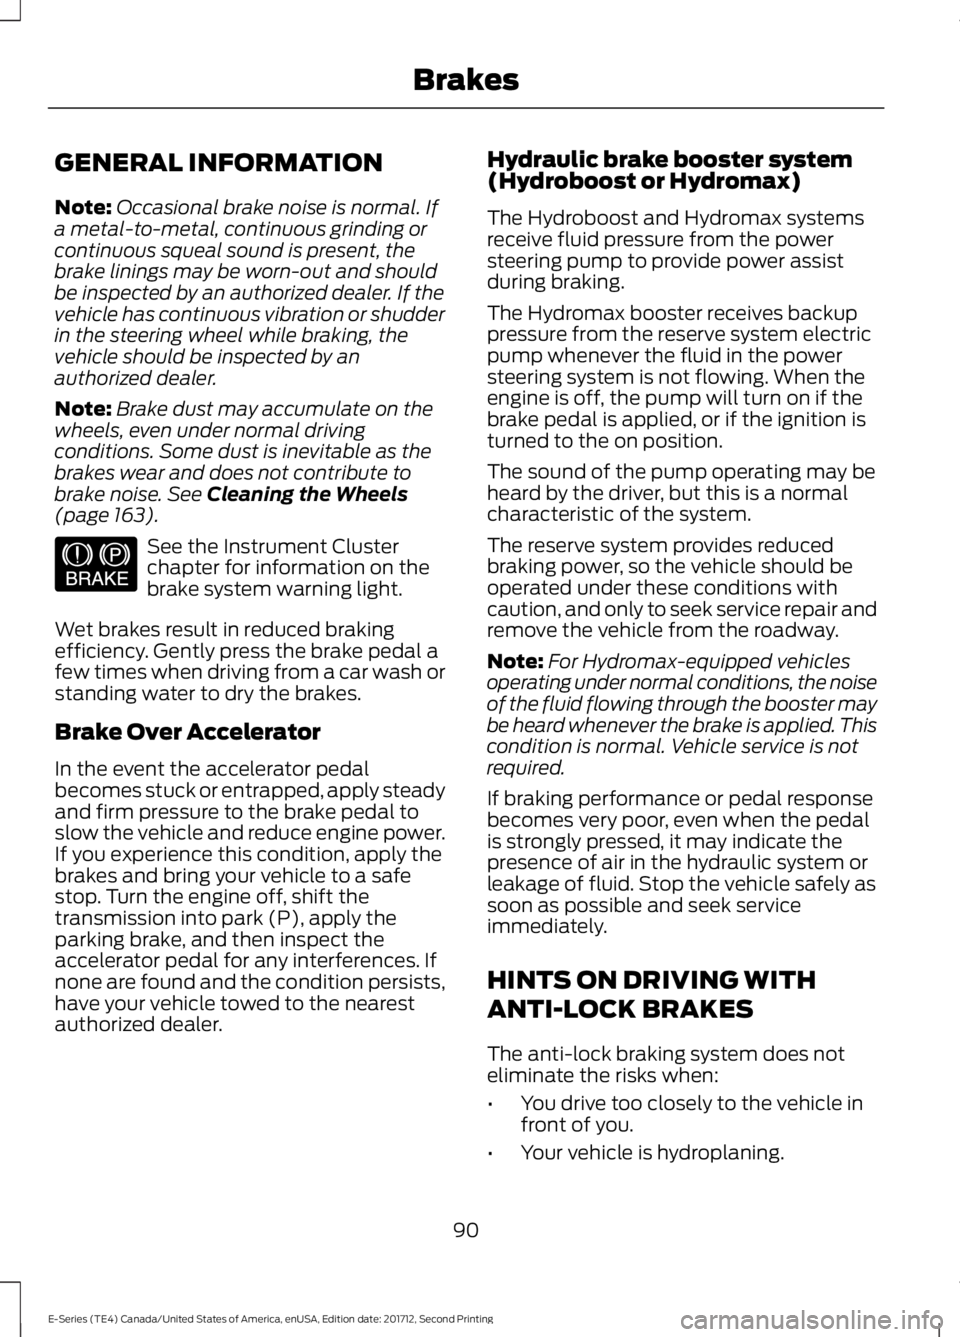
GENERAL INFORMATION
Note:
Occasional brake noise is normal. If
a metal-to-metal, continuous grinding or
continuous squeal sound is present, the
brake linings may be worn-out and should
be inspected by an authorized dealer. If the
vehicle has continuous vibration or shudder
in the steering wheel while braking, the
vehicle should be inspected by an
authorized dealer.
Note: Brake dust may accumulate on the
wheels, even under normal driving
conditions. Some dust is inevitable as the
brakes wear and does not contribute to
brake noise. See Cleaning the Wheels
(page 163). See the Instrument Cluster
chapter for information on the
brake system warning light.
Wet brakes result in reduced braking
efficiency. Gently press the brake pedal a
few times when driving from a car wash or
standing water to dry the brakes.
Brake Over Accelerator
In the event the accelerator pedal
becomes stuck or entrapped, apply steady
and firm pressure to the brake pedal to
slow the vehicle and reduce engine power.
If you experience this condition, apply the
brakes and bring your vehicle to a safe
stop. Turn the engine off, shift the
transmission into park (P), apply the
parking brake, and then inspect the
accelerator pedal for any interferences. If
none are found and the condition persists,
have your vehicle towed to the nearest
authorized dealer. Hydraulic brake booster system
(Hydroboost or Hydromax)
The Hydroboost and Hydromax systems
receive fluid pressure from the power
steering pump to provide power assist
during braking.
The Hydromax booster receives backup
pressure from the reserve system electric
pump whenever the fluid in the power
steering system is not flowing. When the
engine is off, the pump will turn on if the
brake pedal is applied, or if the ignition is
turned to the on position.
The sound of the pump operating may be
heard by the driver, but this is a normal
characteristic of the system.
The reserve system provides reduced
braking power, so the vehicle should be
operated under these conditions with
caution, and only to seek service repair and
remove the vehicle from the roadway.
Note:
For Hydromax-equipped vehicles
operating under normal conditions, the noise
of the fluid flowing through the booster may
be heard whenever the brake is applied. This
condition is normal. Vehicle service is not
required.
If braking performance or pedal response
becomes very poor, even when the pedal
is strongly pressed, it may indicate the
presence of air in the hydraulic system or
leakage of fluid. Stop the vehicle safely as
soon as possible and seek service
immediately.
HINTS ON DRIVING WITH
ANTI-LOCK BRAKES
The anti-lock braking system does not
eliminate the risks when:
• You drive too closely to the vehicle in
front of you.
• Your vehicle is hydroplaning.
90
E-Series (TE4) Canada/United States of America, enUSA, Edition date: 201712, Second Printing BrakesE144522
Page 112 of 323

Separate functioning brake systems
are required for safe control of towed
vehicles and trailers weighing more
than 1500 pounds (680 kilograms)
when loaded.
Integrated Trailer Brake Controller (If
Equipped)
WARNING
The Ford trailer brake controller has
been verified to be compatible with
trailers having electric-actuated
drum brakes (one to four axles) and
electric-over-hydraulic brakes. It will not
activate hydraulic surge-style trailer
brakes. It is the responsibility of the
customer to ensure that the trailer brakes
are adjusted appropriately, functioning
normally and all electric connections are
properly made. Failure to do so may result
in loss of vehicle control, crash or serious
injury. When used properly, the trailer brake
controller assists in smooth and effective
trailer braking by powering the trailer
’s
electric or electric-over-hydraulic brakes
with a proportional output based on the
towing vehicle ’s brake pressure.
The controller user interface consists of
the following: A: + and - (Gain adjustment buttons):
Pressing these buttons adjusts the
controller's power output to the trailer
brakes in 0.5 increments. You can increase
the gain setting to 10.0 (maximum trailer
braking) or decrease it to 0 (no trailer
braking). The gain setting displays in the
message center.
The controller shows gain setting, output
bar graph, and trailer connectivity status
in the information display. They appear in
the information display as follows:
• Trailer Brake Controller Gain (without
trailer connected): Shows the current
gain setting during a given ignition cycle
and when adjusting the gain. This also
displays if you use the manual control
lever or make gain adjustments with
no trailer connected.
• Trailer Brake Controller Gain Output:
Displays when you push your vehicle's
brake pedal, or upon use of the manual
control. Bar indicators illuminate in the
information display to indicate the
amount of power going to the trailer
brakes relative to the brake pedal or
manual control input. One bar indicates
the least amount of output; six bars
indicate maximum output.
• Trailer Connected: Displays when the
system senses a correct trailer wiring
connection (a trailer with electric trailer
brakes) during a given ignition cycle.
• Trailer Disconnected: Displays,
accompanied by a single audible time,
when the system senses a trailer
connection and then a disconnection,
either intentional or unintentional,
during a given ignition cycle. It also
displays if a truck or trailer-wiring fault
occurs causing the trailer to appear
disconnected. This message can also
display if you use the manual control
lever without a trailer connected.
109
E-Series (TE4) Canada/United States of America, enUSA, Edition date: 201712, Second Printing TowingE183395
Page 113 of 323

B: Manual control lever: Slide the control
lever to the left to switch on the trailer's
electric brakes independent of the tow
vehicle's. See the following Procedure for
Adjusting Gain
section for instructions
on proper use of this feature. If you use the
manual control while the brake is also
applied, the greater of the two inputs
determines the power sent to the trailer
brakes.
• Stop lamps: Using the manual control
lever illuminates both the trailer brake
lamps and your vehicle brake lamps
except the center high-mount stop
lamp, if you make the proper electrical
connection to the trailer. Pressing your
vehicle brake pedal also illuminates
both trailer and vehicle brake lamps.
Procedure for Adjusting Gain
Note: Only perform this procedure in a
traffic-free environment at speeds of
approximately 20-25 mph (30-40 km/h).
The gain setting sets the trailer brake
controller for the specific towing condition.
You should change the setting as towing
conditions change. Changes to towing
conditions include trailer load, vehicle load,
road conditions and weather.
The gain should be set to provide the
maximum trailer braking assistance while
making sure the trailer wheels do not lock
when using the brakes. Locked trailer
wheels may lead to trailer instability.
1. Make sure the trailer brakes are in good
working condition, functioning normally
and properly adjusted. See your trailer
dealer if necessary.
2. Hook up the trailer and make the electrical connections according to the
trailer manufacturer's instructions.
3. When you plug in a trailer with electric or electric-over-hydraulic brakes, a
message confirming connection
appears in the information display. 4. Use the gain adjustment (+ and -)
buttons to increase or decrease the
gain setting to the desired starting
point. A gain setting of 6.0 is a good
starting point for heavier loads.
5. In a traffic-free environment, tow the trailer on a dry, level surface at a speed
of 20-25 mph (30-40 km/h) and
squeeze the manual control lever
completely.
6. If the trailer wheels lock up, indicated by squealing tires, reduce the gain
setting. If the trailer wheels turn freely,
increase the gain setting. Repeat Steps
5 and 6 until the gain setting is at a
point just below trailer wheel lock-up.
If towing a heavier trailer, trailer wheel
lock-up may not be attainable even
with the maximum gain setting of 10.
Explanation of Information Display
Warning Messages
Note: An authorized dealer can diagnose
the trailer brake controller to determine
exactly which trailer fault has occurred.
However, your Ford warranty does not cover
this diagnosis if the fault is with the trailer.
A message indicating a trailer brake
module fault may display in response to
faults sensed by the trailer brake controller,
accompanied by a single tone. If this
message appears, contact an authorized
dealer as soon as possible for diagnosis
and repair. The controller may still
function, but performance may be
degraded.
A message indicating a trailer wiring fault
may display when there is a short circuit
on the electric brake output wire. If this
message displays, accompanied by a
single tone, with no trailer connected, the
problem is with your vehicle wiring
between the trailer brake controller and
the 7-pin connector at the bumper. If the
message only displays with a trailer
connected, the problem is with the trailer
110
E-Series (TE4) Canada/United States of America, enUSA, Edition date: 201712, Second Printing Towing
Page 114 of 323

wiring. Consult your trailer dealer for
assistance. This can be a short to ground
(such as a chaffed wire), short to voltage
(such as a pulled pin on trailer emergency
breakaway battery) or the trailer brakes
may be drawing too much current.
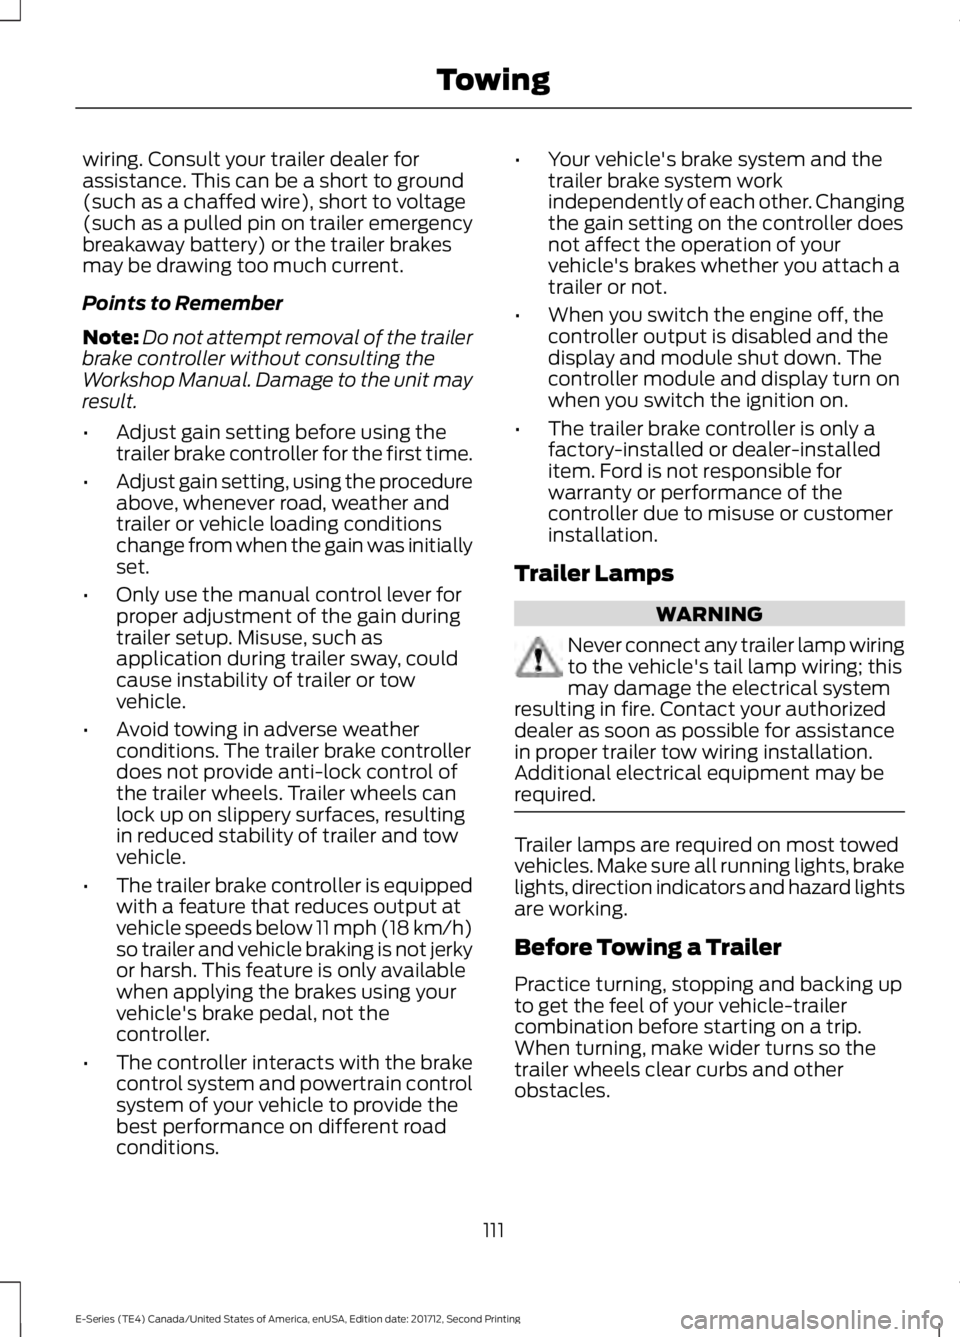
Points to Remember
Note:
Do not attempt removal of the trailer
brake controller without consulting the
Workshop Manual. Damage to the unit may
result.
• Adjust gain setting before using the
trailer brake controller for the first time.
• Adjust gain setting, using the procedure
above, whenever road, weather and
trailer or vehicle loading conditions
change from when the gain was initially
set.
• Only use the manual control lever for
proper adjustment of the gain during
trailer setup. Misuse, such as
application during trailer sway, could
cause instability of trailer or tow
vehicle.
• Avoid towing in adverse weather
conditions. The trailer brake controller
does not provide anti-lock control of
the trailer wheels. Trailer wheels can
lock up on slippery surfaces, resulting
in reduced stability of trailer and tow
vehicle.
• The trailer brake controller is equipped
with a feature that reduces output at
vehicle speeds below 11 mph (18 km/h)
so trailer and vehicle braking is not jerky
or harsh. This feature is only available
when applying the brakes using your
vehicle's brake pedal, not the
controller.
• The controller interacts with the brake
control system and powertrain control
system of your vehicle to provide the
best performance on different road
conditions. •
Your vehicle's brake system and the
trailer brake system work
independently of each other. Changing
the gain setting on the controller does
not affect the operation of your
vehicle's brakes whether you attach a
trailer or not.
• When you switch the engine off, the
controller output is disabled and the
display and module shut down. The
controller module and display turn on
when you switch the ignition on.
• The trailer brake controller is only a
factory-installed or dealer-installed
item. Ford is not responsible for
warranty or performance of the
controller due to misuse or customer
installation.
Trailer Lamps WARNING
Never connect any trailer lamp wiring
to the vehicle's tail lamp wiring; this
may damage the electrical system
resulting in fire. Contact your authorized
dealer as soon as possible for assistance
in proper trailer tow wiring installation.
Additional electrical equipment may be
required. Trailer lamps are required on most towed
vehicles. Make sure all running lights, brake
lights, direction indicators and hazard lights
are working.
Before Towing a Trailer
Practice turning, stopping and backing up
to get the feel of your vehicle-trailer
combination before starting on a trip.
When turning, make wider turns so the
trailer wheels clear curbs and other
obstacles.
111
E-Series (TE4) Canada/United States of America, enUSA, Edition date: 201712, Second Printing Towing