2018 FORD E-450 ECO mode
[x] Cancel search: ECO modePage 44 of 323

Autolock Feature
The autolock feature locks all the doors
when:
•
All doors are closed.
• The ignition is on.
• You shift into any gear putting your
vehicle in motion.
• The ignition is on, all the doors are
closed and your vehicle has been in
motion at a speed greater than 12 mph
(20 km/h).
Autounlock Feature
The autounlock feature unlocks all the
doors when:
• Your vehicle comes to a stop and you
switch the ignition off or to accessory.
• You open the driver door within 10
minutes of switching the ignition off or
to accessory.
Note: If you electronically lock your vehicle
after you switch the ignition off with the
driver door closed, the doors do not
autounlock.
Enabling or Disabling Autolock and
Autounlock
You can enable or disable the autolock and
autounlock features independently of each
other.
To enable or disable autolock, do the
following:
1. Switch the ignition on.
2. Press the power door unlock control three times.
3. Switch the ignition off.
4. Press the power door unlock control three times.
5. Switch the ignition on. The horn sounds
indicating your vehicle is in
programming mode. 6. Press the power door unlock control
and within five seconds, press the
power door lock control. The horn
sounds once if disabled or twice if
enabled.
7. Switch the ignition off. The horn sounds
indicating programming is complete.
Note: You can also switch this feature on
or off using the information display. See
Information Displays
(page 56).
To enable or disable autounlock, do the
following:
1. Switch the ignition on.
2. Press the power door unlock control three times.
3. Switch the ignition off.
4. Press the power door unlock control three times.
5. Switch the ignition on. The horn sounds
indicating your vehicle is in
programming mode.
6. Press the power door lock control and within five seconds, press the power
door unlock control. The horn sounds
once if disabled or twice if enabled.
7. Switch the ignition off. The horn sounds
indicating programming is complete.
Note: You can also switch this feature on
or off using the information display. See
Information Displays
(page 56).
Illuminated Entry
The interior lamps and some exterior
lamps illuminate when you unlock the
doors with the remote control.
The lamps turn off if:
• The ignition is on.
• You press the remote control lock
button.
• 25 seconds have elapsed.
41
E-Series (TE4) Canada/United States of America, enUSA, Edition date: 201712, Second Printing Doors and Locks
Page 57 of 323

Engine Oil
It illuminates when you switch
the ignition on.
If it illuminates when the engine
is running this indicates a malfunction.
Stop your vehicle as soon as it is safe to
do so and switch the engine off. Check the
engine oil level. If the oil level is sufficient,
this indicates a system malfunction. Have
your vehicle checked as soon as possible.
See Engine Oil Check (page 141).
Fasten Seatbelt Warning Lamp It illuminates and a tone sounds
until you fasten the seatbelts.
Headlamp High Beam Indicator It illuminates when you switch
the headlamp high beam on.
Low Fuel Level Warning Lamp If it illuminates when you are
driving, refuel as soon as
possible.
Low Tire Pressure Warning Lamp
(If Equipped) It illuminates if the tire pressure
in one or more tires is below the
correct tire pressure.
It also illuminates momentarily when you
switch the ignition on to confirm the lamp
is functional. If it does not illuminate when
you switch the ignition on, or begins to
flash at any time, have the system checked
by your authorized dealer. Powertrain
Malfunction/Electronic Throttle
Control Illuminates when the system
detects a powertrain fault, have
an authorized dealer check the
system as soon as possible.
Service Engine Soon If it illuminates when the engine
is running this indicates a
malfunction. The On Board
Diagnostics system has detected a
malfunction of the vehicle emission control
system.
If it flashes, engine misfire may be
occurring. Increased exhaust gas
temperatures could damage the catalytic
converter or other vehicle components.
Drive in a moderate fashion (avoid heavy
acceleration and deceleration) and have
your vehicle immediately serviced.
It illuminates when you switch the ignition
on prior to engine start to check the bulb
and to indicate whether your vehicle is
ready for Inspection and Maintenance
(I/M) testing.
Normally, it illuminates until the engine is
cranked and automatically turns off if no
malfunctions are present. However, if after
15 seconds it flashes eight times, this
indicates that your vehicle is not ready for
Inspection and Maintenance (I/M) testing.
See
Emission Law (page 82).
Traction Control System Displays when the traction
control is active. If the light
remains on, have an authorized
dealer check the system immediately.
54
E-Series (TE4) Canada/United States of America, enUSA, Edition date: 201712, Second Printing Instrument Cluster E71880 E138639
Page 61 of 323

Press and hold the SELECT/RESET stem
to get into the setup menu sequence for
the following displays:
Setup
OIL LIFE English or Metric
Press and hold the
SELECT/RESET stem
UNITS ENG /
METRIC
ON or OFF
AUTOLOCK (if
equipped)
ON or OFF
AUTOUNLOCK (if
equipped)
COMPASS ZONE (if equipped)
Electric or EOH
Press and hold the
SELECT/RESET stem
TBC MODE (if
equipped)
English / Spanish / French
LANGUAGE =
ENGLISH /
SPANISH /
FRENCH SYSTEM CHECK
XXX% OIL LIFE
Press and hold the SELECT/
RESET stem
RESET FOR SYSTEM
CHECK
ENGINE HOURS (if enabled)
ENGINE IDLE HOURS (if
enabled)
CHARGING SYSTEM
BRAKE SYSTEM
58
E-Series (TE4) Canada/United States of America, enUSA, Edition date: 201712, Second Printing Information DisplaysE194389
Page 63 of 323

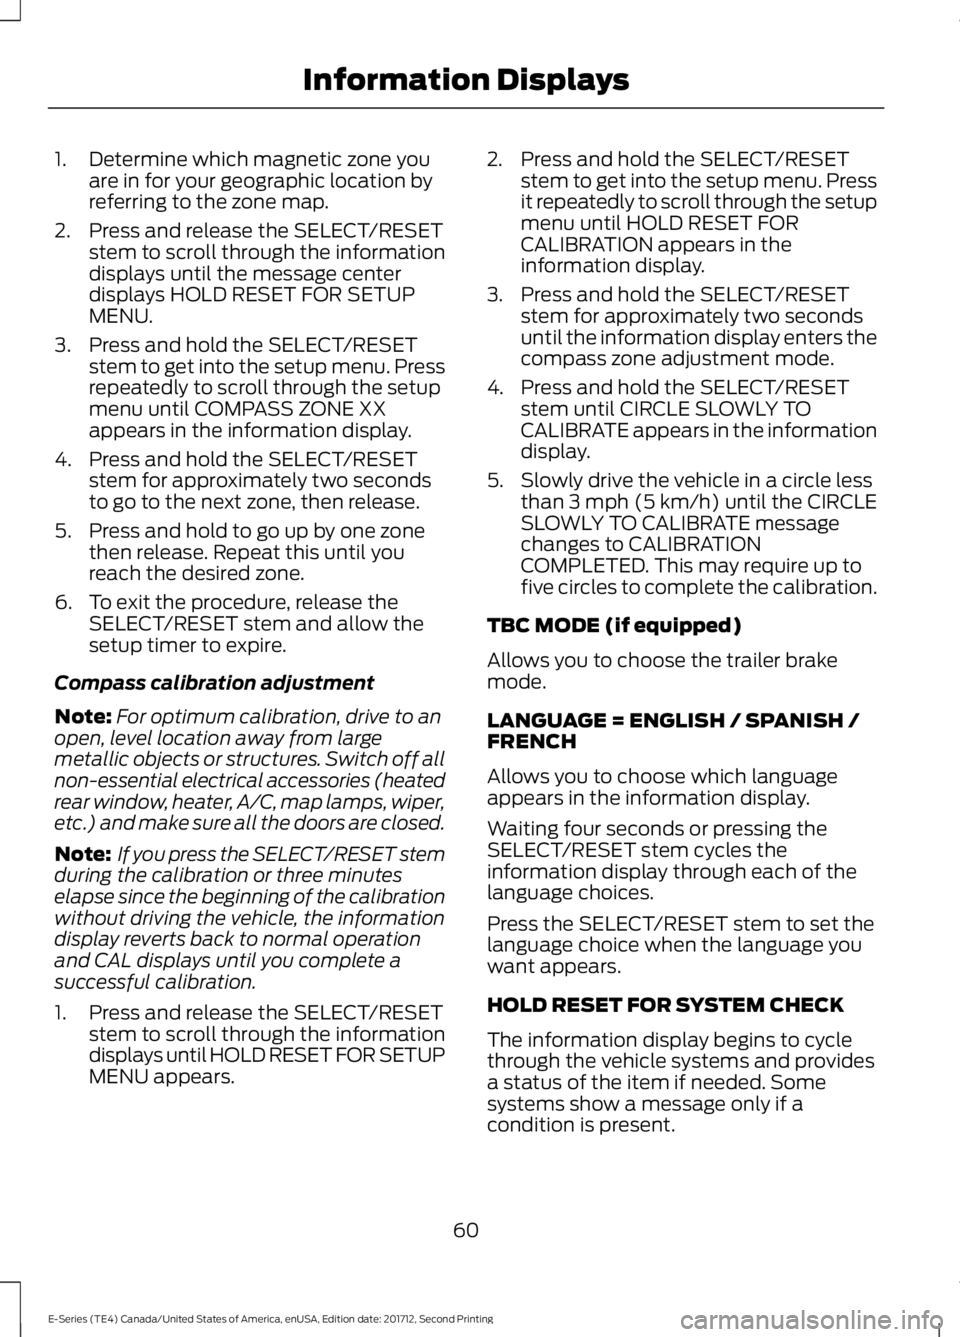
1. Determine which magnetic zone you
are in for your geographic location by
referring to the zone map.
2. Press and release the SELECT/RESET stem to scroll through the information
displays until the message center
displays HOLD RESET FOR SETUP
MENU.
3. Press and hold the SELECT/RESET stem to get into the setup menu. Press
repeatedly to scroll through the setup
menu until COMPASS ZONE XX
appears in the information display.
4. Press and hold the SELECT/RESET stem for approximately two seconds
to go to the next zone, then release.
5. Press and hold to go up by one zone then release. Repeat this until you
reach the desired zone.
6. To exit the procedure, release the SELECT/RESET stem and allow the
setup timer to expire.
Compass calibration adjustment
Note: For optimum calibration, drive to an
open, level location away from large
metallic objects or structures. Switch off all
non-essential electrical accessories (heated
rear window, heater, A/C, map lamps, wiper,
etc.) and make sure all the doors are closed.
Note: If you press the SELECT/RESET stem
during the calibration or three minutes
elapse since the beginning of the calibration
without driving the vehicle, the information
display reverts back to normal operation
and CAL displays until you complete a
successful calibration.
1. Press and release the SELECT/RESET stem to scroll through the information
displays until HOLD RESET FOR SETUP
MENU appears. 2. Press and hold the SELECT/RESET
stem to get into the setup menu. Press
it repeatedly to scroll through the setup
menu until HOLD RESET FOR
CALIBRATION appears in the
information display.
3. Press and hold the SELECT/RESET stem for approximately two seconds
until the information display enters the
compass zone adjustment mode.
4. Press and hold the SELECT/RESET stem until CIRCLE SLOWLY TO
CALIBRATE appears in the information
display.
5. Slowly drive the vehicle in a circle less than 3 mph (5 km/h) until the CIRCLE
SLOWLY TO CALIBRATE message
changes to CALIBRATION
COMPLETED. This may require up to
five circles to complete the calibration.
TBC MODE (if equipped)
Allows you to choose the trailer brake
mode.
LANGUAGE = ENGLISH / SPANISH /
FRENCH
Allows you to choose which language
appears in the information display.
Waiting four seconds or pressing the
SELECT/RESET stem cycles the
information display through each of the
language choices.
Press the SELECT/RESET stem to set the
language choice when the language you
want appears.
HOLD RESET FOR SYSTEM CHECK
The information display begins to cycle
through the vehicle systems and provides
a status of the item if needed. Some
systems show a message only if a
condition is present.
60
E-Series (TE4) Canada/United States of America, enUSA, Edition date: 201712, Second Printing Information Displays
Page 75 of 323

When the indicator light on the power point
is:
•
On: The power point is working, the
ignition is on and a device is plugged
in.
• Off: The power point is off, the ignition
is off or no device is plugged in.
• Flashing: The power point is in fault
mode.
The power outlet temporarily turns off
power when in fault mode if the device
exceeds the 150 watt limit. Unplug your
device and switch the ignition off. Switch
the ignition back on, but do not plug your
device back in. Let the system cool off and
switch the ignition off to reset the fault
mode. Switch the ignition back on and
make sure the indicator light remains on.
Do not use the power point for certain
electric devices, including:
• Cathode-ray, tube-type televisions.
• Motor loads, such as vacuum cleaners,
electric saws and other electric power
tools or compressor-driven
refrigerators.
• Measuring devices, which process
precise data, such as medical
equipment or measuring equipment.
• Other appliances requiring an
extremely stable power supply such as
microcomputer-controlled electric
blankets or touch-sensor lamps.
72
E-Series (TE4) Canada/United States of America, enUSA, Edition date: 201712, Second Printing Auxiliary Power Points
Page 90 of 323

Tow/Haul Mode
To activate tow/haul, press the
button on the gearshift lever.
The TOW HAUL indicator light
illuminates in the instrument cluster.
The tow/haul feature:
• Delays upshifts to reduce the frequency
of transmission shifting.
• Provides engine braking in all forward
gears, which slows your vehicle and
assists you in controlling your vehicle
when descending a slope.
• Depending on driving conditions and
load conditions, may downshift the
transmission, slow your vehicle and
control your vehicle speed when
descending a hill, without pressing the
accelerator pedal. The amount of
downshift braking provided will vary
based upon the amount you press the
brake pedal.
The tow/haul feature improves
transmission operation when towing a
trailer or a heavy load. All transmission
gear ranges are available when using
tow/haul.
To deactivate the tow/haul feature and
return to normal driving mode, press the
button on the gearshift lever again. The
TOW HAUL light deactivates. Tow/haul
also deactivates when you power down
your vehicle. WARNING
Do not use tow/haul when the road
surface is slippery. Failure to follow
this instruction could result in the
loss of control of your vehicle. Brake-Shift Interlock
WARNINGS
When doing this procedure, you need
to take the transmission out of park
(P) which means your vehicle can
roll freely. To avoid unwanted vehicle
movement, always fully apply the parking
brake prior to doing this procedure. Use
wheels chocks if appropriate. If the parking brake is fully released,
but the brake warning lamp remains
illuminated, the brakes may not be
working properly. Have your vehicle
checked as soon as possible. Note:
Do not drive your vehicle until you
verify that the brake lamps are working.
Your vehicle has a brake-shift interlock
feature that prevents the gearshift lever
from moving from park (P) when the
ignition is in the 3 (on) position and the
brake pedal is not pressed.
If you cannot move the gearshift lever out
of park (P) position with the ignition in the
4 (on) position and the brake pedal
pressed, a malfunction may have occurred.
It is possible that a fuse has blown or your
vehicle ’s brake lamps are not operating
properly. See Fuse Specification Chart
(page 129).
If the fuse is not blown and the brake
lamps are working properly, the following
procedure allows you to move the gearshift
lever from park (P):
1. Apply the parking brake and turn the ignition on.
2. Use a screwdriver to remove the lower
trim panel under the steering column.
Make sure not to disturb the wires on
the electrical connector.
3. Locate the brake-shift interlock solenoid underneath the steering
column.
87
E-Series (TE4) Canada/United States of America, enUSA, Edition date: 201712, Second Printing TransmissionE161509
Page 98 of 323

PRINCIPLE OF OPERATION
Cruise control lets you maintain a set
speed without keeping your foot on the
accelerator pedal. You can use cruise
control when your vehicle speed is greater
than 20 mph (30 km/h).
USING CRUISE CONTROL
(If
Equipped) WARNINGS
Do not use cruise control on winding
roads, in heavy traffic or when the
road surface is slippery. This could
result in loss of vehicle control, serious
injury or death. When you are going downhill, your
vehicle speed could increase above
the set speed. The system does not
apply the brakes. To help the system to maintain the set
speed when going downhill, downshift to
a lower gear.
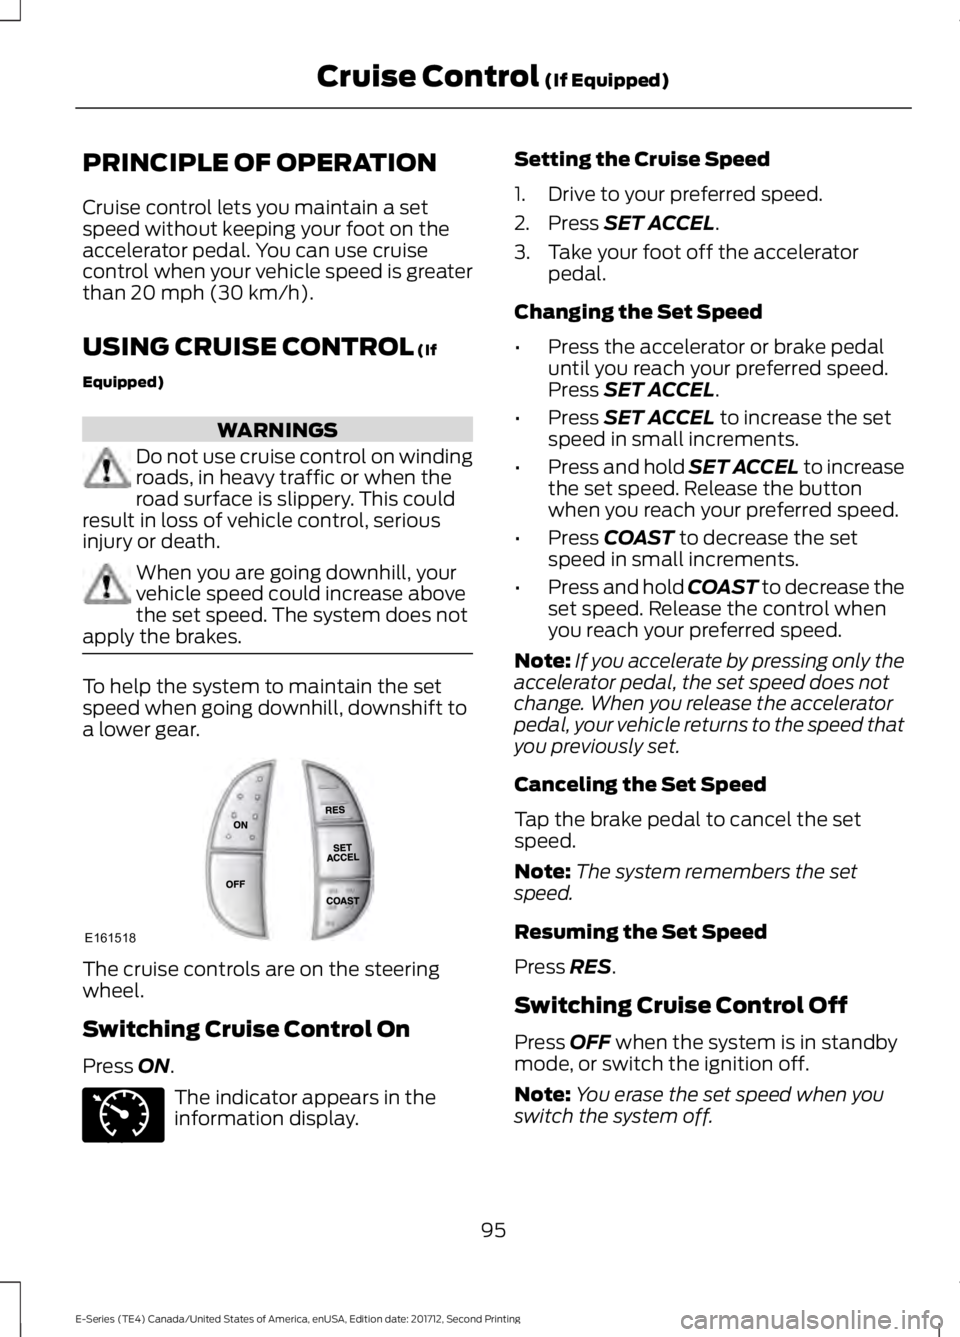
The cruise controls are on the steering
wheel.
Switching Cruise Control On
Press
ON.
The indicator appears in the
information display. Setting the Cruise Speed
1. Drive to your preferred speed.
2. Press
SET ACCEL.
3. Take your foot off the accelerator pedal.
Changing the Set Speed
• Press the accelerator or brake pedal
until you reach your preferred speed.
Press
SET ACCEL.
• Press
SET ACCEL to increase the set
speed in small increments.
• Press and hold SET ACCEL to increase
the set speed. Release the button
when you reach your preferred speed.
• Press
COAST to decrease the set
speed in small increments.
• Press and hold COAST to decrease the
set speed. Release the control when
you reach your preferred speed.
Note: If you accelerate by pressing only the
accelerator pedal, the set speed does not
change. When you release the accelerator
pedal, your vehicle returns to the speed that
you previously set.
Canceling the Set Speed
Tap the brake pedal to cancel the set
speed.
Note: The system remembers the set
speed.
Resuming the Set Speed
Press
RES.
Switching Cruise Control Off
Press
OFF when the system is in standby
mode, or switch the ignition off.
Note: You erase the set speed when you
switch the system off.
95
E-Series (TE4) Canada/United States of America, enUSA, Edition date: 201712, Second Printing Cruise Control
(If Equipped)E161518 E71340
Page 109 of 323

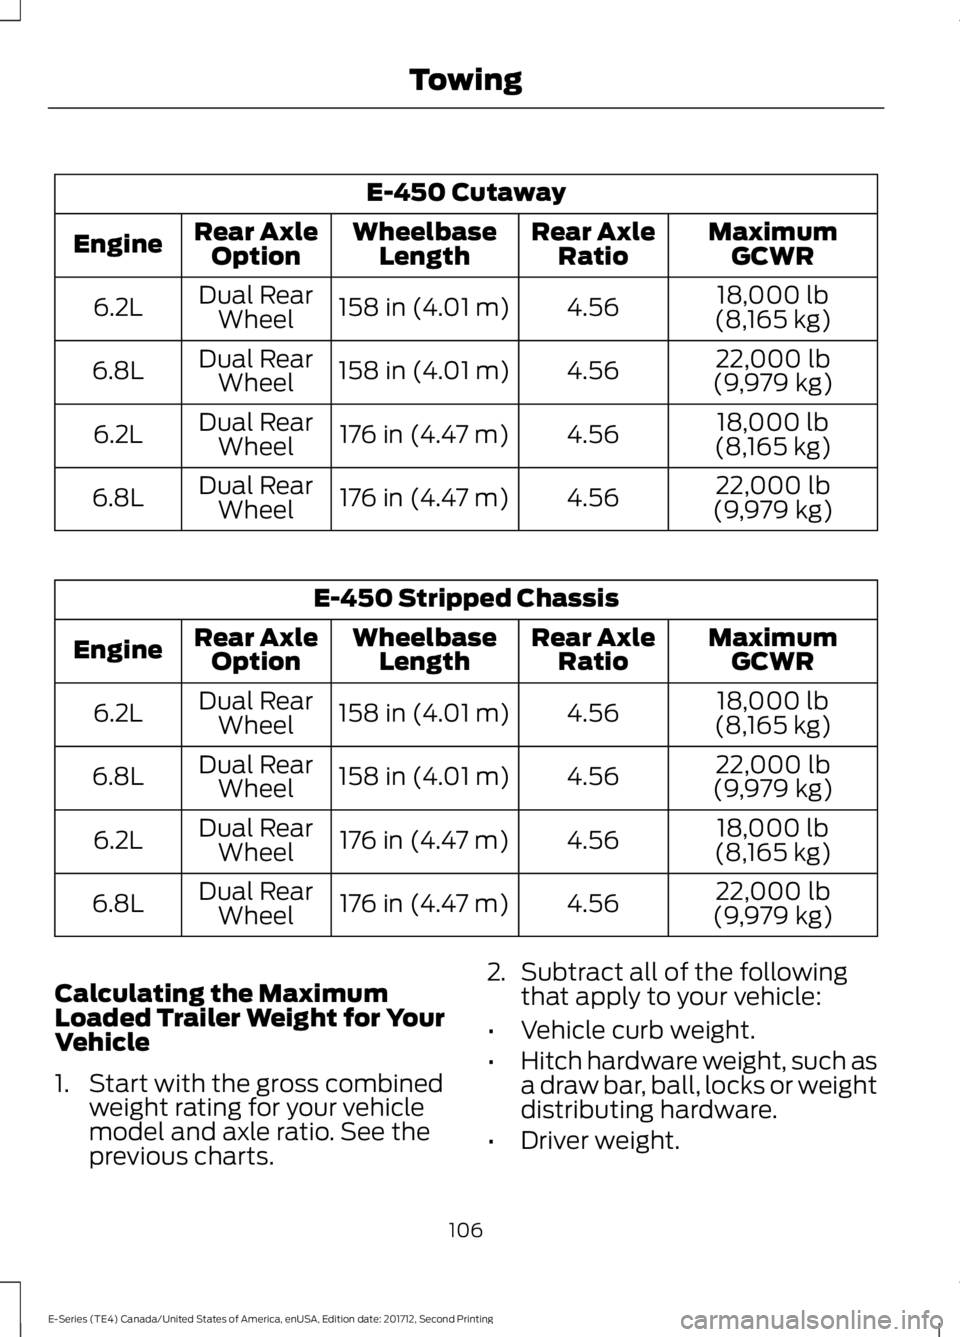
E-450 Cutaway
MaximumGCWR
Rear Axle
Ratio
Wheelbase
Length
Rear Axle
Option
Engine
18,000 lb
(8,165 kg)
4.56
158 in (4.01 m)
Dual Rear
Wheel
6.2L
22,000 lb
(9,979 kg)
4.56
158 in (4.01 m)
Dual Rear
Wheel
6.8L
18,000 lb
(8,165 kg)
4.56
176 in (4.47 m)
Dual Rear
Wheel
6.2L
22,000 lb
(9,979 kg)
4.56
176 in (4.47 m)
Dual Rear
Wheel
6.8L E-450 Stripped Chassis
MaximumGCWR
Rear Axle
Ratio
Wheelbase
Length
Rear Axle
Option
Engine
18,000 lb
(8,165 kg)
4.56
158 in (4.01 m)
Dual Rear
Wheel
6.2L
22,000 lb
(9,979 kg)
4.56
158 in (4.01 m)
Dual Rear
Wheel
6.8L
18,000 lb
(8,165 kg)
4.56
176 in (4.47 m)
Dual Rear
Wheel
6.2L
22,000 lb
(9,979 kg)
4.56
176 in (4.47 m)
Dual Rear
Wheel
6.8L
Calculating the Maximum
Loaded Trailer Weight for Your
Vehicle
1. Start with the gross combined weight rating for your vehicle
model and axle ratio. See the
previous charts. 2.
Subtract all of the following
that apply to your vehicle:
• Vehicle curb weight.
• Hitch hardware weight, such as
a draw bar, ball, locks or weight
distributing hardware.
• Driver weight.
106
E-Series (TE4) Canada/United States of America, enUSA, Edition date: 201712, Second Printing Towing