2018 FORD E-350 hood release
[x] Cancel search: hood releasePage 142 of 323

GENERAL INFORMATION
Have your vehicle serviced regularly to help
maintain its roadworthiness and resale
value. There is a large network of
authorized dealers that are there to help
you with their professional servicing
expertise. We believe that their specially
trained technicians are best qualified to
service your vehicle properly and expertly.
They are supported by a wide range of
highly specialized tools developed
specifically for servicing your vehicle.
If your vehicle requires professional service,
an authorized dealer can provide the
necessary parts and service. Check your
warranty information to find out which
parts and services are covered.
Use only recommended fuels, lubricants,
fluids and service parts conforming to
specifications. Motorcraft® parts are
designed and built to provide the best
performance in your vehicle.
Precautions
•
Do not work on a hot engine.
• Make sure that nothing gets caught in
moving parts.
• Do not work on a vehicle with the
engine running in an enclosed space,
unless you are sure you have enough
ventilation.
• Keep all open flames and other burning
material (such as cigarettes) away
from the battery and all fuel related
parts.
Working with the Engine Off
1. Set the parking brake and shift to park
(P). 2. Switch off the engine.
3. Block the wheels.
Working with the Engine On WARNING
To reduce the risk of vehicle damage
and/or personal burn injuries, do not
start your engine with the air cleaner
removed and do not remove it while the
engine is running. 1.
Set the parking brake and shift to park
(P).
2. Block the wheels.
OPENING AND CLOSING THE
HOOD 1.
Inside the vehicle, pull the hood release
handle located under the bottom left
corner of the instrument panel.
2. Go to the front of the vehicle and push
the auxiliary latch, located in the center
of the top grille, to the left in order to
release the hood.
3. Lift the hood and secure it with the prop rod.
UNDER HOOD OVERVIEW
139
E-Series (TE4) Canada/United States of America, enUSA, Edition date: 201712, Second Printing MaintenanceE196351
Page 145 of 323

Only use oils certified for gasoline engines
by the American Petroleum Institute (API).
An oil with this trademark symbol
conforms to the current engine and
emission system protection standards and
fuel economy requirements of the
International Lubricants Specification
Advisory Committee (ILSAC).
To top up the engine oil level do the
following:
1. Clean the area surrounding the engine
oil filler cap before you remove it.
2. Remove the engine oil filler cap. See Under Hood Overview (page 139).
Turn it counterclockwise and remove
it.
3. Add engine oil that meets Ford specifications. See
Capacities and
Specifications (page 199). You may
have to use a funnel to pour the engine
oil into the opening.
4. Recheck the oil level.
5. If the oil level is correct, replace the dipstick and make sure it is fully seated.
6. Replace the engine oil filler cap. Turn it clockwise until you feel a strong
resistance.
Note: Do not add oil further than the
maximum mark. Oil levels above the
maximum mark may cause engine damage.
Note: Make sure you install the oil filler cap
correctly.
Note: Soak up any spillage with an
absorbent cloth immediately.
OIL CHANGE INDICATOR
RESET
(If Equipped)
Resetting the Oil Life Monitoring
System
Only reset the oil life monitoring system
after changing the engine oil and oil filter. To reset the oil life monitoring system do
the following:
1.
Switch the ignition on. Do not start the
engine.
2. Fully press the accelerator and brake pedals at the same time.
3. Keep the accelerator and brake pedals
fully pressed.
4. After three seconds, a message displays confirming the reset procedure
is in progress.
5. After 25 seconds, a message displays confirming the reset procedure is
complete.
6. Release the accelerator and brake pedals.
7. Switch the ignition off.
ENGINE COOLANT CHECK WARNINGS
Never remove the coolant reservoir
cap when the engine is running or
hot.
Do not put coolant in the windshield
washer reservoir. If sprayed on the
windshield, coolant could make it
difficult to see through the windshield. To reduce the risk of personal injury,
make sure the engine is cool before
unscrewing the coolant pressure
relief cap. The cooling system is under
pressure. Steam and hot liquid can come
out forcefully when you loosen the cap
slightly. Do not add coolant further than the
MAX mark.
When the engine is cold, check the
concentration and level of the coolant at
the intervals listed in the scheduled
maintenance information. See Scheduled
Maintenance
(page 270).
142
E-Series (TE4) Canada/United States of America, enUSA, Edition date: 201712, Second Printing Maintenance
Page 156 of 323

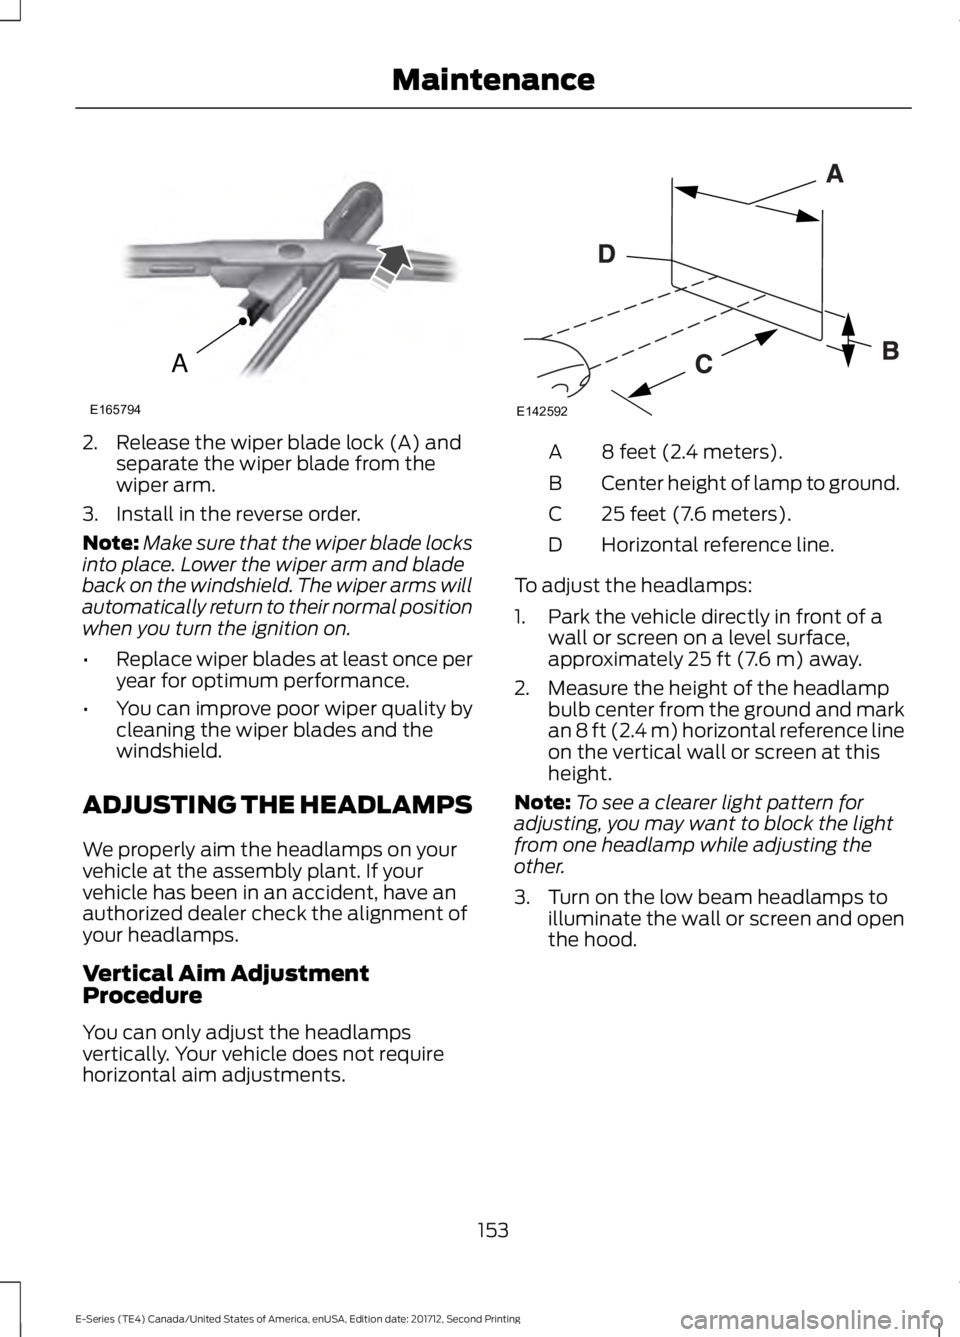
2. Release the wiper blade lock (A) and
separate the wiper blade from the
wiper arm.
3. Install in the reverse order.
Note: Make sure that the wiper blade locks
into place. Lower the wiper arm and blade
back on the windshield. The wiper arms will
automatically return to their normal position
when you turn the ignition on.
• Replace wiper blades at least once per
year for optimum performance.
• You can improve poor wiper quality by
cleaning the wiper blades and the
windshield.
ADJUSTING THE HEADLAMPS
We properly aim the headlamps on your
vehicle at the assembly plant. If your
vehicle has been in an accident, have an
authorized dealer check the alignment of
your headlamps.
Vertical Aim Adjustment
Procedure
You can only adjust the headlamps
vertically. Your vehicle does not require
horizontal aim adjustments. 8 feet (2.4 meters).
A
Center height of lamp to ground.
B
25 feet (7.6 meters).
C
Horizontal reference line.
D
To adjust the headlamps:
1. Park the vehicle directly in front of a wall or screen on a level surface,
approximately 25 ft (7.6 m) away.
2. Measure the height of the headlamp bulb center from the ground and mark
an
8 ft (2.4 m) horizontal reference line
on the vertical wall or screen at this
height.
Note: To see a clearer light pattern for
adjusting, you may want to block the light
from one headlamp while adjusting the
other.
3. Turn on the low beam headlamps to illuminate the wall or screen and open
the hood.
153
E-Series (TE4) Canada/United States of America, enUSA, Edition date: 201712, Second Printing MaintenanceA
E165794 E142592
Page 157 of 323

4.
On the wall or screen, you will observe
a flat zone of high intensity light
located at the top of the right hand
portion of the beam pattern. If the top
edge of the high intensity light zone is
not at the horizontal reference line, you
will need to adjust the headlamp. 5. Locate the vertical adjuster on each
headlamp. Using a Phillips #2
screwdriver, turn the adjuster either
clockwise or counterclockwise in order
to adjust the vertical aim of the
headlamp.
6. Repeat steps 3 through 5 to adjust the
other headlamp.
7. Close the hood and switch off the lamps. REMOVING A HEADLAMP
1. Make sure the headlamp switch is in
the off position, then open the hood. 2. Remove the three screws from the
headlamp assembly and pull the
assembly straight out.
3. Disconnect the electrical connector by
squeezing the release tab and pushing
the connector forward, then pulling it
rearward.
4. Remove the headlamp.
To install the new lamp, follow the
removal procedures in reverse order.
CHANGING A BULB
Lamp Assembly Condensation
Exterior lamps are vented to
accommodate normal changes in
pressure. Condensation can be a natural
by-product of this design. When moist air
enters the lamp assembly through the
vents, there is a possibility that
condensation can occur when the
temperature is cold. When normal
154
E-Series (TE4) Canada/United States of America, enUSA, Edition date: 201712, Second Printing MaintenanceE142465 E163806 E196385
Page 158 of 323

condensation occurs, a thin film of mist
can form on the interior of the lens. The
thin mist eventually clears and exits
through the vents during normal operation.
Clearing time may take as long as 48 hours
under dry weather conditions.
Examples of acceptable condensation are:
•
Presence of thin mist (no streaks, drip
marks or droplets).
• Fine mist covers less than 50% of the
lens.
Examples of unacceptable moisture
(usually caused by a lamp water leak) are:
• Water puddle inside the lamp.
• Large water droplets, drip marks or
streaks present on the interior of the
lens.
Take your vehicle to a dealer for service if
any of the above conditions of
unacceptable moisture are present.
Replacing Headlamp Bulbs WARNING
Make sure the bulbs have cooled
down before removing them. Failure
to follow this warning could result in
serious personal injury. Note:
Grasp the bulb by only its plastic base
and do not touch the glass. The oil from your
hand could cause the bulb to break the next
time the headlamps are operated.
Note: If the bulb is accidentally touched,
clean it with rubbing alcohol before use.
1. Make sure the headlamp switch is in the off position, then open the hood.
2. Remove the headlamp. See Removing a Headlamp (page 154).
3. Disconnect the electrical connector by
squeezing the release tab and pushing
the connector forward, then pulling it
rearward. 4. Remove the bulb assembly by turning
it counterclockwise and pulling it
straight out.
To install the new bulb, follow the removal
procedures in reverse order.
Replacing Front Parking Lamp and
Direction Indicator Bulbs 1. Make sure the headlamp switch is in
the off position, then open the hood.
2. Remove the headlamp assembly. Refer
to
Replacing Headlamp Bulbs in this
section.
3. Rotate the bulb socket counterclockwise and remove.
4. Carefully pry up the bulb straight out of the socket.
To complete installation, follow the
removal procedures in reverse order.
155
E-Series (TE4) Canada/United States of America, enUSA, Edition date: 201712, Second Printing MaintenanceE196386 E196388
Page 168 of 323

Note:
It is necessary to reset memory
features if battery cables are disconnected.
Brakes
• Make sure the brakes and parking brake
release fully.
Tires
• Maintain recommended air pressure.
Miscellaneous
• Make sure all linkages, cables, levers
and pins under your vehicle are covered
with grease to prevent rust.
• Move vehicles at least 25 ft (7.5 m)
every 15 days to lubricate working parts
and prevent corrosion.
Removing Vehicle From Storage
When your vehicle is ready to come out of
storage, do the following:
• Wash your vehicle to remove any dirt
or grease film build-up on window
surfaces.
• Check windshield wipers for any
deterioration.
• Check under the hood for any foreign
material that may have collected
during storage such as mice or squirrel
nests.
• Check the exhaust for any foreign
material that may have collected
during storage.
• Check tire pressures and set tire
inflation per the Tire Label.
• Check brake pedal operation. Drive
your vehicle
15 ft (4.5 m) back and
forth to remove rust build-up. •
Check fluid levels (including coolant,
oil and gas) to make sure there are no
leaks, and fluids are at recommended
levels.
• If you remove the battery, clean the
battery cable ends and check for
damage.
Contact an authorized dealer if you have
any concerns or issues.
165
E-Series (TE4) Canada/United States of America, enUSA, Edition date: 201712, Second Printing Vehicle Care