2018 FIAT TIPO 4DOORS steering wheel
[x] Cancel search: steering wheelPage 35 of 244

Make sure that the bonnet is
completely closed and not only
fastened by the locking device by trying
to open it. If it is not perfectly closed,
do not try to press the bonnet lid down
but open it and repeat the procedure.
IMPORTANT Always check that the
bonnet is closed correctly to prevent it
from opening while the vehicle is
travelling.
WARNING
24)Perform these operations only when
the car is stationary.
25)The bonnet may drop suddenly if the
supporting rod is not positioned correctly.
26)Use both hands to lift the bonnet.
Before lifting, check that the windscreen
wiper arms are not raised from the
windscreen, that the vehicle is stationary
and that the parking brake is engaged.
27)For safety reasons, the bonnet must
always be properly closed while the car is
travelling. Therefore, make sure that the
bonnet is properly closed and that the lock
is engaged. If you discover that the bonnet
is not perfectly closed during travel, stop
immediately and close the bonnet in the
correct manner.
DUALDRIVE
ELECTRIC POWER
STEERING
This only operates with the key turned
to MAR and the engine started. The
electric steering allows the force
required at the steering wheel to be
adjusted to suit driving conditions.
IMPORTANT When turning the ignition
key quickly, full power steering
functionality can be achieved after a
few seconds.
IMPORTANT During parking
manoeuvres requiring a lot of steering,
the steering may become harder; this is
normal and is due to the intervention of
the system to protect the electric
steering motor from overheating. No
repair intervention is needed in this
case. When the car is used again, the
power steering will work normally again.
IMPORTANT The Dualdrive electric
power steering provides an electronic
damping effect when approaching the
end of travel. In some manoeuvring
conditions, the steering wheel may
perform an additional small rotation until
reaching its mechanical stop. This
behaviour is normal and is intended to
prevent excessive impacts with the
mechanical components located inside
the device.POWER STEERING
ACTIVATION/
DEACTIVATION
28) 29)
Engagement/disengagement
Press the fig. 42 button.
The activation of the function is
signalled by a visual indication (CITY) on
the instrument panel or, based on the
version, on the display.
When the CITY function is on, the
steering wheel effort is lighter, making
parking easier: therefore, this function is
particularly useful for driving in city
centres.
4204226J0001EM
33
Page 36 of 244

WARNING
28)It is absolutely forbidden to carry out
any after-market operation involving
steering system or steering column
modifications (e.g. installation of anti-theft
device) that could adversely affect
performance, invalidate the warranty, cause
serious safety problems and also result in
the car not meeting type-approval
requirements.
29)Before performing any maintenance
operations, always turn off the engine and
remove the key from the ignition to lock the
steering column (especially when the car
wheels are not touching the ground). If this
is not possible (for example if the key
needs to be turned to MAR or the engine
must be running), remove the main fuse
that protects the electric power steering.
BOOT
9)
IMPORTANT When travelling, do not
put any object on the rear parcel shelf
because they can injure passengers in
the event of an accident or sudden
braking.
OPENING
30)
Rear flap opening
When the central locking system is
unlocked, the rear boot flap can be
opened from outside the car using the
electric opening handle (where
provided) fig. 44 located under the
handle until the unlocking click is heard
or by pressing the
fig. 43 button on
the dashboard.The roof light inside the luggage
compartment will turn on when the rear
flap is opened; the roof light will
automatically switch off when the rear
flap is closed (see also "Interior lights").
If the rear flap is left open, the roof light
will automatically switch off to preserve
the battery charge.
Emergency opening from inside
Proceed as follows:
For versions with folding rear seat
backrests:
lower the head restraints and fold the
backrests;
4304206J0011EM
4404206J0001EM
34
KNOWING YOUR CAR
Page 48 of 244

DISPLAY
DESCRIPTION
The vehicle is equipped with a display
that can show useful information to the
driver while driving.
GEAR SHIFT INDICATOR
The Gear Shift Indicator (GSI) system
advises the driver to change gear
through a special indication on the
display.
Through the GSI, the driver is informed
that the gear change will allow a
reduction in fuel consumption.
When the
icon appears on the
display, the GSI suggests switching to a
higher gear, while when the
icon is
displayed, the GSI suggests changing
to a lower gear.
The indication in the display remains
until a gear is shifted or the driving
conditions go back to a situation where
gearshifting is not required to improve
consumption.
MULTIFUNCTION
DISPLAY
The display fig. 58 will show the
following information:
1: Headlight alignment position (only
with dipped beam headlights on)
2: Gear Shift Indicator (GSI)
3: Engaged gear indication
4: Time
5: Outside temperature (for
versions/markets, where provided)
6: Odometer (display of distance
travelled in kilometres/miles)
7: Display of "Cruise Control" or
instantaneous speed (for
versions/markets, where provided)
CONTROL BUTTONS
These are located on the left side of the
steering wheel fig. 59.
They allow the driver to select and
interact with the items in the Main menu
of the display (see paragraph "Main
menu").
/: press and release the
buttons to access the Main menu and
to scroll the menu and the submenus
upwards or downwards.
: press briefly to access the
menu and/or go to next screen or to
confirm the required menu option.
: press and release the button to
return to the previous menu item.
5805036J0001EM
5905036J0002EM
46
KNOWING THE INSTRUMENT PANEL
Page 49 of 244

: press and release the button
to display the "Trip computer"
information.
MAIN MENU
The Menu includes the following items:
“Dimmer” (lighting)
“Speed”
“Hour” (Set time)
“Buzzer” (Acoustic warning)
“Units” (Units of measure)
“Corner” (Cornering lights)
“Bag P” (Passenger airbag) (where
present)
“DRL” (Daytime running lights) (for
versions/markets where provided)
Bag P (Passenger airbag)
(where provided)
This function is used to activate/
deactivate the front passenger's airbag.
Proceed as follows:
press theMENU OKbutton and,
after the displaying of the message
(Bag pass: Off, to deactivate) or the
message "Bag pass: On, to activate) by
pressing
/, press thebutton;
a confirmation request message will
appear on the display;
press buttons/to select (Yes)
(confirming activation/deactivation) or
(No) (to abort);
press theMENU OKbutton briefly; a
message confirming the selection is
displayed and you can return to the
menu screen.
WithPassenger's protection not
activethe
LED comes on
constantly in the instrument panel
dashboard.
NOTE With theUconnect™system,
some Menu items are shown and
managed on the display of the latter
and not on the instrument panel display
(refer to the dedicated Multimedia
chapter or to the supplement available
online).
RECONFIGURABLE
MULTIFUNCTION
DISPLAY
The display fig. 60 will show the
following information:
1: headlight alignment position,
indication of the gear engaged (where
present), indication of the gear change
suggestion (GSI), outside temperature,
compass (where present), date.
2: vehicle speed, warning
messages/any failure indications.
3: total kilometres (or miles) run and
icons of any failure indications.
CONTROL BUTTONS
These are located on the left side of the
steering wheel fig. 61.
They allow the driver to select and
interact with the items in the Main menu
of the display (see paragraph "Main
menu").
60P05016J005
47
Page 51 of 244

NOTE With theUconnect™system,
some Menu items are shown and
managed on the display of the latter
and not on the instrument panel display
(refer to the dedicated Multimedia
chapter or to the supplement available
online).TRIP COMPUTER
The "Trip computer" is used to display
information on vehicle operation when
the ignition device is at MAR.
To reset the parameters, press and hold
theMENU OKbutton on the steering
wheel (versions with the multifunction
display) fig. 62 or theOKbutton
(versions with reconfigurable
multifunction display) fig. 63.
NOTE "Range" and "Current fuel"
values cannot be reset.
6205036J0002EM
6305036J0004EM
49
Page 53 of 244
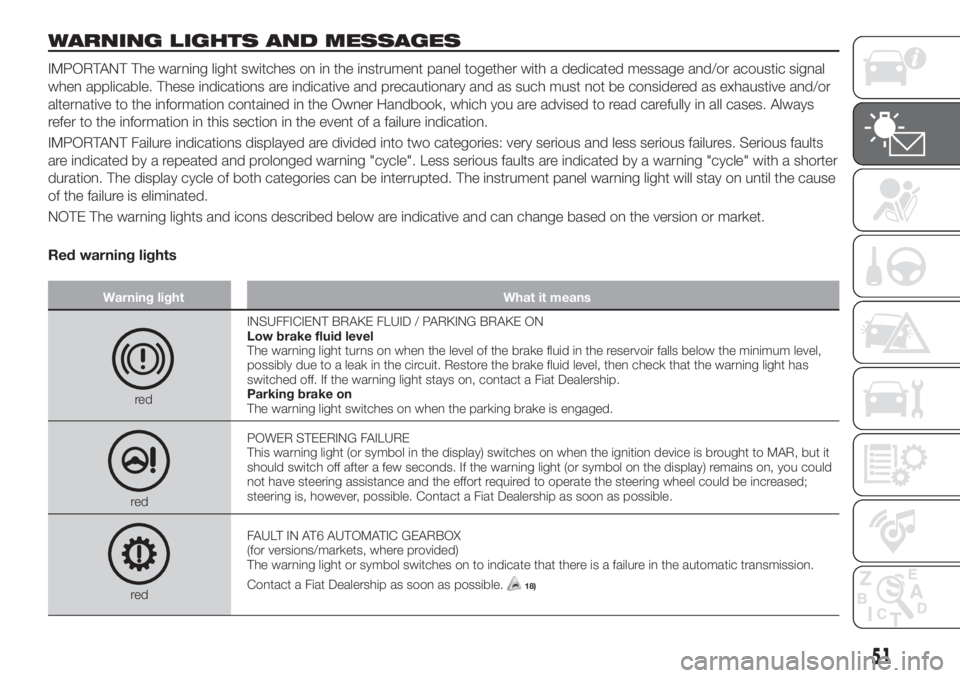
WARNING LIGHTS AND MESSAGES
IMPORTANT The warning light switches on in the instrument panel together with a dedicated message and/or acoustic signal
when applicable. These indications are indicative and precautionary and as such must not be considered as exhaustive and/or
alternative to the information contained in the Owner Handbook, which you are advised to read carefully in all cases. Always
refer to the information in this section in the event of a failure indication.
IMPORTANT Failure indications displayed are divided into two categories: very serious and less serious failures. Serious faults
are indicated by a repeated and prolonged warning "cycle". Less serious faults are indicated by a warning "cycle" with a shorter
duration. The display cycle of both categories can be interrupted. The instrument panel warning light will stay on until the cause
of the failure is eliminated.
NOTE The warning lights and icons described below are indicative and can change based on the version or market.
Red warning lights
Warning light What it means
redINSUFFICIENT BRAKE FLUID / PARKING BRAKE ON
Low brake fluid level
The warning light turns on when the level of the brake fluid in the reservoir falls below the minimum level,
possibly due to a leak in the circuit. Restore the brake fluid level, then check that the warning light has
switched off. If the warning light stays on, contact a Fiat Dealership.
Parking brake on
The warning light switches on when the parking brake is engaged.
redPOWER STEERING FAILURE
This warning light (or symbol in the display) switches on when the ignition device is brought to MAR, but it
should switch off after a few seconds. If the warning light (or symbol on the display) remains on, you could
not have steering assistance and the effort required to operate the steering wheel could be increased;
steering is, however, possible. Contact a Fiat Dealership as soon as possible.
redFAULT IN AT6 AUTOMATIC GEARBOX
(for versions/markets, where provided)
The warning light or symbol switches on to indicate that there is a failure in the automatic transmission.
Contact a Fiat Dealership as soon as possible.18)
51
Page 57 of 244

Warning light What it means
amberiTPMS
iTPMS failure/iTPMS temporarily deactivated
The warning light flashes for about 75 seconds and then stays on constantly (together with a message on
the display) to indicate that the system is temporarily deactivated or faulty. The system will go back to
normal operation when the operating conditions will allow it. If this is not the case, carry out the “Reset”
procedure after restoring the normal operating conditions.
If the malfunction warning persists, contact a Fiat Dealership as soon as possible.
Tyre pressure low
The warning light switches on constantly to indicate that the pressure of one or more tyres is lower than the
recommended value and/or that slow pressure loss is occurring. In these cases, optimal tyre duration and
fuel consumption may not be guaranteed. It is advisable to restore the correct pressure value (see the
"Wheels" paragraph in the "Technical specifications" section). Once the normal operating conditions of the
vehicle are restored, carry out the "Reset" procedure.
WARNING Do not continue driving with one or more flat tyres as the car handling may be compromised.
Stop the vehicle, avoiding sharp braking and steering.
amberABS FAILURE
The warning light switches on to indicate an ABS fault. In this case the braking system maintains its
efficiency unaltered but without the advantage of the ABS system. Drive carefully and contact a Fiat
Dealership as soon as possible.
amberESC SYSTEM
ESC system activation
Intervention by the system is indicated by the flashing of the warning light: it indicates that the car is in
critical stability and grip conditions.
ESC system failure
If the warning light does not switch off, or if it stays on with the engine running, a failure was found on the
ESC system. Contact a Fiat Dealership as soon as possible.
Hill Hold Control system failure
The warning light turns on to indicate a Hill Holder Control system failure. Contact a Fiat Dealership as soon
as possible.
55
Page 70 of 244

ACTIVE SAFETY
SYSTEMS
The vehicle has the following active
safety systems:
ABS (Anti-lock Braking System);
DTC (Drag Torque Control);
ESC (Electronic Stability Control);
TC (Traction Control);
PBA (Panic Brake Assist);
HHC (Hill Hold Control);
ERM (Electronic Rollover Mitigation);
TSC (Trailer Sway Control).
For the operation of the systems, see
the following description.
ABS (Anti-lock Braking
System)
This system, which is an integral part of
the braking system, prevents one or
more wheels from locking and slipping
in all road surface conditions,
irrespective of the intensity of the
braking action, ensuring that the vehicle
can be controlled even during
emergency braking and optimising
stopping distances.
The system intervenes during braking
when the wheels are about to lock,
typically in emergency braking or
low-grip conditions, when locking may
be more frequent.The system also improves control and
stability of the vehicle when braking on
a surface where the grip of the left and
right wheels varies, or on corners.
The Electronic Braking Force
Distribution (EBD) system completes
the system allowing the brake force to
be distributed between the front and
rear wheels.
System intervention
The driver can feel that the ABS system
has come into action because the
brake pedal pulsates slightly and the
system gets noisier: this is entirely
normal with the system operating.35) 36) 37) 38) 39) 40) 41)
DTC (Drag Torque
Control) SYSTEM
The system prevents the drive wheels
from possibly locking, which could
happen, for example, if the accelerator
pedal is released suddenly or in the
case of a sudden downshifting in
conditions of poor grip. In this
conditions, the engine braking effect
could cause the drive wheels to slip,
resulting in a loss of vehicle stability. In
these situations, the DTC system
intervenes, restoring torque to the
engine in order to conserve vehicle
stability and increase vehicle safety.
ESC (Electronic Stability
Control) SYSTEM
The ESC system improves the
directional control and stability of the
car in various driving conditions.
The ESC system corrects the vehicle’s
understeer and oversteer, distributing
the brake force on the wheels
appropriately. The torque supplied by
the engine can also be reduced in order
to maintain control of the vehicle.
The ESC system uses sensors installed
on the vehicle to determine the
trajectory that the driver intends to
follow and compares it with the
vehicle’s effective trajectory. When the
real trajectory deviates from the desired
trajectory, the ESC system intervenes to
counter the vehicle’s understeer or
oversteer.
Oversteer: occurs when the car is
turning more than it should according
to the angle of the steering wheel.
Understeer: occurs when the vehicle
is turning less than it should according
to the angle of the steering wheel.
68
SAFETY