2018 FIAT TALENTO deactivate
[x] Cancel search: deactivatePage 32 of 232

lift up the single seat (movement G
fig. 62 )
move the seat back again
(movement H fig. 62 ) to free up the
front anchorage points;
remove the seat by moving it
towards the front of the vehicle.
IMPORTANT Detach seat 2
fig. 60 before detaching seat 1 fig. 60.
Refitting
Connect the seat with respect to the
front anchorage points;
push the seat until it can enter into
the rear anchorage points;
lower the stops 9 fig. 63 and push
until they lock in place;
check the correct alignment with the
drawing on stops 9 fig. 63.
WARNING
18)For safety reasons, carry out these
operations when the vehicle is stopped.
19)When the front seat backrest is folded
down, the front passenger airbag must be
deactivated (refer to the “Passenger side
airbag and child restraint systems – how to
deactivate the airbags” paragraph in the
“Safety” chapter). Risk of serious injury in
case the air bag opens up because of
objects placed on the folded backrest
flying around. The label (on the dashboard)
and the silkscreen and printed markings
(on the windscreen) remind you of these
instructions.
20)For the occupants' safety, fasten
transported items when the seat in in table
position.21)For safety reasons, carry out these
operations when the vehicle is stopped. In
order not to limit the safety belt's
effectiveness, do not incline the backrests
back too far. There should be no objects
on the driver's side floorboard: in case of
sharp braking, they could slide under the
pedals, hampering their use.
22)When moving a single rear seat, make
sure the relative anchorages are clean
(there must not be any stones, bits of cloth
or other items that could prevent the seat
from locking into place).
23)You absolutely must place the single
rear seats back into their original
anchorages. When driving, you must not
place the "single seats with their backrests
facing backwards.
24)When you reposition the single seats,
make sure they are locked in place. Make
sure the side safety belts are properly
locked in their housings.
25)Do not exchange seats 1 and 2.
62T36660
63T36660-1
30
KNOWING YOUR VEHICLE
Page 34 of 232

ACTIVATION AND
DEACTIVATION OF THE
SYSTEM
Press button 1 fig. 65 to deactivate the
function. The dedicated message will
appear on the instrument panel and the
warning light 2 fig. 65 on the button will
turn on.
Pressing again will reactivate the
system. The appropriate message will
appear on the instrument panel and the
warning light 2 on the button 1 will turn
off.
The system re-activates automatically
whenever the vehicle is voluntarily
restarted (refer to the "Starting the
engine” paragraph in the “Starting and
driving” chapter).
NOTES: With the engine in stand-by,
press button 1: the engine restarts
automatically.Special cases
For vehicles with an electronic key,
with the system activated, engine off
(traffic jam, stopping at a red light, etc.),
if the driver rises up from his seat or
unbuckles his seat belt, the contact is
disengaged. To restart the Start&Stop
system, press the ignition button (see
"Starter switch” paragraph in the
“Knowing your vehicle” chapter).
In case the engine stops, if the
system is activated, press down hard
on the clutch pedal to restart it.
MISSED ENGINE
STOPPING CONDITIONS
Depending on the vehicle, some
conditions stop the system from
applying the stand-by engine,
specifically:
reverse is in gear;
the bonnet is not locked;
for vehicles with an electronic key,
the driver's door is not closed;
for vehicles with an electronic key,
the driver's seat belt is not fastened;
the outside temperature is too low or
too high (lower than 0°C or over 30°C);
the battery not sufficiently charged;
there is too much difference between
the inside vehicle temperature and that
set by the automatic climate control;
the MAX DEF function is activated
(refer to the "Air conditioning"paragraph in the "Knowing your vehicle”
chapter);
the engine coolant liquid temperature
is not sufficient;
the anti-particulate filter automatic
regeneration is underway;
Or:
the instrument panel warning light
turns on to indicate that the engine
cannot be put in standby.
NOTES:To refuel, the engine must be
turned off (and not in stand-by): you
must stop the engine (refer to the
"Starting the engine” paragraph in the
“Starting and driving” chapter):
RESTARTING
CONDITIONS
In some cases, the engine can restart
without any intervention to guarantee
safety and ideal comfort. This can be
confirmed when:
the outside temperature is too low or
too high (lower than 0°C or over 30°C);
the MAX DEF function is activated
(refer to the "Air conditioning"
paragraph in the "Knowing your vehicle”
chapter);
the battery not sufficiently charged;
the vehicle speed is higher than
5 km/h (going downhill, etc.);
repeated pressure on the brake
pedal or need to use the braking
system;
65T36535
32
KNOWING YOUR VEHICLE
Page 35 of 232
Vehicles with remote control
Some of these conditions prevent
automatic engine restart when opening:
one of the doors (for vehicles with a
key);
the passenger door (for vehicles with
an electronic key).
IRREGULAR OPERATION
When the appropriate message
appears on the instrument panel, along
with the integrated light 2 in button 1
fig. 65, the system is deactivated.
Contact a Fiat Dealership.
WARNING
29)In case of an emergency stop, the
engine could restart by pressing the clutch
pedal if the Start&Stop function is
activated.
IMPORTANT
2)Do not drive when the engine is in
standby (the warning lighton the
instrument panel turns on).
3)When the engine in stand-by, the power
steering is deactivated.4)If you leave the vehicle, there is an
acoustic warning that the engine is in
stand-by mode (it is not off). Before getting
out of the vehicle, you must disengage the
starter device (refer to the "Starter switch”
paragraph in the “Knowing your vehicle”
chapter).
REAR VIEW
MIRRORS
DOOR MIRRORS
30) 31) 32)
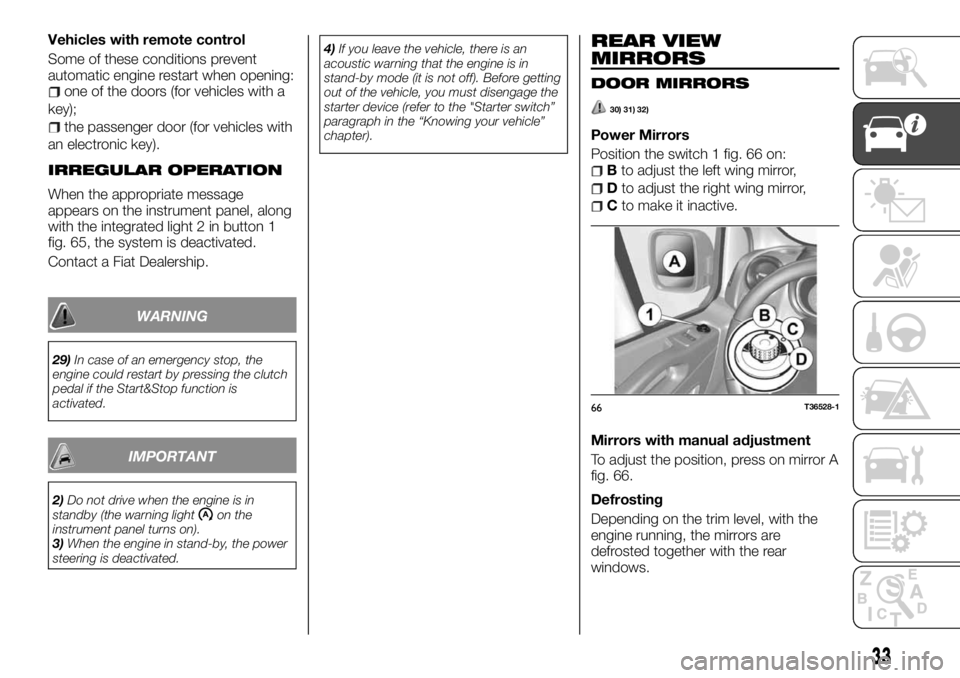
Power Mirrors
Position the switch 1 fig. 66 on:
Bto adjust the left wing mirror,
Dto adjust the right wing mirror,
Cto make it inactive.
Mirrors with manual adjustment
To adjust the position, press on mirror A
fig. 66.
Defrosting
Depending on the trim level, with the
engine running, the mirrors are
defrosted together with the rear
windows.
66T36528-1
33
Page 43 of 232

WARNING
37)When working in the engine
compartment, make sure that the
windscreen wiper is in position A
(stopped). Risk of injury.
38)If the window needs to be cleaned,
make sure the device is deactivated or the
key is on STOP.
39)When working in the engine
compartment, make sure that the rear
window wiper is in the stopped position.
Risk of injury.
IMPORTANT
5)Never use the windscreen wipers to
remove layers of snow or ice from the
windscreen. In such conditions, the
windscreen wiper may be subjected to
excessive stress and the motor cut-out
switch, which prevents operation for a few
seconds, may intervene. If operation is not
subsequently restored, even after restarting
the vehicle, contact a Fiat Dealership.
6)Do not operate the windscreen wiper
with the blades lifted from the windscreen.
7)Make sure the device is switched off if
there is ice on the windscreen.
REFUELLING THE
VEHICLE
Useful tank capacity: Approx. 80 litres
Open the left front door to access the
flap A fig. 84.
While filling, hang the cap 2 fig. 84 on
the cap holder 1 on the flap A.
IMPORTANT After filling, check that the
cap and flap are closed.
Fuel quality
Use the best quality fuel, respecting the
regulations in force specific to each
country, and adhere strictly to the
indications on the label located on the
flap A.
40)
8)
Fuel filling
To refill the tank with the starter device
disengaged, insert the fuel nozzle and
push it as far as it will go before starting
fuelling (risk of splatters).
Hold the nozzle in this position the
entire time you are refilling.
If filling up, after the first automatic stop,
you can top up another two clicks to
keep the expansion volume inside the
tank empty. When refuelling, make sure
water does not get in. The flap A and
related surrounding parts must be kept
clean.
Vehicles with the Start&Stop
function
IMPORTANT When refuelling, the
engine must be stopped and not in
stand-by.
41)
Fuel empty
Vehicles with key with remote
control
Turn the key to the "M" position and
wait a few minutes before starting the
engine to allow the fuel circuit to
reactivate;
Turn the key to D. If the engine does
not start, repeat above.
42)
84T36715
41
Page 51 of 232

Air temperature adjustment
Use control 5 fig. 91 depending on the
desired temperature. The farther the
indicator is in the red zone, the higher
the temperature.
Ventilation speed adjustment
Use control 3 fig. 91 from 0 to 4 fig. 91.
The farther to the right you turn it, the
more air is diffused. If you want to stop
air entry, place control 3 fig. 91 at 0.
The system is deactivated: ventilation
speed in the passenger compartment is
nil (vehicle stopped), you can still notice
a slight air flow when the vehicle is
moving.
NOTE Prolonged use of this control in
position 0 can make the side windows
and windscreen mist up even though
the air inside the passenger
compartment is not stuffy.
Quick de-misting: Passenger
compartment isolation/air recycling
deactivated (warning light on button 4
fig. 91 is off), turn controls 1 fig. 91 and
3 fig. 91 to the positions
. Air
conditioning activation lets you speed
up de-misting.
Activating the passenger
compartment isolation/air
recycling.
Press button 4 fig. 91 (the warning light
will go on).
In this position, the air in the passenger
compartment is recycled without
introducing outside air.Air recirculation allows you:
to isolate the outside environment
(when driving in polluted areas, etc.);
to get the desired internal passenger
compartment temperature more
quickly.
IMPORTANT Prolonged use of air
recycling can make the side windows
and windscreen mist up even though
the air inside the passenger
compartment is not stuffy. We advise
you to return to normal function
(outside air) by pressing button 4
fig. 91 again as soon as air recycling is
no longer needed.
Passenger compartment air
distribution
Turn the knob 1 fig. 91 to select the
distribution type.
The airflow is directed to the
dashboard vents.
The airflow is directed to the
dashboard vents and to the rear seat
lower vents.
The airflow is mainly directed
towards the front seat lower vents and
the dashboard vents. To direct the air
downwards only, close the dashboard
vents.
The airflow is distributed among all
the vents, the front side window vents,
the windscreen demisting vents and the
lower vents.
. The airflow is directed towards the
windscreen demisting vents and the
front side window demisting vents.
Turning the climate control system
on/off
The button 2 fig. 91 lets you turn on
(indicator light on) or off (indicator light
off) the air conditioning.
It cannot be turned on if control 3
fig. 91 is set at 0.
Using air conditioning lets you:
lower the interior car temperature;
de-mist the windows more quickly.
Air conditioning does not work when
the outside temperature is low.
IMPORTANT For vehicles equipped
with ECO mode (button 7 fig. 92 ):
when activated, ECO mode can reduce
the heating and/or climate control
performance.
92T36716
49
Page 52 of 232

Heated rear window demisting/
defrosting
With the engine running, press button 6
fig. 93 and the integrated warning light
will go on.
For vehicles that are equipped with
them, this function quickly defrosts or
demists the rearscreen and defrosts the
external mirrors.
Press button 6 again to deactivate the
this function.
If you do not, the defroster deactivates
automatically.
93T36669
50
KNOWING YOUR VEHICLE
Page 54 of 232

AUTO function (automatic
operation)
Automatic air conditioning is a system
that guarantees (except when using it in
extreme conditions) interior comfort and
a good level of visibility, optimising
consumption. The system uses
ventilation speed, air distribution, air
recycling, activating or turning off the air
conditioner and air temperature.
AUTO: optimising the selected comfort
level reached according to exterior
conditions. Press button 1 fig. 94.
Ventilation speed variation
In automatic mode, the system
oversees the best ventilation speed to
reach and maintain comfort.
You can always adjust the ventilation
speed by turning control 6 fig. 94 to
increase or reduce it.
Air temperature adjustment
Use control 2 fig. 94 depending on the
desired temperature.
The farther to the right you turn it, the
higher the air temperature.
NOTE The farthest adjustments allow
the system to produce the coldest or
hottest air ("18°C" and "26°C").
MAX DEF function
Press button 3 fig. 94 and the
integrated warning light will go on.
This function lets you quickly defrost
and de-mist the windscreen and rear
windows, the side front windows andexterior rear view mirrors (depending on
the vehicle version). Set the automatic
air condition and rear window defrost
activation.
Press button 8 fig. 94 to disconnect the
rear window heat function, the
integrated warning light goes off.
To turn the function off, press button 3
fig. 94 or 1 fig. 94.
IMPORTANT Some of the buttons have
an in use light that indicates the
function status.
Passenger compartment air
distribution
Press one of the buttons 4 fig. 94. The
warning light in the selected button
goes on.
You can select two positions at a time
by pressing two of the buttons 4 fig. 94.
The airflow is distributed mainly
among all the vents, the side front
window demisting vents and the
windscreen demisting vents.
The airflow is directed mainly to the
dashboard vents.
The airflow is directed mainly to the
rear seat lower vents.
Heated rearscreen and door mirror
thermal resistance switch
(For versions/markets where provided)
Press button 8 fig. 94 and the
integrated warning light will go on. This
function lets you quickly demist the
rearscreen and door mirrors (forversions/markets where provided).
Press button 8 fig. 94 again to
deactivate the this function. The
function turns off automatically
Turning the climate control system
on/off
In automatic mode, the climate control
system turns on or off according to the
outside weather conditions.
Press button 5 fig. 94 to turn off the
climate control system and the
integrated indicator light will turn on.
IMPORTANT Vehicles equipped with
the ECOMODE function (button 9
fig. 95 ): when enabled, the ECOMODE
function can reduce the automatic
climate control system performance.
Please see the paragraph "Driving
suggestions".
95T36540
52
KNOWING YOUR VEHICLE
Page 55 of 232

Internal air recirculation
This function is managed automatically,
but you can also enable it manually. It
can be forced on by button 7 fig. 94,
which is highlighted by the button’s led
turning on
IMPORTANT In any case,
de-misting/defrosting takes priority over
air recycling.
Note:
during recycling, the air in the
passenger compartment is recycled
without introducing outside air;
air recirculation lets you isolate the
interior from outside influences (driving
in a polluted area, e.g.);
to get the desired internal passenger
compartment temperature more
quickly.
Manual use: Press button 7
fig. 94 and the integrated warning light
will go on.
Prolonged use of the recirculation
function can create unpleasant odours
and mist up the windows as the air is
not changed.
We advise you to return to automatic
mode by pressing button 7 fig. 94 again
as soon as air recirculation is no longer
needed.
Press button 7 fig. 94 again to
deactivate the this function.System deactivation
Turn control 6 fig. 94 to the OFF
position to deactivate the system. To
turn it on again, turn control 6
fig. 94 again to adjust the fan speed, or
press button 1 fig. 94.
ADDITIONAL CLIMATE
CONTROL
(For versions/markets where provided)
If equipped with them, the vehicle has
four diffusers that can be aimed, 1
fig. 96.
These controls only act on the amount
of air in the passenger compartment:
one control for heat (air coming out
of the lower diffusers);
one control for cold (air coming out
of the upper diffusers);
NOTE Do not close all four diffusers at
the same time (you risk damaging the
system components).Climate control system
Make sure the air conditioning is
working (button 2 fig. 97 led on).
IMPORTANT Pressing button 2
fig. 97 the led turns on:
when the led is on, the function is on;
when the led is off, the function is off.
WARNING
50)Do not introduce anything into the
vehicle's ventilation circuit (for example
perfumed items to remove unpleasant
odours, etc.) There is a risk of damaging or
fire.
51)Do not open the cooling liquid circuit. It
is dangerous to eyes and skin.
96T36557
97T36643
53