2018 FIAT DUCATO AUTO mode
[x] Cancel search: AUTO modePage 33 of 304

FOG LIGHTS ALIGNMENT
(for versions/markets, where provided)
Contact a Fiat Dealership to have the
headlights checked and adjusted.
ADJUSTING THE
HEADLIGHTS WHEN
ABROAD
The dipped beam headlights are
aligned for operation in the country
where the vehicle was originally
purchased. When in countries where
you drive on the other side of the road,
you need to alter the light beam
direction by affixing a specially designed
self-adhesive film in order not to dazzle
the vehicles travelling in the opposite
direction. This film is provided by
Lineaccessori MOPAR and is available
at Fiat Dealerships.
CEILING LIGHTS
FRONT ROOF LIGHT WITH
SPOT LIGHTS
The switch A fig. 58 is used to switch
the roof lights on/off. With the switch A
in the middle position, the lights C
and D go on/off when front doors are
opened/closed. With switch A pressed
to the left, the lights C and D are always
off. With switch A pressed to the right,
the lights C and D are always on.
Lights switch on/off progressively.
The switch B is a spot light; when the
roof light is off, it switches the following
on individually:
light C if pressed on the left side;
light D if pressed on the right side.
The timed period ends automatically
when the doors are locked.Ceiling light timing
On some versions, to facilitate getting
in/out of the vehicle at night or with
poor lighting, 2 different timed modes
are available.
for entering the vehicle;
for leaving the vehicle;
REMOVABLE CEILING
LIGHT
(for versions/markets, where provided)
It is used as both a fixed light and a
portable electric torch.
When the removable light is connected
to its fixed mount fig. 59, the electric
torch battery is automatically
recharged.
With the vehicle stationary and the
ignition key either turned to STOP or
removed, the roof light is recharged for
a maximum of 15 minutes.
MODEMODE
57F1A0326
58F1A0074
59F1A0077
31
Page 34 of 304

CONTROLS
HAZARD WARNING
LIGHTS
They are turned on by pressing switch
A fig. 60, regardless of the ignition key's
position.
The
andwarning lights on the
instrument panel turn on when this
device is enabled. Press switch A again
to turn the lights off.
Emergency braking
(for versions/markets, where provided)
In the event of emergency braking,
the hazard warning lights turn on
automatically together with the
and
warning lights on the instrument
panel. The function switches off
automatically when the nature of the
braking changes.FOG LIGHTS
(for versions/markets, where provided)
With the side lights on, press the
button fig. 61 to turn the fog lights
on. The
warning light on the
instrument panel turns on.
Press the button again to switch the
lights off.
REAR FOG LIGHT
With the dipped beam headlights on or
with the side lights and fog lights on
(for versions/markets, where provided),
these lights turn on when the
button
fig. 62 is pressed. The
warning
light on the instrument panel turns on.
Press the button again to turn the lights
off, or turn off the dipped beams
and/or the front fog lights (where
provided).FRONT FOG
LIGHTS/REAR FOG
LIGHTS
(For 2.3 150 ECOJET versions)
With the dipped beam headlights on,
use the button A fig. 63 to turn on
the front/rear fog lights, as follows:
first press: turns on the fog lights,
the
warning light on the instrument
panel will turn on;
second press: turns on the rear fog
lights, the
warning light on the
instrument panel will turn on;
third press: turns off the front/rear
fog lights.
60F1A0306
MODE
61F1A0331
MODE
62F1A0323
32
KNOWING YOUR VEHICLE
Page 35 of 304

PARKING LIGHTS
These lights can only be turned on with
ignition key in the STOP position or
removed by moving the left stalk ring
first to theOposition and then to the
orposition. Thewarning
light switches on in the instrument
panel.
ECO FUNCTION
(For versions/markets, where provided)
Press theECObutton fig. 63 to enable
this function. When the function is
enabled, the corresponding LED on the
button turns on together with an icon
and a message on the display.
This function is memorised, so when
the vehicle is started again, the system
keeps the setting it had before the
engine was stopped. Press theECO
button again to disable the function and
restore the normal driving setting.In the event of a malfunction with the
function on, the system automatically
disables theECOfunction and restores
the normal driving setting.
HEATED REAR WINDOW
(for versions/markets, where provided)
Press button A fig. 64 to enable. The
device will be switched off automatically
after approximately 20 minutes.
BATTERY
DISCONNECTION
FUNCTION
(DISCONNECTOR)
(for versions/markets, where provided)
The battery disconnection function is
enabled with the ignition key in the
BATT position, as illustrated on the
dedicated plate located in the area
shown in fig. 65.
To turn the ignition key to BATT
position, press the button A (red) fig.
66.The battery will be disconnected, by
interrupting the earth lead, about 7
minutes after the key is turned to the
BATT position.
This 7 minute period is necessary to:
allow the driver to get out of the
vehicle and lock the doors using the
remote control;
guarantee that all the vehicle
electrical systems have been
deactivated.
MODE
63F1A0438
64F1A0330
65F1A0082
66F1A0083
33
Page 42 of 304
During fully automatic system
operation, you can change the set
temperature, air distribution and fan
speed at any time by using the relevant
buttons or knobs: the system will
automatically change its settings to
adjust to the new requirements. During
fully automatic operation (FULL AUTO),
the word FULL will disappear if the air
distribution and/or flow rate and/or
engagement of the compressor and/or
recirculation settings are changed. In
this way, the functions will switch from
automatic to manual control until the
AUTO button is pressed again.
WARNING
2)The air conditioning system uses R134a
or R1234yf refrigerant compatible with
the regulations in force in the countries
where the vehicle is sold. When charging,
only use the gas indicated on the
dedicated plate in the engine compartment
. The use of other coolants affects the
efficiency and condition of the system. The
lubricant used for the compressor is also
strictly linked to the type of cooling gas,
please refer to a Fiat Dealership.
ADDITIONAL
HEATER
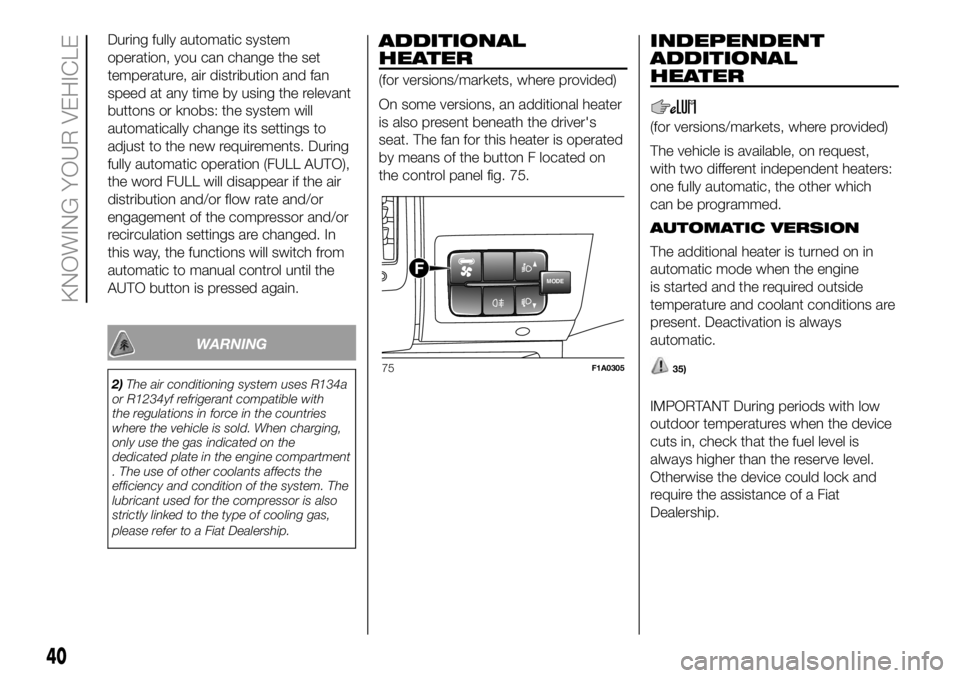
(for versions/markets, where provided)
On some versions, an additional heater
is also present beneath the driver's
seat. The fan for this heater is operated
by means of the button F located on
the control panel fig. 75.
INDEPENDENT
ADDITIONAL
HEATER
(for versions/markets, where provided)
The vehicle is available, on request,
with two different independent heaters:
one fully automatic, the other which
can be programmed.
AUTOMATIC VERSION
The additional heater is turned on in
automatic mode when the engine
is started and the required outside
temperature and coolant conditions are
present. Deactivation is always
automatic.
35)
IMPORTANT During periods with low
outdoor temperatures when the device
cuts in, check that the fuel level is
always higher than the reserve level.
Otherwise the device could lock and
require the assistance of a Fiat
Dealership.
MODEF
75F1A0305
40
KNOWING YOUR VEHICLE
Page 60 of 304

NOTE Theandbuttons
turn on various functions depending on
the situation, as follows:
Adjusting the vehicle interior
lighting
- with the side lights on and standard
screen active, it is possible to adjust the
brightness inside the vehicle.
Setup menu
- within the menu, they allow you to
scroll up and down;
- during setting operations they allow
an increase or decrease.
SETUP MENU
Setup menu functions
The setup menu can be activated by
pressing the MODE button briefly.
The menu comprises the following
functions:
Menu
On
Headlight alignment corrector
Speed warning
Headlight sensor
Cornering lights
Rain sensor
Trip B activation
Traffic sign
Set time
Set date
Autoclose
Units
Language
Warning volume
Service
Passenger's airbag
Daytime running lights
Automatic main beam headlights
Exit menu
Press the
orbuttons to
navigate within the menu
buttons
once to scroll through the setup menu
list.
Operating modes are different
according to the characteristics of the
option selected.
TRIP COMPUTER
IN BRIEF
The Trip computer is used to display
information on vehicleoperation
when the ignition key is turned to
MAR. This function allows you to
define two separate trips, called "Trip
A" and "Trip B", for monitoring the
"complete mission" (journey) of
the vehicle in a reciprocally
independent manner. Both functions
can be reset (reset means start of
a new journey).
"Trip A" can be used to display the
values relating to:
Outside Temperature
Range
Distance travelled A
Average consumption A
Instant consumption
Average speed A
Trip time A (driving time)
Reset Trip A
"Trip B", available on multifunction
display only, is used to display
the values relating to:
58
KNOWING THE INSTRUMENT PANEL
Page 61 of 304

Distance travelled B
Average consumption B
Average speed B
Trip time B (driving time).
7)
Exit Trip
You can automatically exit the TRIP
function once all the values have been
displayed or by holding the MODE
button down for more than 1 second.
WARNING
7)The "Trip B" function may be disabled
(see the "Activating Trip B" paragraph).
"Range" and "Instant consumption" values
cannot be reset.
59
Page 85 of 304

What it means What to do
“COMFORT-MATIC"
GEARBOXFor versions equipped with the "Comfort-matic"
gearbox, the following messages can be displayed:
REDUCE GEAR CHANGES
MANUAL MODE UNAVAILABLE
AUTOMATIC MODE NOT AVAILABLE
CLUTCH OVERHEATING
PRESS BRAKE PEDAL -DELAYED START-UP
GEAR NOT AVAILABLE
MANOEUVRE NOT PERMITTED
PRESS THE BRAKE PEDAL AND REPEAT THE
OPERATION
PLACE GEAR LEVER IN N (neutral)If the message continues to be shown in the
multifunctional display, contact a Fiat Dealership.
NATURAL POWER SYSTEM FAILURE
(for Natural Power versions only)
The symbol on the display turns on together with a
dedicated message and the four methane levels turn
off.In this case, contact a Fiat Dealership as soon as
possible
WARNING
49)When the urea tank is empty and the vehicle is stopped it is no longer possible to restart it until the urea tank is topped up with at least 3
litres of Urea.
WARNING
11)The presence of water in the fuel supply circuit may cause severe damage to the injection system and irregular engine operation. If thesymbol appears (on some versions together with the dedicated message on the display), contact a Fiat Dealership as soon as possible to
have the system bled. If the above indication occurs immediately after refuelling, water may have entered the tank: turn the engine off
immediately and contact a Fiat Dealership.
83
Page 96 of 304

vehicle direction getting constantly
closer to the lane demarcation lines (the
vehicle trajectory is within the lane
demarcation lines);
vehicle not constantly next to the
lane demarcation line.
ACTIVATING/
DEACTIVATING THE
SYSTEM
When the system is active, if the vehicle
gets close to one of the side
demarcation lines or one of the two
lane demarcation lines, the driver is
warned with an acoustic signal (coming
from the crossed line side if the vehicle
is equipped with the radio navigation
system) along with the corresponding
direction warning light (
or) lighting
up.
If the driver turns on the direction
indicator in order to change lanes or for
overtaking, then the system will switch
off the driver warning.
If the driver keeps deliberately with the
lane change manoeuvre, the system
interrupts the warning, remaining
enabled if the operating conditions are
not satisfied or active if the operating
conditions are exceeded (see the
dedicated paragraph).SWITCHING OFF THE
SYSTEM
Manual mode
The system can be switched off by
pressing button A fig. 104 on the
dashboard.
The LED on the button switches on and
a message appears on the display to
confirm that the system has been
switched off.
Automatic mode
If the Start&Stop is active the system
deactivates automatically. The system
will reactivate and check its operating
conditions again after the vehicle has
been started.
SYSTEM FAILURE
In the event of malfunction, the system
signals the fault to the driver with a
message on the display, an acoustic
warning and by turning on the
icon
on the display (for versions/markets,
where provided).
IMPORTANT NOTES
The Driving Advisor cannot operate due
to a not perfectly balanced and
excessive load.The operation of the system can be
adversely affected in some cases
by the morphology of the territory/road
being driven on (e.g. driving over
humps), poor visibility conditions (e.g.
fog, rain, snow), extreme light
conditions (e.g. glare of the sun,
darkness), lack of cleanliness
or damage, even partial, to the
windscreen in the area in front of the
camera.
The Driving Advisor cannot operate
following a malfunction of the following
safety systems: ABS, ESC, ASR and
Traction Plus.
The operation of the system can be
adversely affected by poor visibility
conditions (e.g. fog, rain, snow),
extreme light conditions (glare of the
sun, darkness), lack of cleaning or
damage, even partial, to the
windscreen in the area in front the
camera.
The area of the windscreen by the
camera must not be partly or totally
obscured by objects (e.g. stickers,
protective film, etc.).
94
SAFETY