2018 FIAT 500L reset
[x] Cancel search: resetPage 120 of 268

IMPORTANT NOTES
For towing caravans or trailers the car
must be fitted with an approved tow
hook and an adequate electrical
system. Installation must be carried out
by specialised technicians.
Install any specific and/or additional
door mirrors as specified by the
Highway Code.
Remember that, when towing a trailer,
steep hills are harder to climb, braking
distances increase and overtaking
takes longer depending on the overall
weight of the trailer.
Engage a low gear when driving
downhill, rather than constantly using
the brake.
The weight the trailer exerts on the car
tow hook reduces the car's loading
capacity by the same amount. To make
sure that the maximum towable weight
is not exceeded (given in the vehicle
registration document) account should
be taken of the fully laden trailer,
including accessories and luggage.
Do not exceed the speed limits specific
to each country you are driving in, in
the case of vehicles towing trailers.
In any case, the top speed must not
exceed 100 km/h.Any electric brake (or electric winch,
etc.) should be supplied directly by the
battery through a cable with a section
of at least 2.5 mm
2.
In addition to the electrical branches,
the car electrical system can only
be connected to the supply cable for an
electric brake and to the cable for an
internal light for the trailer, not
exceeding 15 W. For connections, use
the preset control unit with a battery
cable with section not less than 2.5
mm
2.
IMPORTANT The use of auxiliary loads
other than external lights (electric brake,
winch, etc.) must take place with
engine running.
IMPORTANT To install a tow hook
contact a Fiat Dealership.
WARNING
116)The ABS with which the car is
equipped will not control the braking
system of the trailer. Particular caution is
required on slippery roads.
117)Never modify the braking system of
the vehicle to control the trailer brake. The
trailer braking system must be fully
independent of the vehicle’s hydraulic
system.
118)After fitting, screw holes must be
sealed to prevent a exhaust gas inlet.
REFUELLING THE
VEHICLE
119) 120) 121)60)
Before refuelling, make sure that the
fuel type is correct. During refuelling
procedure, switch off the engine,
engage handbrake, rotate the ignition
key to STOP and do not smoke.
PETROL ENGINES
Only use unleaded petrol with a number
of octanes (R.O.N.) not lower than 95
(EN228 specification).
DIESEL ENGINES
Only use Diesel for motor vehicles
(EN590 specification).
When using or parking the car for a
long time in the mountains or cold
areas, it is advisable to refuel using
locally available Diesel. In this case, it is
also advisable to keep the tank over
50% full.
REFUELLING
PROCEDURE
Diesel and petrol versions
Proceed as follows:
open the flap A fig. 111 pulling
outwards, insert the nozzle in the filler
and refuel;
118
STARTING AND DRIVING
Page 147 of 268

FUEL CUT-OFF
SYSTEM
144)
This intervenes in the case of an impact
causing:
the interruption of the fuel supply
with the engine consequently cutting
out;
the automatic unlocking of the
doors;
turning on the lights inside the car;
the switching on of the hazard
warning lights.
The intervention of the system is
indicated by a message shown on the
display.
IMPORTANT Carefully check the vehicle
for fuel leaks, for instance in the engine
compartment, under the vehicle or
near the tank area. After an impact, turn
the ignition key to STOP to prevent the
battery from running down.
Reset procedure
To restore correct operation of the
system, carry out the following Reset
procedure (the procedure must be
completed in less than 1 minute):
turn the ignition key to the MAR
position;
activate the right direction indicator
and then stop it;
activate the left direction indicator
and then stop it;
activate the right direction indicator
and then stop it;
activate the left direction indicator
and then stop it;
turn the ignition key to the STOP
position and then to MAR.
LPG versions: in case of collision, the
petrol feed is immediately closed, the
LPG safety solenoid valves are closed
and injection is interrupted to stop
the engine.
Natural Power versions: in the event
of an impact, the power supply is
immediately cut off, causing engine
switching off.
WARNING
144)If, after an impact, you smell fuel or
notice leaks from the fuel system, do
not reactivate the system to avoid the risk
of fire.
TOWING THE
VEHICLE
ATTACHING THE TOW
RING
145) 146) 147) 148)
The tow rings, which are supplied with
the car, are housed in the tool box,
under the carpet in the luggage
compartment.
IMPORTANT The shorter tow ring is for
use on the front of the car and the
longer one on the rear.
500L WAGON versions
NOTE 500L WAGON versions have
only one tow ring, which can be used
on either the front or the rear bumper.
Front
Manually remove cap A fig. 168,
pressing in the lower part. Take tow ring
B from its housing in the tool support
and screw it completely onto the
threaded pin.
Rear
Manually remove cap A fig. 169 or fig.
170 (500L WAGON versions) by
pressing at the bottom. Take tow ring B
from its housing in the tool support
and screw it completely onto the
threaded pin.
145
Page 228 of 268

SYSTEM ON / OFF
The system is switched on/off by
pressing the
(ON/OFF) button/knob.
Turn the button/knob clockwise to
increase the radio volume or
anticlockwise to decrease it.
USB/iPod/AUX SUPPORT
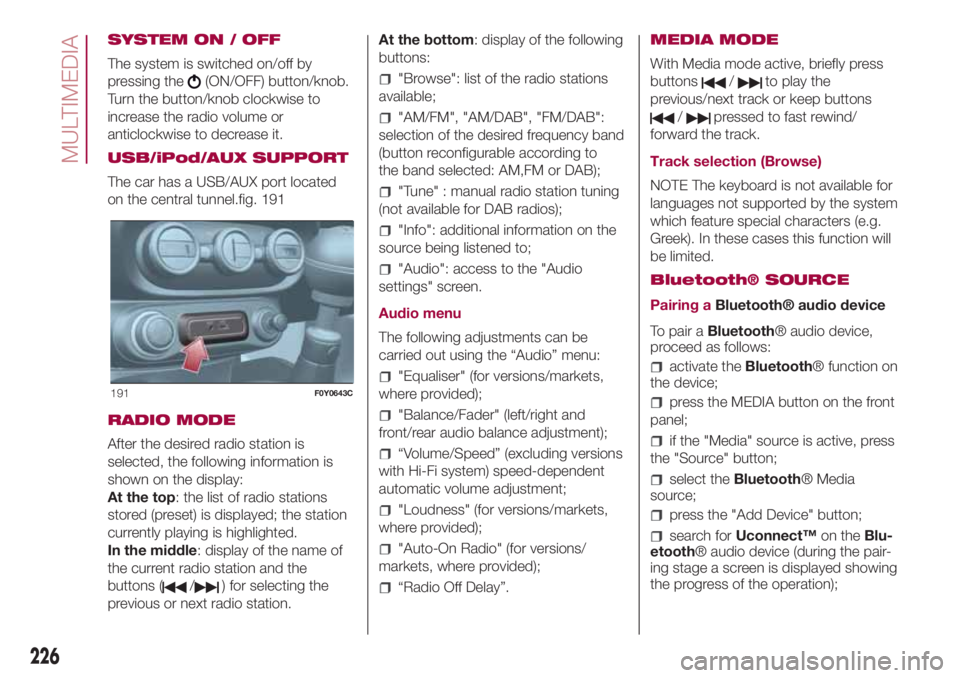
The car has a USB/AUX port located
on the central tunnel.fig. 191
RADIO MODE
After the desired radio station is
selected, the following information is
shown on the display:
At the top: the list of radio stations
stored (preset) is displayed; the station
currently playing is highlighted.
In the middle: display of the name of
the current radio station and the
buttons (
/) for selecting the
previous or next radio station.At the bottom: display of the following
buttons:
"Browse": list of the radio stations
available;
"AM/FM", "AM/DAB", "FM/DAB":
selection of the desired frequency band
(button reconfigurable according to
the band selected: AM,FM or DAB);
"Tune" : manual radio station tuning
(not available for DAB radios);
"Info": additional information on the
source being listened to;
"Audio": access to the "Audio
settings" screen.
Audio menu
The following adjustments can be
carried out using the “Audio” menu:
"Equaliser" (for versions/markets,
where provided);
"Balance/Fader" (left/right and
front/rear audio balance adjustment);
“Volume/Speed” (excluding versions
with Hi-Fi system) speed-dependent
automatic volume adjustment;
"Loudness" (for versions/markets,
where provided);
"Auto-On Radio" (for versions/
markets, where provided);
“Radio Off Delay”.MEDIA MODE
With Media mode active, briefly press
buttons
/to play the
previous/next track or keep buttons
/pressed to fast rewind/
forward the track.
Track selection (Browse)
NOTE The keyboard is not available for
languages not supported by the system
which feature special characters (e.g.
Greek). In these cases this function will
be limited.
Bluetooth® SOURCE
Pairing aBluetooth® audio device
To pair aBluetooth® audio device,
proceed as follows:
activate theBluetooth® function on
the device;
press the MEDIA button on the front
panel;
if the "Media" source is active, press
the "Source" button;
select theBluetooth® Media
source;
press the "Add Device" button;
search forUconnect™on theBlu-
etooth® audio device (during the pair-
ing stage a screen is displayed showing
the progress of the operation);
191F0Y0643C
226
MULTIMEDIA
Page 241 of 268

SWITCHING THE SYSTEM
ON/OFF
The system is switched on/off by
pressing the
button/knob.
Turn the button/knob clockwise to
increase the radio volume or
anticlockwise to decrease it. The
electronic volume adjustment control
rotates continuously (360°) in both
directions, without stop positions.
"TOUCH SCREEN"
FUNCTION
The system uses the "touch screen”
function; to interact with the different
functions, press the "graphic buttons"
displayed.
Confirming a selection: press the
"OK" button.
Return to the previous screen: press
the
(Delete) button or, depending
on the active screen,
/Done.
RADIO MODE
After the desired radio station is
selected, the following information is
shown on the display:
At the top: the list of radio stations
stored (preset) is displayed; the station
currently playing is highlighted.
At the centre: the name of station
being listened too is displayed.On the left side: the "AM", "FM",
"DAB” (for versions/markets, where
provided) buttons to select the desired
frequency band are displayed (the
button corresponding to the selected
band is highlighted);
On the right: display of the following
buttons:
“Info”: additional information on the
source being listened to;
“Map": navigation map view
(versions withUconnect™7" HD Nav
LIVE only).
At the bottom: display of the following
buttons:
“Browse”: list of the radio stations
available;
/select previous/following
radio station;
“Tune” : manual radio station tuning;
“Audio”: access to the “Audio
Settings” screen.
Audio menu
To access the "Audio" menu press the
Audio" button located at the bottom
of the display.
The following adjustments can be
carried out using the “Audio” menu:
"Balance/Fader" (left/right and
front/rear audio balance adjustment);
"Equaliser" (for versions/markets,
where provided);
“Speed Adj Volume” (speed-
dependent automatic volume control);
"Loudness" (for versions/markets,
where provided);
“AUX Volume Offset” (only active if
an AUX device is inserted);
“AutoPlay”;
“Auto-On Radio”.
MEDIA MODE
Press the "Media" button to select the
desired audio source among those
available: USB/iPod,Bluetooth® and
AUX.
IMPORTANT Applications used on
portable devices may be not
compatible with theUconnect™
system.
After Media mode is selected, the
following information is shown on the
display:
At the top: information on the track
being played and the following graphic
buttons:
“Repeat”: to repeat the track being
played;
“Shuffle”: to play the tracks in
random order;
Track progress and duration.
239