2018 FIAT 500L clock
[x] Cancel search: clockPage 134 of 268

FRONT UPPER LIGHT
CLUSTER
This contains the bulbs for the direction
indicators and dipped headlights.
The bulbs are arranged as follows fig.
136:
A: direction indicators
B: dipped beam headlights
DIRECTION INDICATORS
To replace the bulb, proceed as follows:
remove cover A fig. 136;
turn bulb holder B fig. 137
anticlockwise, extract bulb C and
replace it;
refit the new bulb on the bulb holder,
making sure it is correctly locked;
refit the bulb holder in its housing
and turn it clockwise, until the locking
click is heard;
then refit the cover A fig. 136.DIPPED BEAM
HEADLIGHTS
To replace the bulb, proceed as follows:
remove cover B fig. 136;
remove the connector and bulb
holder C fig. 138 unit, releasing it
outwards;
remove bulb D from connector E
and replace it;
refit the new bulb on the connector,
making sure it is correctly locked;
refit the connector and bulb holder C
unit in its housing;
then refit the cover B fig. 136.
FRONT LOWER LIGHT
CLUSTER
This contains the bulbs for the main
beams and side lights/daytime running
lights (DRL).
The bulbs are arranged as follows fig.
139:
C: main beam headlights
D: side lights/daytime running lights
(DRL)
MAIN BEAM HEADLIGHTS
To replace the bulb, proceed as
follows:
steer the wheel completely inwards;
undo the screws A fig. 140 and
remove the flap B;
remove cover C fig. 139;
136F0Y0021C
137F0Y0022C
138F0Y0023C
139F0Y0499C
132
IN AN EMERGENCY
Page 135 of 268

remove the connector and bulb
holder D unit, releasing it outwards;
remove the bulb E from connector F
and replace it;
refit the new bulb on the connector,
making sure it is correctly locked;
refit the connector and bulb holder D
unit in its housing;
finally refit cover C.SIDE LIGHTS/DAYTIME
RUNNING LIGHTS (DRL)
Side lights/daytime running lights
(DRL)
(versions with LED lights)
For light replacement, contact a Fiat
Dealership.
Daytime running lights (DRL)
(versions with incandescent bulb)
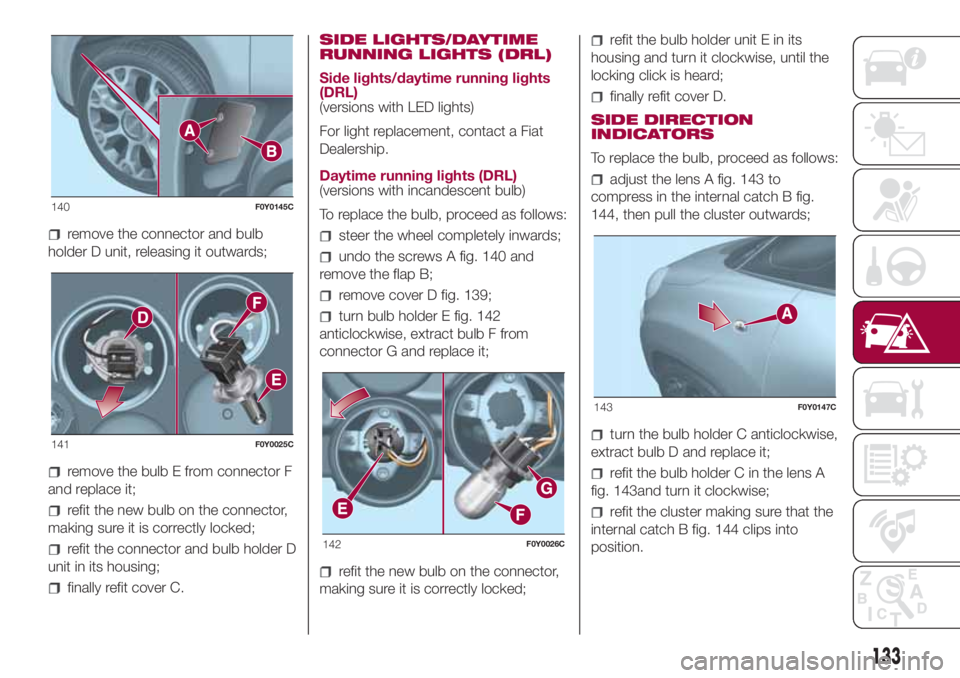
To replace the bulb, proceed as follows:
steer the wheel completely inwards;
undo the screws A fig. 140 and
remove the flap B;
remove cover D fig. 139;
turn bulb holder E fig. 142
anticlockwise, extract bulb F from
connector G and replace it;
refit the new bulb on the connector,
making sure it is correctly locked;
refit the bulb holder unit E in its
housing and turn it clockwise, until the
locking click is heard;
finally refit cover D.
SIDE DIRECTION
INDICATORS
To replace the bulb, proceed as follows:
adjust the lens A fig. 143 to
compress in the internal catch B fig.
144, then pull the cluster outwards;
turn the bulb holder C anticlockwise,
extract bulb D and replace it;
refit the bulb holder C in the lens A
fig. 143and turn it clockwise;
refit the cluster making sure that the
internal catch B fig. 144 clips into
position.
140F0Y0145C
141F0Y0025C
142F0Y0026C
143F0Y0147C
133
Page 137 of 268

disconnect the electrical connector,
undo the fixing screws E fig. 151 and
remove the bulb holder assembly;
then replace the bulb concernedfig.
152: F = direction indicators,
G = side/brake lights.FIXED REAR LIGHT
CLUSTERS
These contain the rear fog light bulbs
(left side) and reversing light bulbs (right
side).
IMPORTANT Take particular care when
replacing the rear fog light bulb: RISK
OF BURNS if the exhaust pipe is hot
500L versions
To replace the bulb, proceed as follows:
from the underneath of the rear
bumper, release the tabs A fig. 153,
unscrew the fixing screw B and remove
the flap;
disconnect the electrical connector
C, rotate the bulb/bulb holder unit D
anticlockwise fig. 154 and remove the
unit;
release the bulb and replace it;
reinsert the bulb/bulb holder unit D
by turning it clockwise;
reconnect the electric connector C;
refit the flap and check that it is
correctly locked;
tighten the fixing screw B.
150F0Y0151C
151F0Y0027C
152F0Y0028C153F0Y0634C
154F0Y0635C
135
Page 138 of 268

500L WAGON versions
To replace the bulb, proceed as follows:
open the luggage compartment,
remove the trim frame, undo the four
fixing screws A fig. 155 and remove
light cluster B;
disconnect the electrical connector
and rotate bulb holder C anticlockwise
fig. 156;
remove bulb D from the bulb holder
and replace it;
refit the new bulb on the bulb holder,
making sure it is correctly locked;
refit bulb holder C in the lens turning
it clockwise and reconnect the electrical
connector;
refit the light cluster B fig. 155
correctly by tightening the four fixing
screws A, then close the luggage
compartment.
THIRD BRAKE LIGHTS
These are LEDs. They are located in the
tailgate. For replacement, contact a
Fiat Dealership.
NUMBER PLATE LIGHTS
To replace the bulbs, proceed as
follows:
remove lens A fig. 157;
replace the bulb B fig. 158 releasing
it from the side contacts;
insert the new bulb and make sure
that it is correctly clamped between the
contact and refit the lens A fig. 157.
WARNING
132)Modifications or repairs to the electric
system that are not carried out properly
or do not take the system technical
specifications into account can cause
malfunctions leading to the risk of fire.
133)Halogen bulbs contain pressurised
gas, in the case of breakage they may
burst causing glass fragments to be
projected outwards.
155F0Y0032C
156F0Y0029C
157F0Y0030C
158F0Y0031C
136
IN AN EMERGENCY
Page 139 of 268

WARNING
64)Halogen bulbs must be handled
holding the metallic part only. Touching the
transparent part of the bulb with your
fingers may reduce the intensity of the
emitted light and even reduce the lifespan
of the bulb. In the event of accidental
contact, wipe the bulb with a cloth
moistened with alcohol and let the bulb
dry.
65)Where possible, it is advisable to have
bulbs changed at a Fiat Dealership. The
correct operation and direction of the
external lights are absolutely essential for
the safety of the car and of compliance
with the law.
REPLACING FUSES
134) 135) 136) 137) 138) 139)66)
FUSE LOCATION
Fuses are grouped together in three
fuseboxes located in the engine
compartment, under the dashboard
and inside the boot.
ENGINE COMPARTMENT
CONTROL UNIT
To access the fuses unscrew the two
screws A fig. 159 and remove the cover
B in the direction shown by the arrow.
IMPORTANT Before removing cover
Bfig. 159 press and turn the two
bayonet screws A slowly anticlockwise
(using the flat tip screwdriver provided)
until unlocking them. This is shown
by the screw heads lifting.After replacing the fuse, make sure you
close cover B on the junction unit.
The fuseboxfig. 160 is located by the
side of the battery.
159F0Y0071C
160F0Y0072C
137
Page 228 of 268

SYSTEM ON / OFF
The system is switched on/off by
pressing the
(ON/OFF) button/knob.
Turn the button/knob clockwise to
increase the radio volume or
anticlockwise to decrease it.
USB/iPod/AUX SUPPORT
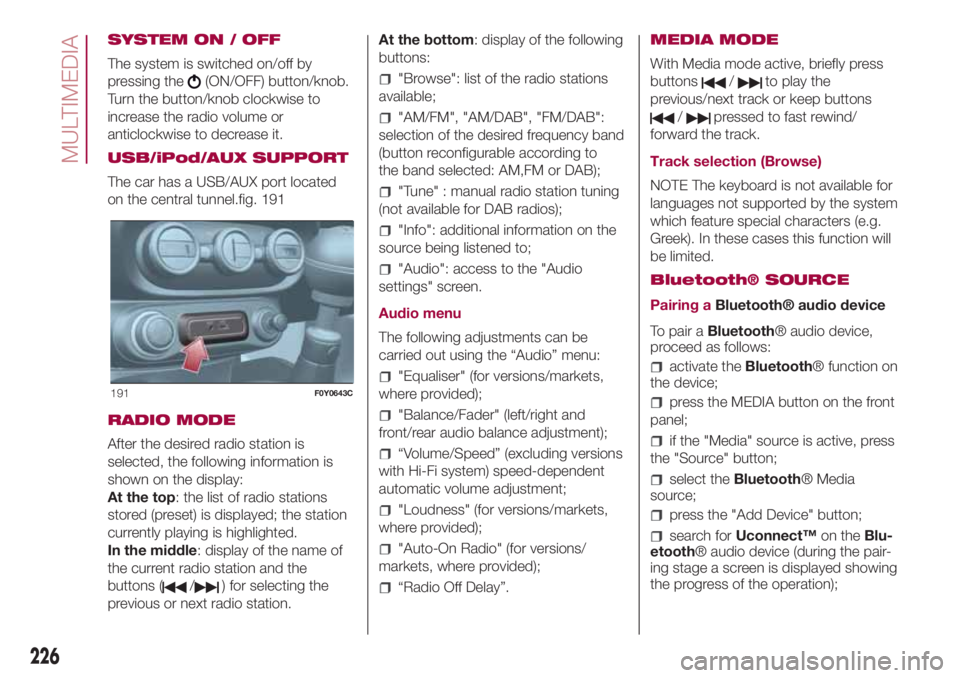
The car has a USB/AUX port located
on the central tunnel.fig. 191
RADIO MODE
After the desired radio station is
selected, the following information is
shown on the display:
At the top: the list of radio stations
stored (preset) is displayed; the station
currently playing is highlighted.
In the middle: display of the name of
the current radio station and the
buttons (
/) for selecting the
previous or next radio station.At the bottom: display of the following
buttons:
"Browse": list of the radio stations
available;
"AM/FM", "AM/DAB", "FM/DAB":
selection of the desired frequency band
(button reconfigurable according to
the band selected: AM,FM or DAB);
"Tune" : manual radio station tuning
(not available for DAB radios);
"Info": additional information on the
source being listened to;
"Audio": access to the "Audio
settings" screen.
Audio menu
The following adjustments can be
carried out using the “Audio” menu:
"Equaliser" (for versions/markets,
where provided);
"Balance/Fader" (left/right and
front/rear audio balance adjustment);
“Volume/Speed” (excluding versions
with Hi-Fi system) speed-dependent
automatic volume adjustment;
"Loudness" (for versions/markets,
where provided);
"Auto-On Radio" (for versions/
markets, where provided);
“Radio Off Delay”.MEDIA MODE
With Media mode active, briefly press
buttons
/to play the
previous/next track or keep buttons
/pressed to fast rewind/
forward the track.
Track selection (Browse)
NOTE The keyboard is not available for
languages not supported by the system
which feature special characters (e.g.
Greek). In these cases this function will
be limited.
Bluetooth® SOURCE
Pairing aBluetooth® audio device
To pair aBluetooth® audio device,
proceed as follows:
activate theBluetooth® function on
the device;
press the MEDIA button on the front
panel;
if the "Media" source is active, press
the "Source" button;
select theBluetooth® Media
source;
press the "Add Device" button;
search forUconnect™on theBlu-
etooth® audio device (during the pair-
ing stage a screen is displayed showing
the progress of the operation);
191F0Y0643C
226
MULTIMEDIA
Page 241 of 268

SWITCHING THE SYSTEM
ON/OFF
The system is switched on/off by
pressing the
button/knob.
Turn the button/knob clockwise to
increase the radio volume or
anticlockwise to decrease it. The
electronic volume adjustment control
rotates continuously (360°) in both
directions, without stop positions.
"TOUCH SCREEN"
FUNCTION
The system uses the "touch screen”
function; to interact with the different
functions, press the "graphic buttons"
displayed.
Confirming a selection: press the
"OK" button.
Return to the previous screen: press
the
(Delete) button or, depending
on the active screen,
/Done.
RADIO MODE
After the desired radio station is
selected, the following information is
shown on the display:
At the top: the list of radio stations
stored (preset) is displayed; the station
currently playing is highlighted.
At the centre: the name of station
being listened too is displayed.On the left side: the "AM", "FM",
"DAB” (for versions/markets, where
provided) buttons to select the desired
frequency band are displayed (the
button corresponding to the selected
band is highlighted);
On the right: display of the following
buttons:
“Info”: additional information on the
source being listened to;
“Map": navigation map view
(versions withUconnect™7" HD Nav
LIVE only).
At the bottom: display of the following
buttons:
“Browse”: list of the radio stations
available;
/select previous/following
radio station;
“Tune” : manual radio station tuning;
“Audio”: access to the “Audio
Settings” screen.
Audio menu
To access the "Audio" menu press the
Audio" button located at the bottom
of the display.
The following adjustments can be
carried out using the “Audio” menu:
"Balance/Fader" (left/right and
front/rear audio balance adjustment);
"Equaliser" (for versions/markets,
where provided);
“Speed Adj Volume” (speed-
dependent automatic volume control);
"Loudness" (for versions/markets,
where provided);
“AUX Volume Offset” (only active if
an AUX device is inserted);
“AutoPlay”;
“Auto-On Radio”.
MEDIA MODE
Press the "Media" button to select the
desired audio source among those
available: USB/iPod,Bluetooth® and
AUX.
IMPORTANT Applications used on
portable devices may be not
compatible with theUconnect™
system.
After Media mode is selected, the
following information is shown on the
display:
At the top: information on the track
being played and the following graphic
buttons:
“Repeat”: to repeat the track being
played;
“Shuffle”: to play the tracks in
random order;
Track progress and duration.
239