Page 77 of 568

Ambient Light — If Equipped
The overhead console is equipped with an ambient light
feature. This light casts illumination for improved visibility
of the floor and center console area.
Dimmer Control
Courtesy and dome lights are turned on when the front
doors are opened or when the dimmer control (rotating
wheel on the right side of the headlight switch) is rotated
to its farthest upward position. If your vehicle is equipped
with a key fob and the unlock button is pushed, the
courtesy and dome lights will turn on. When a door is open
and the interior lights are on, rotating the dimmer control
all the way down, to the (O) off detent, will cause all the
interior lights to go out. This is also known as the “Party”
mode because it allows the doors to stay open for extended
periods of time without discharging the vehicle’s battery.
The brightness of the instrument panel lighting can be
regulated by rotating the dimmer control up (brighter) or
down (dimmer). When the headlights are on you can
supplement the brightness of the odometer, trip odometer,
Ambient Light
3
GETTING TO KNOW YOUR VEHICLE 75
Page 78 of 568
radio and overhead console by rotating the control to its
farthest position up until you hear a click. This feature is
termed the “Parade” mode and is useful when headlights
are required during the day.WINDSHIELD WIPERS AND WASHERS
The windshield wiper/washer controls are located on the
multifunction lever on the left side of the steering column.
The front wipers are operated by rotating a switch, located
on the end of the lever. For information on the rear
wiper/washer, refer to “Rear Window Wiper/Washer” in
this section.
Dimmer Control
Multifunction Lever
76 GETTING TO KNOW YOUR VEHICLE
Page 162 of 568

— Service LaneSense Warning Light — If
Equipped
This warning light will illuminate when the LaneSense
system is not operating and requires service. Please see an
authorized dealer.
Yellow Indicator Lights
— Forward Collision Warning Off Indicator Light
— If Equipped
This indicator light illuminates to indicate that Forward
Collision Warning is off.
Green Indicator Lights
— Adaptive Cruise Control (ACC) Set With
Target Light — If Equipped
This will display when the ACC is set and a target vehicle
is detected. Refer to “Adaptive Cruise Control (ACC)” in
“Starting And Operating” for further information.
— Adaptive Cruise Control (ACC) Set Without
Target Light — If Equipped
This will display when the ACC is set and a target vehicle
is not detected. Refer to “Adaptive Cruise Control (ACC)”
in “Starting And Operating” for further information.
— ECO Mode Indicator Light
This light will turn on when ECO Mode is active.
— Cruise Control Set Indicator Light — If
Equipped
This indicator light will illuminate when the cruise control
is set to the desired speed. Refer to “Speed Control” in
“Starting And Operating” for further information.
— Front Fog Indicator Light — If Equipped
This indicator light will illuminate when the front fog
lights are on.
— LaneSense Indicator Light — If Equipped
The LaneSense indicator light illuminates solid green when
both lane markings have been detected and the system is
“armed” and ready to provide visual and torque warnings
if an unintentional lane departure occurs.
Refer to “LaneSense — If Equipped� in “Starting And
Operating” for further information.
— Park/Headlight On Indicator Light
This indicator light will illuminate when the park lights or
headlights are turned on.
160 GETTING TO KNOW YOUR INSTRUMENT PANEL
Page 164 of 568

For further information refer to “Instrument Cluster Dis-
play” in “Getting To Know Your Instrument Panel.”
The number “55” is only an example of a speed that can be
set.
— LaneSense Indicator Light — If Equipped
When the LaneSense system is ON, but not armed, the
LaneSense indicator light illuminates solid white. This
occurs when only left, right, or neither lane line has been
detected. If a single lane line is detected, the system is
ready to provide only visual warnings if an unintentional
lane departure occurs on the detected lane line.
Refer to “LaneSense — If Equipped�in “Starting And
Operating” for further information.
— Valet Mode SRT Indicator Light
This light will turn on when Valet Mode is active.
Refer to the “Drive Mode Supplement” for further infor-
mation.
Blue Indicator Lights
— High Beam Indicator Light
This indicator light will illuminate to indicate that the high
beam headlights are on. With the low beams activated,
push the multifunction lever forward (toward the front of
the vehicle) to turn on the high beams. Pull the multifunc-
tion lever rearward (toward the rear of the vehicle) to turn
off the high beams. If the high beams are off, pull the lever
toward you for a temporary high beam on, �flash to pass�
scenario.
ONBOARD DIAGNOSTIC SYSTEM — OBD II
Your vehicle is equipped with a sophisticated Onboard
Diagnostic system called OBD II. This system monitors the
performance of the emissions, engine, and transmission
control systems. When these systems are operating prop-
erly, your vehicle will provide excellent performance and
fuel economy, as well as engine emissions well within
current government regulations.
162 GETTING TO KNOW YOUR INSTRUMENT PANEL
Page 224 of 568

Your vehicle may also be designed to perform any of these
other functions in response to the Enhanced Accident
Response System:
•Turn off the Fuel Filter Heater, Turn off the HVAC
Blower Motor, Close the HVAC Circulation Door
• Cut off battery power to the:
• Engine
• Electric Motor (if equipped)
• Electric power steering
• Brake booster
• Electric park brake
• Automatic transmission gear selector
• Horn
• Front wiper
• Headlamp washer pump NOTE:
After an accident, remember to cycle the ignition
to the STOP (OFF/LOCK) position and remove the key
from the ignition switch to avoid draining the battery.
Carefully check the vehicle for fuel leaks in the engine
compartment and on the ground near the engine compart-
ment and fuel tank before resetting the system and starting
the engine. If there are no fuel leaks or damage to the
vehicle electrical devices (e.g. headlights) after an accident,
reset the system by following the procedure described
below. If you have any doubt, contact an authorized dealer.
Enhanced Accident Response System Reset
Procedure
In order to reset the Enhanced Accident Response System
functions after an event, the ignition switch must be
changed from ignition START or ON/RUN to ignition OFF.
Carefully check the vehicle for fuel leaks in the engine
compartment and on the ground near the engine compart-
ment and fuel tank before resetting the system and starting
the engine.
222 SAFETY
Page 447 of 568

The following maintenance recommendations will enable
you to obtain maximum benefit from the corrosion resis-
tance built into your vehicle.
What Causes Corrosion?
Corrosion is the result of deterioration or removal of paint
and protective coatings from your vehicle.
The most common causes are:
•Road salt, dirt and moisture accumulation.
• Stone and gravel impact.
• Insects, tree sap and tar.
• Salt in the air near seacoast localities.
• Atmospheric fallout/industrial pollutants.
Body And Underbody Maintenance
Cleaning Headlights
Your vehicle is equipped with plastic headlights and fog
lights that are lighter and less susceptible to stone breakage
than glass headlights.
Plastic is not as scratch resistant as glass and therefore
different lens cleaning procedures must be followed. To minimize the possibility of scratching the lenses and
reducing light output, avoid wiping with a dry cloth. To
remove road dirt, wash with a mild soap solution followed
by rinsing.
Do not use abrasive cleaning components, solvents, steel
wool or other aggressive material to clean the lenses.
Preserving The Bodywork
Washing
•
Wash your vehicle regularly. Always wash your vehicle
in the shade using Mopar Car Wash, or a mild car wash
soap, and rinse the panels completely with clear water.
• If insects, tar, or other similar deposits have accumulated
on your vehicle, use Mopar Super Kleen Bug and Tar
Remover to remove.
• Use a high quality cleaner wax, such as Mopar Cleaner
Wax to remove road film, stains and to protect your
paint finish. Take care never to scratch the paint.
• Avoid using abrasive compounds and power buffing
that may diminish the gloss or thin out the paint finish.
8
SERVICING AND MAINTENANCE 445
Page 467 of 568

Customer Programmable Features — Uconnect
4C/4C NAV Settings
Press the “Apps” button, then press the “Settings”
button on the touchscreen to display the menu setting
screen. In this mode the Uconnect system allows you to
access programmable features that may be equipped
such as Display, Units, Voice, Clock, Safety & Driving
Assistance, Lights, Doors & Locks, Auto-On Comfort,
Engine Off Options, Audio, Phone/Bluetooth, SiriusXM
Setup, Restore Settings, Clear Personal Data, and Sys-
tem Information.
NOTE: Depending on the vehicles options, feature settings
may vary.
When making a selection, press the button on the touch-
screen to enter the desired mode. Once in the desired mode, press and release the preferred setting “option” until
a check-mark appears next to the setting, showing that
setting has been selected. Once the setting is complete,
either press the “Back” Arrow button on the touchscreen to
return to the previous menu, or press the “X” button on the
touchscreen to close out of the settings screen. Pressing the
“Up” or “Down” Arrow button on the right side of the
screen will allow you to toggle up or down through the
available settings.
Display
After pressing the “Display” button on the touchscreen, the
following settings will be available:
Setting Name
Selectable Options
Display Mode ManualAuto
Display Brightness With Headlights ON +-
NOTE:
To make changes to the �Display Brightness with Headlights ON� setting, the headlights must be on and the interior
dimmer switch must not be in the �party�or�parade� positions.
10
MULTIMEDIA 465
Page 468 of 568
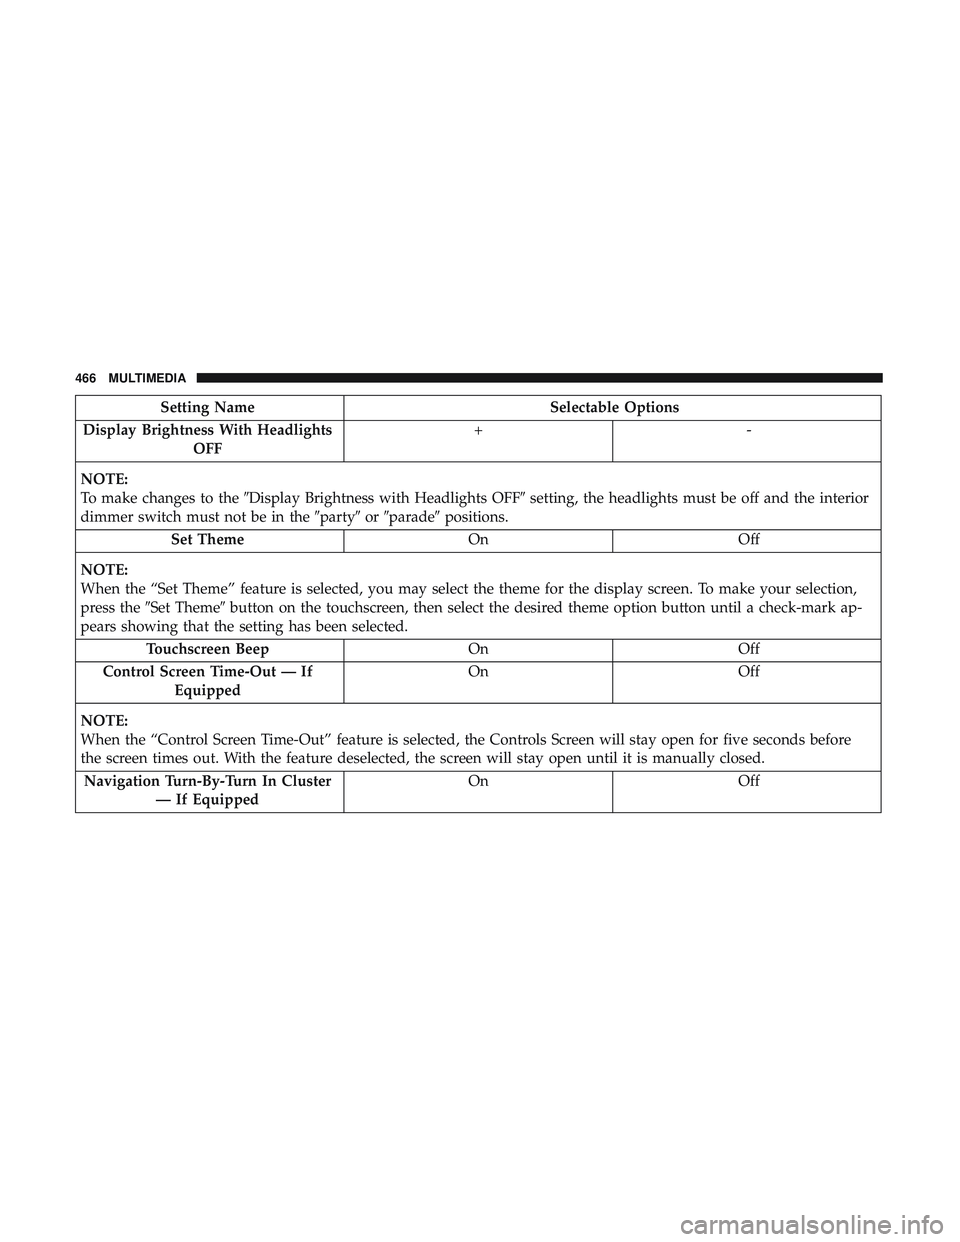
Setting NameSelectable Options
Display Brightness With Headlights OFF +-
NOTE:
To make changes to the �Display Brightness with Headlights OFF� setting, the headlights must be off and the interior
dimmer switch must not be in the �party�or�parade� positions.
Set Theme OnOff
NOTE:
When the “Set Theme” feature is selected, you may select the theme for the display screen. To make your selection,
press the �Set Theme� button on the touchscreen, then select the desired theme option button until a check-mark ap-
pears showing that the setting has been selected.
Touchscreen Beep OnOff
Control Screen Time-Out — If Equipped On
Off
NOTE:
When the “Control Screen Time-Out” feature is selected, the Controls Screen will stay open for five seconds before
the screen times out. With the feature deselected, the screen will stay open until it is manually closed. Navigation Turn-By-Turn In Cluster — If Equipped On
Off
466 MULTIMEDIA