Page 360 of 553

NOTE:
•The oil change indicator message will not monitor the
time since the last oil change. Change your vehicle’s oil
if it has been six months since your last oil change, even
if the oil change indicator message is NOT illuminated.
• Change your engine oil more often if you drive your
vehicle off-road/track usage for an extended period of
time.
• Under no circumstances should oil change intervals
exceed 6,000 miles (10,000 km) or six months, whichever
comes first.
An authorized dealer will reset the oil change indicator
message after completing the scheduled oil change. If a
scheduled oil change is performed by someone other than
an authorized dealer, the message can be reset by referring
to the steps described under “Instrument Cluster Display”
in “Getting To Know Your Instrument Panel” for further
information. At Each Stop For Fuel
•
Check the engine oil level. Refer to “Engine Compart-
ment” in this chapter for further information.
• Check the windshield washer solvent and add if re-
quired.
Once A Month
• Check tire pressure and look for unusual wear or
damage.
• Inspect the battery, and clean and tighten the terminals
as required.
• Check the fluid levels of the coolant reservoir, brake
master cylinder, and add as needed.
• Check all lights and other electrical items for correct
operation.
358 SERVICING AND MAINTENANCE
Page 368 of 553
Adding Washer Fluid
The windshield washer fluid reservoir is located in the
front of the engine compartment. Be sure to check the fluid
level at regular intervals. Fill the reservoir with windshield
washer solvent (not radiator antifreeze) and operate the
system for a few seconds to flush out the residual water.
When refilling the washer fluid reservoir, apply some
washer fluid to a cloth or towel and wipe the wiper blades
clean. This will help blade performance.
To prevent freeze-up of your windshield washer system in
cold weather, select a solution or mixture that meets or
exceeds the temperature range of your climate. This rating
information can be found on most washer fluid containers.
The fluid reservoir will hold nearly 1 gallon (4 liters) of
washer fluid when the message “Low Washer Fluid”
appears in the instrument cluster.
WARNING!
Commercially available windshield washer solvents
are flammable. They could ignite and burn you. Care
must be exercised when filling or working around the
washer solution.
Maintenance-Free Battery
Your vehicle is equipped with a maintenance-free battery.
You will never have to add water, nor is periodic mainte-
nance required.
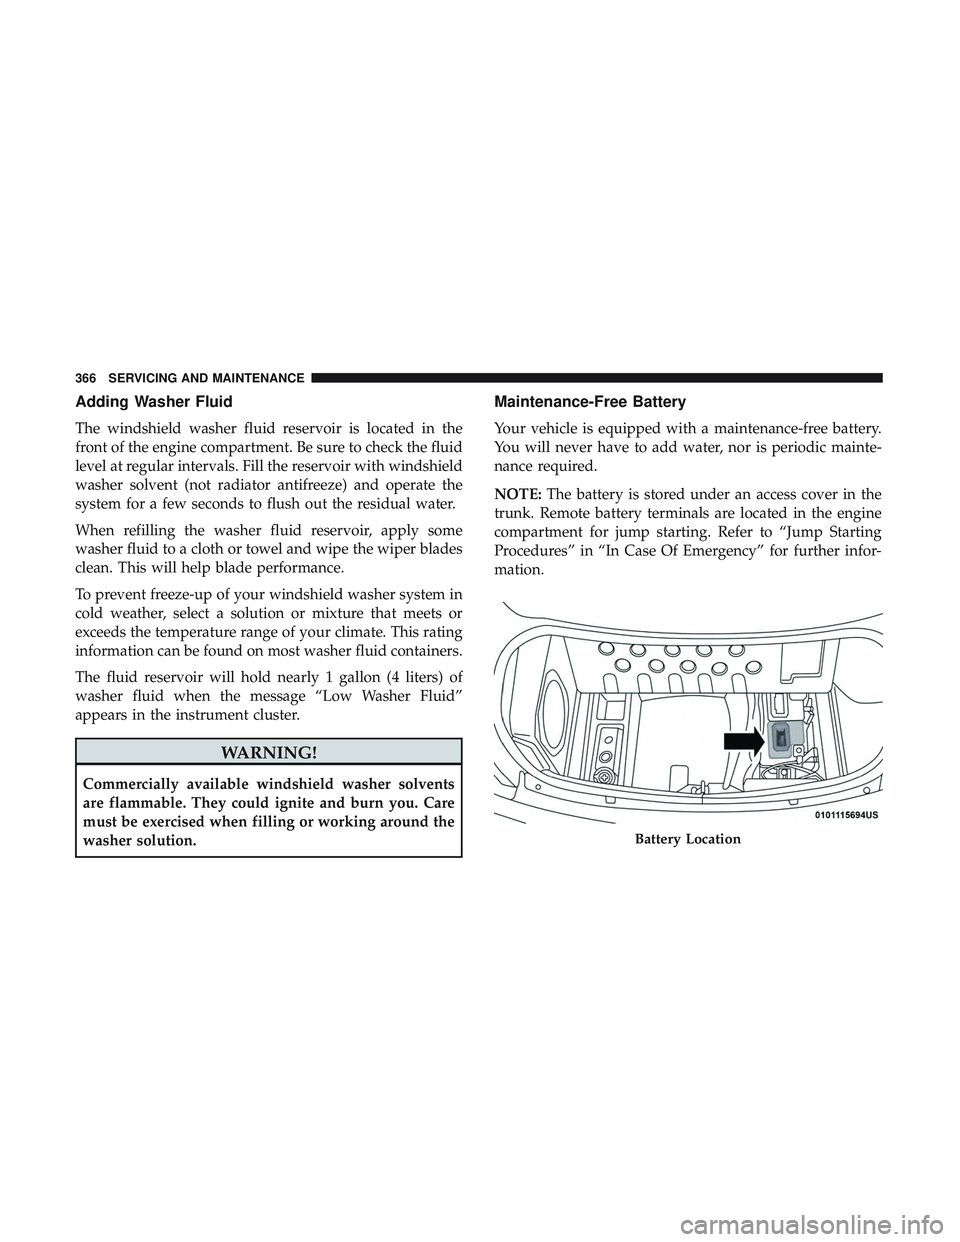
NOTE:The battery is stored under an access cover in the
trunk. Remote battery terminals are located in the engine
compartment for jump starting. Refer to “Jump Starting
Procedures” in “In Case Of Emergency” for further infor-
mation.
Battery Location
366 SERVICING AND MAINTENANCE
Page 418 of 553
Seat Belt Maintenance
Do not bleach, dye, or clean the belts with chemical
solvents or abrasive cleaners. This will weaken the fabric.
Sun damage can also weaken the fabric.
If the belts need cleaning, use Mopar Total Clean, a mild
soap solution, or lukewarm water. Do not remove the belts
from the vehicle to wash them. Dry with a soft cloth.
Replace the belts if they appear frayed or worn or if the
buckles do not work properly.
WARNING!
A frayed or torn belt could rip apart in a collision and
leave you with no protection. Inspect the belt system
periodically, checking for cuts, frays, or loose parts.
Damaged parts must be replaced immediately. Do not
disassemble or modify the system. Seat belt assemblies
must be replaced after a collision if they have been
damaged (i.e., bent retractor, torn webbing, etc.).
Plastic And Coated Parts
Use Mopar Total Clean to clean vinyl upholstery.
CAUTION!
•Direct contact of air fresheners, insect repellents,
suntan lotions, or hand sanitizers to the plastic,
painted, or decorated surfaces of the interior may
cause permanent damage. Wipe away immediately.
• Damage caused by these type of products may not be
covered by your New Vehicle Limited Warranty.
Cleaning Plastic Instrument Cluster Lenses
The lenses in front of the instruments in this vehicle are
molded in clear plastic. When cleaning the lenses, care
must be taken to avoid scratching the plastic.
1. Clean with a wet soft cloth. A mild soap solution may be
used, but do not use high alcohol content or abrasive
cleaners. If soap is used, wipe clean with a clean damp
cloth.
2. Dry with a soft cloth.
416 SERVICING AND MAINTENANCE
Page 443 of 553
Uconnect 4 Settings
Press the “Settings” button on the bottom bar, or press the
“Apps
” button, then press the “Settings” button on
the touchscreen to display the menu setting screen. In
this mode the Uconnect system allows you to access all
of the available programmable features.
NOTE: Depending on the vehicles options, feature settings
may vary.
When making a selection, press the button on the touch-
screen to enter the desired mode. Once in the desired
mode, press and release the preferred setting “option” until
a check-mark appears next to the setting, showing that
setting has been selected. Once the setting is complete,
either press the Back Arrow button on the touchscreen to
return to the previous menu, or press the “X” button on the touchscreen to close out of the settings screen. Pressing the
Up or Down Arrow button on the right side of the screen
will allow you to toggle up or down through the available
settings.
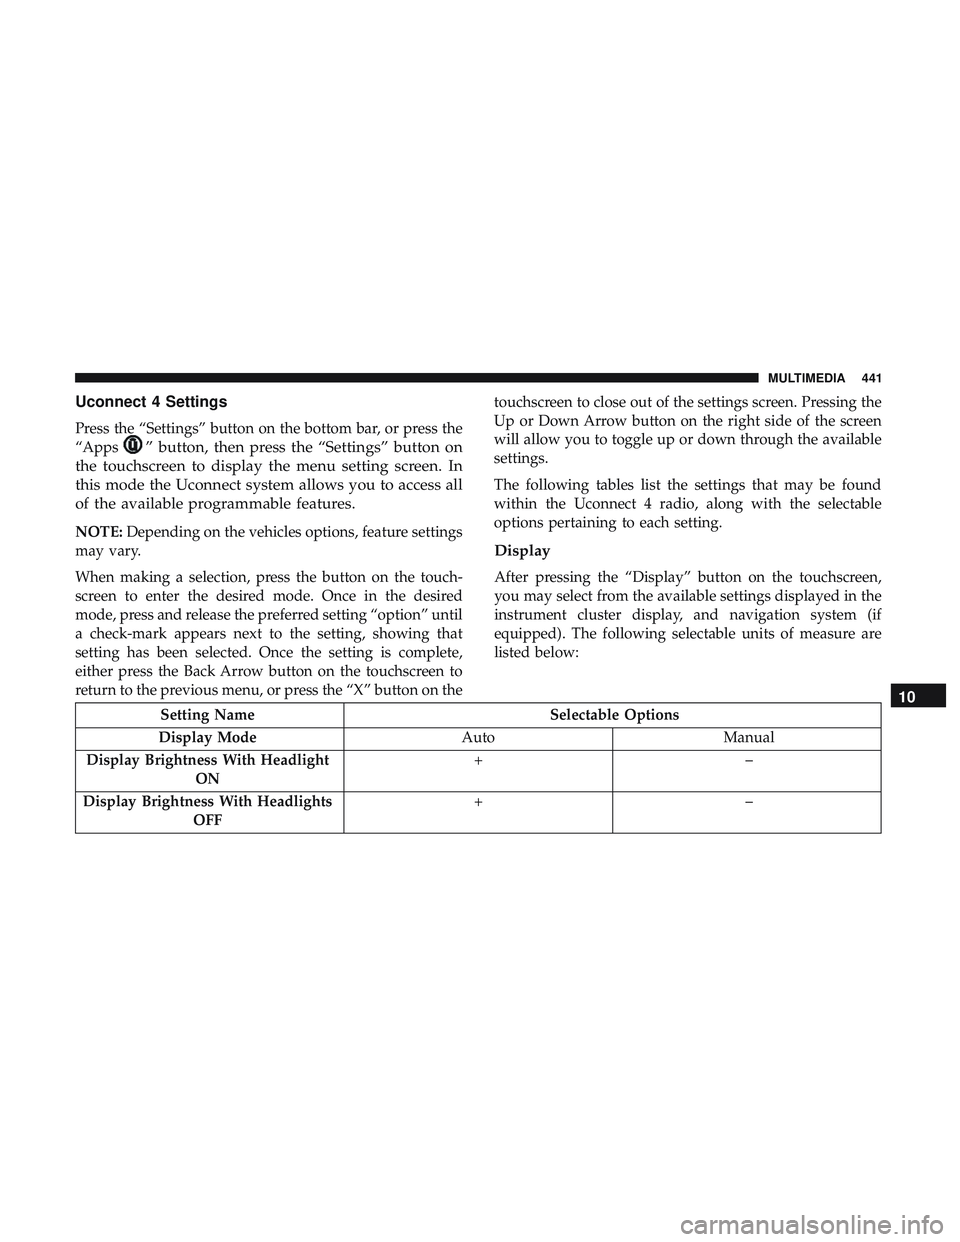
The following tables list the settings that may be found
within the Uconnect 4 radio, along with the selectable
options pertaining to each setting.
Display
After pressing the “Display” button on the touchscreen,
you may select from the available settings displayed in the
instrument cluster display, and navigation system (if
equipped). The following selectable units of measure are
listed below:
Setting Name
Selectable Options
Display Mode AutoManual
Display Brightness With Headlight ON +–
Display Brightness With Headlights OFF +–
10
MULTIMEDIA 441
Page 444 of 553
Setting NameSelectable Options
Set Language OnOff
NOTE:
When the “Set Language” feature is selected, you may select one of multiple languages (English/Français/Español)
for all display nomenclature, including the trip functions and the navigation system (if equipped). Press the “Set Lan-
guage” button on the touchscreen, then press the desired language button on the touchscreen until a check-mark ap-
pears next to the language, showing that setting has been selected. Touchscreen Beep OnOff
Units
After pressing the “Units” button on the touchscreen you
may select each unit of measure independently displayed
in the instrument cluster display, and navigation system (if
equipped). The following selectable units of measure are
listed below:
Setting Name Selectable Options
Units US Metric Custom
Speed MPH km/h
Distance mi km
Fuel Consumption MPG (US)MPG (UK) L/100 km km/L
Pressure psikPa bar
Temperature °F °C
442 MULTIMEDIA
Page 468 of 553
Setting NameSelectable Options
Navigation Next Turn Pop-Ups Dis- played In Cluster — If Equipped On
Off
NOTE:
When the “Navigation Turn-By-Turn In Cluster” feature is selected, the turn-by-turn directions will appear in the in-
strument cluster display as the vehicle approaches a designated turn within a programmed route.
Units
After pressing the “Units” button on the touchscreen, you
may select each unit of measure independently displayed
in the instrument cluster display, and navigation system (if equipped). The following selectable units of measure are
listed below:
Setting Name
Selectable Options
Units USMetric Custom
NOTE: When the “Custom” setting is selected, units will appear according to your personally configured settings. To
configure these settings, press the “Custom” bar. The following settings will appear:
Speed MPH km/h
Distance mi km
Fuel Consumption MPG (US)MPG (UK) L/100 km km/L
Pressure psikPa bar
Temperature °F °C
466 MULTIMEDIA
Page 474 of 553
Setting NameSelectable Options
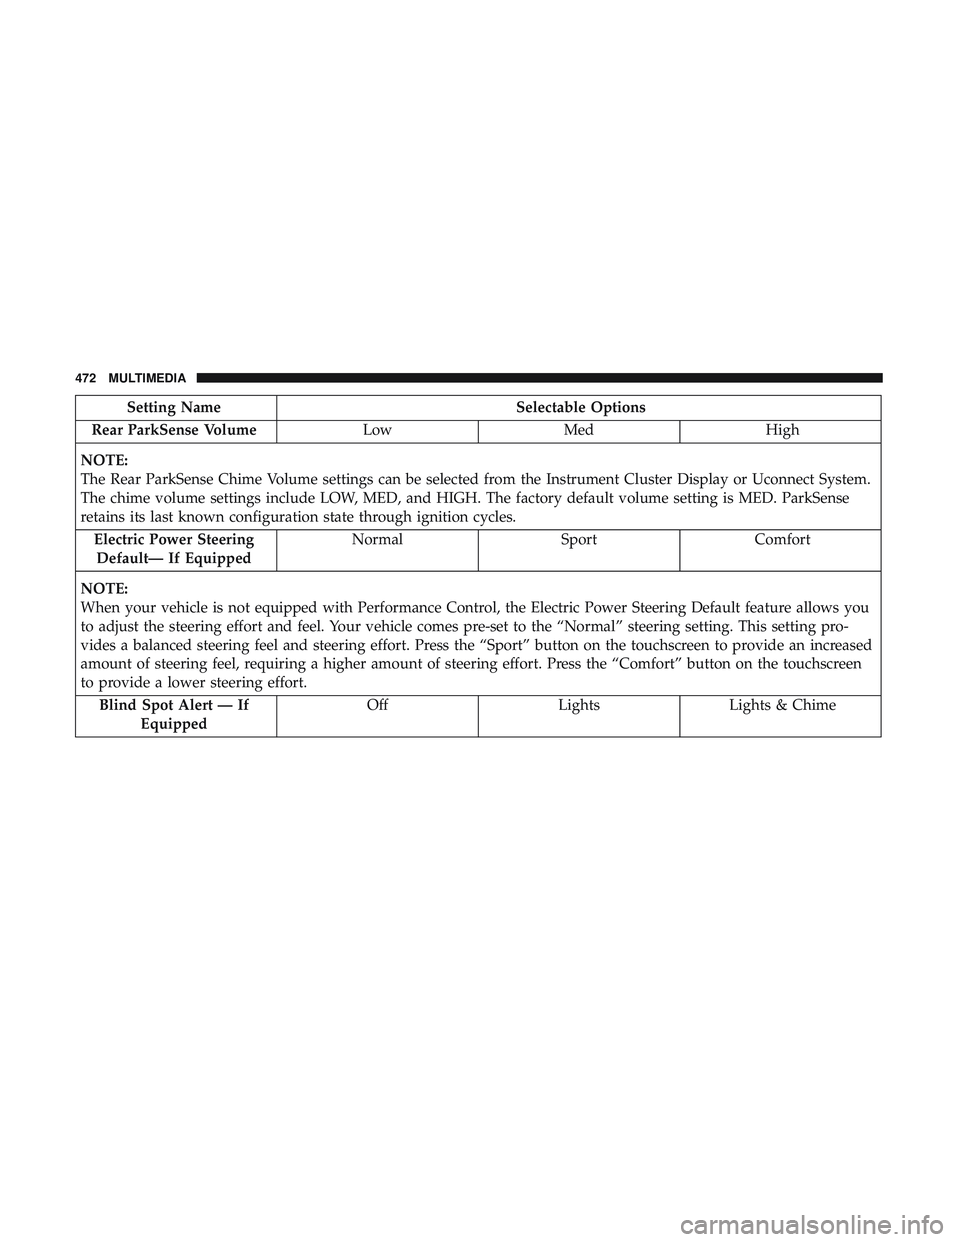
Rear ParkSense Volume LowMed High
NOTE:
The Rear ParkSense Chime Volume settings can be selected from the Instrument Cluster Display or Uconnect System.
The chime volume settings include LOW, MED, and HIGH. The factory default volume setting is MED. ParkSense
retains its last known configuration state through ignition cycles. Electric Power SteeringDefault— If Equipped Normal
SportComfort
NOTE:
When your vehicle is not equipped with Performance Control, the Electric Power Steering Default feature allows you
to adjust the steering effort and feel. Your vehicle comes pre-set to the “Normal” steering setting. This setting pro-
vides a balanced steering feel and steering effort. Press the “Sport” button on the touchscreen to provide an increased
amount of steering feel, requiring a higher amount of steering effort. Press the “Comfort” button on the touchscreen
to provide a lower steering effort. Blind Spot Alert — If Equipped Off
LightsLights & Chime
472 MULTIMEDIA
Page 488 of 553
Performance Pages — If Equipped
Performance Pages is an application that provides a dis-
play for performance indicators, as received from the
instrument cluster, that will help you gain familiarity with
the capabilities of your vehicle in real-time.
To access the Performance Pages, press the “Apps” button
on the touchscreen then press the “Performance Pages”
button on the touchscreen. Press the desired button on the
touchscreen to access that specific Performance Page.
WARNING!
Measurement of vehicle statistics with the Perfor-
mance Pages is intended for off-highway or off-road
use only and should not be done on any public
roadways. It is recommended that these features be
used in a controlled environment and within the limits
of the law. The capabilities of the vehicle as measured
by the Performance Pages must never be exploited in a
reckless or dangerous manner, which can jeopardize
the user ’s safety or the safety of others. Only a safe,
attentive, and skillful driver can prevent accidents.The Performance Pages include the following:
•
Home
• Timers
• Gauges
• G-Force
• Engine
• Dyno
486 MULTIMEDIA