Page 81 of 516

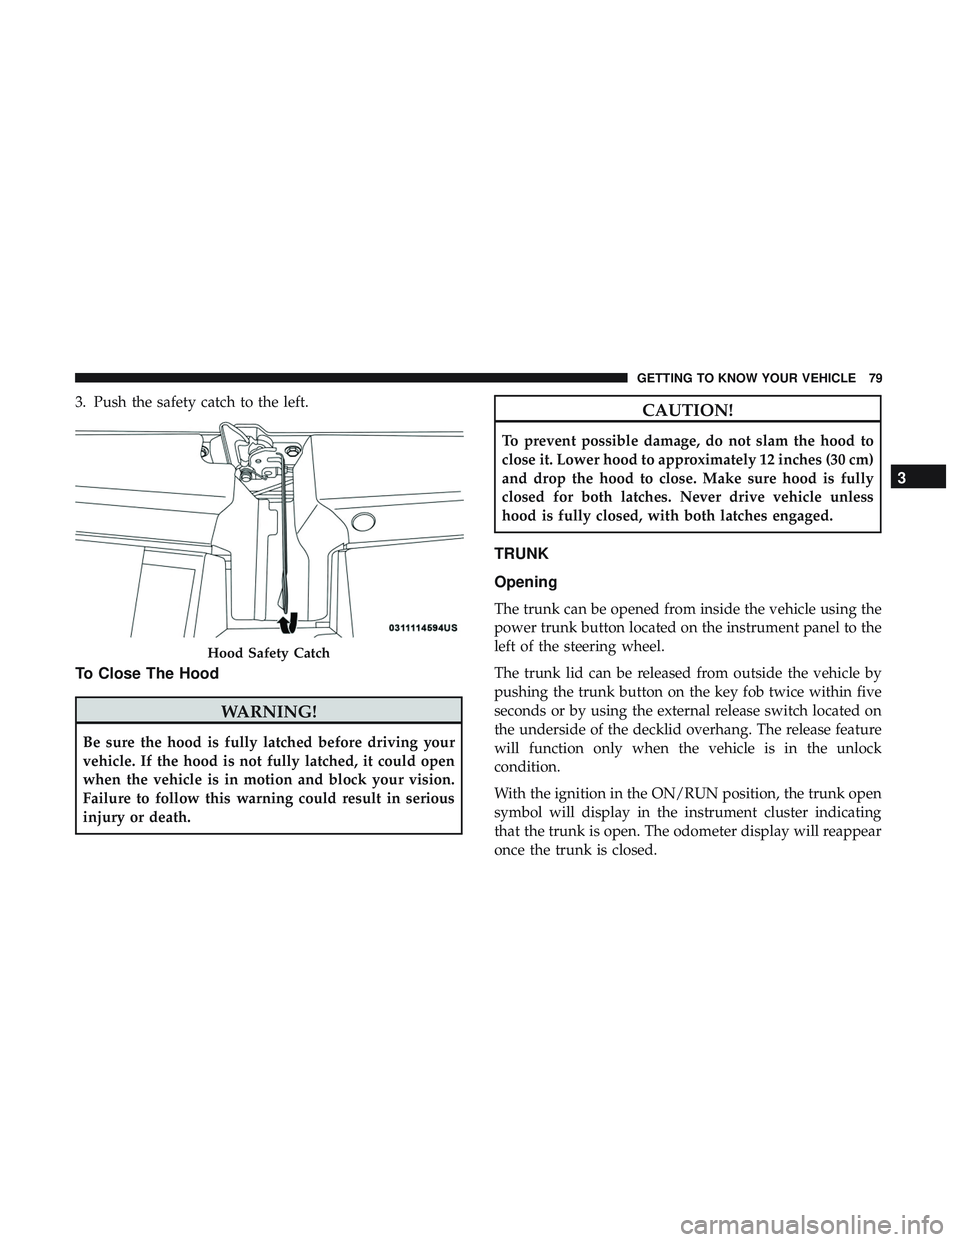
3. Push the safety catch to the left.
To Close The Hood
WARNING!
Be sure the hood is fully latched before driving your
vehicle. If the hood is not fully latched, it could open
when the vehicle is in motion and block your vision.
Failure to follow this warning could result in serious
injury or death.
CAUTION!
To prevent possible damage, do not slam the hood to
close it. Lower hood to approximately 12 inches (30 cm)
and drop the hood to close. Make sure hood is fully
closed for both latches. Never drive vehicle unless
hood is fully closed, with both latches engaged.
TRUNK
Opening
The trunk can be opened from inside the vehicle using the
power trunk button located on the instrument panel to the
left of the steering wheel.
The trunk lid can be released from outside the vehicle by
pushing the trunk button on the key fob twice within five
seconds or by using the external release switch located on
the underside of the decklid overhang. The release feature
will function only when the vehicle is in the unlock
condition.
With the ignition in the ON/RUN position, the trunk open
symbol will display in the instrument cluster indicating
that the trunk is open. The odometer display will reappear
once the trunk is closed.
Hood Safety Catch
3
GETTING TO KNOW YOUR VEHICLE 79
Page 83 of 516

Closing
With one or more hands placed on the outside trunk
surface push the trunk lid down until you hear the trunk
lock latch into place.
NOTE:Before closing the trunk lid make sure your key fob
isn’t inside the trunk area. The trunk will latch then
automatically unlock if the key fob is sensed not allowing
the key fob to be locked in the trunk area.
Trunk Safety
Trunk Emergency Release
As a security measure, a trunk internal emergency release
lever is built into the trunk latching mechanism. In the
event of an individual being locked inside the trunk, the
trunk can be opened by actuating the glow-in-the-dark
handle attached to the trunk latching mechanism.
WARNING!
Do not allow children to have access to the trunk, either
by climbing into the trunk from outside, or through the
inside of the vehicle. Always close the trunk lid when
your vehicle is unattended. Once in the trunk, young
children may not be able to escape, even if they entered
through the rear seat. If trapped in the trunk, children
can die from suffocation or heat stroke.
Trunk Emergency Release
3
GETTING TO KNOW YOUR VEHICLE 81
Page 89 of 516

Security
It is advised to erase all channels before you sell or turn in
your vehicle.
To do this, push and hold the two outside buttons for 20
seconds until the orange indicator flashes. Note that all
channels will be erased. Individual channels cannot be
erased.
The HomeLink Universal Transceiver is disabled when the
Vehicle Security Alarm is active.
Troubleshooting Tips
If you are having trouble programming HomeLink, here
are some of the most common solutions:
•Replace the battery in the Garage Door Opener hand-
held transmitter.
• Push the LEARN button on the Garage Door Opener to
complete the training for a Rolling Code.
• Did you unplug the device for programming and
remember to plug it back in? If you have any problems, or require assistance, please call
toll-free 1-800-355-3515 or, on the Internet at
HomeLink.com for information or assistance.
WARNING!
•
Vehicle exhaust contains carbon monoxide, a danger-
ous gas. Do not run your vehicle in the garage while
programming the transceiver. Exhaust gas can cause
serious injury or death.
• Your motorized door or gate will open and close
while you are programming the universal trans-
ceiver. Do not program the transceiver if people, pets
or other objects are in the path of the door or gate.
Only use this transceiver with a garage door opener
that has a “stop and reverse” feature as required by
Federal safety standards. This includes most garage
door opener models manufactured after 1982. Do not
use a garage door opener without these safety fea-
tures. Call toll-free 1-800-355-3515 or, on the Internet
at HomeLink.com for safety information or assis-
tance.
3
GETTING TO KNOW YOUR VEHICLE 87
Page 91 of 516
Console Storage
The center console has a storage compartment located
underneath the armrest. The compartment contains a
12 Volt power outlet, and is also equipped with a USB port
featuring active charging, which will continue charging
your device up to 60 minutes after the ignition is turned
off. The USB port also may be equipped with an IPOD/
USB control, or Apple CarPlay and Android Auto. Refer to
“IPOD/USB/MP3 Control – If Equipped” in “Multimedia”for further information. If equipped with Apple CarPlay
and Android Auto, refer to the Uconnect Owner ’s Manual
Supplement.
WARNING!
Do not operate this vehicle with a console compartment
lid in the open position. Driving with the console
compartment lid open may result in injury in a collision.
Opened Glove Compartment
Center Console
3
GETTING TO KNOW YOUR VEHICLE 89
Page 92 of 516
Cupholders
The front cupholders are located in the center console and
in the door panels.
WARNING!
If containers of hot liquid are place in the cupholder,
they can spill when the door is closed, burning the
occupants. Be careful when closing the doors to avoid
injury.
The rear seat cupholders are located in the center armrest
between the rear seats. The cupholders are positioned
forward in the armrest and side-by-side to provideFront Cupholders
Door Cupholder
90 GETTING TO KNOW YOUR VEHICLE
Page 94 of 516
NOTE:All accessories connected to these powered outlets
should be removed or turned off when the vehicle is not in
use to protect the battery against discharge.
WARNING!
To avoid serious injury or death:
• Only devices designed for use in this type of outlet
should be inserted into any 12 Volt outlet.
• Do not touch with wet hands.
(Continued)
Power Outlet — Center ConsolePower Outlet Fuse Locations
1 — #12 Fuse 20A Yellow Power Outlet Integrated Center Stack
2 — #38 Fuse 20A Yellow Power Outlet Center Console
92 GETTING TO KNOW YOUR VEHICLE
Page 95 of 516

WARNING!(Continued)
•Close the lid when not in use and while driving the
vehicle.
• If this outlet is mishandled, it may cause an electric
shock and failure.
CAUTION!
• Do not exceed the maximum power of 160 Watts
(13 Amps) at 12 Volts. If the 160 Watt (13 Amp) power
rating is exceeded the fuse protecting the system will
need to be replaced.
•
Power outlets are designed for accessory plugs only.
Do not insert any other object in the power outlets as
this will damage the outlet and blow the fuse. Im-
proper use of the power outlet can cause damage not
covered by your New Vehicle Limited Warranty.
CAUTION!
• Many accessories that can be plugged in draw power
from the vehicle’s battery, even when not in use (i.e.,
cellular phones, etc.). Eventually, if plugged in long
(Continued)
CAUTION! (Continued)
enough, the vehicle’s battery will discharge suffi-
ciently to degrade battery life and/or prevent the
engine from starting.
• Accessories that draw higher power (i.e., coolers,
vacuum cleaners, lights, etc.), will degrade the bat-
tery even more quickly. Only use these intermit-
tently and with greater caution.
• After the use of high power draw accessories, or long
periods of the vehicle not being started (with acces-
sories still plugged in), the vehicle must be driven a
sufficient length of time to allow the alternator to
recharge the vehicle’s battery.
• Power outlets are designed for accessory plugs only.
Do not hang any type of accessory or accessory
bracket from the plug. Improper use of the power
outlet can cause damage.
3
GETTING TO KNOW YOUR VEHICLE 93
Page 97 of 516
GETTING TO KNOW YOUR INSTRUMENT PANEL
CONTENTS
�INSTRUMENT CLUSTER ...................96
▫ Instrument Cluster Descriptions .............97
� INSTRUMENT CLUSTER DISPLAY ............99
▫ Location And Controls ...................99
� WARNING LIGHTS AND MESSAGES .........108
▫ Red Warning Lights .....................108
▫ Yellow Warning Lights ...................112
▫ Yellow Indicator Lights ...................116
▫ Green Indicator Lights ...................116 ▫
White Indicator Lights ...................117
▫ Blue Indicator Lights ....................118
� ONBOARD DIAGNOSTIC SYSTEM — OBD II . . .118
▫ Onboard Diagnostic System (OBD II)
Cybersecurity ..........................118
� EMISSIONS INSPECTION AND MAINTENANCE
PROGRAMS ...........................1194