Page 408 of 516

Uconnect 4 Settings
Press the “Settings” button on the bottom bar, or press the
“Apps
” button, then press the “Settings” button on
the touchscreen to display the menu setting screen. In
this mode the Uconnect system allows you to access all
of the available programmable features.
NOTE: Depending on the vehicles options, feature settings
may vary.
When making a selection, press the button on the touch-
screen to enter the desired mode. Once in the desired
mode, press and release the preferred setting “option” until
a check-mark appears next to the setting, showing that
setting has been selected. Once the setting is complete,
either press the Back Arrow button on the touchscreen to
return to the previous menu, or press the “X” button on the
touchscreen to close out of the settings screen. Pressing the
Up or Down Arrow button on the right side of the screen
will allow you to toggle up or down through the available
settings.
The following tables list the settings that may be found
within the Uconnect 4 radio, along with the selectable
options pertaining to each setting.
Uconnect 4C/4C NAV Buttons On Touchscreen And
Buttons On Faceplate
1 — Uconnect Buttons On The Touchscreen
2 — Uconnect Buttons On The Faceplate 406 MULTIMEDIA
Page 409 of 516
Display
After pressing the “Display” button on the touchscreen, the
following settings will be available:
Setting NameSelectable Options
Display Mode ManualAuto
Display Brightness With Headlights ON +–
NOTE:
•When in the “Display Brightness With Headlights ON” display, you may select the brightness with the headlights on.
•To make changes to the �Display Brightness with Headlights ON� setting, the headlights must be on and the inte-
rior dimmer switch must not be in the �party�or�parade� positions.
Display Brightness With Headlights OFF +–
NOTE:
•When in the “Display Brightness With Headlights OFF” display, you may select the brightness with the headlights
off. Adjust the brightness from (1–10) with the “+” and “–” buttons on the touchscreen.
•To make changes to the �Display Brightness with Headlights OFF� setting, the headlights must be off and the inte-
rior dimmer switch must not be in the �party�or�parade� positions.
10
MULTIMEDIA 407
Page 410 of 516
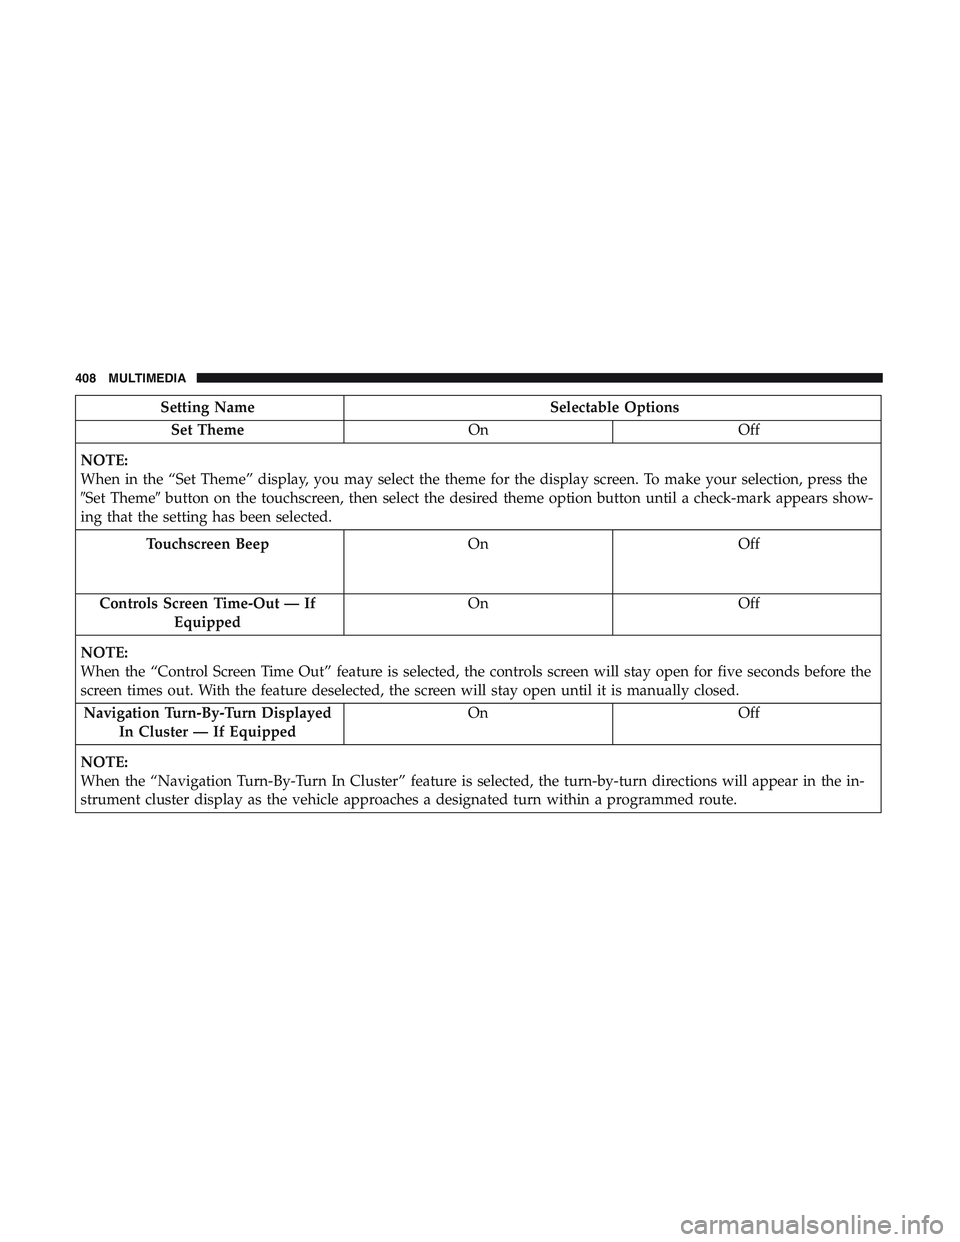
Setting NameSelectable Options
Set Theme OnOff
NOTE:
When in the “Set Theme” display, you may select the theme for the display screen. To make your selection, press the
�Set Theme� button on the touchscreen, then select the desired theme option button until a check-mark appears show-
ing that the setting has been selected.
Touchscreen Beep On
Off
Controls Screen Time-Out — If
Equipped On
Off
NOTE:
When the “Control Screen Time Out” feature is selected, the controls screen will stay open for five seconds before the
screen times out. With the feature deselected, the screen will stay open until it is manually closed. Navigation Turn-By-Turn Displayed In Cluster — If Equipped On
Off
NOTE:
When the “Navigation Turn-By-Turn In Cluster” feature is selected, the turn-by-turn directions will appear in the in-
strument cluster display as the vehicle approaches a designated turn within a programmed route.
408 MULTIMEDIA
Page 411 of 516
Units
After pressing the “Units” button on the touchscreen you
may select each unit of measure independently displayed
in the instrument cluster display, and navigation system (if
equipped). The following selectable units of measure are
listed below:
Setting NameSelectable Options
Units US Metric Custom
Speed MPH km/h
Distance mi km
Fuel Consumption MPG (US)MPG (UK) L/100 km km/L
Pressure psikPa bar
Temperature °C °F
Power — If Equipped HP (US)
HP (UK) kW
Torque — If Equipped lb-ft
Nm
10
MULTIMEDIA 409
Page 414 of 516
” setting includes Advanced Brake Assist (ABA). The")
Setting NameSelectable Options
Forward Collision Warn- ing Active Braking — If Equipped On
Off
NOTE:
The “Forward Collision Warning Plus (FCW+)” setting includes Advanced Brake Assist (ABA). The ABA applies ad-
ditional brake pressure when the driver requests insufficient brake pressure to avoid a potential frontal collision. Steering Feel Options — If Equipped Sport
Normal Comfort
NOTE:
The Steering Feel Options feature will allow you to adjust the steering effort and feel. Press the “Sport” button on the
touchscreen to provide the greatest amount of steering feel, requiring the highest amount of steering effort. Press the
“Normal” button on the touchscreen to provide greater steering feel, requiring greater steering effort. Press the “Com-
fort” button on the touchscreen to a lesser steering feel, requiring less steering effort. ParkSense — If Equipped Sound Only Sound and Display
NOTE:
The ParkSense system will scan for objects behind the vehicle when the gear selector is in REVERSE and the vehicle
speed is less than 7 mph (11 km/h). It will provide an alert (audible and/or visual) to indicate the proximity to other
objects. The system can be enabled with Sound Only, or Sound and Display.
412 MULTIMEDIA
Page 415 of 516

Setting NameSelectable Options
Rear ParkSense Volume — If Equipped On
Off
NOTE:
The Rear ParkSense Chime Volume settings can be selected from the instrument cluster display or Uconnect System.
The chime volume settings include LOW, MEDIUM, and HIGH. The factory default volume setting is MEDIUM. To
make your selection, press the “Rear ParkSense Vol.” button on the touchscreen, until a check-mark appears next to
setting, indicating that the setting had been selected. ParkSense will retain its last known configuration state through
ignition cycles. Blind Spot Alert — If Equipped Off
LightsLights and Chimes
NOTE:
•When this feature is selected, the Blind Spot Alert feature Provides alerts, visual and/or audible, to indicate objects
in your blind spot. The Blind Spot Alert feature can be activated in “Lights” mode. When this mode is selected, the
Blind Spot Monitor (BSM) system is activated and will only show a visual alert in the exterior mirrors. When
“Lights & Chime” mode is activated, the Blind Spot Monitor (BSM) will show a visual alert in the exterior mirrors
as well as an audible alert when the turn signal is on. When “Off” is selected, the Blind Spot Monitor (BSM) sys-
tem is deactivated.
•If your vehicle has experienced any damage in the area where the sensor is located, even if the fascia is not dam-
aged, the sensor may have become misaligned. Take your vehicle to an authorized dealer to verify sensor align-
ment. Having a sensor that is misaligned will result in the BSM not operating to specification.
10
MULTIMEDIA 413
Page 416 of 516

Setting NameSelectable Options
ParkView Backup Camera Active Guidelines On
Off
NOTE:
Your vehicle may be equipped with the ParkView Rear Back Up Camera Active Guidelines that allows you to see ac-
tive guidelines over the ParkView Back up camera display whenever the gear selector is put into REVERSE. The im-
age will be displayed on the radio touchscreen display along with a caution note to “check entire surroundings”
across the top of the screen. After five seconds, this note will disappear. ParkView Backup Camera Delay On
Off
NOTE:
When the vehicle is shifted out of REVERSE (with camera delay turned OFF), the rear camera mode is exited and the
navigation or audio screen appears again. When the vehicle is shifted out of REVERSE (with camera delay turned
ON), the rear view image with dynamic grid lines will be displayed for up to ten seconds after shifting out of “RE-
VERSE” unless the forward vehicle speed exceeds 8 mph (12 km/h), the transmission is shifted into “PARK” or the
ignition is switched to the OFF position. To set the ParkView Backup Camera Delay, press the “Controls” button on
the touchscreen, the “settings” button on the touchscreen, then the “Safety & Driving Assistance” button on the
touchscreen.
414 MULTIMEDIA
Page 424 of 516
Audio
After pressing the “Audio” button on the touchscreen, the
following settings will be available:
Setting NameSelectable Options
Equalizer +-
NOTE:
When in the “Equalizer” display you may adjust the Bass, Mid and Treble settings. Adjust the settings with the “+”
and “–” buttons on the touchscreen or by selecting any point on the scale between the “+” and “–” buttons on the
touchscreen. Balance/Fade Arrow Buttons “C” icon
NOTE:
The “Balance/Fade” feature allows you to adjust the Balance and Fade settings. Press and drag the speaker icon or
use the arrows to adjust, tap the “C” icon to readjust to the center. Speed Adjusted Volume Off
12 3
NOTE:
The “Speed Adjusted Volume” feature increases or decreases volume relative to vehicle speed. To change the Speed
Adjusted Volume press the “Speed Adjusted Volume” button on the touchscreen and select from “Off,” “1,” “2” or
“3” buttons on the touchscreen.
422 MULTIMEDIA

. The f")
