2018 CITROEN DISPATCH SPACETOURER ESP
[x] Cancel search: ESPPage 228 of 400

226
This system is designed to improve safety
when driving and is in no circumstances
a substitute for the use of the interior rear
view mirror and door mirrors. It is the
driver's responsibility to constantly check
the traffic, to assess the distances and
relative speeds of other vehicles and to
predict their movements before deciding
whether to change lane.
The alert is given by a warning lamp which
comes on in the door mirror on the side in
question as soon as a vehicle – car, lorry,
bicycle – is detected and the following
conditions are fulfilled:
-
a
ll the vehicles must be moving in the same
direction and on adjacent lanes,
-
t
he speed of the vehicle must be between
7
and 87 mph (12 and 140 km/h),
-
y
ou overtake a vehicle with a speed
difference of less than 6
mph (10 km/h),
-
a v
ehicle overtakes you with a speed
difference of less than 16
mph (25 km/h),
-
t
he traffic must be flowing normally,
-
i
n the case of an overtaking manoeuvre,
if this is prolonged and the vehicle being
overtaken returns to the blind spot,
-
y
ou are driving on a straight or slightly
curved road,
-
y
our vehicle is not pulling a trailer, a
caravan, etc. No alert will be given in the following situations:
-
i
n the presence of non-moving objects
(parked vehicles, barriers, street lamps,
road signs, etc.),
-
on
coming traffic,
-
d
riving on a winding road or a sharp corner,-
w
hen overtaking or being overtaken by a
very long vehicle (lorry, bus, etc.) which is
also in the rear blind spot and present in the
driver’s front field of vision,
-
i
n very heavy traffic: vehicles detected in
front and behind are confused with a lorry or
a stationary object,
-
w
hen overtaking quickly.
Driving
Page 232 of 400

230
Reversing camera with
display in the interior
mirror
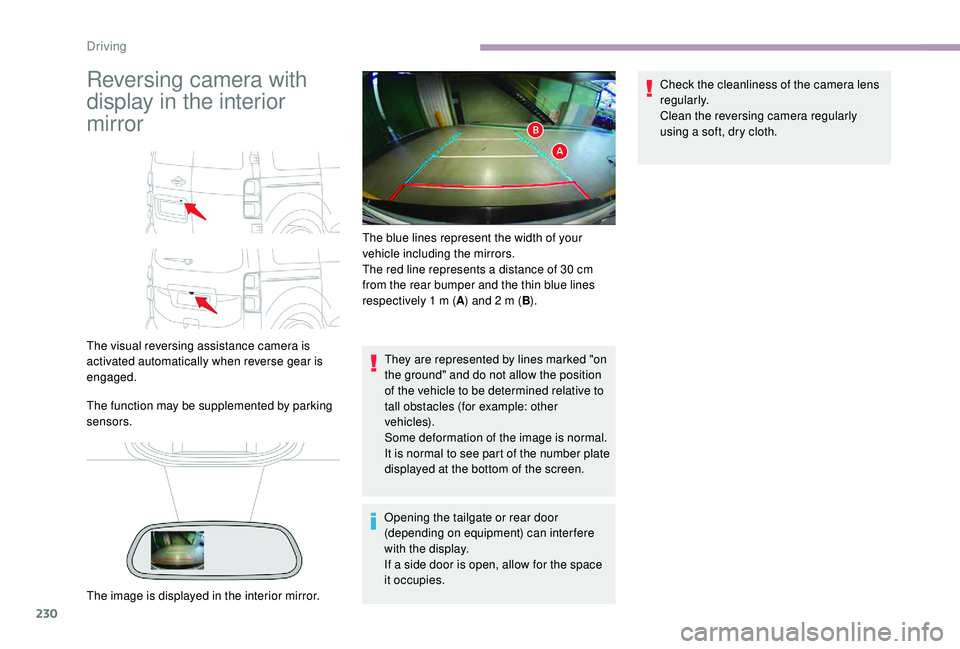
The visual reversing assistance camera is
activated automatically when reverse gear is
engaged.
The function may be supplemented by parking
sensors.They are represented by lines marked "on
the ground" and do not allow the position
of the vehicle to be determined relative to
tall obstacles (for example: other
vehicles).
Some deformation of the image is normal.
It is normal to see part of the number plate
displayed at the bottom of the screen.
Opening the tailgate or rear door
(depending on equipment) can interfere
with the display.
If a side door is open, allow for the space
it occupies. Check the cleanliness of the camera lens
regularly.
Clean the reversing camera regularly
using a soft, dry cloth.
The image is displayed in the interior mirror. The blue lines represent the width of your
vehicle including the mirrors.
The red line represents a distance of 30
cm
from the rear bumper and the thin blue lines
respectively 1 m (
A) and 2 m (
B).
Driving
Page 234 of 400

232
Rear views
Engage reverse gear to activate the camera,
located on the boot or
"Standard view""180° view"
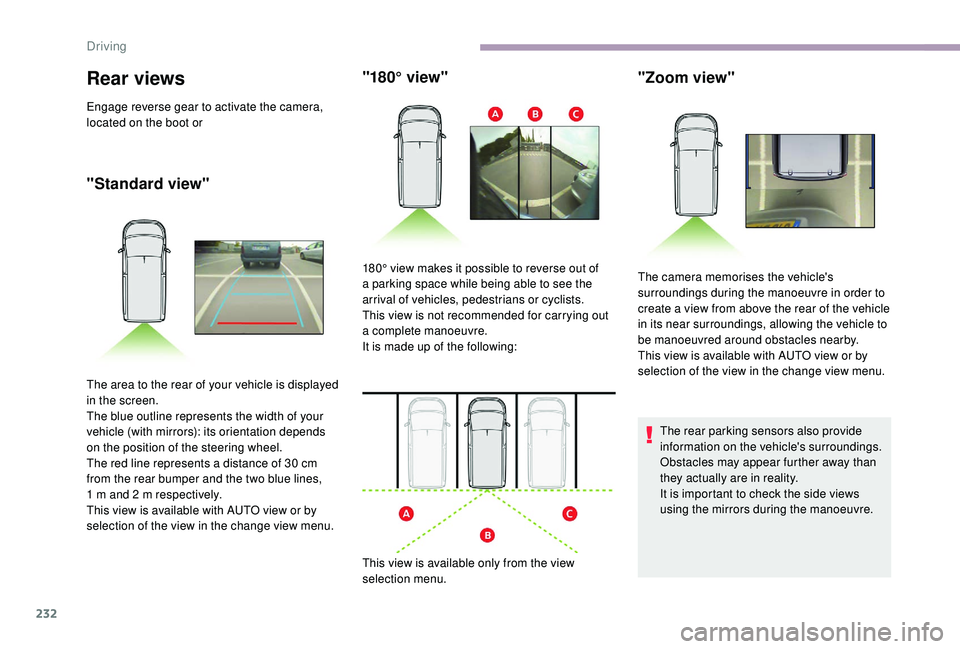
The area to the rear of your vehicle is displayed
in the screen.
The blue outline represents the width of your
vehicle (with mirrors): its orientation depends
on the position of the steering wheel.
The red line represents a distance of 30
cm
from the rear bumper and the two blue lines,
1
m and 2 m respectively.
This view is available with AUTO view or by
selection of the view in the change view menu. 180° view makes it possible to reverse out of
a parking space while being able to see the
arrival of vehicles, pedestrians or cyclists.
This view is not recommended for carrying out
a complete manoeuvre.
It is made up of the following:
This view is available only from the view
selection menu.
The rear parking sensors also provide
information on the vehicle's surroundings.
Obstacles may appear further away than
they actually are in reality.
It is important to check the side views
using the mirrors during the manoeuvre.
"Zoom view"
The camera memorises the vehicle's
surroundings during the manoeuvre in order to
create a view from above the rear of the vehicle
in its near surroundings, allowing the vehicle to
be manoeuvred around obstacles nearby.
This view is available with AUTO view or by
selection of the view in the change view menu.
Driving
Page 236 of 400

234
Under-inflation detection
This system automatically monitors the tyre
pressure while driving.
The system monitors the pressure in all four
tyres, once the vehicle is moving.
It compares the information given by the
wheel speed sensors with reference values,
which must be reinitialised after ever y tyre
pressure adjustment or wheel change.
The system triggers an alert as soon as it
detects a drop in the pressure of one or more
tyres.
The tyre under-inflation detection system
does not replace the need for vigilance on
the part of the driver.
This system still requires you to check
the tyre inflation pressures (including
the spare wheel) every month as well as
before a long journey.
Driving with under-inflated tyres impairs
handling, extends braking distances and
causes early tyre wear, particularly in
adverse conditions (heavy loads, high
speeds, long journeys). Driving with under-inflated tyres
increases fuel consumption.
The tyre pressure specifications for your
vehicle can be found on the tyre pressure
label.
For more information on the
Identification markings , refer to the
corresponding section.
Tyre pressures should be checked when
the tyres are "cold" (vehicle stopped for
1
hour or after a journey of less than
6
miles (10 km) at moderate speeds).
Other wise (when hot), add 0.3
bar to the
pressures shown on the label.
Snow chains
The system does not have to be
reinitialised after fitting or removing snow
chains.
Spare wheel
The steel spare wheel does not have an
under-inflation detection sensor.
Under-inflation alert
This warning is indicated by fixed
illumination of the lamp, an audible
signal and, depending on the
equipment installed, a message
displayed on the screen.
F
R
educe speed immediately, avoid excessive
steering movements and sudden braking.
F
S
top the vehicle as soon as it is safe to do
so.
The loss of pressure detected does not
always cause visible bulging of the tyre.
Do not satisfy yourself with just a visual
check.
F
I
n the event of a puncture, use the
temporary puncture repair kit or the spare
wheel (depending on equipment),
or
F
i
f you have a compressor, such as the one
in the temporary puncture repair kit, check
the pressures of the four tyres when cold,
or
F
i
f it is not possible to make this check
immediately, drive carefully at reduced
speed.
Driving
Page 241 of 400

239
Compatibility of fuels
Fuel used for Diesel
engines
For more information, contact a CITROËN
dealer or a qualified workshop.The use of any other type of (bio)fuel
(vegetable or animal oils, pure or diluted,
domestic fuel, etc.) is strictly prohibited
(risk of damage to the engine and fuel
syste m).
The only Diesel additives authorised
for use are those that meet the
B715000
standard.
Diesel at low temperature
At temperatures below 0°C (+32°F), the
formation of paraffins in summer-type Diesel
fuels could entail an abnormal operation
of the fuel supply circuit. To avoid this, we
recommend using winter-type Diesel fuel and
keeping the fuel tank more than 50% full.
If, despite this, at temperatures below -15°C
(+5°F) the engine has problems starting,
just leave the vehicle in a garage or heated
workshop for a little while.
Travelling abroad
Cer tain fuels could damage the engine
of your vehicle.
In cer tain countries, the use of a
par ticular fuel may be required
(specific octane rating, specific sales
name, etc.) to ensure correct operation
of the engine.
For any additional information, contact a
dealer.
The Diesel engines are compatible with
biofuels that conform to current and future
European standards and which can be
obtained from filling stations:
Diesel fuel that meets standard
EN590
mixed with a biofuel that meets
standard EN14214
(possibly containing
up to 7% Fatty Acid Methyl Ester).
Diesel fuel that meets standard
EN16734
mixed with a biofuel that
meets standard EN14214
(possibly
containing up to 10% Fatty Acid Methyl
Ester).
Paraffinic Diesel fuel that meets
standard EN15940
mixed with a biofuel
that meets standard EN14214
(possibly
containing up to 7% Fatty Acid Methyl
Ester). The use of B20
or B30
fuel that meets
the standard EN16709
is possible
with your Diesel engine. However, this
use, even occasional, requires strict
application of the special ser vicing
conditions referred to as "Arduous
conditions".
7
Practical information
Page 243 of 400

241
Towing a trailer
We recommend using genuine CITROËN
towbars and their harnesses that have
been tested and approved from the
design stage of your vehicle, and having a
CITROËN dealer or a qualified workshop
fit the towbar.
If the towbar is not fitted by a CITROËN
dealer, it must still be fitted in accordance
with the vehicle manufacturer's
instructions.Driving with a trailer places greater
demands on the towing vehicle and
requires extra care from the driver.
Please respect the maximum authorised
towable weights indicated on the
registration certificate or in your vehicle’s
technical data.
For more information on Driving advice
,
particularly when towing, refer to the
corresponding section.
Energy economy mode
System which manages the duration of use of
certain functions to conser ve a sufficient level
of charge in the battery.
After the engine has stopped, you can still use
functions such as the audio and telematics
system, windscreen wipers, dipped beam
headlamps, courtesy lamps, etc. for a
maximum combined duration of about forty
minutes.
Switching to this mode
A message appears in the instrument panel
screen indicating that the vehicle has switched
to economy mode and the active functions are
put on standby.
If a telephone call is being made at this
time, it will be maintained for around
10
minutes with the hands-free kit of your
audio system.
Your vehicle is primarily designed for
transporting people and luggage, but it may
also be used for towing a trailer.
7
Practical information
Page 244 of 400

242
Exiting the mode
These functions will be automatically restored
the next time the vehicle is used.
In order to restore the use of these functions
immediately, start the engine and let it run:
-
f
or less than ten minutes, to use the
equipment for approximately five minutes,
-
f
or more than ten minutes, to use the
equipment for up to approximately thirty
minutes.
Let the engine run for the duration specified to
ensure that the battery charge is sufficient.
Do not repeatedly and continuously restart the
engine in order to charge the battery.
A flat battery prevents the engine from
starting.
For more information on the 12
V batter y,
refer to the corresponding section.
Load reduction mode
System which manages the use of certain
functions according to the level of charge
remaining in the battery.
When the vehicle is being driven, the load
reduction function temporarily deactivates
certain functions, such as the air conditioning,
the heated rear screen, etc.
The deactivated functions are reactivated
automatically as soon as conditions permit.
Roof bars
Recommendations
F D istribute the load uniformly, taking
care to avoid overloading one of the
sides.
F
A
rrange the heaviest part of the load
as close as possible to the roof.
F
L
ash the load down securely and fit a
warning flag if it overhangs the vehicle.
F
D
rive gently: the vehicle will be more
susceptible to the effects of side winds
(stability may be affected).
F
W
hen not in use, the roof bars should
be removed.
If the height exceeds 40
cm, adapt the
speed of the vehicle to the profile of the
road to avoid damaging the roof bars and
the mountings on the vehicle.
Be sure to refer to national legislation in
order to comply with the regulations for
transporting objects which are longer than
the vehicle.
Practical information
Page 245 of 400

243
As a safety measure and to avoid
damaging the roof, it is essential to use
the transverse bars approved for your
vehicle.
Obser ve the instructions on fitting and use
contained in the guide supplied with the
roof bars.
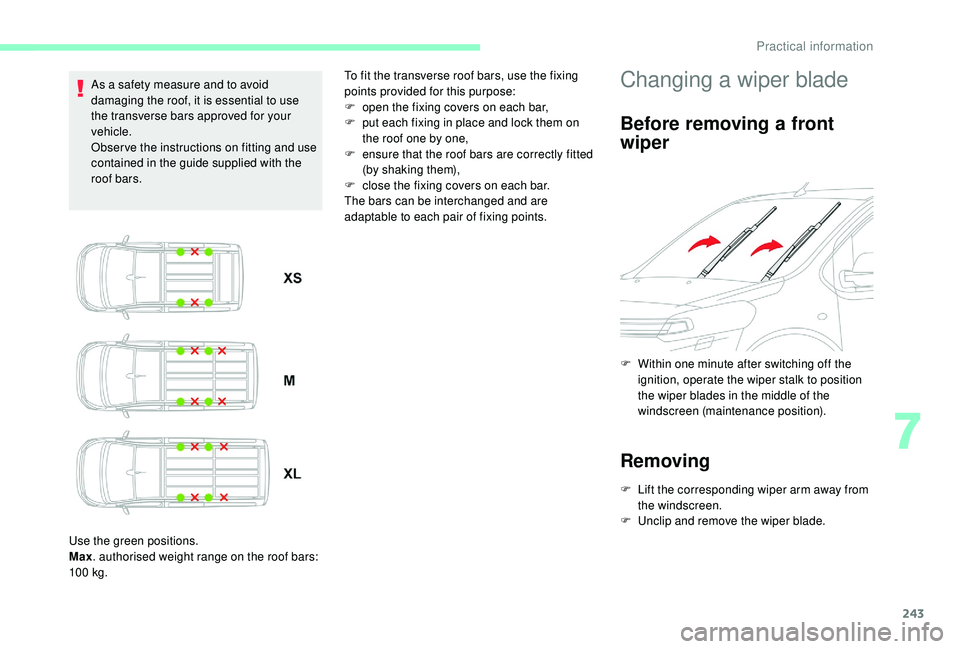
Use the green positions.
Max . authorised weight range on the roof bars:
10 0
kg. To fit the transverse roof bars, use the fixing
points provided for this purpose:
F
o
pen the fixing covers on each bar,
F
p
ut each fixing in place and lock them on
the roof one by one,
F
e
nsure that the roof bars are correctly fitted
(by shaking them),
F
c
lose the fixing covers on each bar.
The bars can be interchanged and are
adaptable to each pair of fixing points.Changing a wiper blade
Before removing a front
wiper
F Within one minute after switching off the ignition, operate the wiper stalk to position
the wiper blades in the middle of the
windscreen (maintenance position).
Removing
F Lift the corresponding wiper arm away from the windscreen.
F
U
nclip and remove the wiper blade.
7
Practical information