2018 CITROEN C3 AIRCROSS light
[x] Cancel search: lightPage 46 of 308

44
As a safety measure (children on board),
never leave the vehicle without taking the
electronic key for the
K
eyless Entry and
Starting system with you, even for a short
period.
Be aware of the risk of theft when the
electronic key for the
K
eyless Entry and
Starting system is in one of the defined
zones with the vehicle unlocked.
In order to preser ve the battery in the
electronic key and the vehicle's battery,
the "hands-free" functions are put into
long-term standby after 21 days without
use. To restore these functions, press
one of the remote control buttons or start
the engine with the electronic key in the
reader.
For more information on Star ting with
K
eyless Entr y and Star ting , refer to the
corresponding section.Locking the vehicle
Normal locking
F With the electronic key in recognition zone A, press with your finger or thumb on the
door handle of one of the front doors (at the
markings) or on the locking control located
on the tailgate (on the right).
It is not possible to lock the vehicle if one of the
keys is left inside the vehicle.
The lighting of the direction indicators for
a few seconds signals:
-
t
he locking of the vehicle for versions
without an alarm,
-
t
he activation of the alarm for other
versions.
Deadlocking
Deadlocking renders the interior door
controls inoperative.
It also deactivates the interior central
locking button on the dashboard.
Therefore, never leave anyone inside the
vehicle when it is deadlocked.
F
W
ith the electronic key in recognition zone
A , press with your finger or thumb on the
door handle of one of the front doors (at the
markings) or on the locking control located
on the tailgate (on the right).
F
W
ithin five seconds, press the front door
handle or the locking control on the tailgate
(on the right) again to deadlock the vehicle.
Access
Page 63 of 308

61
To remove a head restraint:
F r elease the backrest using the control 1 ,
F
t
ilt the backrest slightly for wards,
F
p
ull the head restraint as far up as it will go,
F
p
ress lug A to release the head restraint
and remove it completely,
F
s
tow the head restraint.
To refit a head restraint:
F
i
ntroduce the head restraint rods into the
guides in the corresponding seat backrest,
F
p
ush the head restraint down as far as it will
go,
F
p
ress lug A to release the head restraint
and then push the head restraint fully down.
Never drive with passengers seated at
the rear when the head restraints are
removed; they must be in place and in the
high position.
The head restraint for the centre seat
and those for the outer seats are not
interchangeable.
Longitudinal seat adjustment
(depending on version)
Adjusting the seats must only be done
with the vehicle stationary.
Each 2/3 -1/3 part can be adjusted individually. F
Ra
ise the control and slide the bench seat
forwards or backwards.
Adjusting the seat backrest
angle (depending on version)
Several adjustment positions are available.
F
M
ove the seat for ward.
F
P
ull the strap for ward then tilt the backrest
to the desired position. Sit in the seat to per form the adjustments.
Folding the backrests
Adjusting the seat backrests must only be
done with the vehicle stationary.
First steps:
F
l
ower the head restraints,
F
i
f necessary, move the front seats for ward,
F
p
ull the seats fully back (depending on
version),
F
c
heck that nothing and no-one might
inter fere with the folding of the backrests
(clothing, luggage, etc.),
F
c
heck that the outer seat belts are lying
flat against the backrests and placed in the
retaining hook.
3
Ease of use and comfort
Page 66 of 308

64
Folding/unfolding during locking/unlocking
can be disabled. Contact a CITROËN
dealer or a qualified workshop.
If necessary, the mirrors can be folded
manually.
Rear view mirror
Equipped with an anti-dazzle system, which
darkens the mirror glass and reduces the
nuisance to the driver caused by the sun,
headlamps from other vehicles, etc.
Manual model
Adjustment
F A djust the mirror so that the mirror is
directed correctly in the "day" position.
Day/night position
Automatic "electrochrome"
model
In order to ensure optimum visibility during
your manoeuvres, the mirror lightens
automatically when reverse gear is
engaged.
F
P
ull the lever to change to the "night" anti-
dazzle position. F
P
ush the lever to change to the normal
"day" position.
This system automatically and progressively
changes between the day and night uses by
means of a sensor, which measures the light
from the rear of the vehicle.
Ventilation
Air intake
The air circulating in the passenger
compartment is filtered and originates either
from the outside via the grille located at the
base of the windscreen or from the inside in air
recirculation mode.
Air treatment
The incoming air follows various routes
depending on the controls selected by the
driver:
-
d
irect arrival in the passenger compartment
(air intake),
-
p
assage through a heating circuit (heating),
-
p
assage through a cooling circuit (air
conditioning).
Control panel
Depending on equipment, the
controls for this system will be
accessible via the Air conditioning
menu on the touch screen, or via the
centre console panel located below
the audio system.
The demisting/defrosting controls for the
windscreen and the rear screen are located
below the touch screen, or on the centre
console panel located below the audio system.
Ease of use and comfort
Page 72 of 308

70
Heated windscreen
In cold weather, this system heats the whole of
the windscreen, as well as the areas alongside
the windscreen pillars.
Without changing the settings for the air
conditioning system, it allows faster release
of the windscreen wiper blades when they
are frozen to the windscreen and helps avoid
the accumulation of snow resulting from the
operation of the windscreen wipers.
Switching on/off
F Pressing the button again switches off the system; its indicator lamp goes off.
The system is automatically deactivated every
time the engine is switched off.
Rear screen demist –
defrost
On/Off
F Press this button to demist /defrost the rear screen and, depending on version, the door
mirrors. The button indicator lamp comes on.
Defrosting switches off automatically to prevent
an excessive consumption of current.
F
I
t is possible to stop the demisting/
defrosting operation before it is switched off
automatically by pressing this button again.
The button indicator lamp goes off. Switch off the heating of the rear
screen and door mirrors as soon as
you judge it necessary, as reducing
the consumption of electrical current
reduces fuel consumption.
Rear screen demisting – defrosting can
only be operated when the engine is
running.
Boot lighting
This comes on automatically when the boot is opened
and goes off automatically when the boot is closed.
There are different lighting times:
-
w
hen the ignition is off, approximately ten
minutes,
-
i
n energy saving mode, approximately thirty
seconds,
-
w
ith the engine running, unlimited.
F With the engine running, press this button; its indicator lamp comes on.
The system is activated if the exterior
temperature falls below 0°C.
Ease of use and comfort
Page 78 of 308

76
Caution, when putting the armrest back
in place, ensure that it is properly locked
and that the red indicator for each strap is
no longer visible. Otherwise, passenger
safety could be compromised if sharp
braking occurs or if there is a collision.
The contents of the boot may be thrown
forward – Risk of serious injury!
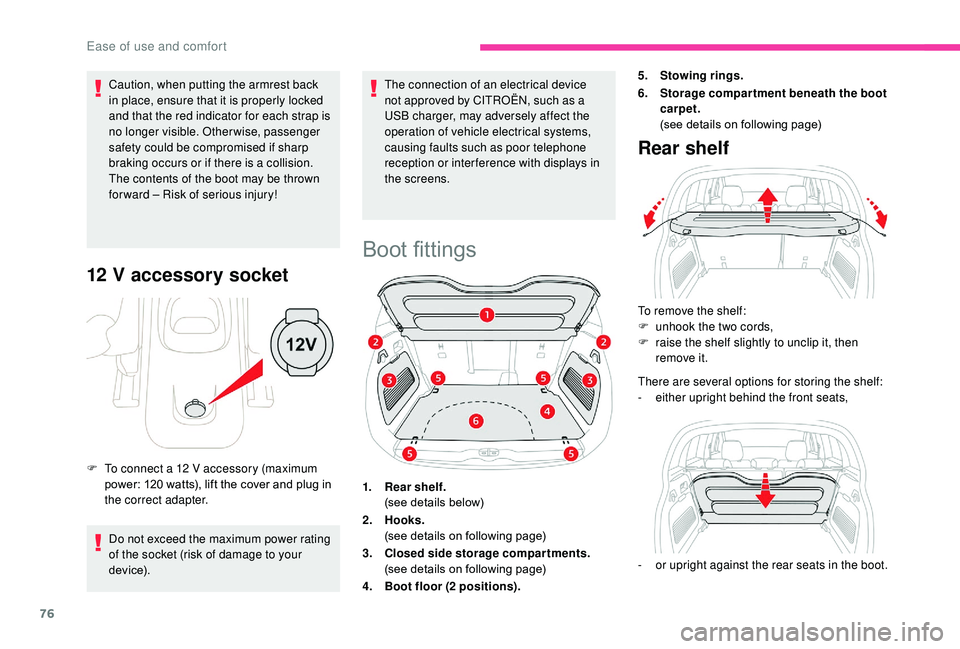
12 V accessory socket
Do not exceed the maximum power rating
of the socket (risk of damage to your
device). The connection of an electrical device
not approved by CITROËN, such as a
USB charger, may adversely affect the
operation of vehicle electrical systems,
causing faults such as poor telephone
reception or inter ference with displays in
the screens.
F
T
o connect a 12 V accessory (maximum
power: 120 watts), lift the cover and plug in
the correct adapter.
Boot fittings
1. Rear shelf.
(see details below)
2. Hooks.
(see details on following page)
3. Closed side storage compartments.
(see details on following page)
4. Boot floor (2 positions). 5.
Stowing rings.
6. Storage compar tment beneath the boot
carpet.
(see details on following page)
Rear shelf
To remove the shelf:
F
u nhook the two cords,
F
r
aise the shelf slightly to unclip it, then
remove it.
There are several options for storing the shelf:
-
ei
ther upright behind the front seats,
-
o
r upright against the rear seats in the boot.
Ease of use and comfort
Page 79 of 308

77
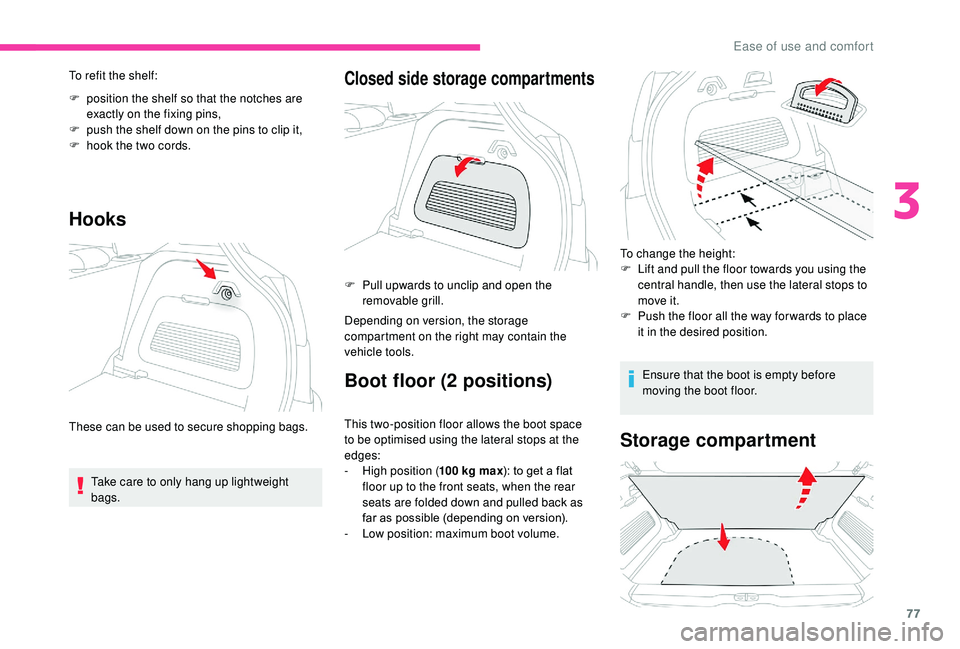
To refit the shelf:
F
p
osition the shelf so that the notches are
exactly on the fixing pins,
F
p
ush the shelf down on the pins to clip it,
F
h
ook the two cords.
Hooks
Take care to only hang up lightweight
bags.
Closed side storage compartments
F Pull upwards to unclip and open the removable grill.
Depending on version, the storage
compartment on the right may contain the
vehicle tools.
Boot floor (2 positions)
This two-position floor allows the boot space
to be optimised using the lateral stops at the
edges:
-
Hig
h position ( 100
kg max): to get a flat
floor up to the front seats, when the rear
seats are folded down and pulled back as
far as possible (depending on version).
-
L
ow position: maximum boot volume. To change the height:
F
L
ift and pull the floor towards you using the
central handle, then use the lateral stops to
move it.
F
P
ush the floor all the way for wards to place
it in the desired position.
Ensure that the boot is empty before
moving the boot floor.
Storage compartmentThese can be used to secure shopping bags.
3
Ease of use and comfort
Page 80 of 308

78
Depending on version, it includes:
- a t emporary puncture repair kit with the
vehicle tools,
-
a s
pare wheel with or without the vehicle
tools.
F
R
aise the boot floor as far as possible to
access the storage compartment.
Courtesy lamps
1. Front courtesy lamp
2. Front map reading lamps
3. Rear courtesy lamp
4. Rear map reading lamps
Front and rear courtesy lamps
In this position, the courtesy lamp
comes on gradually:
-
w
hen the vehicle is unlocked,
-
w
hen the key is removed from the ignition,
-
w
hen opening a door,
-
w
hen the remote control locking button is
activated, in order to locate your vehicle.
It switches off gradually:
-
w
hen the vehicle is locked,
-
w
hen the ignition is switched on,
-
3
0
seconds after the last door is closed. Permanently off.
Permanent lighting.
Front and rear map reading
lamps
F With the ignition on, operate the corresponding switch.
Take care not to put anything in contact
with the courtesy lamps.
In "permanent lighting" mode, the lighting time
varies according to the circumstances:
-
w
hen the ignition is off, approximately ten
minutes,
-
i
n energy saving mode, approximately thirty
seconds,
-
w
ith the engine running, unlimited. When the courtesy lamp is in the
"permanent lighting" position, the rear
courtesy lamp also comes on, except if it
is in the "permanently off " position.
To switch off the rear courtesy lamp, put it
in the "permanently off " position.
Ease of use and comfort
Page 81 of 308

79
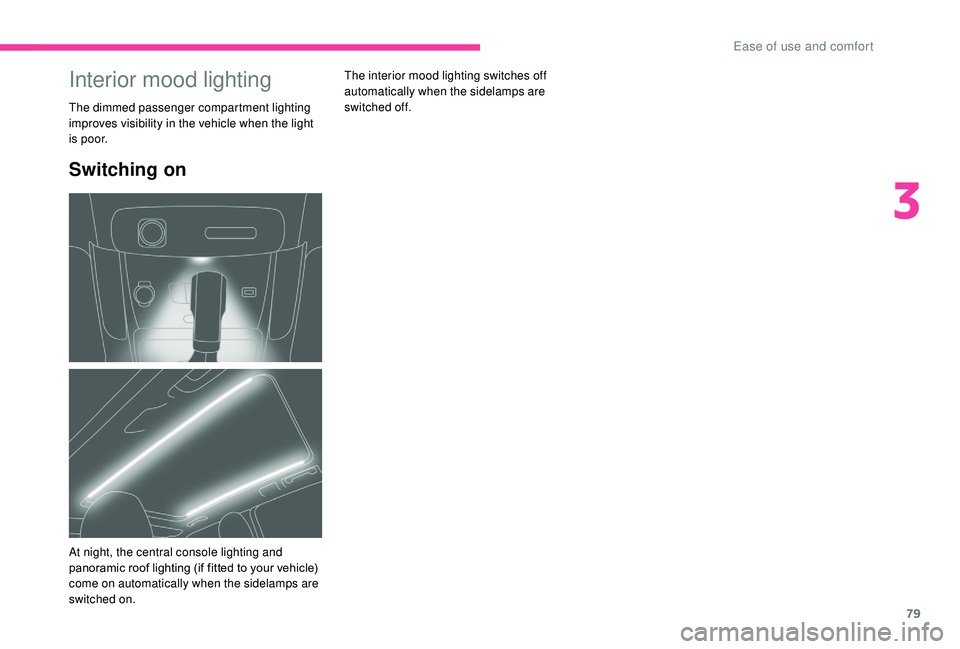
Switching on
The interior mood lighting switches off
automatically when the sidelamps are
switched
off.Interior mood lighting
The dimmed passenger compartment lighting
improves visibility in the vehicle when the light
i s p o o r.
At night, the central console lighting and
panoramic roof lighting (if fitted to your vehicle)
come on automatically when the sidelamps are
switched on.
3
Ease of use and comfort