Page 573 of 696
Units
After pressing the “Units” button on the touchscreen, the
following settings will be available:
Setting NameSelectable Options
Units USMetric Custom
NOTE:
The “Custom” option allows you to set the “Speed” (MPH, or km/h), “Distance” (mi, or km), “Fuel Consumption”
[MPG (US), MPG (UK), L/100 km, or km/L], “Pressure” (psi, kPa, or bar), and “Temperature” (°C, or °F) units of
measure independently.
Voice
After pressing the “Voice” button on the touchscreen, the
following settings will be available:
Setting Name Selectable Options
Voice Response Length Brief Detailed
Show Command List AlwaysWith Help Never10
MULTIMEDIA 571
Page 574 of 696
Clock
After pressing the “Clock” button on the touchscreen, the
following settings will be available:
Setting NameSelectable Options
Sync Time With GPS — If Equipped On
Off
Set Time Hours +-
NOTE:
The “Set Time Hours” feature will allow you to adjust the hours. The “Sync time with GPS” button on the touch-
screen must be unchecked. Set Time Minutes +-
NOTE:
The “Set Time Minutes” feature will allow you to adjust the minutes. The “Sync time with GPS” button on the touch-
screen must be unchecked. Set Time and Format 12 hr24 hr
AM PM
NOTE:
Within the “Set Time and Format” setting, press the corresponding arrow buttons on the touchscreen to adjust to the
correct time.
572 MULTIMEDIA
Page 596 of 696
Language
After pressing the “Language” button on the touchscreen,
the following settings will be available:
Setting NameSelectable Options
Language List of Languages
NOTE:
When the “Set Language” feature is selected, you may select one of multiple languages (English / Français / Espa-
ñol) for all display nomenclature, including the trip functions and the navigation system (if equipped). Press the “Set
Language” button on the touchscreen, then press the desired language button on the touchscreen until a check-mark
appears next to the language, showing that setting has been selected.
594 MULTIMEDIA
Page 599 of 696
Units
After pressing the “Units” button on the touchscreen, the
following settings will be available:
Setting NameSelectable Options
Units USMetric Custom
NOTE:
The “Custom” option allows you to set the “Speed” (MPH, or km/h), “Distance” (mi, or km), “Fuel Consumption”
[MPG (US), MPG (UK), L/100 km, or km/L], “Pressure” (psi, kPa, or bar), and “Temperature” (°C, or °F) units of
measure independently.
Voice
After pressing the “Voice” button on the touchscreen, the
following settings will be available:
Setting Name Selectable Options
Voice Response Length Brief Detailed
Show Command List NeverWith Help Always10
MULTIMEDIA 597
Page 629 of 696

General Information
The following regulatory statement applies to all Radio
Frequency (RF) devices equipped in this vehicle:
This device complies with Part 15 of the FCC Rules and
with Industry Canada license-exempt RSS standard(s).
Operation is subject to the following two conditions:
1. This device may not cause harmful interference, and
2. This device must accept any interference received, in-cluding interference that may cause undesired opera-
tion.
NOTE: Changes or modifications not expressly approved
by the party responsible for compliance could void the
user ’s authority to operate the equipment.
Play A DVD/Blu-ray Or USB Media File From
Uconnect System
1. Insert a Blu-ray disc or DVD disc into the disc player with the label facing up. Or insert a USB drive into rear
Video USB port.
NOTE: The DVD/Blu-ray Disc player and Video USB port
are both located under the radio controls in the instrument
panel. 2. Press the “Uconnect Theater” button on the radio touch-
screen.
Refer to “Accessing The System From The Uconnect sys-
tem” in this section for further information.
3. Select Disc or USB from the source controls (i.e. select the desired source from the “Select Input 1” or “Select
Input 2” menu for the respective screen).
4. For DVD/Blu-ray disc – press the “Press to Enter” feature in the Movie Snapshot on radio touchscreen,
then press “OK” on following screen. The steps to start
a DVD are dependent on the steps required by that
specific DVD. For USB Media Files - Press Music, Movie,
or Folders, then select media title from list(s).
5. To play a DVD/Blu-ray disc on both screens simultane- ously, select disc from both screen drop downs, or
choose disc source on one screen and push “View
Screen” button on the other.
10
MULTIMEDIA 627
Page 632 of 696

Disc Menu
When listening to a CD Audio disc, CD Data disc, DVD or
Blu-ray, pushing the remote control’s arrow buttons will
navigate the cursor on the rear touchscreen in the desired
direction, on whichever touchscreen is selected. The UP,
DOWN, LEFT, and RIGHT arrow buttons, and the OK and
MENU buttons on the remote, along with the correspond-
ing buttons overlaid on the radio touchscreen, can be used
to navigate the disc menu when it appears. This can be
used to select specific chapters in a movie, navigate special
features, or to play the movie from the menu.
NOTE:Inserting a disc into the player will “auto play” the
disc if already in the �Disc�source menu on the rear
screens, and the disc supports “auto play.”
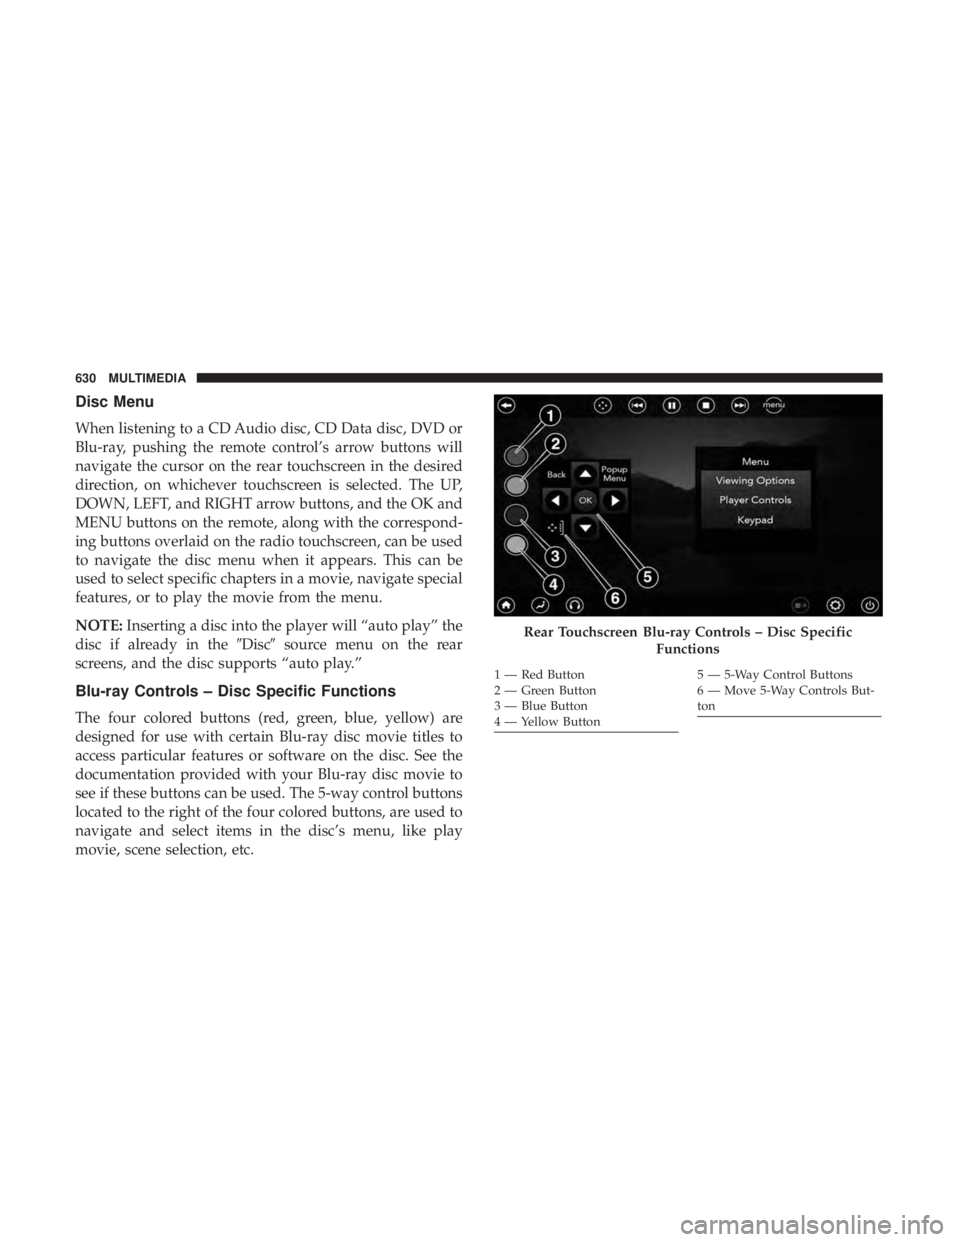
Blu-ray Controls – Disc Specific Functions
The four colored buttons (red, green, blue, yellow) are
designed for use with certain Blu-ray disc movie titles to
access particular features or software on the disc. See the
documentation provided with your Blu-ray disc movie to
see if these buttons can be used. The 5-way control buttons
located to the right of the four colored buttons, are used to
navigate and select items in the disc’s menu, like play
movie, scene selection, etc.
Rear Touchscreen Blu-ray Controls – Disc Specific
Functions
1 — Red Button
2 — Green Button
3 — Blue Button
4 — Yellow Button5 — 5-Way Control Buttons
6 — Move 5-Way Controls But-
ton
630 MULTIMEDIA
Page 644 of 696

NOTE:Refer to your device’s user manual or www.ucon-
nectphone.com for further information.
3. Select the Pacifica Wireless Network from the list of available networks on your device.
4. When prompted by an Authentication Screen, press Accept on the touchscreen to begin wireless streaming
on your device. If prompted, verify that the code on the
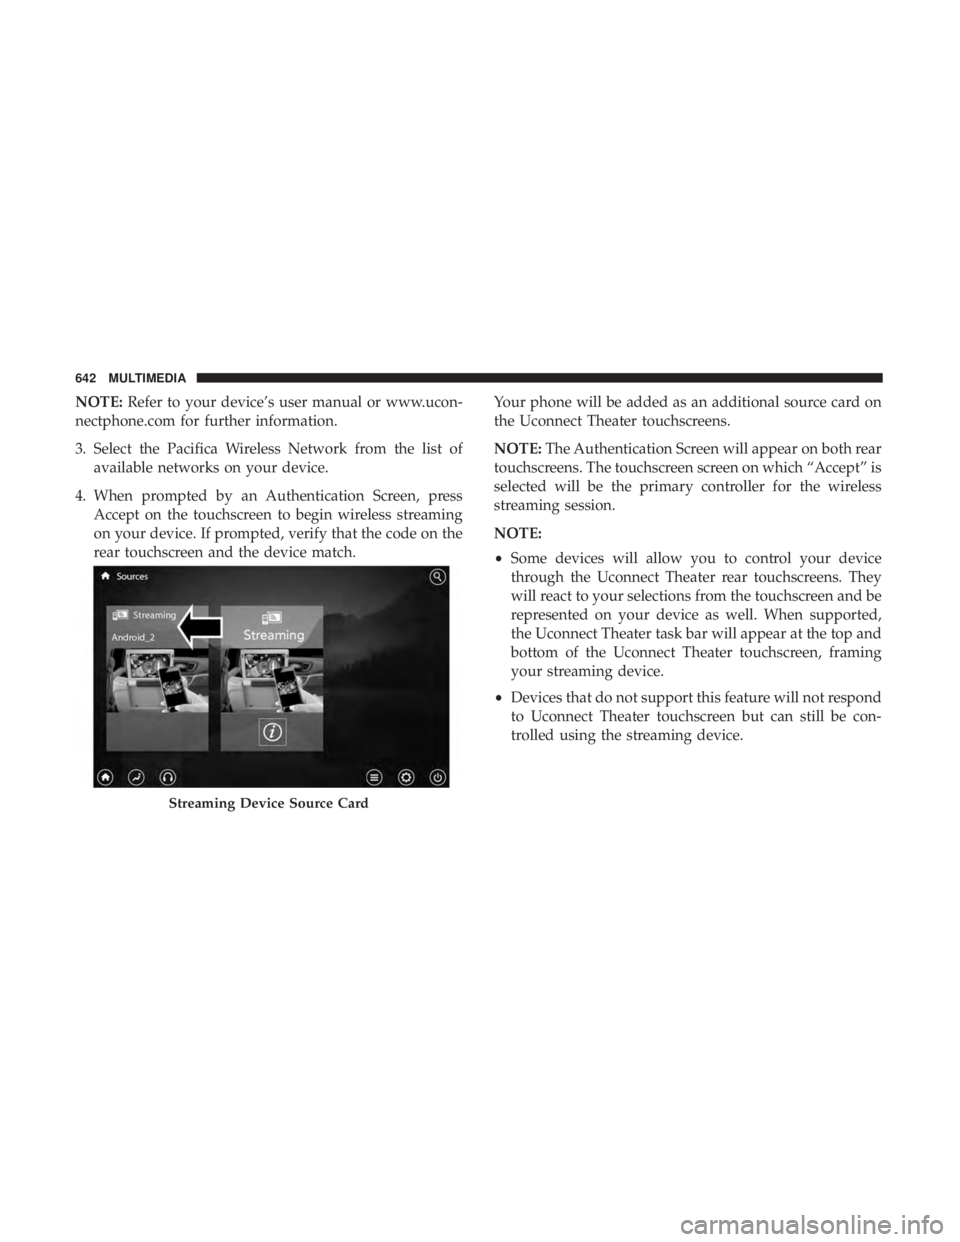
rear touchscreen and the device match. Your phone will be added as an additional source card on
the Uconnect Theater touchscreens.
NOTE:
The Authentication Screen will appear on both rear
touchscreens. The touchscreen screen on which “Accept” is
selected will be the primary controller for the wireless
streaming session.
NOTE:
• Some devices will allow you to control your device
through the Uconnect Theater rear touchscreens. They
will react to your selections from the touchscreen and be
represented on your device as well. When supported,
the Uconnect Theater task bar will appear at the top and
bottom of the Uconnect Theater touchscreen, framing
your streaming device.
• Devices that do not support this feature will not respond
to Uconnect Theater touchscreen but can still be con-
trolled using the streaming device.
Streaming Device Source Card
642 MULTIMEDIA
Page 650 of 696

device setup menu. DivX, DivX Certified and associated
logos are trademarks of DivX, LLC and are used under
license.
Cinavia
�Cinavia Notice This product uses Cinavia technology to
limit the use of unauthorized copies of some commercially-
produced film and videos and their soundtracks. When a
prohibited use of an unauthorized copy is detected, a
message will be displayed and playback or copying will be
interrupted. More information about Cinavia technology is
provided at the Cinavia Online Consumer Information
Center at http://www.cinavia.com. To request additional
information about Cinavia by mail, send a postcard with
your mailing address to: Cinavia Consumer Information
Center, P.O. Box 86851, San Diego, CA, 92138, USA.” “This
product incorporates proprietary technology under license
from Verance Corporation and is protected by U.S. Patent
7,369,677 and other U.S. and worldwide patents issued and
pending as well as copyright and trade secret protection for
certain aspects of such technology. Cinavia is a trademark
of Verance Corporation. Copyright 2004-2012 Verance
Corporation. All rights reserved by Verance. Reverse engi-
neering or disassembly is prohibited.
CAUTION!
Use of controls or adjustments or performance of
procedures other than those specified herein may re-
sult in hazardous radiation exposure.
General Information
The following regulatory statement applies to all Radio
Frequency (RF) devices equipped in this vehicle:
This device complies with Part 15 of the FCC Rules and
with Industry Canada license-exempt RSS standard(s).
Operation is subject to the following two conditions:
1. This device may not cause harmful interference, and
2. This device must accept any interference received, in-cluding interference that may cause undesired opera-
tion.
NOTE: Changes or modifications not expressly approved
by the party responsible for compliance could void the
user ’s authority to operate the equipment.
648 MULTIMEDIA