Page 16 of 614
▫To Arm The System .....................54
▫ To Disarm The System ...................54
� DOORS ...............................55
▫ Manual Lock ...........................55
▫ Central Lock/Unlock — If Equipped ..........57
▫ Unlock Doors Automatically On Exit —
If Equipped ...........................58
▫ Keyless Enter-N-Go — Passive Entry .........58
▫ Manual Sliding Side Door ..................62
▫ Power Sliding Side Door — If Equipped .......63
▫ Hands-Free Sliding Doors — If Equipped .......65
▫ Child Locks ............................66
� SEATS ................................68
▫
Manual Adjustment (Front Seats) — If Equipped . .68
▫ Manual Adjustment (Rear Seats) ............70
▫ Power Adjustment (Front Seats) — If Equipped . .72
▫ Heated Seats ...........................74 ▫
Ventilated Seats — If Equipped ..............75
▫ Easy Entry Slide Second Row Seating .........76
▫ Fold-Flat ..............................78
▫ Second Row Removable Seat ...............78
▫ Manually Folding Third Row Seats —
If Equipped ............................81
� HEAD RESTRAINTS ......................83
▫ Head Restraints — Front Seats ..............83
▫ Head Restraints — Second Row .............85
▫ Head Restraints — Third Row ..............86
� STEERING WHEEL .......................87
▫ Tilt/Telescoping Steering Column ............87
▫ Heated Steering Wheel — If Equipped ........88
� MIRRORS ..............................89
▫ Inside Day/Night Mirror — If Equipped ......89
▫ Automatic Dimming Mirror — If Equipped .....89
▫ Outside Mirrors ........................90
14 GETTING TO KNOW YOUR VEHICLE
Page 70 of 614
sliding door closed to make certain the Child Protection
Door Lock is in the desired position. The inside door
handle will open the sliding door when the Child
Protection Door Lock is disengaged.
SEATS
Seats are a part of the Occupant Restraint System of the
vehicle.
WARNING!
•It is dangerous to ride in a cargo area, inside or
outside of a vehicle. In a collision, people riding in
these areas are more likely to be seriously injured or
killed.
• Do not allow people to ride in any area of your
vehicle that is not equipped with seats and seat belts.
In a collision, people riding in these areas are more
likely to be seriously injured or killed.
• Be sure everyone in your vehicle is in a seat and
using a seat belt properly.
Manual Adjustment (Front Seats) — If Equipped
WARNING!
• Adjusting a seat while the vehicle is moving is
dangerous. The sudden movement of the seat could
cause you to lose control. The seat belt might not be
adjusted properly and you could be injured. Adjust
the seat only while the vehicle is parked.
• Do not ride with the seatback reclined so that the
shoulder belt is no longer resting against your chest.
In a collision you could slide under the seat belt and
be seriously or even fatally injured. Use the recliner
only when the vehicle is parked.
Manual Front Adjuster
Both front seats are adjustable forward or rearward. The
manual seat adjustment handle is located under the seat
cushion at the front edge of each seat.
68 GETTING TO KNOW YOUR VEHICLE
Page 71 of 614
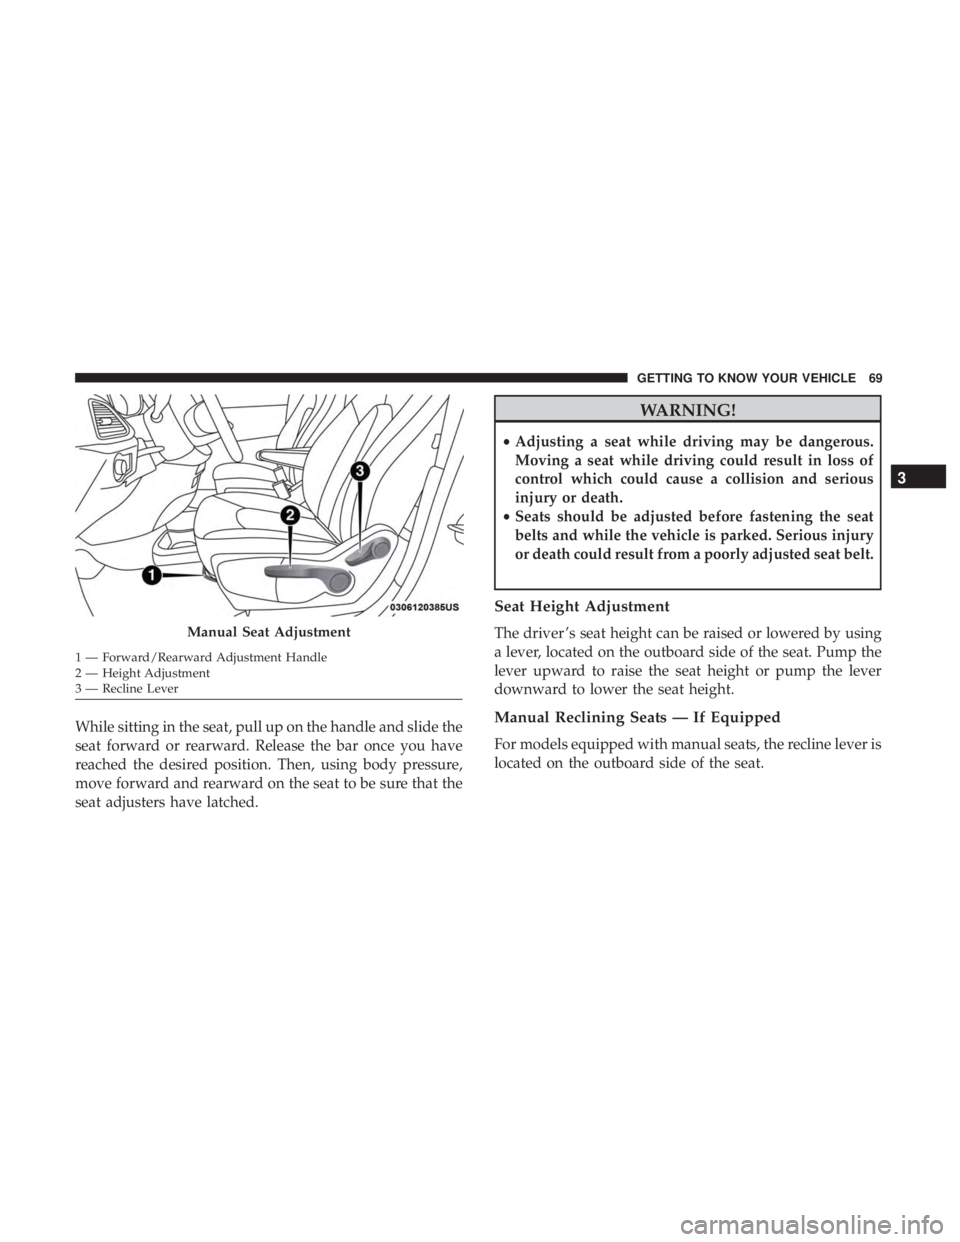
While sitting in the seat, pull up on the handle and slide the
seat forward or rearward. Release the bar once you have
reached the desired position. Then, using body pressure,
move forward and rearward on the seat to be sure that the
seat adjusters have latched.
WARNING!
•Adjusting a seat while driving may be dangerous.
Moving a seat while driving could result in loss of
control which could cause a collision and serious
injury or death.
• Seats should be adjusted before fastening the seat
belts and while the vehicle is parked. Serious injury
or death could result from a poorly adjusted seat belt.
Seat Height Adjustment
The driver ’s seat height can be raised or lowered by using
a lever, located on the outboard side of the seat. Pump the
lever upward to raise the seat height or pump the lever
downward to lower the seat height.
Manual Reclining Seats — If Equipped
For models equipped with manual seats, the recline lever is
located on the outboard side of the seat.
Manual Seat Adjustment
1 — Forward/Rearward Adjustment Handle
2 — Height Adjustment
3 — Recline Lever
3
GETTING TO KNOW YOUR VEHICLE 69
Page 72 of 614

To recline, lean forward slightly, lift the lever and push
back to the desired position and release the lever. Lean
forward and lift the lever to return the seatback to its
normal position. Using body pressure, lean forward and
rearward on the seat to be sure the seatback has latched.
WARNING!
Do not ride with the seatback reclined so that the
shoulder belt is no longer resting against your chest. In
a collision you could slide under the seat belt, which
could result in serious injury or death.
Manual Adjustment (Rear Seats)
WARNING!
•Adjusting a seat while the vehicle is moving is
dangerous. The sudden movement of the seat could
cause you to lose control. The seat belt might not be
adjusted properly and you could be injured. Adjust
the seat only while the vehicle is parked.
• Do not ride with the seatback reclined so that the
shoulder belt is no longer resting against your chest.
In a collision you could slide under the seat belt and
be seriously or even fatally injured. Use the recliner
only when the vehicle is parked.
Manual Rear Seat Adjuster
Both second row seats are adjustable forward or rearward.
The manual seat adjustment handle is located under the
seat cushion at the front edge of each seat.
Manual Recline Lever
70 GETTING TO KNOW YOUR VEHICLE
Page 74 of 614
WARNING!
Do not ride with the seatback reclined so that the
shoulder belt is no longer resting against your chest. In
a collision you could slide under the seat belt, which
could result in serious injury or death.
Power Adjustment (Front Seats) — If Equipped
Some models may be equipped with eight-way power seats
for the driver and front passenger. The power seat switches
are located on the outboard side of the seat. The switches
control the movement of the seat cushion and the seatback.
Recline Lever
Driver Power Seat Switches
1 — Seat Switch
2 — Seatback Switch
3 — Lumbar Switch
72 GETTING TO KNOW YOUR VEHICLE
Page 85 of 614
WARNING!(Continued)
collision. Always make sure the head restraints are in
their upright positions when the seat is to be occu-
pied.
HEAD RESTRAINTS
Head restraints are designed to reduce the risk of injury by
restricting head movement in the event of a rear impact.
Head restraints should be adjusted so that the top of the
head restraint is located above the top of your ear.
WARNING!
•All occupants, including the driver, should not oper-
ate a vehicle or sit in a vehicle’s seat until the head
restraints are placed in their proper positions in
order to minimize the risk of neck injury in the event
of a crash.
• Head restraints should never be adjusted while the
vehicle is in motion. Driving a vehicle with the head
restraints improperly adjusted or removed could
cause serious injury or death in the event of a
collision.
Head Restraints — Front Seats
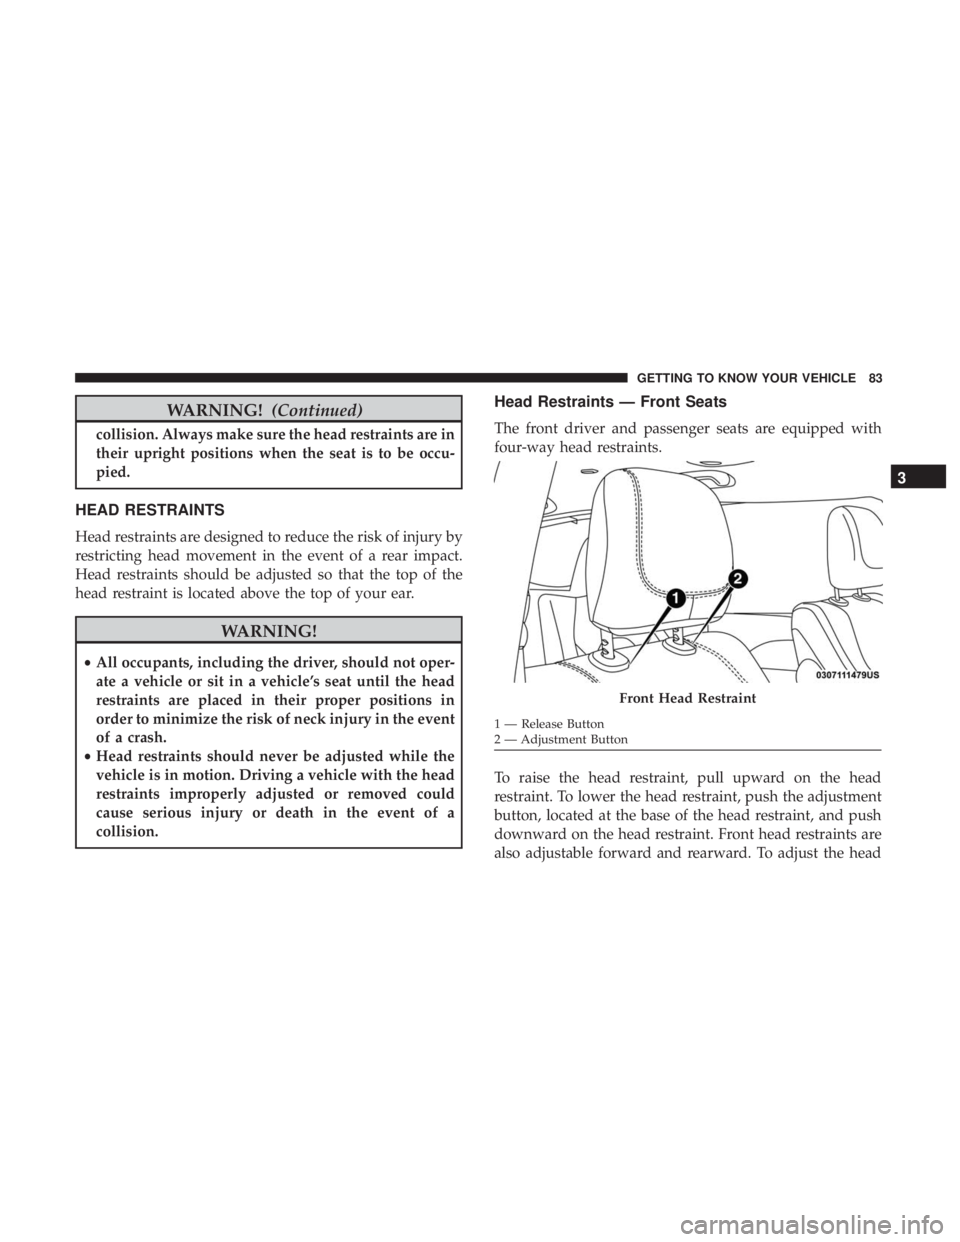
The front driver and passenger seats are equipped with
four-way head restraints.
To raise the head restraint, pull upward on the head
restraint. To lower the head restraint, push the adjustment
button, located at the base of the head restraint, and push
downward on the head restraint. Front head restraints are
also adjustable forward and rearward. To adjust the head
Front Head Restraint
1 — Release Button
2 — Adjustment Button
3
GETTING TO KNOW YOUR VEHICLE 83
Page 87 of 614
NOTE:To remove the head restraint, raise it as far as it can
go. Then, push the release button and the adjustment
button at the base of each post while pulling the head
restraint up. Seatback angle may need to be adjusted to
fully remove the head restraint. To reinstall the head
restraint, put the head restraint posts into the holes and
push downward. Then, adjust the head restraint to the
appropriate height.
WARNING!
• A loose head restraint thrown forward in a collision
or hard stop could cause serious injury or death to
occupants of the vehicle. Always securely stow re-
moved head restraints in a location outside the
occupant compartment.
• ALL the head restraints MUST be reinstalled in the
vehicle to properly protect the occupants. Follow the
re-installation instructions above prior to operating
the vehicle or occupying a seat.
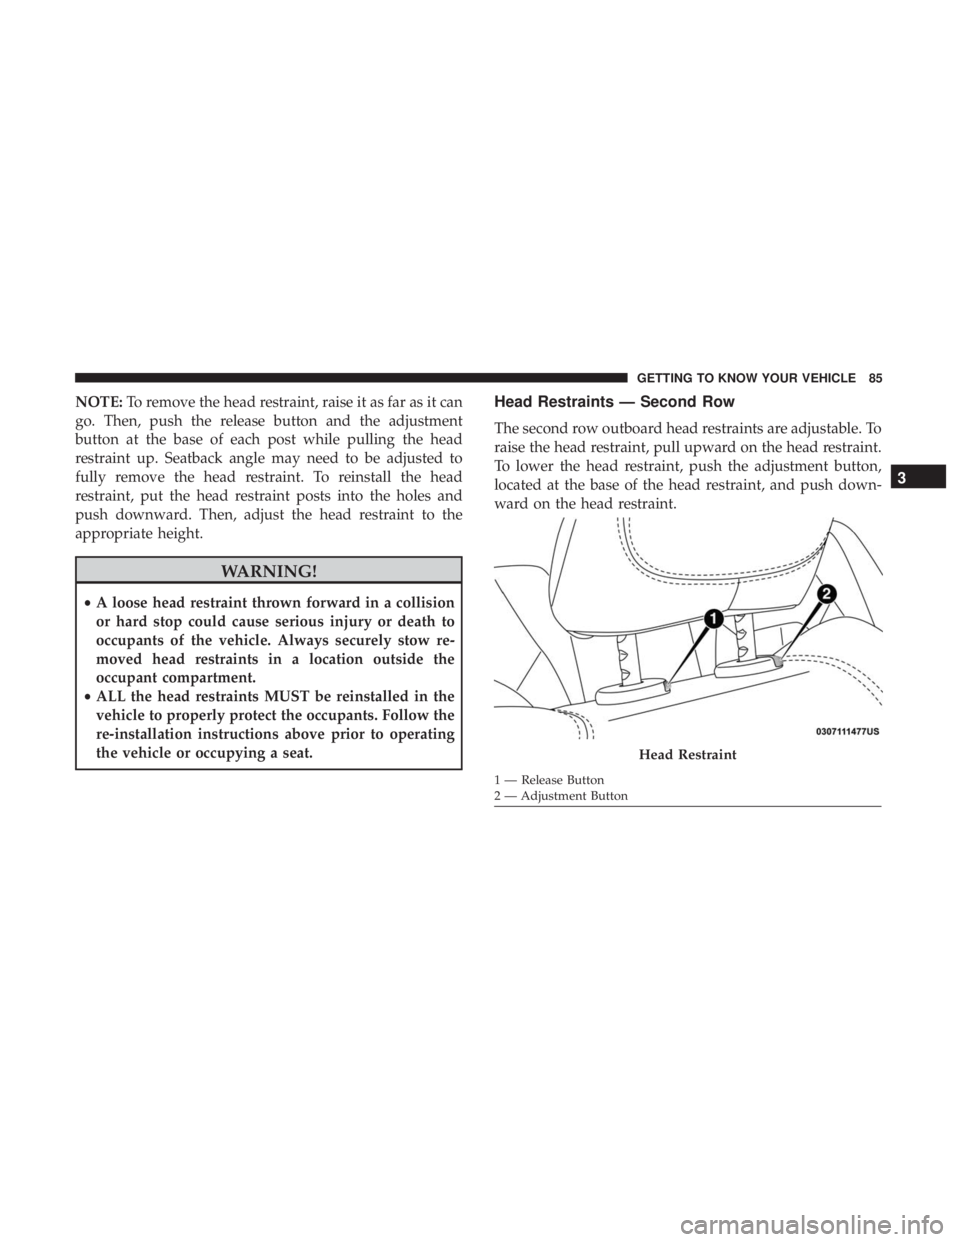
Head Restraints — Second Row
The second row outboard head restraints are adjustable. To
raise the head restraint, pull upward on the head restraint.
To lower the head restraint, push the adjustment button,
located at the base of the head restraint, and push down-
ward on the head restraint.
Head Restraint
1 — Release Button
2 — Adjustment Button
3
GETTING TO KNOW YOUR VEHICLE 85
Page 88 of 614
NOTE:To remove the head restraint, raise it as far as it can
go then push the release button and the adjustment button
at the base of each post while pulling the head restraint up.
Seatback angle may need to be adjusted to fully remove the
head restraint. To reinstall the head restraint, put the head
restraint posts into the holes and push downward. Then,
adjust the head restraint to the appropriate height.
WARNING!
• A loose head restraint thrown forward in a collision
or hard stop could cause serious injury or death to
occupants of the vehicle. Always securely stow re-
moved head restraints in a location outside the
occupant compartment.
• ALL the head restraints MUST be reinstalled in the
vehicle to properly protect the occupants. Follow the
re-installation instructions above prior to operating
the vehicle or occupying a seat.
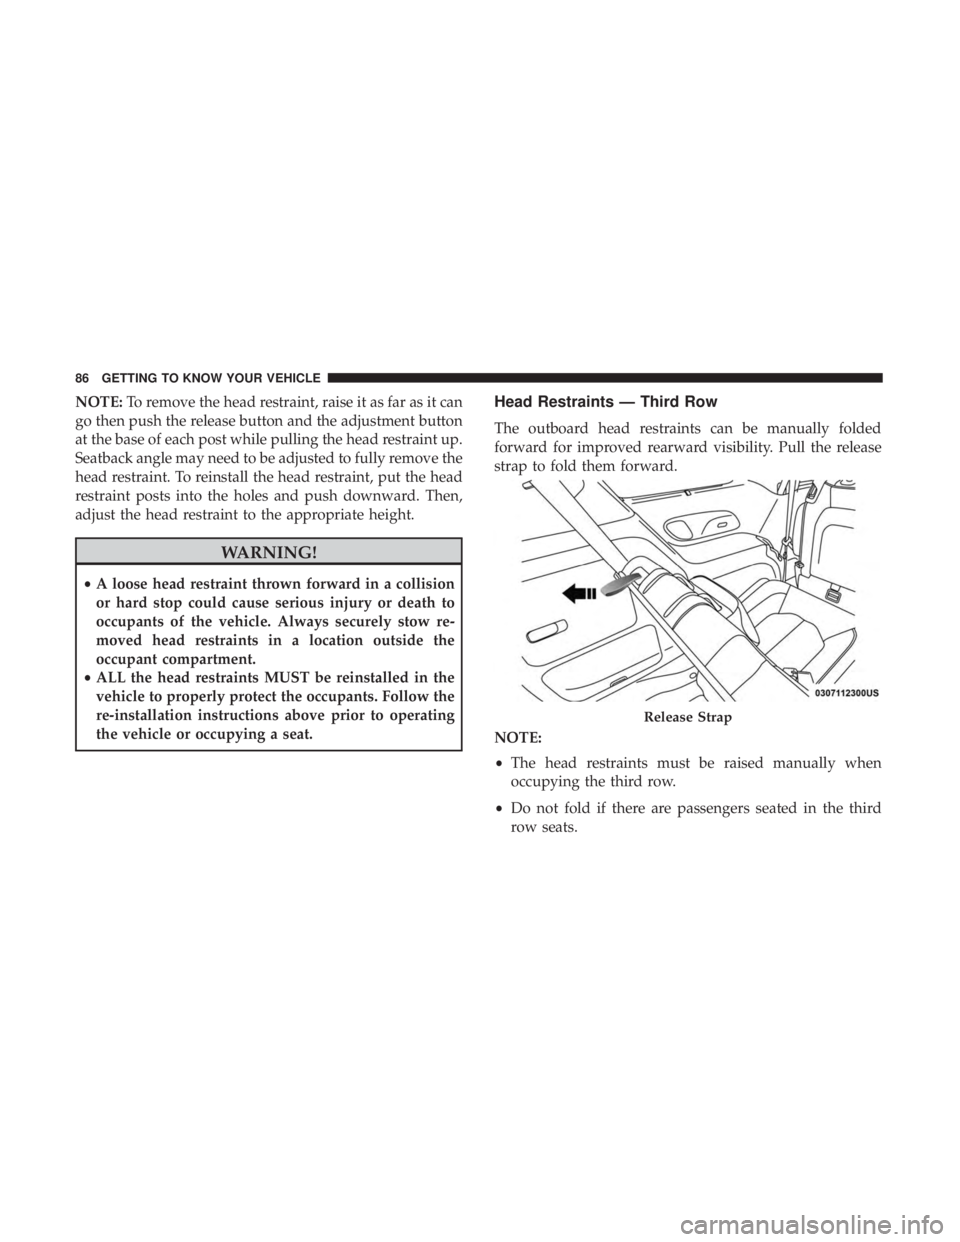
Head Restraints — Third Row
The outboard head restraints can be manually folded
forward for improved rearward visibility. Pull the release
strap to fold them forward.
NOTE:
• The head restraints must be raised manually when
occupying the third row.
• Do not fold if there are passengers seated in the third
row seats.
Release Strap
86 GETTING TO KNOW YOUR VEHICLE