2018 CHRYSLER 300 odometer
[x] Cancel search: odometerPage 73 of 492
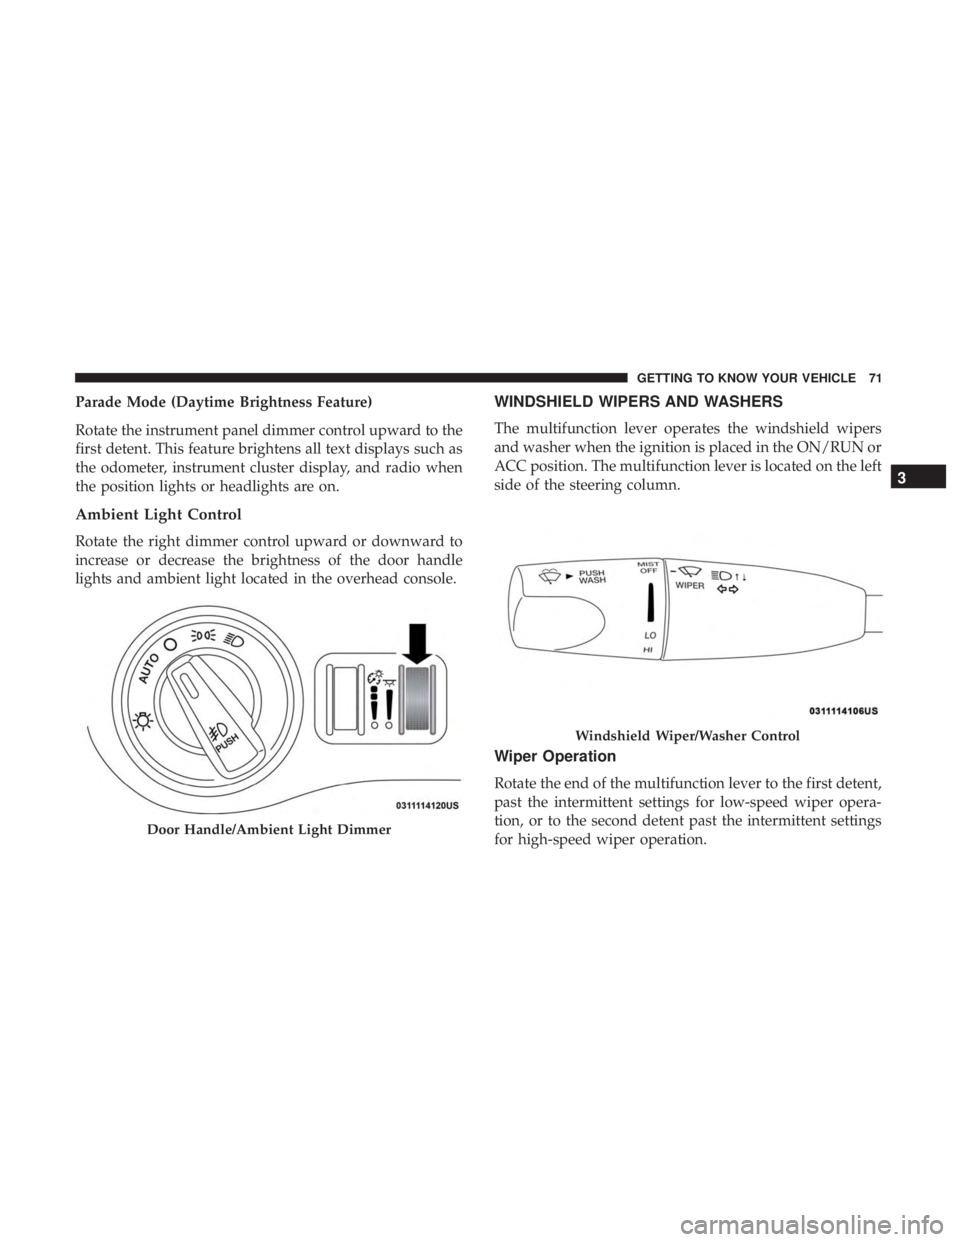
Parade Mode (Daytime Brightness Feature)
Rotate the instrument panel dimmer control upward to the
first detent. This feature brightens all text displays such as
the odometer, instrument cluster display, and radio when
the position lights or headlights are on.
Ambient Light Control
Rotate the right dimmer control upward or downward to
increase or decrease the brightness of the door handle
lights and ambient light located in the overhead console.
WINDSHIELD WIPERS AND WASHERS
The multifunction lever operates the windshield wipers
and washer when the ignition is placed in the ON/RUN or
ACC position. The multifunction lever is located on the left
side of the steering column.
Wiper Operation
Rotate the end of the multifunction lever to the first detent,
past the intermittent settings for low-speed wiper opera-
tion, or to the second detent past the intermittent settings
for high-speed wiper operation.
Door Handle/Ambient Light Dimmer
Windshield Wiper/Washer Control
3
GETTING TO KNOW YOUR VEHICLE 71
Page 93 of 492
WARNING!
Be sure the hood is fully latched before driving your
vehicle. If the hood is not fully latched, it could open
when the vehicle is in motion and block your vision.
Failure to follow this warning could result in serious
injury or death.
CAUTION!
To prevent possible damage, do not slam the hood to
close it. Lower hood to approximately 12 inches (30 cm)
and drop the hood to close. Make sure hood is fully
closed for both latches. Never drive vehicle unless
hood is fully closed, with both latches engaged.
TRUNK
Opening
The trunk can be opened from inside the vehicle using the
power trunk button located on the instrument panel to the
left of the steering wheel.
The trunk lid can be released from outside the vehicle by
pushing the trunk button on the key fob twice within five
seconds or by using the external release switch located onthe underside of the decklid overhang. The release feature
will function only when the vehicle is in the unlock
condition.
With the ignition in the ON/RUN position, the trunk open
symbol will display in the instrument cluster indicating
that the trunk is open. The odometer display will reappear
once the trunk is closed.
With the ignition in the OFF position, the trunk open
symbol will display until the trunk is closed.
NOTE:
Refer to “Keyless Enter-N-Go — Passive Entry” in
”Doors” in “Getting To Know Your Vehicle” for further
information on trunk operation with the Passive Entry
feature.
Opening From Inside The Vehicle
Interior Power Trunk Release
The trunk can be opened from inside the
vehicle using the power trunk release
button located on the instrument panel
to the left of the steering wheel.
NOTE:The transmission must be in
PARK before the button will operate.
Power Trunk
Release
3
GETTING TO KNOW YOUR VEHICLE 91
Page 118 of 492
NOTE:The hard telltales will illuminate for a bulb check
when the ignition is first cycled.
INSTRUMENT CLUSTER DISPLAY
Your vehicle will be equipped with an instrument cluster
display, which offers useful information to the driver. With
the ignition in the STOP/OFF mode, opening/closing of a
door will activate the display for viewing, and display the
total miles, or kilometers, in the odometer. Your instrument
cluster display is designed to display important informa-
tion about your vehicle’s systems and features. Using a
driver interactive display located on the instrument panel,
your instrument cluster display can show you how sys-
tems are working and give you warnings when they are
not. The steering wheel mounted controls allow you to
scroll through the main menus and submenus. You can
access the specific information you want and make selec-
tions and adjustments.
Location And Controls
The instrument cluster display features an interactive
display which is located in the instrument cluster.
This system conveniently allows the driver to select a
variety of useful information by pushing the arrow buttons
located on the left side of the steering wheel. The instru-
ment cluster display menu items consist of the following:
• Speedometer
• Vehicle Info
• Driver Assist — If Equipped
• Fuel Economy
• Trip
• Audio
• Messages
• Screen Setup
116 GETTING TO KNOW YOUR INSTRUMENT PANEL
Page 125 of 492
5. Odometer•Show (default)
• Hide
6. Fuel Gauge •Standard (default)
• Detailed
7. Restore Default •Ok
• Cancel
Battery Saver On/Battery Saver Mode Message —
Electrical Load Reduction Actions — If Equipped
This vehicle is equipped with an Intelligent Battery Sensor
(IBS) to perform additional monitoring of the electrical
system and status of the vehicle battery.
In cases when the IBS detects charging system failure, or
the vehicle battery conditions are deteriorating, electrical
load reduction actions will take place to extend the driving
time and distance of the vehicle. This is done by reducing
power to or turning off non-essential electrical loads. Load reduction is only active when the engine is running.
It will display a message if there is a risk of battery
depletion to the point where the vehicle may stall due to
lack of electrical supply, or will not restart after the current
drive cycle.
When load reduction is activated, the message “Battery
Saver On” or “Battery Saver Mode” will appear in the
instrument cluster.
These messages indicate the vehicle battery has a low state
of charge and continues to lose electrical charge at a rate
that the charging system cannot sustain.
NOTE:
•
The charging system is independent from load reduc-
tion. The charging system performs a diagnostic on the
charging system continuously.
• If the Battery Charge Warning Light is on it may indicate
a problem with the charging system. Refer to “Battery
Charge Warning Light” in “Getting To Know Your
Instrument Panel” for further information.
4
GETTING TO KNOW YOUR INSTRUMENT PANEL 123
Page 389 of 492
WARNING!(Continued)
and suspension components. You could lose control
and have a collision resulting in serious injury or
death. Use only the tire and wheel sizes with load
ratings approved for your vehicle.
• Never use a tire with a smaller load index or capacity,
other than what was originally equipped on your
vehicle. Using a tire with a smaller load index could
result in tire overloading and failure. You could lose
control and have a collision.
• Failure to equip your vehicle with tires having ad-
equate speed capability can result in sudden tire
failure and loss of vehicle control.
CAUTION!
Replacing original tires with tires of a different size
may result in false speedometer and odometer read-
ings.
Tire Types
All Season Tires — If Equipped
All Season tires provide traction for all seasons (Spring,
Summer, Fall, and Winter). Traction levels may vary be-
tween different all season tires. All season tires can be
identified by the M+S, M&S, M/S or MS designation on the
tire sidewall. Use all season tires only in sets of four; failure
to do so may adversely affect the safety and handling of
your vehicle.
Summer Or Three Season Tires — If Equipped
Summer tires provide traction in both wet and dry condi-
tions, and are not intended to be driven in snow or on ice.
If your vehicle is equipped with Summer tires, be aware
these tires are not designed for Winter or cold driving
conditions. Install Winter tires on your vehicle when am-
bient temperatures are less than 40°F (5°C) or if roads are
covered with ice or snow. For more information, contact an
authorized dealer.
Summer tires do not contain the all season designation or
mountain/snowflake symbol on the tire sidewall. Use
Summer tires only in sets of four; failure to do so may
adversely affect the safety and handling of your vehicle.8
SERVICING AND MAINTENANCE 387