Page 214 of 492
WARNING!(Continued)
interference with the accelerator, brake, or clutch
pedals then re-install the floor mats.
• It is recommended to only use mild soap and water
to clean your floor mats. After cleaning, always check
your floor mat has been properly installed and is
secured to your vehicle using the floor mat fasteners
by lightly pulling mat.
Periodic Safety Checks You Should Make Outside
The Vehicle
Tires
Examine tires for excessive tread wear and uneven wear
patterns. Check for stones, nails, glass, or other objects
lodged in the tread or sidewall. Inspect the tread for cuts
and cracks. Inspect sidewalls for cuts, cracks, and bulges.
Check the wheel nuts for tightness. Check the tires (includ-
ing spare) for proper cold inflation pressure.
Lights
Have someone observe the operation of brake lights and
exterior lights while you work the controls. Check turn
signal and high beam indicator lights on the instrument
panel.
Door Latches
Check for proper closing, latching, and locking.
Fluid Leaks
Check area under the vehicle after overnight parking for
fuel, coolant, oil, or other fluid leaks. Also, if gasoline
fumes are detected or if fuel, or brake fluid leaks are
suspected. The cause should be located and corrected
immediately.
212 SAFETY
Page 290 of 492
WARNING!(Continued)
•Vehicles with trailers should not be parked on a
grade. When parking, apply the parking brake on the
tow vehicle. Put the tow vehicle transmission in
PARK. Always, block or �chock�the trailer wheels.
• GCWR must not be exceeded.
• Total weight must be distributed between the tow
vehicle and the trailer such that the following four
ratings are not exceeded:
1. Max loading as defined on the “Tire and Loading
Information” placard.
2. GTW
3. GAWR
4. Tongue weight rating for the trailer hitch utilized.
Perform the maintenance listed in the “Scheduled Servic-
ing”. Refer to “Scheduled Servicing” in “Servicing And
Maintenance” for the proper maintenance intervals. When
towing a trailer, never exceed the GAWR or GCWR ratings.
CAUTION!
• Do not tow a trailer at all during the first 500 miles
(805 km) the new vehicle is driven. The engine, axle
or other parts could be damaged.
• Then, during the first 500 miles (805 km) that a trailer
is towed, do not drive over 50 mph (80 km/h) and do
not make starts at full throttle. This helps the engine
and other parts of the vehicle wear in at the heavier
loads.
Towing Requirements — Tires
• Do not attempt to tow a trailer while using a compact
spare tire.
• Do not drive more than 50 mph (80 km/h) when towing
while using a full size spare tire.
• Proper tire inflation pressures are essential to the safe
and satisfactory operation of your vehicle. Refer to
“Tires” in “Servicing And Maintenance” for proper tire
inflation procedures.
• Check the trailer tires for proper tire inflation pressures
before trailer usage.
288 STARTING AND OPERATING
Page 295 of 492

Acceleration
Rapid acceleration on snow covered, wet, or other slippery
surfaces may cause the driving wheels to pull erratically to
the right or left. This phenomenon occurs when there is a
difference in the surface traction under the front (driving)
wheels.
WARNING!
Rapid acceleration on slippery surfaces is dangerous.
Unequal traction can cause sudden pulling of the front
wheels. You could lose control of the vehicle and
possibly have a collision. Accelerate slowly and care-
fully whenever there is likely to be poor traction (ice,
snow, wet, mud, loose sand, etc.).
Traction
When driving on wet or slushy roads, it is possible for a
wedge of water to build up between the tire and road
surface. This is known as hydroplaning and may cause
partial or complete loss of vehicle control and stopping
ability. To reduce this possibility, the following precautions
should be observed:•
Slow down during rainstorms or when the roads are
slushy.
• Slow down if the road has standing water or puddles.
• Replace tires when tread wear indicators first become
visible.
• Keep tires properly inflated.
• Maintain sufficient distance between your vehicle and
the vehicle in front of you to avoid a collision in a
sudden stop.
Your vehicle may be equipped with a Limited Slip Differ-
ential (LSD) that reduces, but does not eliminate, the
amount of wheel slip across a given axle for improved
handling.
Driving Through Water
Driving through water more than a few inches/centimeters
deep will require extra caution to ensure safety and pre-
vent damage to your vehicle.
6
STARTING AND OPERATING 293
Page 301 of 492
WARNING!(Continued)
SiriusXM Guardian features and applications in this
vehicle. Only use Uconnect features and SiriusXM
Guardian services when it is safe to do so. Failure to do
so may result in an accident involving serious injury or
death.
NOTE:
• Your vehicle may be transmitting data as authorized by
the subscriber.
• The SOS and ASSIST buttons will only function if you
are connected to an operable LTE (voice/data) or 4G
(data) network. Other Uconnect services will only be
operable if your SiriusXM Guardian service is active and
you are connected to an operable LTE (voice/data) or 4G
(data) network.
ASSIST Call
The ASSIST Button is used to automatically connect you to
any one of the following support centers:
• Roadside Assistance – If you get a flat tire, or need a tow,
just push the ASSIST button and you’ll be connected to someone who can help. Roadside Assistance will know
what vehicle you’re driving and its location. Additional
fees may apply for roadside Assistance.
• SiriusXM Guardian Customer Care – In-vehicle support
for SiriusXM Guardian.
• Vehicle Customer Care – Total support for all other
vehicle issues.
SOS Call
1. Push the SOS Call button on the Rearview Mirror.
NOTE: In case the SOS Call button is pushed in error, there
will be a ten second delay before the SOS Call system
initiates a call to a SOS operator. To cancel the SOS Call
connection, push the SOS call button on the Rearview
Mirror or press the cancellation button on the Device
Screen. Termination of the SOS Call will turn off the green
LED light on the Rearview Mirror.
2. The LED light located between the ASSIST and SOS buttons on the Rearview Mirror will turn green once a
connection to a SOS operator has been made.
7
IN CASE OF EMERGENCY 299
Page 325 of 492
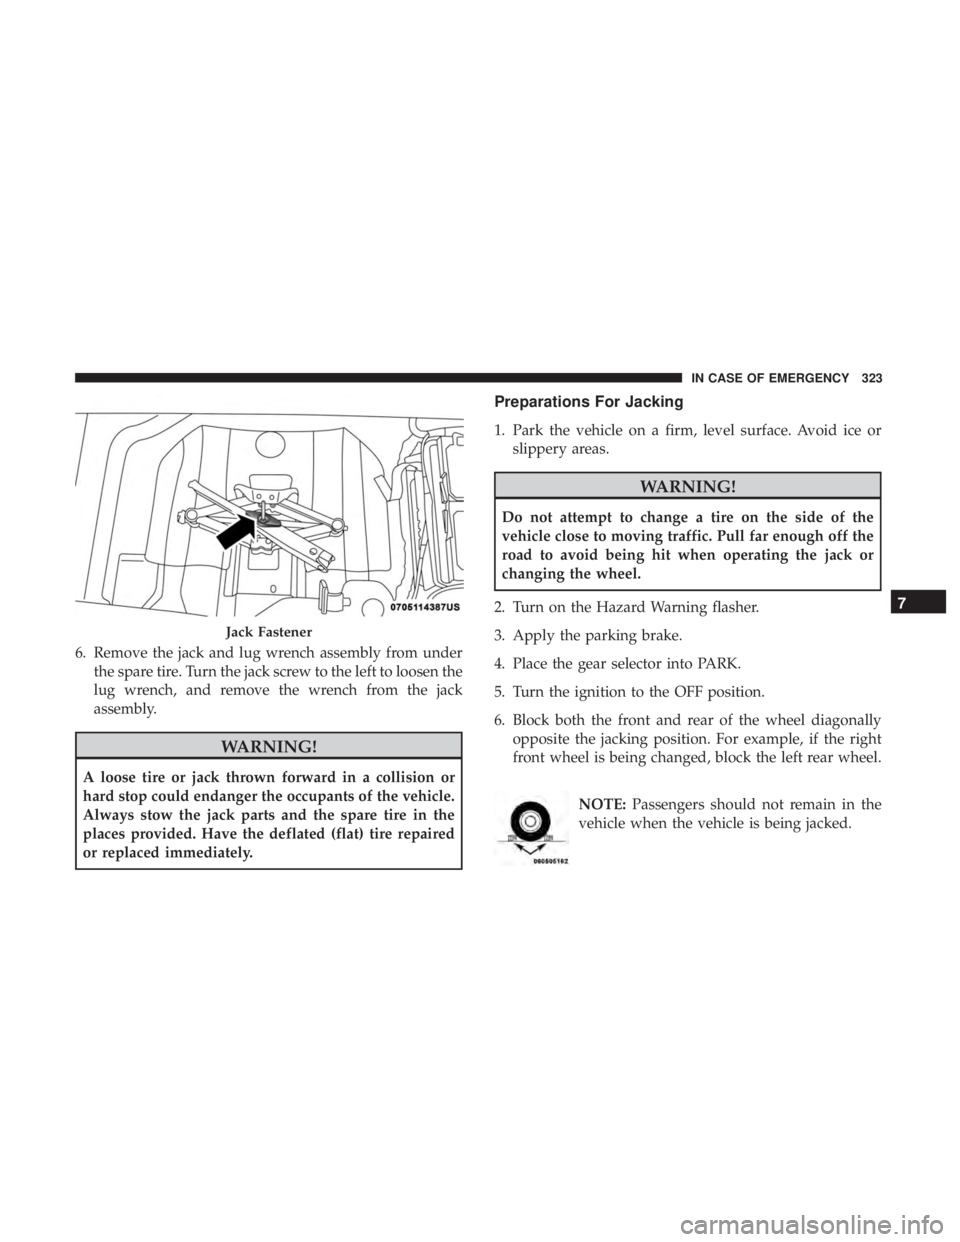
6. Remove the jack and lug wrench assembly from underthe spare tire. Turn the jack screw to the left to loosen the
lug wrench, and remove the wrench from the jack
assembly.
WARNING!
A loose tire or jack thrown forward in a collision or
hard stop could endanger the occupants of the vehicle.
Always stow the jack parts and the spare tire in the
places provided. Have the deflated (flat) tire repaired
or replaced immediately.
Preparations For Jacking
1. Park the vehicle on a firm, level surface. Avoid ice orslippery areas.
WARNING!
Do not attempt to change a tire on the side of the
vehicle close to moving traffic. Pull far enough off the
road to avoid being hit when operating the jack or
changing the wheel.
2. Turn on the Hazard Warning flasher.
3. Apply the parking brake.
4. Place the gear selector into PARK.
5. Turn the ignition to the OFF position.
6. Block both the front and rear of the wheel diagonally opposite the jacking position. For example, if the right
front wheel is being changed, block the left rear wheel.
NOTE:Passengers should not remain in the
vehicle when the vehicle is being jacked.
Jack Fastener
7
IN CASE OF EMERGENCY 323
Page 327 of 492
3. Before raising the vehicle, use the lug wrench to loosen,but not remove, the lug nuts on the wheel with the flat
tire. Turn the lug nuts counterclockwise one turn while
the wheel is still on the ground. 4. Place the jack underneath the lift area that is closest to
the flat tire. Turn the jack screw clockwise to firmly
engage the jack saddle with the lift area of the sill flange.
NOTE: If the vehicle is too low for jack placement, slide
the jack on its side and rotate it up into position.
Jacking Locations
Front Jacking Location
7
IN CASE OF EMERGENCY 325
Page 328 of 492
5. Raise the vehicle just enough to remove the flat tire andinstall the spare tire.
WARNING!
Raising the vehicle higher than necessary can make the
vehicle less stable. It could slip off the jack and hurt
someone near it. Raise the vehicle only enough to
remove the tire.
6. Remove the lug nuts and tire. 7. Mount the spare tire.
CAUTION!
Be sure to mount the spare tire with the valve stem
facing outward. The vehicle could be damaged if the
spare tire is mounted incorrectly.
Rear Jacking Location
Mounting Spare Tire
326 IN CASE OF EMERGENCY
Page 329 of 492
NOTE:•For vehicles so equipped, do not attempt to install a
center cap or wheel cover on the compact spare.
• Refer to “Compact Spare Tire” and to “Limited-Use
Spare” under “Tires—General Information” in “Servic-
ing And Maintenance” for additional warnings, cau-
tions, and information about the spare tire, its use, and
operation.
8. Install the lug nuts with the cone shaped end of the lug nut toward the wheel. Lightly tighten the lug nuts.
WARNING!
To avoid the risk of forcing the vehicle off the jack, do
not tighten the wheel nuts fully until the vehicle has
been lowered. Failure to follow this warning may
result in serious injury. 9. Lower the vehicle to the ground by turning the jack
handle counterclockwise.
10. Finish tightening the lug nuts. Push down on the wrench while at the end of the handle for increased
leverage. Tighten the lug nuts in a star pattern until
each nut has been tightened twice. For the correct lug
nut torque, refer to “Torque Specifications” in “Techni-
cal Specifications”. If in doubt about the correct tight-
ness, have them checked with a torque wrench by your
authorized dealer or at a service station.
11. Stow the jack, tools and flat tire. Make sure the base of the jack faces the front of the vehicle before tightening
down the fastener.
WARNING!
A loose tire or jack thrown forward in a collision or
hard stop could endanger the occupants of the vehicle.
Always stow the jack parts and the spare tire in the
places provided. Have the deflated (flat) tire repaired
or replaced immediately.
7
IN CASE OF EMERGENCY 327