2018 CHEVROLET TRAVERSE liftgate
[x] Cancel search: liftgatePage 342 of 419

Chevrolet Traverse Owner Manual (GMNA-Localizing-U.S./Canada/Mexico-
10603118) - 2018 - CRC - 1/29/18
Vehicle Care 341
Warning (Continued)
5. Place wheel blocks,if equipped, on both sides of
the tire at the opposite
corner of the tire being
changed.
When the vehicle has a flat tire (2),
use the following example as a
guide to assist in the placement of
the wheel blocks (1), if equipped.
1. Wheel Block (If Equipped)
2. Flat Tire
The following information explains
how to repair or change a tire.
Tire Changing
Removing the Spare Tire and
Tools
To access the spare tire and tools: 1. Open the liftgate. See Liftgate
0 44.
2. Lift the load floor.
3. Remove the cargo
management system. See
Cargo Management System
0119.
4. Turn the wing nut (3)
counterclockwise to remove the
jack (1) and wheel wrench (2).
Place the tool container near
the tire being changed.
5. Remove the spare tire and place it next to the tire being
changed.
Removing the Flat Tire and
Installing the Spare Tire
1. Do a safety check beforeproceeding. See If a Tire Goes
Flat 0339.
Page 346 of 419
Chevrolet Traverse Owner Manual (GMNA-Localizing-U.S./Canada/Mexico-
10603118) - 2018 - CRC - 1/29/18
Vehicle Care 345
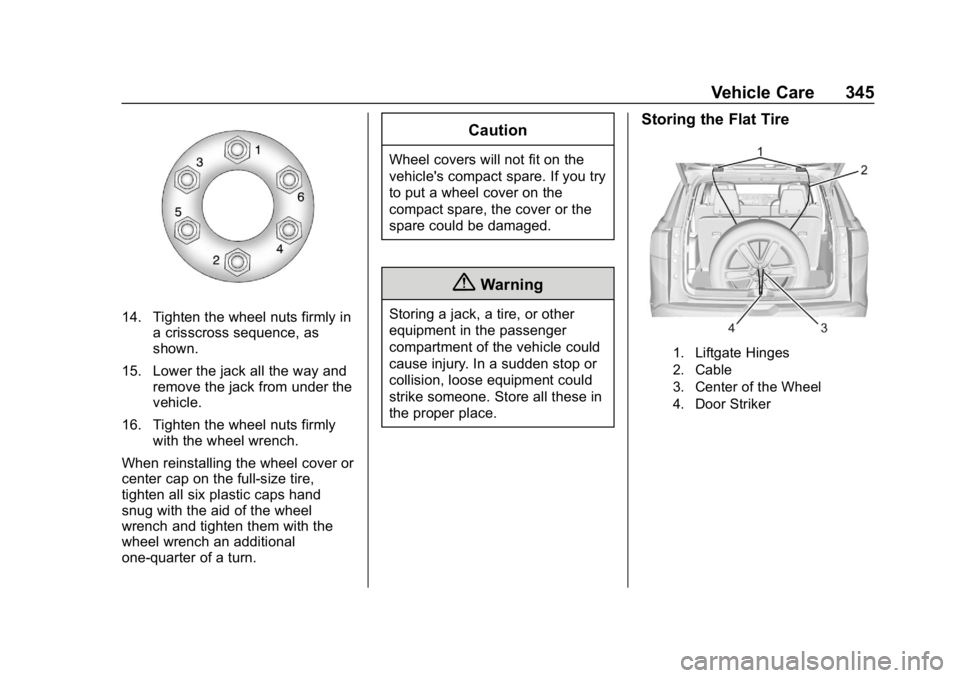
14. Tighten the wheel nuts firmly ina crisscross sequence, as
shown.
15. Lower the jack all the way and remove the jack from under the
vehicle.
16. Tighten the wheel nuts firmly with the wheel wrench.
When reinstalling the wheel cover or
center cap on the full-size tire,
tighten all six plastic caps hand
snug with the aid of the wheel
wrench and tighten them with the
wheel wrench an additional
one-quarter of a turn.
Caution
Wheel covers will not fit on the
vehicle's compact spare. If you try
to put a wheel cover on the
compact spare, the cover or the
spare could be damaged.
{Warning
Storing a jack, a tire, or other
equipment in the passenger
compartment of the vehicle could
cause injury. In a sudden stop or
collision, loose equipment could
strike someone. Store all these in
the proper place.
Storing the Flat Tire
1. Liftgate Hinges
2. Cable
3. Center of the Wheel
4. Door Striker
Page 347 of 419
Chevrolet Traverse Owner Manual (GMNA-Localizing-U.S./Canada/Mexico-
10603118) - 2018 - CRC - 1/29/18
346 Vehicle Care
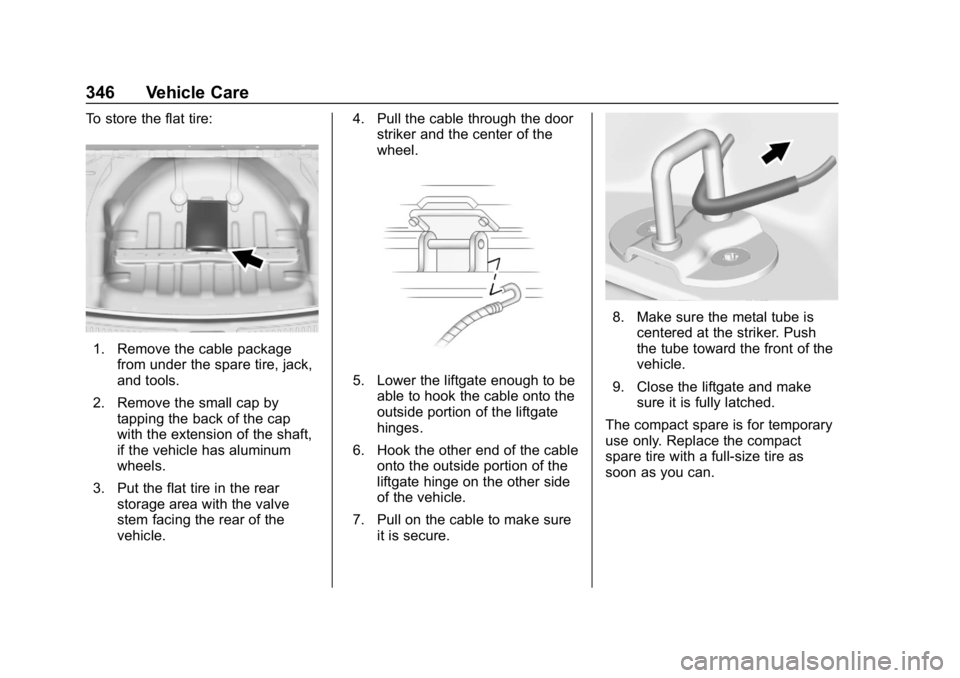
To store the flat tire:
1. Remove the cable packagefrom under the spare tire, jack,
and tools.
2. Remove the small cap by tapping the back of the cap
with the extension of the shaft,
if the vehicle has aluminum
wheels.
3. Put the flat tire in the rear storage area with the valve
stem facing the rear of the
vehicle. 4. Pull the cable through the door
striker and the center of the
wheel.
5. Lower the liftgate enough to be
able to hook the cable onto the
outside portion of the liftgate
hinges.
6. Hook the other end of the cable onto the outside portion of the
liftgate hinge on the other side
of the vehicle.
7. Pull on the cable to make sure it is secure.
8. Make sure the metal tube iscentered at the striker. Push
the tube toward the front of the
vehicle.
9. Close the liftgate and make sure it is fully latched.
The compact spare is for temporary
use only. Replace the compact
spare tire with a full-size tire as
soon as you can.
Page 348 of 419

Chevrolet Traverse Owner Manual (GMNA-Localizing-U.S./Canada/Mexico-
10603118) - 2018 - CRC - 1/29/18
Vehicle Care 347
Storing the Compact Spare
Tire and Tools
To store the spare tire and tools:1. Open the liftgate. See Liftgate
0 44.
2. Lift the load floor.
3. Remove the cargo management system.
4. Put back the spare tire and all tools as they were stored in the
rear storage compartment.
5. Install the cargo management system and load floor.
The compact spare is for temporary
use only. Replace the compact
spare tire with a full-size tire as
soon as you can.
Compact Spare Tire
{Warning
Driving with more than one
compact spare tire at a time could
result in loss of braking and
handling. This could lead to a
crash and you or others could be
injured. Use only one compact
spare tire at a time.
If this vehicle has a compact spare
tire, it was fully inflated when new;
however, it can lose air over time.
Check the inflation pressure
regularly. It should be 420 kPa
(60 psi).
Stop as soon as possible and check
that the spare tire is correctly
inflated after being installed on the
vehicle. The compact spare tire is
designed for temporary use only. The vehicle will perform differently
with the spare tire installed and it is
recommended that the vehicle
speed be limited to 80 km/h
(50 mph). To conserve the tread of
the spare tire, have the standard tire
repaired or replaced as soon as
convenient and return the spare tire
to the storage area.
When using a compact spare tire,
the ABS and Traction Control
systems may engage until the spare
tire is recognized by the vehicle,
especially on slippery roads. Adjust
driving to reduce possible
wheel slip.
Performance of the All-Wheel
Drive (AWD) system will be
automatically reduced to protect the
system when using the compact
spare. To restore the AWD and
prevent excessive wear on the
clutch in the AWD, replace the
compact spare tire with a full-size
tire as soon as possible.
Page 359 of 419

Chevrolet Traverse Owner Manual (GMNA-Localizing-U.S./Canada/Mexico-
10603118) - 2018 - CRC - 1/29/18
358 Vehicle Care
Visually check constant velocity joint
boots and axle seals for leaks.
Body Component Lubrication
Lubricate all key lock cylinders,
hood hinges, liftgate hinges, and the
steel fuel door hinges, unless the
components are plastic. Applying
silicone grease on weatherstrips
with a clean cloth will make them
last longer, seal better, and not stick
or squeak.
Underbody Maintenance
At least twice a year, spring and fall,
use plain water to flush any
corrosive materials from the
underbody. Take care to thoroughly
clean any areas where mud and
other debris can collect.
Do not directly power wash the
transfer case and/or front/rear axle
output seals. High pressure water
can overcome the seals and
contaminate the fluid. Contaminated
fluid will decrease the life of the
transfer case and/or axles and
should be replaced.
Sheet Metal Damage
If the vehicle is damaged and
requires sheet metal repair or
replacement, make sure the body
repair shop applies anti-corrosion
material to parts repaired or
replaced to restore corrosion
protection.
Original manufacturer replacement
parts will provide the corrosion
protection while maintaining the
vehicle warranty.
Finish Damage
Quickly repair minor chips and
scratches with touch-up materials
available from your dealer to avoid
corrosion. Larger areas of finish
damage can be corrected in your
dealer's body and paint shop.
Chemical Paint Spotting
Airborne pollutants can fall upon
and attack painted vehicle surfaces
causing blotchy, ring-shaped
discolorations, and small, irregular
dark spots etched into the paint
surface. See“Finish Care”
previously in this section.
Interior Care
To prevent dirt particle abrasions,
regularly clean the vehicle's interior.
Immediately remove any soils.
Newspapers or dark garments can
transfer color to the vehicle’s
interior.
Use a soft bristle brush to remove
dust from knobs and crevices on the
instrument cluster. Using a mild
soap solution, immediately remove
hand lotions, sunscreen, and insect
repellent from all interior surfaces or
permanent damage may result.
Use cleaners specifically designed
for the surfaces being cleaned to
prevent permanent damage. Apply
all cleaners directly to the cleaning
cloth. Do not spray cleaners on any
switches or controls. Remove
cleaners quickly.
Before using cleaners, read and
follow all safety instructions on the
label. While cleaning the interior,
open the doors and windows to get
proper ventilation.
Page 408 of 419

Chevrolet Traverse Owner Manual (GMNA-Localizing-U.S./Canada/Mexico-
10603118) - 2018 - CRC - 1/29/18
Index 407
Apple CarPlay andAndroid Auto . . . . . . . . . . . . . . . . . . 196
Assistance Program, Roadside . . . . . . . . . . . . . . . . . . . . . . 384
Assistance Systems for Driving . . . . . . . . . . . . . . . . . . . . . . . . 259
Assistance Systems for
Parking and Backing . . . . . . . . . . 256
Audio Theft-Deterrent Feature . . . . . . . 176
Automatic
Dimming Mirrors . . . . . . . . . . . . . . . . 54
Door Locks . . . . . . . . . . . . . . . . . . . . . 42
Forward Braking . . . . . . . . . . . . . . 261
Headlamp System . . . . . . . . . . . . 169
Transmission . . . . . . . . . . . . . . . . . 232
Transmission Fluid . . . . . . . . . . . 292
Automatic Transmission Manual Mode . . . . . . . . . . . . . . . . . 234
Shift Lock Control FunctionCheck . . . . . . . . . . . . . . . . . . . . . . . 303
Auxiliary Devices . . . . . . . . . . . . . . . . . . . . . . . 190
Avoiding Untrusted Media Devices . . . . . . . . . . . . . . . . . . . . . . . 184B
Battery
Exterior Lighting BatterySaver . . . . . . . . . . . . . . . . . . . . . . . 174
Load Management . . . . . . . . . . . . 173
Power Protection . . . . . . . . . . . . . 174
Battery - North America . . . . 302, 348
Blade Replacement, Wiper . . . . . 304
Bluetooth Overview . . . . . . . . . . . . . . . . 191, 192
Brake Parking, Electric . . . . . . . . . . . . . . 237
System Warning Light . . . . . . . . 143
Brakes . . . . . . . . . . . . . . . . . . . . . . . . . . 300
Antilock . . . . . . . . . . . . . . . . . . . . . . . 236
Assist . . . . . . . . . . . . . . . . . . . . . . . . . 238
Fluid . . . . . . . . . . . . . . . . . . . . . . . . . . 301
Braking . . . . . . . . . . . . . . . . . . . . . . . . . 209 Automatic Forward . . . . . . . . . . . 261
Braking System Front Pedestrian (FPB) . . . . . . . 263
Break-In, New Vehicle . . . . . . . . . . 223
Bulb Replacement Headlamp Aiming . . . . . . . . . . . . . 307
Headlamps . . . . . . . . . . . . . . . . . . . 307
Headlamps, Front Turn
Signal, and Sidemarker . . . . . 308 Bulb Replacement (cont'd)
High Intensity Discharge
(HID) Lighting . . . . . . . . . . . . . . . 307
License Plate Lamps . . . . . . . . . 308
Buying New Tires . . . . . . . . . . . . . . . 334
C
Calibration . . . . . . . . . . . . . . . . . . . . . . 127
California Fuel Requirements . . . . . . . . . . . 270
Perchlorate Materials
Requirements . . . . . . . . . . . . . . . 284
California Proposition
65 Warning . . . . . . . . . .283, 302, 348,
Back Cover
Canadian Vehicle Owners . . . . . . . . 2
Capacities and Specifications . . . . . . . . . . . . . . . . . 377
Carbon Monoxide Engine Exhaust . . . . . . . . . . . . . . . 231
Liftgate . . . . . . . . . . . . . . . . . . . . . . . . . 44
Winter Driving . . . . . . . . . . . . . . . . 217
Cargo
Management System . . . . . . . . . .119
Caution, Danger, and Warning . . . . 3
Center Console Storage . . . . . . . . 119
Chains, Tire . . . . . . . . . . . . . . . . . . . . 339
Page 412 of 419

Chevrolet Traverse Owner Manual (GMNA-Localizing-U.S./Canada/Mexico-
10603118) - 2018 - CRC - 1/29/18
Index 411
Horn . . . . . . . . . . . . . . . . . . . . . . . . . . . . 125
How to Wear Seat BeltsProperly . . . . . . . . . . . . . . . . . . . . . . . . 78
HVAC . . . . . . . . . . . . . . . . . . . . . . 200, 203
I
Ignition Positions . . . . . . . . . . . . . . . 224
Immobilizer . . . . . . . . . . . . . . . . . . . . . . 52
Indicator Pedestrian Ahead . . . . . . . . . . . . 145
Vehicle Ahead . . . . . . . . . . . . . . . . 145
Infants and Young Children,
Restraints . . . . . . . . . . . . . . . . . . . . . . 99
Infotainment . . . . . . . . . . . . . . . . . . . . 175
Infotainment System . . . . . . . . . . . . 393
Instrument Cluster . . . . . . . . . . . . . . 134
Instrument Panel Storage Area . . . . . . . . . . . . . . . . . .118
Interior Rearview Mirrors . . . . . . . . . 54
Introduction . . . . . . . . . . . . . . . . . . . . . . . 2
J
Jump Starting - North America . . . . . . . . . . . . . . . . . . . . . . . 348
K
Keyless EntryRemote (RKE) System . . . . . . . . . 32
Keys . . . . . . . . . . . . . . . . . . . . . . . . . . . . . 31
L
Labeling, Tire Sidewall . . . . . . . . . . 320
Lamps Courtesy . . . . . . . . . . . . . . . . . . . . . . 171
Daytime Running (DRL) . . . . . . 168
Dome . . . . . . . . . . . . . . . . . . . . . . . . . 171
Exterior Controls . . . . . . . . . . . . . . 166
Exterior Lighting BatterySaver . . . . . . . . . . . . . . . . . . . . . . . 174
License Plate . . . . . . . . . . . . . . . . . 308
Malfunction Indicator
(Check Engine) . . . . . . . . . . . . . 141
On Reminder . . . . . . . . . . . . . . . . . 149
Reading . . . . . . . . . . . . . . . . . . . . . . 172
Lane Change Alert (LCA) . . . . . . . 265
Lane Departure Warning (LDW) . . . . . . . . . . . . . . . . 267
Lane Keep Assist (LKA) . . . . . . . . 267
Lane Keep Assist Light . . . . . . . . . 145
Lap-Shoulder Belt . . . . . . . . . . . . . . . 79
LATCH System Replacing Parts after aCrash . . . . . . . . . . . . . . . . . . . . . . . .112
LATCH, Lower Anchors and
Tethers for Children . . . . . . . . . . . 104
LED Lighting . . . . . . . . . . . . . . . . . . . . 308
Liftgate . . . . . . . . . . . . . . . . . . . . . . . . . . 44 Lighting
Entry . . . . . . . . . . . . . . . . . . . . . . . . . 173
Exit . . . . . . . . . . . . . . . . . . . . . . . . . . . 173
Illumination Control . . . . . . . . . . . 171
LED . . . . . . . . . . . . . . . . . . . . . . . . . . 308
Lights Airbag Readiness . . . . . . . . . . . . . 140
Antilock Brake System
(ABS) Warning . . . . . . . . . . . . . . 144
Brake System Warning . . . . . . . 143
Charging System . . . . . . . . . . . . . 141
Check Engine (Malfunction Indicator) . . . . . . . . . . . . . . . . . . . . 141
Cruise Control . . . . . . . . . . . . . . . . 149
Door Ajar . . . . . . . . . . . . . . . . . . . . . 149
Electric Parking Brake . . . . . . . . 144
Engine Oil Pressure . . . . . . . . . . 147
Flash-to-Pass . . . . . . . . . . . . . . . . . 168
Front Fog Lamp . . . . . . . . . . . . . . 149
High-Beam On . . . . . . . . . . . . . . . . 148
High/Low Beam Changer . . . . . 168
Lane Keep Assist . . . . . . . . . . . . . 145
Low Fuel Warning . . . . . . . . . . . . 148
Seat Belt Reminders . . . . . . . . . . 139
Security . . . . . . . . . . . . . . . . . . . . . . 148
Service Electric Parking Brake . . . . . . . . . . . . . . . . . . . . . . . 144
StabiliTrak OFF . . . . . . . . . . . . . . . 146