2018 CHEVROLET TRAVERSE infotainment
[x] Cancel search: infotainmentPage 3 of 20

3
Refer to your Owner’s Manual to learn about the information being relayed by the lights, gauges and indicators on the instrument cluster.
See In Brief in your Owner’s Manual.
Infotainment System Controls
Storage Compartment/ USB Port (behind touch screen)F
Infotainment System Touch ScreenClimate Controls
Driver’s Heated/Vented Seat ButtonsF
Electric Parking Brake Switch
Hazard Warning Flashers Button
Wireless Charging PadF
USB Ports/Accessory Power Outlet
Passenger’s Heated/Vented Seat ButtonsF
Shift LeverDriver Mode Control/Traction Control-StabiliTrak Off Button/Lane Keep Assist ButtonF
Vehicle Ahead
Pedestrian Ahead
Antilock Brake System
Low Tire Pressure
StabiliTrak Active
Door Ajar
Charging System
Driver Safety Belt Reminder
2 Passenger Safety Belt Reminder
F Optional equipment
Page 10 of 20

10F Optional equipment *Screen measured diagonally
INFOTAINMENT SYSTEM
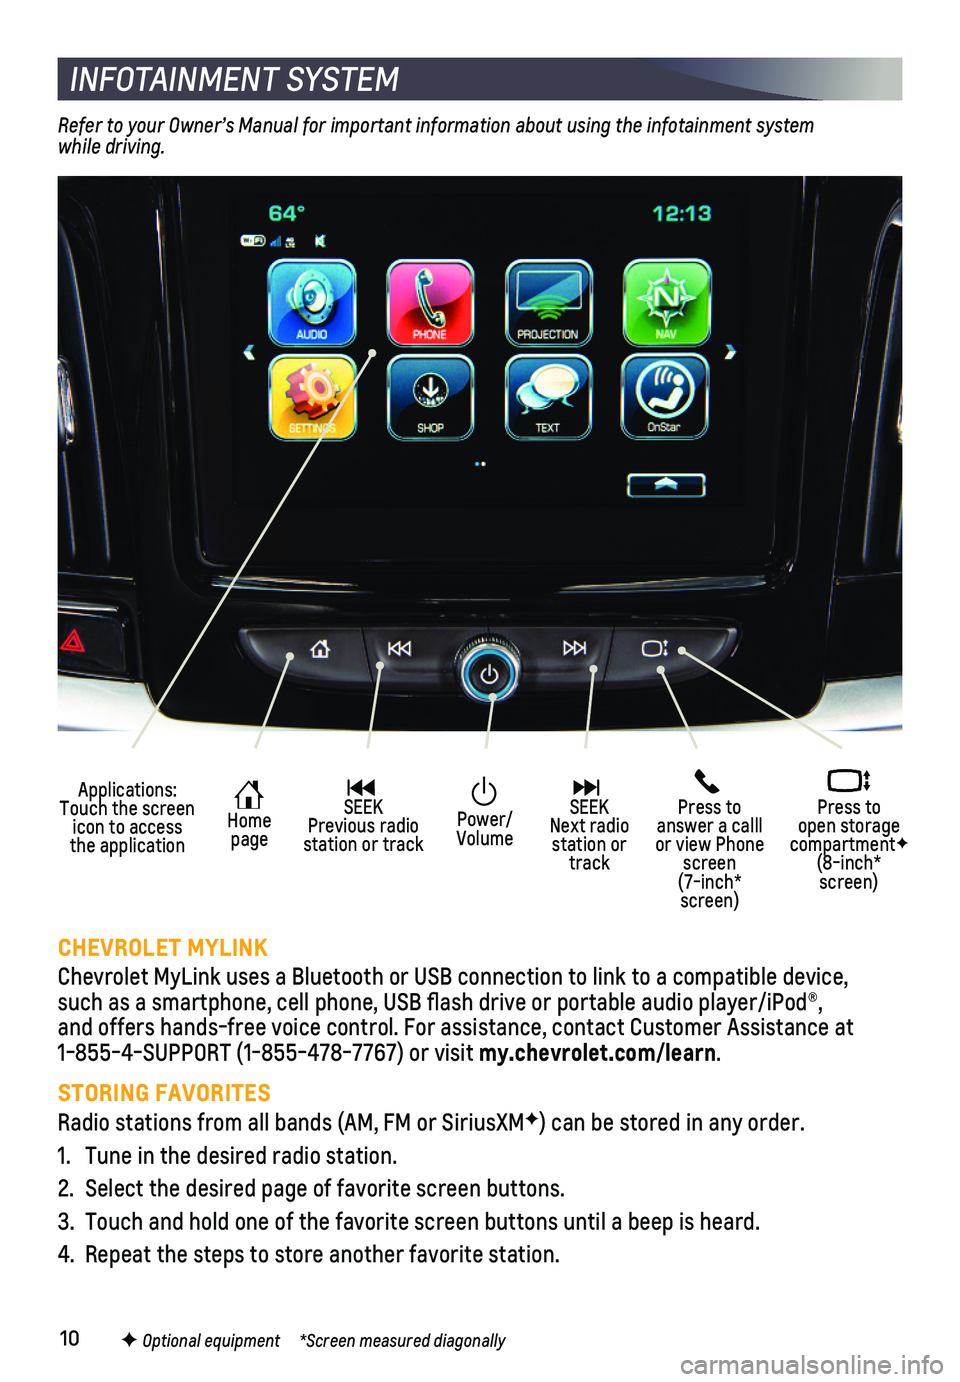
Applications: Touch the screen icon to access the application
Home page
SEEK Previous radio station or track
Press to answer a calll or view Phone screen (7-inch* screen)
Press to open storage compartmentF (8-inch* screen)
SEEK Next radio station or track
Power/ Volume
CHEVROLET MYLINK
Chevrolet MyLink uses a Bluetooth or USB connection to link to a compati\
ble device, such as a smartphone, cell phone, USB flash drive or portable audio pl\
ayer/iPod®, and offers hands-free voice control. For assistance, contact Customer As\
sistance at 1-855-4-SUPPORT (1-855-478-7767) or visit my.chevrolet.com/learn.
STORING FAVORITES
Radio stations from all bands (AM, FM or SiriusXMF) can be stored in any order.
1. Tune in the desired radio station.
2. Select the desired page of favorite screen buttons.
3. Touch and hold one of the favorite screen buttons until a beep is heard.\
4. Repeat the steps to store another favorite station.
Refer to your Owner’s Manual for important information about using the infotainment system while driving.
Page 11 of 20

11F Optional equipment
INFOTAINMENT SYSTEM
NATURAL VOICE RECOGNITIONF
Control the music source and make phone calls hands-free (after pairing\
your Bluetooth-enabled phone) using the natural voice recognition system.
1. Press the Push to Talk button on the steering wheel.
2. The radio will play a prompt followed by a beep.
3. After the beep, say what you want it to do using natural speech.
• Example Phone command (using your paired phone): “Call Amanda” o\
r “Dial 555-1212”
• Example Media Music Device Search command (when connected to USB only)\
: “Play artist [name]” or “Play song [name]”
• Example Radio command: “Tune FM 104.3” or “Tune XM Classic Viny\
l”
• Help: Say “Help” for voice recognition assistance
CHEVROLET SHOP
In-vehicle apps — connecting to music, news, weather, travel informat\
ion and more — are available for download to the infotainment system through the SHOP icon \
on the home page. Downloading and using the apps requires internet connectivity and \
a data plan accessed through the vehicle’s OnStar 4G LTE Wi-Fi hotspot, if active\
, or a mobile device hotspot.
APPLE CARPLAY™ AND ANDROID AUTO™
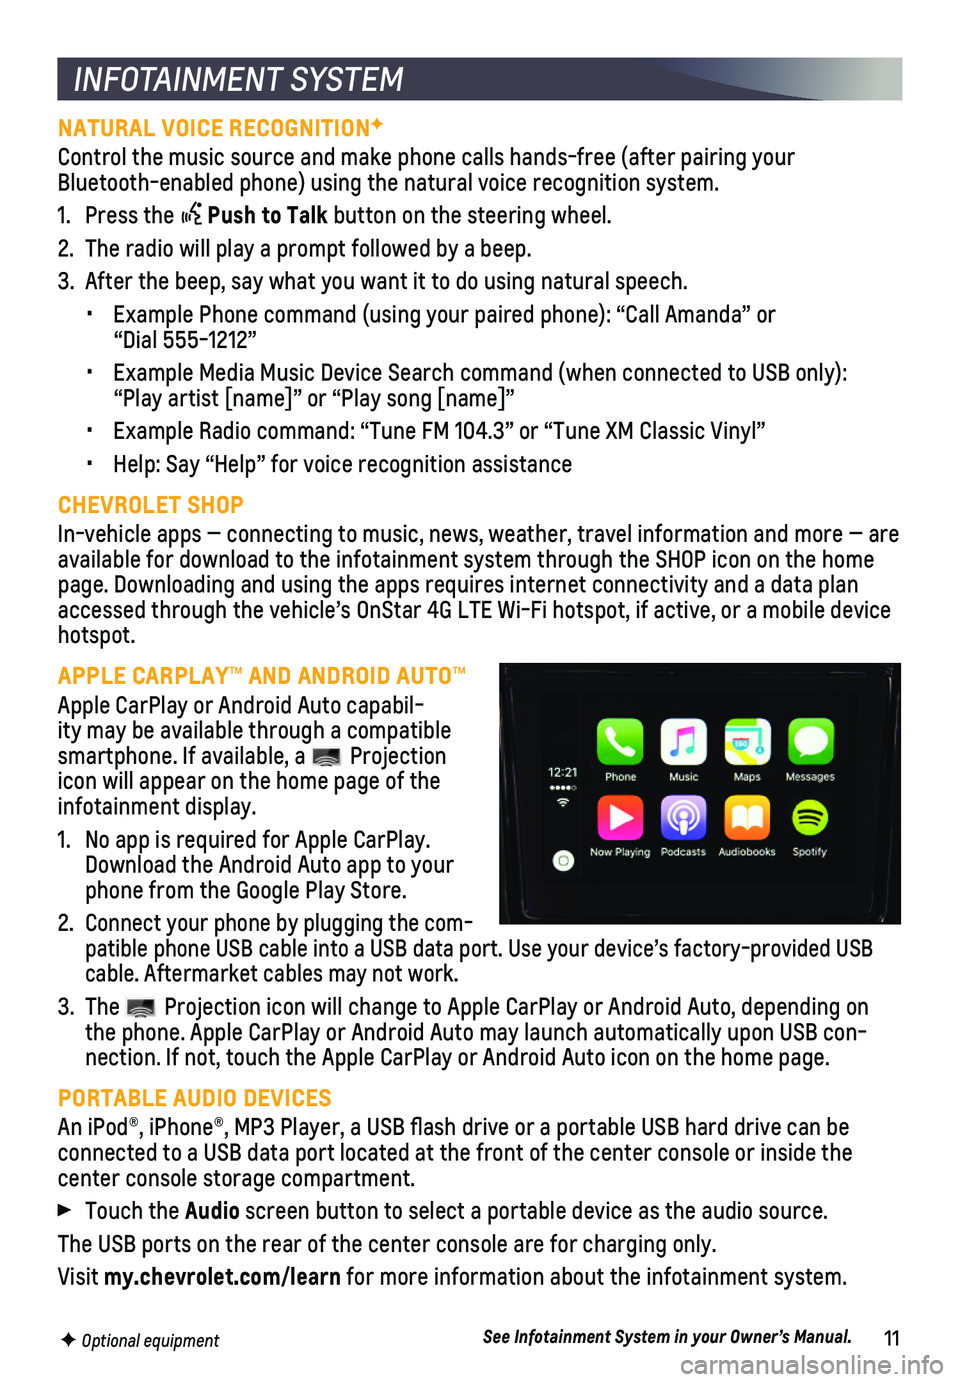
Apple CarPlay or Android Auto capabil-ity may be available through a compatible smartphone. If available, a Projection icon will appear on the home page of the infotainment display.
1. No app is required for Apple CarPlay. Download the Android Auto app to your phone from the Google Play Store.
2. Connect your phone by plugging the com-patible phone USB cable into a USB data port. Use your device’s facto\
ry-provided USB cable. Aftermarket cables may not work.
3. The Projection icon will change to Apple CarPlay or Android Auto, depending \
on the phone. Apple CarPlay or Android Auto may launch automatically upon U\
SB con-nection. If not, touch the Apple CarPlay or Android Auto icon on the hom\
e page.
PORTABLE AUDIO DEVICES
An iPod®, iPhone®, MP3 Player, a USB flash drive or a portable U\
SB hard drive can be
connected to a USB data port located at the front of the center console \
or inside the center console storage compartment.
Touch the Audio screen button to select a portable device as the audio source.
The USB ports on the rear of the center console are for charging only.
Visit my.chevrolet.com/learn for more information about the infotainment system.
See Infotainment System in your Owner’s Manual.
Page 12 of 20

12F Optional equipment
ONSTAR® WITH 4G LTE AND WI-FI®
With the vehicle’s built-in Wi-Fi hotspot, up to 7 devices (smartpho\
nes, tablets and
laptops) can be connected to high-speed internet using OnStar’s 4G L\
TE signal.
To retrieve the SSID and password for the hotspot, go to Settings > Wi-F\
i > Manage Wi-Fi Networks > Information icon; or press the OnStar Voice Command button on the overhead console or rearview mirror, wait for the prompt, and then s\
ay “Wi-Fi settings.” The information will be displayed on the infotainment scre\
en.
For assistance, press the blue OnStar button or call 1-888-4-ONSTAR (1-888-466-7827).
Note: See onstar.com for a detailed instruction guide, vehicle availability, details, and system limitations.
See your Infotainment System Manual.
BLUETOOTH® SYSTEM
Refer to your Owner’s Manual for important information about using the Bluetooth system while driving.
Before using a Bluetooth-enabled device in the vehicle, it must be paire\
d with the in-vehicle Bluetooth system. The pairing process is disabled when the vehic\
le is moving. Not all devices will support all functions. Visit my.chevrolet.com/learn for more information.
PAIR A PHONE
1. To use voice recognition, press the Push to Talk button; after the beep, say “Pair phone.”
To use the screen buttons, touch the Phone icon and then select Pair or \
Search Device.
2. Start the pairing process on the phone. Locate your vehicle or Chevrolet\
MyLink on the phone.
3. Follow the pairing instructions.
4. When pairing is complete, the phone screen is displayed. Depending on th\
e phone, your phone book may be downloaded automatically.
See Infotainment System in your Owner’s Manual.
TEEN DRIVERF
Teen Driver allows multiple keys to be registered for beginning drivers.\
When active, the system automatically activates certain safety systems, allows setting of\
some features, and limits the use of others. A Report Card records vehicle data about d\
riving behavior. When the vehicle is started with a registered key, the Driver Informatio\
n Center displays that Teen Driver is active.
To create a Personal Identification Number, register a key, change Tee\
n Driver set-tings, or access the Report Card, go to Settings > Teen Driver.
See your Infotainment System Manual.
Page 13 of 20

13F Optional equipment
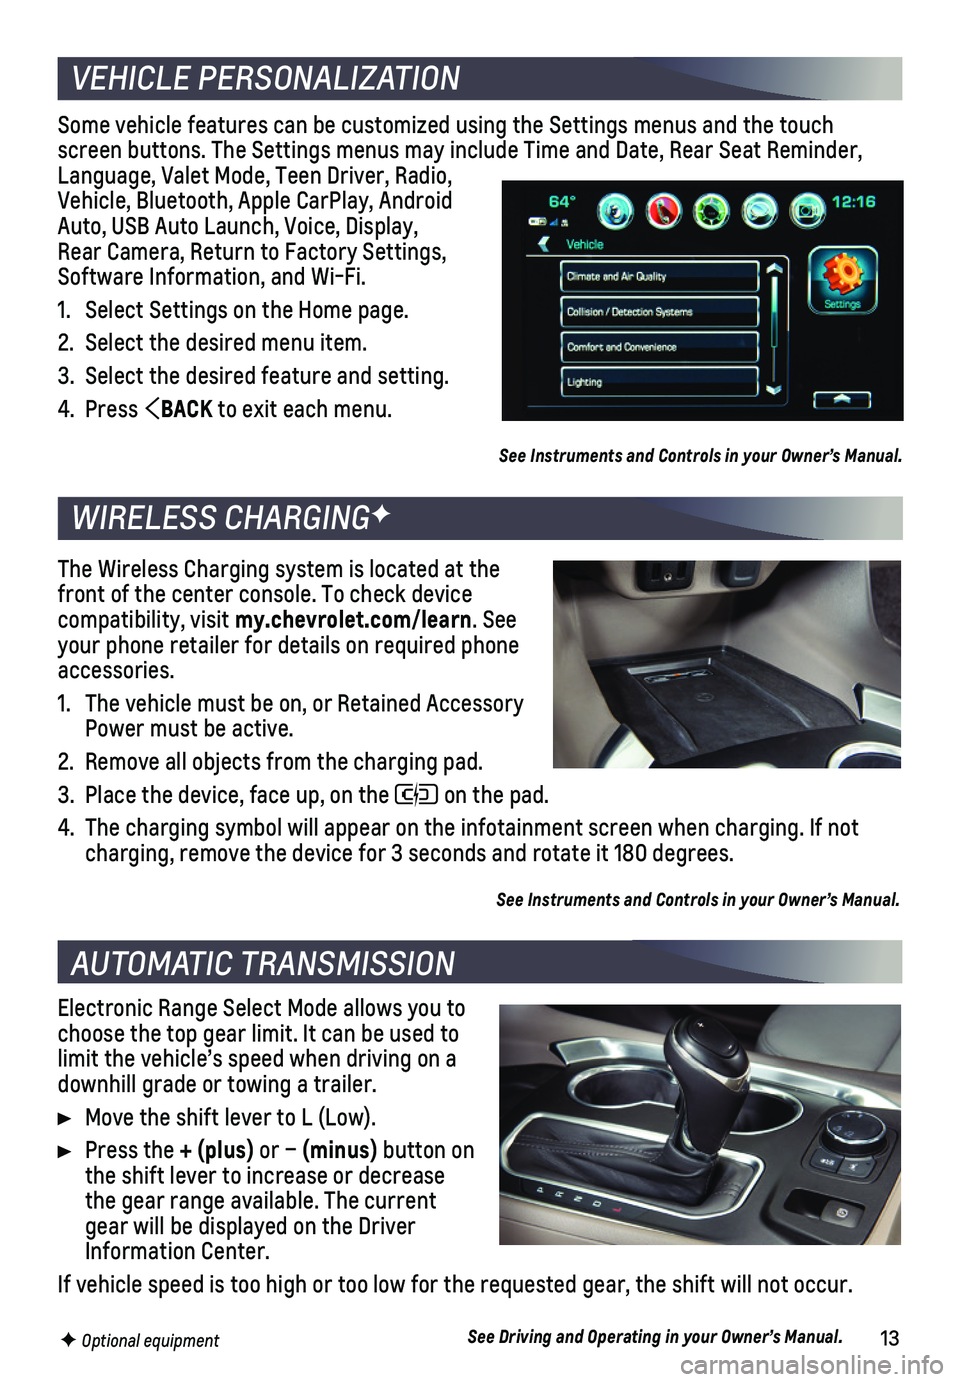
Some vehicle features can be customized using the Settings menus and the\
touch screen buttons. The Settings menus may include Time and Date, Rear Seat \
Reminder, Language, Valet Mode, Teen Driver, Radio, Vehicle, Bluetooth, Apple CarPlay, Android Auto, USB Auto Launch, Voice, Display, Rear Camera, Return to Factory Settings, Software Information, and Wi-Fi.
1. Select Settings on the Home page.
2. Select the desired menu item.
3. Select the desired feature and setting.
4. Press BACK to exit each menu.
See Instruments and Controls in your Owner’s Manual.
Electronic Range Select Mode allows you to choose the top gear limit. It can be used to limit the vehicle’s speed when driving on a downhill grade or towing a trailer.
Move the shift lever to L (Low).
Press the + (plus) or – (minus) button on the shift lever to increase or decrease the gear range available. The current gear will be displayed on the Driver Information Center.
If vehicle speed is too high or too low for the requested gear, the shif\
t will not occur.
See Driving and Operating in your Owner’s Manual.
VEHICLE PERSONALIZATION
AUTOMATIC TRANSMISSION
WIRELESS CHARGINGF
The Wireless Charging system is located at the front of the center console. To check device compatibility, visit my.chevrolet.com/learn. See your phone retailer for details on required phone accessories.
1. The vehicle must be on, or Retained Accessory Power must be active.
2. Remove all objects from the charging pad.
3. Place the device, face up, on the on the pad.
4. The charging symbol will appear on the infotainment screen when charging\
. If not charging, remove the device for 3 seconds and rotate it 180 degrees.
See Instruments and Controls in your Owner’s Manual.
Page 16 of 20

16
DRIVER ASSISTANCE SYSTEMS
LANE KEEP ASSIST WITH LANE DEPARTURE WARNINGF – The system may help avoid col-lisions due to unintentional lane departures. The Lane Keep Assist indicator is green on the instrument cluster if the system is available to assist. If the v\
ehicle approaches a detected lane marking without using a turn signal in that direction, t\
he system may assist by gently turning the steering wheel and displaying an amber .
If active driver steering is not detected, the amber may flash and 3 beeps may sound on the side of the departure direction as the lane marking is crossed. I\
n order to use this system safely, the driver needs to steer and be in complete control of t\
he vehicle.
To turn the system on or off, press the Lane Keep Assist button on the center console.
REAR VISION CAMERA – When the vehicle is in Reverse, a view of the area behind the vehicle displays on the infotainment screen. Vehicle speed must be below\
5 mph.
To turn the guidelines on or off, go to Settings > Rear Camera.
SURROUND VISIONF – The Surround Vision system displays a bird’s-eye view of the are\
a surrounding the vehicle on the infotainment screen when the vehicle is i\
n Reverse or Drive below 5 mph.
To switch to the front or rear camera view, touch the front or rear camera
button at the bottom of the infotainment screen.
REAR PARKING ASSISTF – During low- speed parking maneuvers, “distance to closest object” information is provided on the Driver Information Center. A beep sounds when an object is detected and 5 beeps sound when an object is very close.
REAR CROSS TRAFFIC ALERTF – When the vehicle is in Reverse, the system warns of traffic coming in either direction by displaying a red alert on the in\
fotainment screen and sounding beeps from the left or right side of the vehicle.
To turn Rear Parking Assist and Rear Cross Traffic Alert on or off, go\
to Settings > Vehicle > Collision/Detection Systems.
See Driving and Operating in your Owner’s Manual.
The rear camera mirror provides a wide angle view of the area behind the\
vehicle.
Pull or push the lever at the bottom of the mirror to turn the video dis\
play on or off.
To adjust the brightness of the display, press and release the button on\
the top back of the mirror without covering the light sensor. There are 5 brightness \
settings.
See Keys, Doors and Windows in your Owner’s Manual.
REAR CAMERA MIRRORF
F Optional equipment
Page 17 of 20

17
SUNROOF/SUNSHADEF
AUTOMATIC CLIMATE CONTROLSF
Driver’s Temperature Control
AUTO Automatic OperationF
A/C Air Conditioning Control
Passenger’s Temperature Control
REAR Rear Window Defogger
Driver’s Heated/ Vented Seat ButtonsF
Passenger’s Heated/Vented Seat ButtonsF
Air Delivery Modes: Defog Vent Floor
Recirculation Mode
SYNC Link passenger’s temperature setting to driver’s settingF
Power Fan Controls
MAX Defrost
AUTOMATIC OPERATION
Press AUTO.
Set the temperature.
The system automatically controls the fan speed, air delivery, air condi\
tioning, and
recirculation functions. Allow time for the system to reach the set temp\
erature. If a function is manually adjusted, automatic operation for that function is \
turned off.
REAR CLIMATE CONTROLS
The rear climate control settings can be adjusted using the control pane\
l on the rear of the center console or the rear climate display on the infotainment scree\
n.
To lock/unlock the rear controls from the front seat, select Rear Contro\
l Lockout on the infotainment screen.
See Climate Controls in your Owner’s Manual.
F Optional equipment
Press and release the SLIDE switch to express-open the sunroof.
Press and release the Close switch to express-close the sunroof.
To open the sunshade, press the latch button on the handle while pushing\
up to unlatch it.
To close the sunshade, pull the handle forward until it latches.
See Keys, Doors and Windows in your Owner’s Manual.