2018 CHEVROLET SILVERADO checking oil
[x] Cancel search: checking oilPage 340 of 501

Chevrolet Silverado Owner Manual (GMNA-Localizing-U.S./Canada/Mexico-
11349200) - 2018 - CRC - 2/27/18
Vehicle Care 339
1. Positive (+) Terminal. SeeJump Starting - North America
0421.
2. Battery - North America 0362.
3. Coolant Surge Tank and Pressure Cap. See Cooling
System 0352.
4. Engine Air Cleaner/Filter 0351.
5. Automatic Transmission Dipstick (If Equipped). See
“How to Check Automatic
Transmission Fluid” under
Automatic Transmission Fluid
(6-Speed Transmission) 0347
or Automatic Transmission
Fluid (8-Speed Transmission)
0 350. 6. Remote Negative (–) Location.
See Jump Starting - North
America 0421.
7. Engine Cooling Fans (Out of View). See Cooling System
0 352.
8. Engine Oil Fill Cap. See “When
to Add Engine Oil” under
Engine Oil 0343.
9. Engine Oil Dipstick. See “Checking Engine Oil” under
Engine Oil 0343. 10. Brake Fluid Reservoir. See
Brake Fluid 0361.
11. Windshield Washer Fluid Reservoir. See “Adding Washer
Fluid” under Washer Fluid
0 359.
12. Engine Compartment Fuse
Block 0376.
Page 342 of 501

Chevrolet Silverado Owner Manual (GMNA-Localizing-U.S./Canada/Mexico-
11349200) - 2018 - CRC - 2/27/18
Vehicle Care 341
1. Positive (+) Terminal. SeeJump Starting - North America
0421.
2. Battery - North America 0362.
3. Coolant Surge Tank and Pressure Cap. See Cooling
System 0352.
4. Engine Air Cleaner/Filter 0351.
5. Automatic Transmission Dipstick (If Equipped). See
“How to Check Automatic
Transmission Fluid” under
Automatic Transmission Fluid
(6-Speed Transmission) 0347
or Automatic Transmission
Fluid (8-Speed Transmission)
0 350. 6. Remote Negative (–) Location
(Out of View). See Jump
Starting - North America 0421.
7. Engine Cooling Fans (Out of View). See Cooling System
0 352.
8. Engine Oil Fill Cap. See “When
to Add Engine Oil” under
Engine Oil 0343.
9. Engine Oil Dipstick. See “Checking Engine Oil” under
Engine Oil 0343. 10. Windshield Washer Fluid
Reservoir. See “Adding Washer
Fluid” under Washer Fluid
0 359.
11. Brake Fluid Reservoir. See Brake Fluid 0361.
12. Engine Compartment Fuse
Block 0376.
Page 344 of 501

Chevrolet Silverado Owner Manual (GMNA-Localizing-U.S./Canada/Mexico-
11349200) - 2018 - CRC - 2/27/18
Vehicle Care 343
1. Positive (+) Terminal. SeeJump Starting - North America
0421.
2. Battery - North America 0362.
3. Coolant Surge Tank and Pressure Cap. See Cooling
System 0352.
4. Engine Air Cleaner/Filter 0351.
5. Automatic Transmission Dipstick (If Equipped). See
“How to Check Automatic
Transmission Fluid” under
Automatic Transmission Fluid
(6-Speed Transmission) 0347
or Automatic Transmission
Fluid (8-Speed Transmission)
0 350.
6. Engine Oil Dipstick. See “Checking Engine Oil” under
Engine Oil 0343.
7. Engine Oil Fill Cap. See “When
to Add Engine Oil” under
Engine Oil 0343.
8. Engine Cooling Fan (Out of View). See Cooling System
0 352. 9. Remote Negative (–) Location.
See Jump Starting - North
America 0421.
10. Power Steering Fluid Reservoir. See Power Steering
Fluid (1500 Series) 0359 or
Power Steering Fluid (2500/
3500 Series) 0359.
11. Windshield Washer Fluid Reservoir. See “Adding Washer
Fluid” under Washer Fluid
0 359.
12. Brake Fluid Reservoir. See Brake Fluid 0361.
13. Clutch Fluid Reservoir (If Equipped). See Hydraulic
Clutch 0351.
14. Auxiliary Battery (If Equipped). SeeBattery - North America
0 362.
15. Engine Compartment Fuse
Block 0376.
If the vehicle has a diesel engine
and/or an Allison Transmission, see
the Duramax diesel supplement. For an eAssist vehicle, see the
Silverado/Sierra eAssist
supplement.
Engine Oil
For diesel engine vehicles, see
“Engine Oil”
in the Duramax diesel
supplement.
To ensure proper engine
performance and long life, careful
attention must be paid to engine oil.
Following these simple, but
important steps will help protect
your investment:
. Use engine oil approved to the
proper specification and of the
proper viscosity grade. See
“Selecting the Right Engine Oil”
in this section.
. Check the engine oil level
regularly and maintain the
proper oil level. See “Checking
Engine Oil” and“When to Add
Engine Oil” in this section.
. Change the engine oil at the
appropriate time. See Engine Oil
Life System 0346.
Page 345 of 501

Chevrolet Silverado Owner Manual (GMNA-Localizing-U.S./Canada/Mexico-
11349200) - 2018 - CRC - 2/27/18
344 Vehicle Care
.Always dispose of engine oil
properly. See “What to Do with
Used Oil” in this section.
Checking Engine Oil
Check the engine oil level regularly,
every 650 km (400 mi), especially
prior to a long trip. The engine oil
dipstick handle is a loop. See
Engine Compartment Overview
0338 for the location.
{Warning
The engine oil dipstick handle
may be hot; it could burn you.
Use a towel or glove to touch the
dipstick handle.
If a low oil Driver Information Center
(DIC) message displays, check the
oil level.
Follow these guidelines:
. To get an accurate reading, park
the vehicle on level ground.
Check the engine oil level after
the engine has been off for at
least two hours. Checking the engine oil level on steep grades
or too soon after engine shutoff
can result in incorrect readings.
Accuracy improves when
checking a cold engine prior to
starting. Remove the dipstick
and check the level.
. If unable to wait two hours, the
engine must be off for at least
15 minutes if the engine is
warm, or at least 30 minutes if
the engine is not warm. Pull out
the dipstick, wipe it with a clean
paper towel or cloth, then push it
back in all the way. Remove it
again, keeping the tip down, and
check the level.
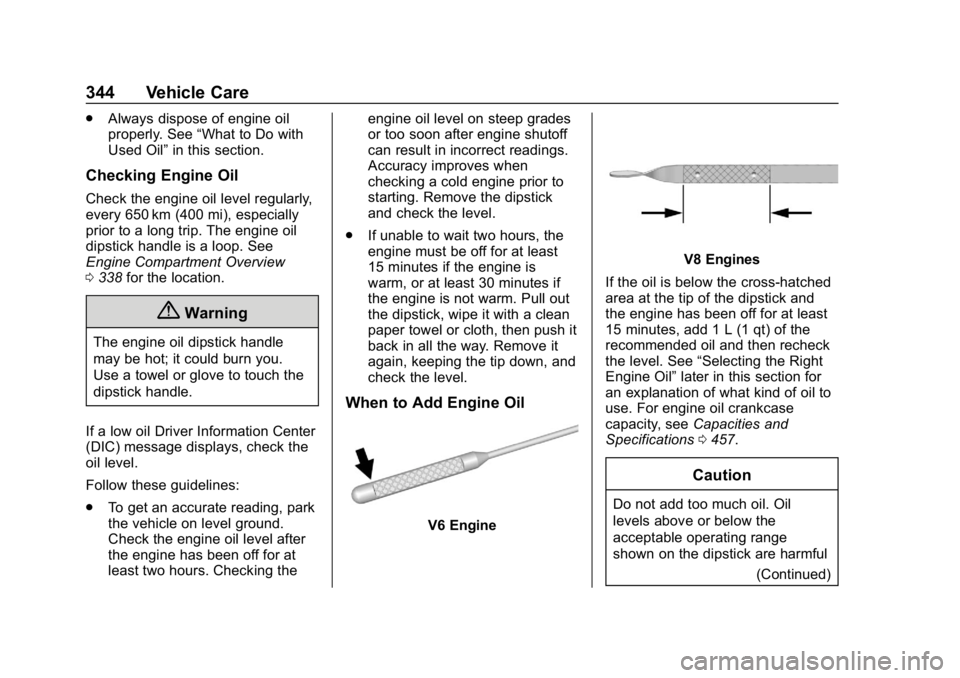
When to Add Engine Oil
V6 Engine
V8 Engines
If the oil is below the cross-hatched
area at the tip of the dipstick and
the engine has been off for at least
15 minutes, add 1 L (1 qt) of the
recommended oil and then recheck
the level. See “Selecting the Right
Engine Oil” later in this section for
an explanation of what kind of oil to
use. For engine oil crankcase
capacity, see Capacities and
Specifications 0457.
Caution
Do not add too much oil. Oil
levels above or below the
acceptable operating range
shown on the dipstick are harmful
(Continued)
Page 348 of 501

Chevrolet Silverado Owner Manual (GMNA-Localizing-U.S./Canada/Mexico-
11349200) - 2018 - CRC - 2/27/18
Vehicle Care 347
1. Display the OIL LIFEREMAINING on the DIC. If the
vehicle does not have DIC
buttons, the vehicle must be in
P (Park) to access this display.
See Driver Information Center
(DIC) (Base Level) 0155 or
Driver Information Center (DIC)
(Uplevel) 0156.
2. Press and hold
V, or the trip
odometer reset stem if the
vehicle does not have DIC
buttons, for several seconds.
The oil life will change
to 100%.
The oil life system can also be reset
as follows:
1. Display the OIL LIFE REMAINING on the DIC.
See Driver Information Center
(DIC) (Base Level) 0155 or
Driver Information Center (DIC)
(Uplevel) 0156.
2. Fully press the accelerator pedal slowly three times within
five seconds. 3. Display the OIL LIFE
REMAINING on the DIC. If the
display shows 100%, the
system is reset.
If the vehicle has a CHANGE
ENGINE OIL SOON message and it
comes back on when the vehicle is
started and/or the OIL LIFE
REMAINING is near 0%, the engine
oil life system has not been reset.
Repeat the procedure.
Automatic Transmission
Fluid (6-Speed
Transmission)
When to Check and Change
Automatic Transmission Fluid
It is usually not necessary to check
the transmission fluid level. The only
reason for fluid loss is a
transmission leak or overheated
transmission. If a small leak is
suspected, then use the following
checking procedures to check the
fluid level. However, if there is a
large leak, then it may be necessary
to have the vehicle towed to a dealer service department and have
it repaired before driving the vehicle
further.
Caution
Use of the incorrect automatic
transmission fluid may damage
the vehicle, and the damage may
not be covered by the vehicle
warranty. Always use the
automatic transmission fluid listed
in
Recommended Fluids and
Lubricants 0451.
Change the fluid and filter at the
scheduled maintenance intervals
listed in Maintenance Schedule
0 443. Be sure to use the
transmission fluid listed in
Recommended Fluids and
Lubricants 0451.
Page 355 of 501

Chevrolet Silverado Owner Manual (GMNA-Localizing-U.S./Canada/Mexico-
11349200) - 2018 - CRC - 2/27/18
354 Vehicle Care
What to Use
{Warning
Plain water, or other liquids such
as alcohol, can boil before the
proper coolant mixture will. With
plain water or the wrong mixture,
the engine could get too hot but
there would not be an overheat
warning. The engine could catch
fire and you or others could be
burned.
Use a 50/50 mixture of clean,
drinkable water and DEX-COOL
coolant. This mixture:
. Gives freezing protection down
to−37 °C (−34 °F), outside
temperature.
. Gives boiling protection up to
129 °C (265 °F), engine
temperature.
. Protects against rust and
corrosion.
. Will not damage aluminum parts. .
Helps keep the proper engine
temperature.Caution
Do not use anything other than a
mix of DEX-COOL coolant that
meets GM Standard
GMW3420 and clean, drinkable
water. Anything else can cause
damage to the engine cooling
system and the vehicle, which
would not be covered by the
vehicle warranty.
Never dispose of engine coolant by
putting it in the trash, or by pouring
it on the ground, or into sewers,
streams, or bodies of water. Have
the coolant changed by an
authorized service center, familiar
with legal requirements regarding
used coolant disposal. This will help
protect the environment and your
health.
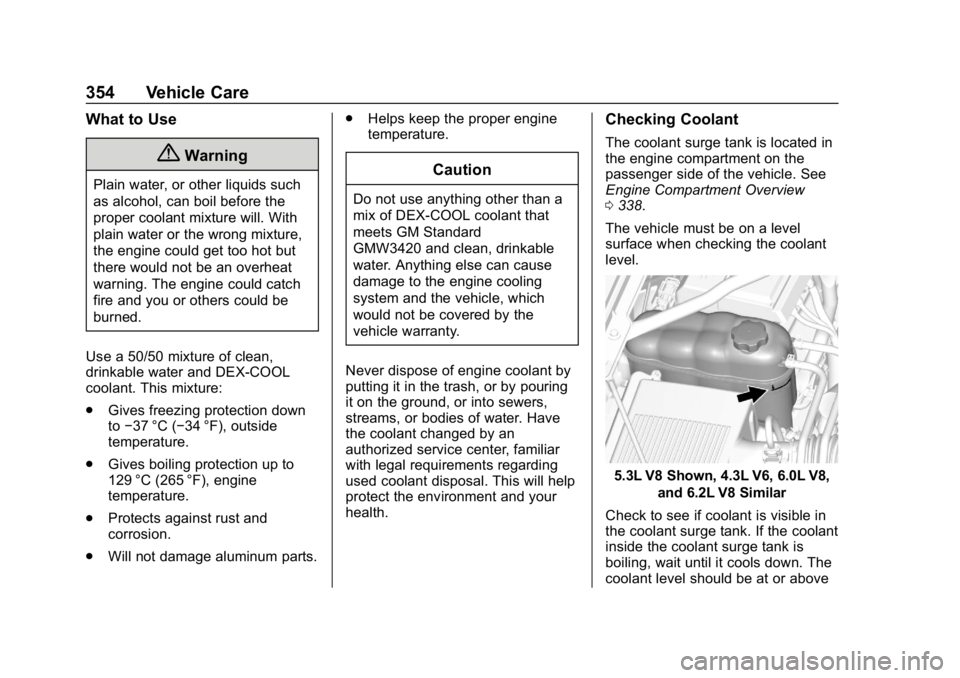
Checking Coolant
The coolant surge tank is located in
the engine compartment on the
passenger side of the vehicle. See
Engine Compartment Overview
0 338.
The vehicle must be on a level
surface when checking the coolant
level.
5.3L V8 Shown, 4.3L V6, 6.0L V8, and 6.2L V8 Similar
Check to see if coolant is visible in
the coolant surge tank. If the coolant
inside the coolant surge tank is
boiling, wait until it cools down. The
coolant level should be at or above