2018 CHEVROLET SILVERADO buttons
[x] Cancel search: buttonsPage 199 of 501

Chevrolet Silverado Owner Manual (GMNA-Localizing-U.S./Canada/Mexico-
11349200) - 2018 - CRC - 2/27/18
198 Infotainment System
1. Pressgon the steering wheel
control to activate voice
recognition, or select
gon the
infotainment display.
. If voice recognition is
started from the steering
wheel control, the
instrument cluster displays
the selections and visual
dialog content.
. If voice recognition is
started from the
infotainment display, the
selections and visual dialog
content are displayed on
both the infotaonment
display and the instrument
cluster display.
2. The audio system mutes and the system plays a prompt
followed by a beep.
3. Wait until after the beep completes, then clearly speak
one of the commands
described in this section. Press
gto interrupt any voice
recognition system prompt. For
example, if the prompt seems
to be taking too long to finish,
press
gagain and the beep
should happen right away.
There are two voice prompt modes
supported:
. Long verbal prompts: The longer
prompts provide more
information regarding the
supported actions.
. Short prompts: The short
prompts provide simple
instructions about what can be
stated.
If a command is not spoken, the
voice recognition system says a
help prompt.
Prompts and Screen Displays
While a voice recognition session is
active, there will be corresponding
buttons on screens displayed.
Manual interaction in the voice
recognition session is permitted.
Interaction during a voice session
may be completed entirely using voice commands, or some
selections may expedite a session.
If a selection is made using a
manual control, the dialog will
progress in the same way as if the
selection was made through a voice
command. Once the system is able
to complete the task, or the session
is terminated, the voice recognition
dialog stops.
An example of this type of manual
intervention is pressing on an entry
of a displayed number list instead of
speaking the number associated
with the entry desired.
Canceling Voice Recognition
.
Press the Home screen button
to terminate the voice
recognition session which was
initiated by pressing
gon the
infotainment display.
. Press or say “Cancel”or“Exit” to
terminate the voice recognition
session and display the screen
from which voice recognition
was initiated.
Page 205 of 501

Chevrolet Silverado Owner Manual (GMNA-Localizing-U.S./Canada/Mexico-
11349200) - 2018 - CRC - 2/27/18
204 Infotainment System
.Review the controls and
operation of the infotainment
system.
. Pair cell phone(s) to the vehicle.
The system may not work with
all cell phones. See “Pairing”in
this section.
. If the cell phone has voice
dialing capability, learn to use
that feature to access the
address book or contact list.
. See “Deleting a Bluetooth
Device” in this section.
{Warning
When using a cell phone, it can
be distracting to look too long or
too often at the screen of the
phone or the infotainment system.
Taking your eyes off the road too
long or too often could cause a
crash resulting in injury or death.
Focus your attention on driving.
Vehicles with a Bluetooth system
can use a Bluetooth-capable cell
phone with a Hands-Free Profile to make and receive phone calls. The
infotainment system and voice
recognition are used to control the
system. The system can be used
when the ignition is on or in ACC/
ACCESSORY. The range of the
Bluetooth system can be up to 9.1 m
(30 ft). Not all phones support all
functions and not all phones work
with the Bluetooth system. For U.S.
and Canada only, see www.gm.com/
bluetooth for more information about
compatible phones.
Bluetooth Controls
Use the buttons on the instrument
panel, center stack, and steering
wheel to operate the Bluetooth
system.
Steering Wheel Controls
g:
Press to answer incoming calls,
confirm system information, and
start voice recognition.
i: Press to end a call, reject a
call, or cancel an operation. Press
to mute or unmute the infotainment
system. Infotainment System Controls
For information about how to
navigate the menu system using the
infotainment controls, see
Overview
0 183.
{:Press to go to the Home Page.
See Home Page 0184.
#:Select to enter the phone main
menu. See Bluetooth (Overview)
0 203 orBluetooth (Infotainment
Controls) 0205.
Voice Recognition
If equipped, the voice recognition
system uses commands to control
the system and dial phone numbers.
Noise : The system may not
recognize voice commands if there
is too much background noise, such
as noise from open windows or loud
talking inside the vehicle.
When to Speak : A tone sounds to
indicate that the system is ready for
a voice command. Wait for the tone
and then speak.
Page 252 of 501

Chevrolet Silverado Owner Manual (GMNA-Localizing-U.S./Canada/Mexico-
11349200) - 2018 - CRC - 2/27/18
Driving and Operating 251
be flooded with too much
gasoline. Try pushing the
accelerator pedal all the way to
the floor and holding it there
while holding the key in START
for up to 15 seconds. Wait at
least 15 seconds between each
try, to allow the cranking motor
to cool down. When the engine
starts, let go of the key and
accelerator. If the vehicle starts
briefly but then stops again, do
the same thing. This clears the
extra gasoline from the engine.
Do not race the engine
immediately after starting it.
Operate the engine and
transmission gently until the oil
warms up and lubricates all
moving parts.
Fast Idle System
If equipped, this feature is available
only with cruise control. The manual
fast idle switch is operated using the
cruise control buttons on the left
side of the steering wheel.This system can be used to
increase engine idle speed
whenever the following conditions
are met:
.
The parking brake is set.
. The brake pedal is not pressed.
. The vehicle must not be moving
and the accelerator must not be
pressed.
To control the fast idle:
. To enable the Fast Idle System,
press and release the cruise
control on/off button and ensure
that the switch indicator light
is lit.
. Press and release the cruise
control SET- button. Engine
speed will be held at
approximately 1200 rpm.
One of the following actions will turn
off the fast idle:
. Pressing the brake.
. Selecting the cruise control
cancel button.
. Releasing the parking brake. .
Moving the transmission shift
lever out of P (Park) or
N (Neutral).
. Selecting the cruise control on/
off button when it was
previously on.
. Pressing the cruise control SET-
button a second time.
. Pressing the accelerator more
than one-quarter of the
way down.
. Turning the ignition off.
Retained Accessory
Power (RAP)
The following vehicle accessories
can be used for up to 10 minutes
after the engine is turned off:
.Audio System
. Power Windows
. OnStar System (if equipped)
. Sunroof (if equipped)
These features work when the key
is in ON/RUN or ACC/
ACCESSORY. Once the key is
Page 261 of 501

Chevrolet Silverado Owner Manual (GMNA-Localizing-U.S./Canada/Mexico-
11349200) - 2018 - CRC - 2/27/18
260 Driving and Operating
Caution (Continued)
When stopping on a hill, use the
brakes to hold the vehicle in
place.
Normal Mode Grade Braking
If equipped with a gasoline engine
and an automatic transmission,
Normal Mode Grade Braking is
enabled when the vehicle is started,
but is not enabled in Range
Selection Mode. It assists in
maintaining desired vehicle speeds
when driving on downhill grades by
using the engine and transmission
to slow the vehicle. The first time
the system engages for each
ignition key cycle, a DIC message
will be displayed.
To disable or enable Normal Mode
Grade Braking within the current
ignition key cycle, press and hold
the Tow/Haul button for
five seconds. When the button is
released, the requested mode
change is made. A DIC message
displays.For other forms of grade braking,
see
Tow/Haul Mode 0262 and
Cruise Control 0279.
Kickdown Mode
If equipped, the accelerator pedal
provides an additional downshift
after pressing through the kickdown
feature.
It requires extra pedal pressure near
the end of its travel to engage.
Manual Mode
Range Selection Mode
If equipped, Range Selection Mode
helps control the vehicle's
transmission and vehicle speed
while driving downhill or towing a
trailer by letting you select a desired
range of gears. To use this feature:
1. Move the shift lever to L (Manual Mode).
2. Press the plus/minus buttons on the shift lever to select the
desired range of gears for
current driving conditions.
With an 8-speed automatic
transmission, hold the plus/minus
buttons on the shift lever to select
the highest or lowest range
available for the current vehicle
speed.
When the shift lever is moved from
D (Drive) to L (Manual Mode), a
number displays next to the L,
indicating the current transmission
range.
This number is the highest gear that
the transmission will command while
operating in L (Manual Mode). All
gears below that number are
available. As driving conditions
change, the transmission can
automatically shift to lower gears.
Page 325 of 501

Chevrolet Silverado Owner Manual (GMNA-Localizing-U.S./Canada/Mexico-
11349200) - 2018 - CRC - 2/27/18
324 Driving and Operating
This symbol is on the Trailer Brake
Control Panel on vehicles with an
ITBC system. The power output to
the trailer brakes is based on the
amount of brake pressure being
applied by the vehicle’s brake
system, and on the type of trailer
brakes detected. This available
power output to the trailer brakes
can be adjusted to a wide range of
trailering situations.
The ITBC system is integrated with
the vehicle’s brake, antilock brake,
and StabiliTrak systems. In trailering
conditions that cause the vehicle’s
antilock brake or StabiliTrak
systems to activate, power sent to
the trailer's brakes will be
automatically adjusted to minimize
trailer wheel lock-up. This does not
imply that the trailer has StabiliTrak. If the vehicle’s brake, antilock brake,
or StabiliTrak systems are not
functioning properly, the ITBC
system may not be fully functional
or may not function at all. Make sure
all of these systems are fully
operational to ensure full
functionality of the ITBC system.
The ITBC system is powered
through the vehicle's electrical
system. Turning the ignition off will
also turn off the ITBC system. The
ITBC system is fully functional only
when the ignition is in ON/RUN.
{Warning
Connecting a trailer that has an
air brake system may result in
reduced or complete loss of trailer
braking. There may be an
increase in stopping distance or
trailer instability which could
result in personal injury or
damage to the vehicle, trailer,
or other property. Use the ITBC
(Continued)
Warning (Continued)
system only with electric or
electric over hydraulic trailer
brakes.
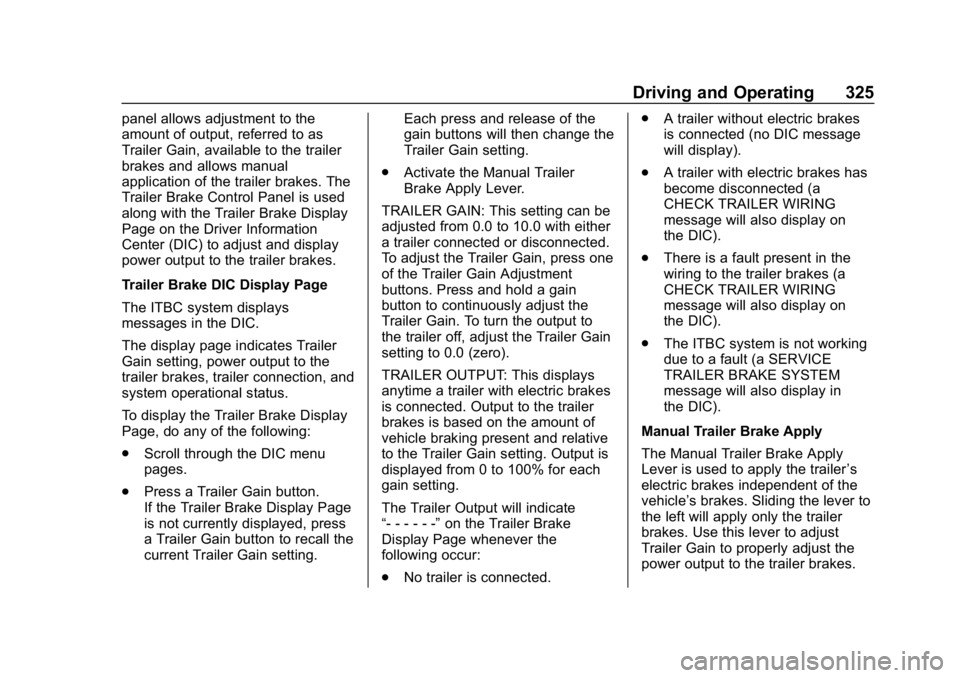
Trailer Brake Control Panel
1. Manual Trailer Brake Apply Lever
2. Trailer Gain Adjustment Buttons
The ITBC system has a control
panel on the instrument panel to the
left of the steering column. See
Instrument Panel 06. The control
Page 326 of 501

Chevrolet Silverado Owner Manual (GMNA-Localizing-U.S./Canada/Mexico-
11349200) - 2018 - CRC - 2/27/18
Driving and Operating 325
panel allows adjustment to the
amount of output, referred to as
Trailer Gain, available to the trailer
brakes and allows manual
application of the trailer brakes. The
Trailer Brake Control Panel is used
along with the Trailer Brake Display
Page on the Driver Information
Center (DIC) to adjust and display
power output to the trailer brakes.
Trailer Brake DIC Display Page
The ITBC system displays
messages in the DIC.
The display page indicates Trailer
Gain setting, power output to the
trailer brakes, trailer connection, and
system operational status.
To display the Trailer Brake Display
Page, do any of the following:
.Scroll through the DIC menu
pages.
. Press a Trailer Gain button.
If the Trailer Brake Display Page
is not currently displayed, press
a Trailer Gain button to recall the
current Trailer Gain setting. Each press and release of the
gain buttons will then change the
Trailer Gain setting.
. Activate the Manual Trailer
Brake Apply Lever.
TRAILER GAIN: This setting can be
adjusted from 0.0 to 10.0 with either
a trailer connected or disconnected.
To adjust the Trailer Gain, press one
of the Trailer Gain Adjustment
buttons. Press and hold a gain
button to continuously adjust the
Trailer Gain. To turn the output to
the trailer off, adjust the Trailer Gain
setting to 0.0 (zero).
TRAILER OUTPUT: This displays
anytime a trailer with electric brakes
is connected. Output to the trailer
brakes is based on the amount of
vehicle braking present and relative
to the Trailer Gain setting. Output is
displayed from 0 to 100% for each
gain setting.
The Trailer Output will indicate
“- - - - - -” on the Trailer Brake
Display Page whenever the
following occur:
. No trailer is connected. .
A trailer without electric brakes
is connected (no DIC message
will display).
. A trailer with electric brakes has
become disconnected (a
CHECK TRAILER WIRING
message will also display on
the DIC).
. There is a fault present in the
wiring to the trailer brakes (a
CHECK TRAILER WIRING
message will also display on
the DIC).
. The ITBC system is not working
due to a fault (a SERVICE
TRAILER BRAKE SYSTEM
message will also display in
the DIC).
Manual Trailer Brake Apply
The Manual Trailer Brake Apply
Lever is used to apply the trailer ’s
electric brakes independent of the
vehicle’s brakes. Sliding the lever to
the left will apply only the trailer
brakes. Use this lever to adjust
Trailer Gain to properly adjust the
power output to the trailer brakes.
Page 327 of 501

Chevrolet Silverado Owner Manual (GMNA-Localizing-U.S./Canada/Mexico-
11349200) - 2018 - CRC - 2/27/18
326 Driving and Operating
The trailer's and the vehicle's brake
lamps will come on when either
vehicle brakes or manual trailer
brakes are applied.
Trailer Gain Adjustment Procedure
Trailer Gain should be set for a
specific trailering condition and must
be adjusted anytime vehicle loading,
trailer loading, or road surface
conditions change.
{Warning
Trailer brakes that are
over-gained or under-gained may
not stop the vehicle and the trailer
as intended and can result in a
crash. Always follow the
instructions to set the Trailer Gain
for the proper trailer stopping
performance.
Use the following to adjust Trailer
Gain for each towing condition: 1. Drive the vehicle with the trailer attached on a level road
surface representative of the
towing condition and free of traffic at about 32 to 40 km/h
(20 to 25 mph) and fully apply
the Manual Trailer Brake Apply
Lever.
Adjusting Trailer Gain at
speeds lower than 32 to
40 km/h (20 to 25 mph) may
result in an incorrect gain
setting.
2. Adjust the Trailer Gain, using the Trailer Gain Adjustment
Buttons, to just below the point
of trailer wheel lock-up,
indicated by trailer wheel
squeal or tire smoke when a
trailer wheel locks.
Trailer wheel lock-up may not
occur if towing a heavily loaded
trailer. In this case, adjust the
Trailer Gain to the highest
allowable setting for the towing
condition.
3. Readjust Trailer Gain anytime vehicle loading, trailer loading,
or road surface conditions
change or if trailer wheel
lock-up is noticed at any time
while towing. Other ITBC-Related DIC Messages
In addition to displaying TRAILER
GAIN and OUTPUT through the
DIC, trailer connection and ITBC
system status are displayed on
the DIC.
TRAILER CONNECTED: This
message will briefly display when a
trailer with electric brakes is first
connected to the vehicle. This
message will automatically turn off
in about 10 seconds. This message
can be acknowledged before it
automatically turns off.
CHECK TRAILER WIRING: This
message will display if:
.
The ITBC system first
determines connection to a
trailer with electric brakes and
then the trailer harness becomes
disconnected from the vehicle.
If the disconnect occurs while
the vehicle is stationary, this
message will automatically turn
off in about 30 seconds. This
message will also turn off if it is
acknowledged or if the trailer
harness is reconnected.
Page 348 of 501

Chevrolet Silverado Owner Manual (GMNA-Localizing-U.S./Canada/Mexico-
11349200) - 2018 - CRC - 2/27/18
Vehicle Care 347
1. Display the OIL LIFEREMAINING on the DIC. If the
vehicle does not have DIC
buttons, the vehicle must be in
P (Park) to access this display.
See Driver Information Center
(DIC) (Base Level) 0155 or
Driver Information Center (DIC)
(Uplevel) 0156.
2. Press and hold
V, or the trip
odometer reset stem if the
vehicle does not have DIC
buttons, for several seconds.
The oil life will change
to 100%.
The oil life system can also be reset
as follows:
1. Display the OIL LIFE REMAINING on the DIC.
See Driver Information Center
(DIC) (Base Level) 0155 or
Driver Information Center (DIC)
(Uplevel) 0156.
2. Fully press the accelerator pedal slowly three times within
five seconds. 3. Display the OIL LIFE
REMAINING on the DIC. If the
display shows 100%, the
system is reset.
If the vehicle has a CHANGE
ENGINE OIL SOON message and it
comes back on when the vehicle is
started and/or the OIL LIFE
REMAINING is near 0%, the engine
oil life system has not been reset.
Repeat the procedure.
Automatic Transmission
Fluid (6-Speed
Transmission)
When to Check and Change
Automatic Transmission Fluid
It is usually not necessary to check
the transmission fluid level. The only
reason for fluid loss is a
transmission leak or overheated
transmission. If a small leak is
suspected, then use the following
checking procedures to check the
fluid level. However, if there is a
large leak, then it may be necessary
to have the vehicle towed to a dealer service department and have
it repaired before driving the vehicle
further.
Caution
Use of the incorrect automatic
transmission fluid may damage
the vehicle, and the damage may
not be covered by the vehicle
warranty. Always use the
automatic transmission fluid listed
in
Recommended Fluids and
Lubricants 0451.
Change the fluid and filter at the
scheduled maintenance intervals
listed in Maintenance Schedule
0 443. Be sure to use the
transmission fluid listed in
Recommended Fluids and
Lubricants 0451.