2018 CHEVROLET SILVERADO engine overheat
[x] Cancel search: engine overheatPage 300 of 501

Chevrolet Silverado Owner Manual (GMNA-Localizing-U.S./Canada/Mexico-
11349200) - 2018 - CRC - 2/27/18
Driving and Operating 299
When towing a trailer, the arrows on
the instrument cluster flash for turns
even if the bulbs on the trailer are
burned out.
Check occasionally to be sure the
trailer bulbs are still working.
Driving on Grades
Reduce speed and shift to a lower
gearbefore starting down a long or
steep downgrade. If the
transmission is not shifted down, the
brakes might get hot and no longer
work well.
Vehicles can tow in D (Drive). Shift
the transmission to a lower gear if
the transmission shifts too often
under heavy loads and/or hilly
conditions.
The Tow/Haul Mode may be used if
the transmission shifts too often.
See Tow/Haul Mode 0262.
When towing at high altitude on
steep uphill grades, consider the
following: Engine coolant will boil at
a lower temperature than at normal
altitudes. If the engine is turned off
immediately after towing at high altitude on steep uphill grades, the
vehicle may show signs similar to
engine overheating. To avoid this,
let the engine run while parked,
preferably on level ground, with the
transmission in P (Park) for a few
minutes before turning the engine
off. If the overheat warning comes
on, see
Engine Overheating 0356.
Parking on Hills
{Warning
Parking the vehicle on a hill with
the trailer attached can be
dangerous. If something goes
wrong, the rig could start to move.
People can be injured, and both
the vehicle and the trailer can be
damaged. When possible, always
park the rig on a flat surface.
If parking the rig on a hill: 1. Press the brake pedal, but do not shift into P (Park) yet. Turn
the wheels into the curb if
facing downhill or into traffic if
facing uphill. 2. Have someone place chocks
under the trailer wheels.
3. When the wheel chocks are in place, release the regular
brakes until the chocks absorb
the load.
4. Reapply the brake pedal. Then apply the parking brake and
shift into P (Park).
5. Release the brake pedal.
For vehicles with a manual
transmission, move the shift lever
into R (Reverse) if parking on a
downhill slope, use 1 (First) gear if
parking on an uphill slope.
Leaving After Parking on a Hill
1. Apply and hold the brake pedal.
.Start the engine.
. Shift into a gear.
. Release the parking brake.
2. Let up on the brake pedal.
3. Drive slowly until the trailer is clear of the chocks.
Page 301 of 501
Chevrolet Silverado Owner Manual (GMNA-Localizing-U.S./Canada/Mexico-
11349200) - 2018 - CRC - 2/27/18
300 Driving and Operating
4. Stop and have someone pickup and store the chocks.
Maintenance when Trailer
Towing
The vehicle needs service more
often when pulling a trailer. See
Maintenance Schedule 0443.
Things that are especially important
in trailer operation are automatic
transmission fluid, engine oil, axle
lubricant, belts, cooling system, and
brake system. It is a good idea to
inspect these before and during
the trip.
Check periodically to see that all
hitch nuts and bolts are tight.
Engine Cooling When Trailer
Towing
The cooling system may temporarily
overheat during severe operating
conditions. See Engine Overheating
0 356.
Trailer Towing
If the vehicle has a diesel engine,
see the Duramax diesel
supplement.
Do not tow a trailer during break-in.
See New Vehicle Break-In 0247.
{Warning
The driver can lose control when
pulling a trailer if the correct
equipment is not used or the
vehicle is not driven properly. For
example, if the trailer is too heavy
or the trailer brakes are
inadequate for the load, the
vehicle may not stop as expected.
The driver and passengers could
be seriously injured. The vehicle
may also be damaged; the
resulting repairs would not be
covered by the vehicle warranty.
Pull a trailer only if all the steps in
this section have been followed.
Ask your dealer for advice and
information about towing a trailer
with the vehicle.
Caution
Pulling a trailer improperly can
damage the vehicle and result in
costly repairs not covered by the
vehicle warranty. To pull a trailer
correctly, follow the advice in this
section and see your dealer for
important information about
towing a trailer with the vehicle.
See Vehicle Load Limits 0239 for
more information about the vehicle's
maximum load capacity.
To identify the trailering capacity of
the vehicle, read the information in
“Weight of the Trailer” later in this
section.
Trailering is different than just
driving the vehicle by itself.
Trailering means changes in
handling, acceleration, braking,
durability, and fuel economy.
Successful, safe trailering takes
correct equipment, and it has to be
used properly.
Page 331 of 501
Chevrolet Silverado Owner Manual (GMNA-Localizing-U.S./Canada/Mexico-
11349200) - 2018 - CRC - 2/27/18
330 Driving and Operating
Adding a Snow Plow or
Similar Equipment
Caution
Do not exceed 72 km/h (45 mph)
with a snow plow mounted to the
vehicle. The vehicle could
overheat and be damaged.
Before installing a snow plow on the
vehicle, follow these guidelines:
Caution
If the vehicle does not have the
snow plow prep package, RPO
VYU, adding a plow can damage
the vehicle, and the repairs would
not be covered by the vehicle
warranty. Unless the vehicle was
built to carry a snow plow, do not
add one to the vehicle. If the
vehicle has RPO VYU, then the
payload the vehicle can carry will
be reduced when a snow plow is (Continued)
Caution (Continued)
installed. The vehicle can be
damaged if either the front or rear
axle ratings or the Gross Vehicle
Weight Rating (GVWR) are
exceeded.
The plow the vehicle can carry
depends on many things, such as:
. The options the vehicle came
with, and the weight of those
options.
. The weight and number of
passengers to be carried.
. The weight of items added to the
vehicle, like a tool box or
truck cap.
. The total weight of any
additional cargo to be carried.
For example, if the snow plow
weighs 318 kg (700 lb), the total
weight of all occupants and cargo
inside the cab should not exceed
135 kg (300 lb). This means that you
may only be able to carry one
passenger. Even this may be too much if there is other equipment
already adding to the weight of the
vehicle.
To safely carry a snow plow on the
vehicle:
.
Follow all aftermarket snow plow
manufacturer ’s instructions for
the operation and transportation
of the snow plow.
. With a snow plow attached, the
engine coolant temperature
gauge may show a higher
temperature than while driving
without one. The snow plow
could block the airflow to the
radiator. This could be more
noticeable as vehicle speed
increases. At speeds above
72 km (45 mph), this may cause
the engine coolant to overheat.
. To increase the airflow, move the
snow plow blade postion.
. If driving more than 24 km
(15 mi), angle the plow blade
position.
Page 335 of 501
Chevrolet Silverado Owner Manual (GMNA-Localizing-U.S./Canada/Mexico-
11349200) - 2018 - CRC - 2/27/18
334 Vehicle Care
Vehicle Care
General Information
General Information . . . . . . . . . . 335
California Proposition65 Warning . . . . . . . . . . . . . . . . . 336
California Perchlorate Materials Requirements . . . . . 336
Accessories and Modifications . . . . . . . . . . . . . . . . 336
Vehicle Checks
Doing Your OwnService Work . . . . . . . . . . . . . . . 337
Hood . . . . . . . . . . . . . . . . . . . . . . . . . 337
Engine Compartment Overview . . . . . . . . . . . . . . . . . . . . 338
Engine Oil . . . . . . . . . . . . . . . . . . . . 343
Engine Oil Life System . . . . . . . 346
Automatic Transmission Fluid (6-Speed Transmission) . . . . . 347
Automatic Transmission Fluid (8-Speed Transmission) . . . . . 350
Manual Transmission Fluid . . . 350
Hydraulic Clutch . . . . . . . . . . . . . . 351
Engine Air Cleaner/Filter . . . . . . 351
Cooling System . . . . . . . . . . . . . . 352
Engine Overheating . . . . . . . . . . 356 Overheated Engine Protection
Operating Mode . . . . . . . . . . . . . 358
Engine Fan . . . . . . . . . . . . . . . . . . . 358
Power Steering Fluid (1500 Series) . . . . . . . . . . . . . . . . . . . . . . 359
Power Steering Fluid (2500/ 3500 Series) . . . . . . . . . . . . . . . . 359
Washer Fluid . . . . . . . . . . . . . . . . . 359
Brakes . . . . . . . . . . . . . . . . . . . . . . . 360
Brake Fluid . . . . . . . . . . . . . . . . . . . 361
Battery - North America . . . . . . 362
Four-Wheel Drive . . . . . . . . . . . . . 363
Front Axle . . . . . . . . . . . . . . . . . . . . 364
Rear Axle . . . . . . . . . . . . . . . . . . . . 365
Noise Control System . . . . . . . . 366
Starter Switch Check . . . . . . . . . 367
Automatic Transmission Shift Lock Control Function
Check . . . . . . . . . . . . . . . . . . . . . . . 368
Ignition Transmission Lock Check . . . . . . . . . . . . . . . . . . . . . . . 368
Park Brake and P (Park) Mechanism Check . . . . . . . . . . 368
Wiper Blade Replacement . . . . 369
Windshield Replacement . . . . . 369
Gas Strut(s) . . . . . . . . . . . . . . . . . . 370
Headlamp Aiming
Headlamp Aiming . . . . . . . . . . . . 371
Bulb Replacement
Bulb Replacement . . . . . . . . . . . . 371
Halogen Bulbs . . . . . . . . . . . . . . . . 371
High Intensity Discharge (HID) Lighting . . . . . . . . . . . . . . . . . . . . . 371
LED Lighting . . . . . . . . . . . . . . . . . 371
Headlamps, Front Turn Signal,
Sidemarker, and Parking
Lamps . . . . . . . . . . . . . . . . . . . . . . 372
Fog Lamps . . . . . . . . . . . . . . . . . . . 373
Taillamps (Chassis Cab Models) . . . . . . . . . . . . . . . . . . . . . 373
Taillamps, Turn Signal, Stoplamps, and Back-Up
Lamps . . . . . . . . . . . . . . . . . . . . . . 373
Center High-Mounted Stoplamp (CHMSL) and
Cargo Lamp . . . . . . . . . . . . . . . . . 375
Electrical System
High Voltage Devices andWiring . . . . . . . . . . . . . . . . . . . . . . . 375
Electrical System Overload . . . 375
Fuses and Circuit Breakers . . . 376
Engine Compartment Fuse Block . . . . . . . . . . . . . . . . . . . . . . . . 376
Instrument Panel Fuse Block (Right) . . . . . . . . . . . . . . . . . . . . . . 380
Instrument Panel Fuse Block (Left) . . . . . . . . . . . . . . . . . 381
Page 348 of 501

Chevrolet Silverado Owner Manual (GMNA-Localizing-U.S./Canada/Mexico-
11349200) - 2018 - CRC - 2/27/18
Vehicle Care 347
1. Display the OIL LIFEREMAINING on the DIC. If the
vehicle does not have DIC
buttons, the vehicle must be in
P (Park) to access this display.
See Driver Information Center
(DIC) (Base Level) 0155 or
Driver Information Center (DIC)
(Uplevel) 0156.
2. Press and hold
V, or the trip
odometer reset stem if the
vehicle does not have DIC
buttons, for several seconds.
The oil life will change
to 100%.
The oil life system can also be reset
as follows:
1. Display the OIL LIFE REMAINING on the DIC.
See Driver Information Center
(DIC) (Base Level) 0155 or
Driver Information Center (DIC)
(Uplevel) 0156.
2. Fully press the accelerator pedal slowly three times within
five seconds. 3. Display the OIL LIFE
REMAINING on the DIC. If the
display shows 100%, the
system is reset.
If the vehicle has a CHANGE
ENGINE OIL SOON message and it
comes back on when the vehicle is
started and/or the OIL LIFE
REMAINING is near 0%, the engine
oil life system has not been reset.
Repeat the procedure.
Automatic Transmission
Fluid (6-Speed
Transmission)
When to Check and Change
Automatic Transmission Fluid
It is usually not necessary to check
the transmission fluid level. The only
reason for fluid loss is a
transmission leak or overheated
transmission. If a small leak is
suspected, then use the following
checking procedures to check the
fluid level. However, if there is a
large leak, then it may be necessary
to have the vehicle towed to a dealer service department and have
it repaired before driving the vehicle
further.
Caution
Use of the incorrect automatic
transmission fluid may damage
the vehicle, and the damage may
not be covered by the vehicle
warranty. Always use the
automatic transmission fluid listed
in
Recommended Fluids and
Lubricants 0451.
Change the fluid and filter at the
scheduled maintenance intervals
listed in Maintenance Schedule
0 443. Be sure to use the
transmission fluid listed in
Recommended Fluids and
Lubricants 0451.
Page 349 of 501
Chevrolet Silverado Owner Manual (GMNA-Localizing-U.S./Canada/Mexico-
11349200) - 2018 - CRC - 2/27/18
348 Vehicle Care
How to Check Automatic
Transmission FluidCaution
Too much or too little fluid can
damage the transmission. Too
much can mean that some of the
fluid could come out and fall on
hot engine parts or exhaust
system parts, starting a fire. Too
little fluid could cause the
transmission to overheat. Be sure
to get an accurate reading if
checking the transmission fluid.
Before checking the fluid level,
prepare the vehicle: 1. Start the engine and park the vehicle on a level surface.
Keep the engine running.
2. Apply the parking brake and place the shift lever in P (Park).
3. With your foot on the brake pedal, move the shift lever
through each gear range,
pausing for about three seconds in each range.
Then, move the shift lever back
to P (Park).
4. Allow the engine to idle (500– 800 rpm) for at least
one minute. Slowly release the
brake pedal.
5. Keep the engine running and check the transmission fluid
temperature on the Driver
Information Center (DIC).
See Driver Information Center
(DIC) (Base Level) 0155 or
Driver Information Center (DIC)
(Uplevel) 0156.
6. Using the transmission fluid temperature reading, determine
and perform the appropriate
check procedure. If the
transmission fluid temperature
reading is not within the
required temperature ranges,
allow the vehicle to cool,
or operate the vehicle until the
appropriate transmission fluid
temperature is reached. Cold Check Procedure
Use this procedure only as a
reference to determine if the
transmission has enough fluid to be
operated safely until a hot check
procedure can be made. The hot
check procedure is the most
accurate method to check the fluid
level. Perform the hot check
procedure at the first opportunity.
Use this cold check procedure to
check fluid level when the
transmission temperature is
between 27 °C and 32 °C (80 °F and
90 °F).
1. Locate the transmission
dipstick at the rear of the
engine compartment, on the
passenger side of the vehicle.
See Engine Compartment
Overview 0338.
Page 354 of 501
Chevrolet Silverado Owner Manual (GMNA-Localizing-U.S./Canada/Mexico-
11349200) - 2018 - CRC - 2/27/18
Vehicle Care 353
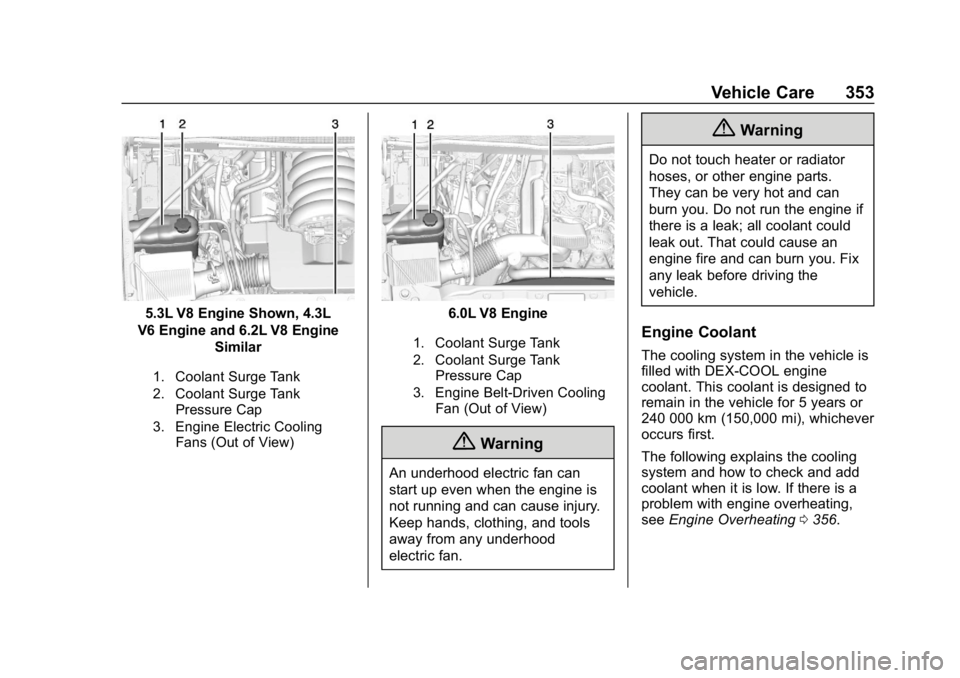
5.3L V8 Engine Shown, 4.3L
V6 Engine and 6.2L V8 Engine Similar
1. Coolant Surge Tank
2. Coolant Surge TankPressure Cap
3. Engine Electric Cooling Fans (Out of View)
6.0L V8 Engine
1. Coolant Surge Tank
2. Coolant Surge TankPressure Cap
3. Engine Belt-Driven Cooling Fan (Out of View)
{Warning
An underhood electric fan can
start up even when the engine is
not running and can cause injury.
Keep hands, clothing, and tools
away from any underhood
electric fan.
{Warning
Do not touch heater or radiator
hoses, or other engine parts.
They can be very hot and can
burn you. Do not run the engine if
there is a leak; all coolant could
leak out. That could cause an
engine fire and can burn you. Fix
any leak before driving the
vehicle.
Engine Coolant
The cooling system in the vehicle is
filled with DEX-COOL engine
coolant. This coolant is designed to
remain in the vehicle for 5 years or
240 000 km (150,000 mi), whichever
occurs first.
The following explains the cooling
system and how to check and add
coolant when it is low. If there is a
problem with engine overheating,
see Engine Overheating 0356.
Page 355 of 501
Chevrolet Silverado Owner Manual (GMNA-Localizing-U.S./Canada/Mexico-
11349200) - 2018 - CRC - 2/27/18
354 Vehicle Care
What to Use
{Warning
Plain water, or other liquids such
as alcohol, can boil before the
proper coolant mixture will. With
plain water or the wrong mixture,
the engine could get too hot but
there would not be an overheat
warning. The engine could catch
fire and you or others could be
burned.
Use a 50/50 mixture of clean,
drinkable water and DEX-COOL
coolant. This mixture:
. Gives freezing protection down
to−37 °C (−34 °F), outside
temperature.
. Gives boiling protection up to
129 °C (265 °F), engine
temperature.
. Protects against rust and
corrosion.
. Will not damage aluminum parts. .
Helps keep the proper engine
temperature.Caution
Do not use anything other than a
mix of DEX-COOL coolant that
meets GM Standard
GMW3420 and clean, drinkable
water. Anything else can cause
damage to the engine cooling
system and the vehicle, which
would not be covered by the
vehicle warranty.
Never dispose of engine coolant by
putting it in the trash, or by pouring
it on the ground, or into sewers,
streams, or bodies of water. Have
the coolant changed by an
authorized service center, familiar
with legal requirements regarding
used coolant disposal. This will help
protect the environment and your
health.
Checking Coolant
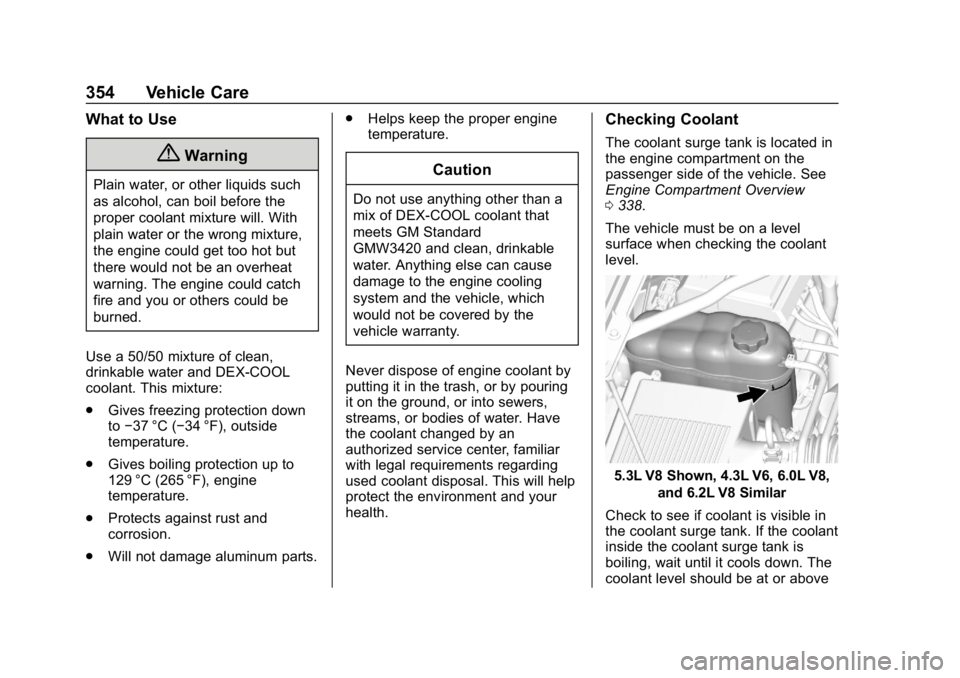
The coolant surge tank is located in
the engine compartment on the
passenger side of the vehicle. See
Engine Compartment Overview
0 338.
The vehicle must be on a level
surface when checking the coolant
level.
5.3L V8 Shown, 4.3L V6, 6.0L V8, and 6.2L V8 Similar
Check to see if coolant is visible in
the coolant surge tank. If the coolant
inside the coolant surge tank is
boiling, wait until it cools down. The
coolant level should be at or above