2018 CHEVROLET SILVERADO lock
[x] Cancel search: lockPage 340 of 501

Chevrolet Silverado Owner Manual (GMNA-Localizing-U.S./Canada/Mexico-
11349200) - 2018 - CRC - 2/27/18
Vehicle Care 339
1. Positive (+) Terminal. SeeJump Starting - North America
0421.
2. Battery - North America 0362.
3. Coolant Surge Tank and Pressure Cap. See Cooling
System 0352.
4. Engine Air Cleaner/Filter 0351.
5. Automatic Transmission Dipstick (If Equipped). See
“How to Check Automatic
Transmission Fluid” under
Automatic Transmission Fluid
(6-Speed Transmission) 0347
or Automatic Transmission
Fluid (8-Speed Transmission)
0 350. 6. Remote Negative (–) Location.
See Jump Starting - North
America 0421.
7. Engine Cooling Fans (Out of View). See Cooling System
0 352.
8. Engine Oil Fill Cap. See “When
to Add Engine Oil” under
Engine Oil 0343.
9. Engine Oil Dipstick. See “Checking Engine Oil” under
Engine Oil 0343. 10. Brake Fluid Reservoir. See
Brake Fluid 0361.
11. Windshield Washer Fluid Reservoir. See “Adding Washer
Fluid” under Washer Fluid
0 359.
12. Engine Compartment Fuse
Block 0376.
Page 342 of 501

Chevrolet Silverado Owner Manual (GMNA-Localizing-U.S./Canada/Mexico-
11349200) - 2018 - CRC - 2/27/18
Vehicle Care 341
1. Positive (+) Terminal. SeeJump Starting - North America
0421.
2. Battery - North America 0362.
3. Coolant Surge Tank and Pressure Cap. See Cooling
System 0352.
4. Engine Air Cleaner/Filter 0351.
5. Automatic Transmission Dipstick (If Equipped). See
“How to Check Automatic
Transmission Fluid” under
Automatic Transmission Fluid
(6-Speed Transmission) 0347
or Automatic Transmission
Fluid (8-Speed Transmission)
0 350. 6. Remote Negative (–) Location
(Out of View). See Jump
Starting - North America 0421.
7. Engine Cooling Fans (Out of View). See Cooling System
0 352.
8. Engine Oil Fill Cap. See “When
to Add Engine Oil” under
Engine Oil 0343.
9. Engine Oil Dipstick. See “Checking Engine Oil” under
Engine Oil 0343. 10. Windshield Washer Fluid
Reservoir. See “Adding Washer
Fluid” under Washer Fluid
0 359.
11. Brake Fluid Reservoir. See Brake Fluid 0361.
12. Engine Compartment Fuse
Block 0376.
Page 344 of 501

Chevrolet Silverado Owner Manual (GMNA-Localizing-U.S./Canada/Mexico-
11349200) - 2018 - CRC - 2/27/18
Vehicle Care 343
1. Positive (+) Terminal. SeeJump Starting - North America
0421.
2. Battery - North America 0362.
3. Coolant Surge Tank and Pressure Cap. See Cooling
System 0352.
4. Engine Air Cleaner/Filter 0351.
5. Automatic Transmission Dipstick (If Equipped). See
“How to Check Automatic
Transmission Fluid” under
Automatic Transmission Fluid
(6-Speed Transmission) 0347
or Automatic Transmission
Fluid (8-Speed Transmission)
0 350.
6. Engine Oil Dipstick. See “Checking Engine Oil” under
Engine Oil 0343.
7. Engine Oil Fill Cap. See “When
to Add Engine Oil” under
Engine Oil 0343.
8. Engine Cooling Fan (Out of View). See Cooling System
0 352. 9. Remote Negative (–) Location.
See Jump Starting - North
America 0421.
10. Power Steering Fluid Reservoir. See Power Steering
Fluid (1500 Series) 0359 or
Power Steering Fluid (2500/
3500 Series) 0359.
11. Windshield Washer Fluid Reservoir. See “Adding Washer
Fluid” under Washer Fluid
0 359.
12. Brake Fluid Reservoir. See Brake Fluid 0361.
13. Clutch Fluid Reservoir (If Equipped). See Hydraulic
Clutch 0351.
14. Auxiliary Battery (If Equipped). SeeBattery - North America
0 362.
15. Engine Compartment Fuse
Block 0376.
If the vehicle has a diesel engine
and/or an Allison Transmission, see
the Duramax diesel supplement. For an eAssist vehicle, see the
Silverado/Sierra eAssist
supplement.
Engine Oil
For diesel engine vehicles, see
“Engine Oil”
in the Duramax diesel
supplement.
To ensure proper engine
performance and long life, careful
attention must be paid to engine oil.
Following these simple, but
important steps will help protect
your investment:
. Use engine oil approved to the
proper specification and of the
proper viscosity grade. See
“Selecting the Right Engine Oil”
in this section.
. Check the engine oil level
regularly and maintain the
proper oil level. See “Checking
Engine Oil” and“When to Add
Engine Oil” in this section.
. Change the engine oil at the
appropriate time. See Engine Oil
Life System 0346.
Page 350 of 501
Chevrolet Silverado Owner Manual (GMNA-Localizing-U.S./Canada/Mexico-
11349200) - 2018 - CRC - 2/27/18
Vehicle Care 349
2. Flip the handle up, then pull outthe dipstick and wipe it with a
clean rag or paper towel.
3. Install the dipstick by pushing it back in all the way; wait
three seconds, and then pull it
back out again.
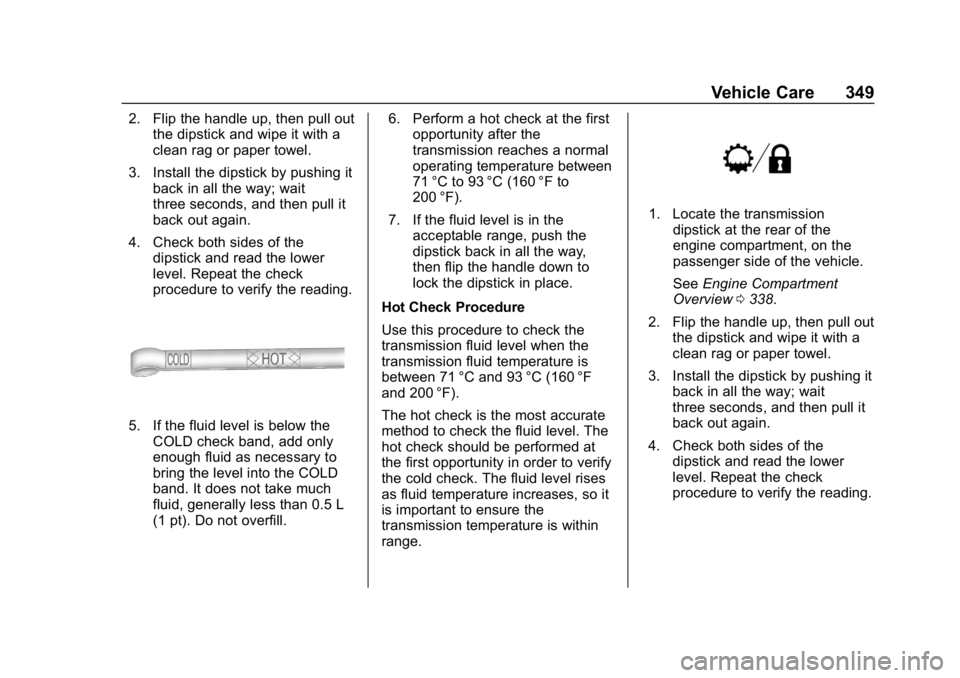
4. Check both sides of the dipstick and read the lower
level. Repeat the check
procedure to verify the reading.
5. If the fluid level is below the
COLD check band, add only
enough fluid as necessary to
bring the level into the COLD
band. It does not take much
fluid, generally less than 0.5 L
(1 pt). Do not overfill. 6. Perform a hot check at the first
opportunity after the
transmission reaches a normal
operating temperature between
71 °C to 93 °C (160 °F to
200 °F).
7. If the fluid level is in the acceptable range, push the
dipstick back in all the way,
then flip the handle down to
lock the dipstick in place.
Hot Check Procedure
Use this procedure to check the
transmission fluid level when the
transmission fluid temperature is
between 71 °C and 93 °C (160 °F
and 200 °F).
The hot check is the most accurate
method to check the fluid level. The
hot check should be performed at
the first opportunity in order to verify
the cold check. The fluid level rises
as fluid temperature increases, so it
is important to ensure the
transmission temperature is within
range.
1. Locate the transmission dipstick at the rear of the
engine compartment, on the
passenger side of the vehicle.
See Engine Compartment
Overview 0338.
2. Flip the handle up, then pull out the dipstick and wipe it with a
clean rag or paper towel.
3. Install the dipstick by pushing it back in all the way; wait
three seconds, and then pull it
back out again.
4. Check both sides of the dipstick and read the lower
level. Repeat the check
procedure to verify the reading.
Page 351 of 501
Chevrolet Silverado Owner Manual (GMNA-Localizing-U.S./Canada/Mexico-
11349200) - 2018 - CRC - 2/27/18
350 Vehicle Care
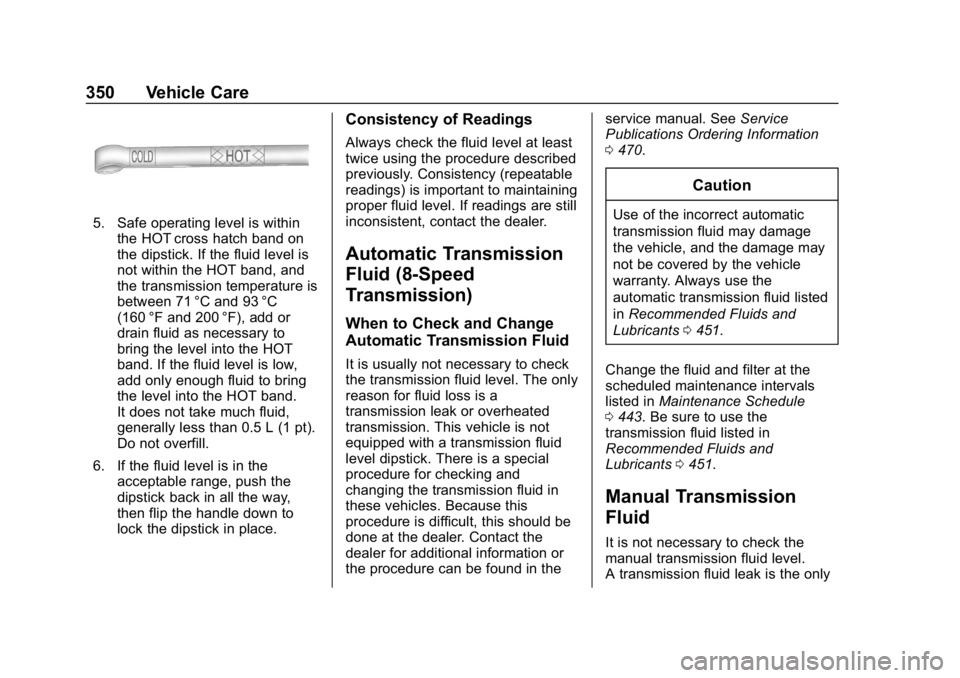
5. Safe operating level is withinthe HOT cross hatch band on
the dipstick. If the fluid level is
not within the HOT band, and
the transmission temperature is
between 71 °C and 93 °C
(160 °F and 200 °F), add or
drain fluid as necessary to
bring the level into the HOT
band. If the fluid level is low,
add only enough fluid to bring
the level into the HOT band.
It does not take much fluid,
generally less than 0.5 L (1 pt).
Do not overfill.
6. If the fluid level is in the acceptable range, push the
dipstick back in all the way,
then flip the handle down to
lock the dipstick in place.
Consistency of Readings
Always check the fluid level at least
twice using the procedure described
previously. Consistency (repeatable
readings) is important to maintaining
proper fluid level. If readings are still
inconsistent, contact the dealer.
Automatic Transmission
Fluid (8-Speed
Transmission)
When to Check and Change
Automatic Transmission Fluid
It is usually not necessary to check
the transmission fluid level. The only
reason for fluid loss is a
transmission leak or overheated
transmission. This vehicle is not
equipped with a transmission fluid
level dipstick. There is a special
procedure for checking and
changing the transmission fluid in
these vehicles. Because this
procedure is difficult, this should be
done at the dealer. Contact the
dealer for additional information or
the procedure can be found in the service manual. See
Service
Publications Ordering Information
0 470.
Caution
Use of the incorrect automatic
transmission fluid may damage
the vehicle, and the damage may
not be covered by the vehicle
warranty. Always use the
automatic transmission fluid listed
in Recommended Fluids and
Lubricants 0451.
Change the fluid and filter at the
scheduled maintenance intervals
listed in Maintenance Schedule
0 443. Be sure to use the
transmission fluid listed in
Recommended Fluids and
Lubricants 0451.
Manual Transmission
Fluid
It is not necessary to check the
manual transmission fluid level.
A transmission fluid leak is the only
Page 357 of 501
Chevrolet Silverado Owner Manual (GMNA-Localizing-U.S./Canada/Mexico-
11349200) - 2018 - CRC - 2/27/18
356 Vehicle Care
Turn the pressure cap slowly
counterclockwise about one full
turn. If a hiss is heard, wait for
that to stop. A hiss means
there is still some pressure left.
2. Keep turning the pressure cap slowly, and remove it.
3. Fill the coolant surge tank with the proper mixture to the full
cold mark.
4. With the coolant surge tank pressure cap off, start the
engine and let it run until the
engine coolant temperature
gauge indicates approximately
90 °C (195 °F).
By this time, the coolant level
inside the coolant surge tank
may be lower. If the level is
lower, add more of the proper
mixture to the coolant surge
tank until the level reaches the
full cold mark.
5. Replace the pressure cap tightly. 6. Verify coolant level after the
engine is shut off and the
coolant is cold. If necessary,
repeat coolant fill procedure
Steps 1–6.
Caution
If the pressure cap is not tightly
installed, coolant loss and engine
damage may occur. Be sure the
cap is properly and tightly
secured.
Engine Overheating
If the vehicle has the Duramax
diesel engine, see the Duramax
diesel supplement.
Caution
Do not run the engine if there is a
leak in the engine cooling system.
This can cause a loss of all
coolant and can damage the
system and vehicle. Have any
leaks fixed right away. The vehicle has several indicators
to warn of engine overheating.
There is a coolant temperature
gauge in the vehicle's instrument
cluster. See
Engine Coolant
Temperature Gauge 0142.
In addition, there are ENGINE
OVERHEATED STOP ENGINE,
ENGINE OVERHEATED IDLE
ENGINE, and ENGINE POWER IS
REDUCED messages in the Driver
Information Center (DIC).
If the decision is made not to lift the
hood when this warning appears,
get service help right away. See
Roadside Assistance Program
0 465.
If the decision is made to lift the
hood, make sure the vehicle is
parked on a level surface.
4.3L V6, 5.3L V8, and 6.2L
V8 Engines
Check to see if the engine cooling
fans are running. If the engine is
overheating, the fans should be
Page 369 of 501
Chevrolet Silverado Owner Manual (GMNA-Localizing-U.S./Canada/Mexico-
11349200) - 2018 - CRC - 2/27/18
368 Vehicle Care
Automatic Transmission
Shift Lock Control
Function Check
{Warning
When you are doing this
inspection, the vehicle could
move suddenly. If the vehicle
moves, you or others could be
injured.
1. Before starting this check, be sure there is enough room
around the vehicle. It should be
parked on a level surface.
2. Apply the parking brake. Be ready to apply the regular
brake immediately if the vehicle
begins to move.
3. With the engine off, turn the ignition on, but do not start the
engine. Without applying the
regular brake, try to move the
shift lever out of P (Park) with normal effort. If the shift lever
moves out of P (Park), contact
your dealer for service.
Ignition Transmission
Lock Check
While parked, and with the parking
brake set, try to turn the ignition off
in each shift lever position.
.
For automatic transmission
vehicles, the ignition should turn
to off only when the shift lever is
in P (Park).
. For manual transmission
vehicles, the ignition should turn
off only when you press the key
release button.
On all vehicles, the ignition key
should come out only when the
ignition is off.
Contact your dealer if service is
required.
Park Brake and P (Park)
Mechanism Check
{Warning
When you are doing this check,
the vehicle could begin to move.
You or others could be injured
and property could be damaged.
Make sure there is room in front
of the vehicle in case it begins to
roll. Be ready to apply the regular
brake at once should the vehicle
begin to move.
Park on a fairly steep hill, with the
vehicle facing downhill. Keeping
your foot on the regular brake, set
the parking brake.
. To check the parking brake's
holding ability: With the engine
running and the transmission in
N (Neutral), slowly remove foot
pressure from the regular brake
pedal. Do this until the vehicle is
held by the parking brake only.
Page 373 of 501
Chevrolet Silverado Owner Manual (GMNA-Localizing-U.S./Canada/Mexico-
11349200) - 2018 - CRC - 2/27/18
372 Vehicle Care
Headlamps, Front Turn
Signal, Sidemarker, and
Parking Lamps
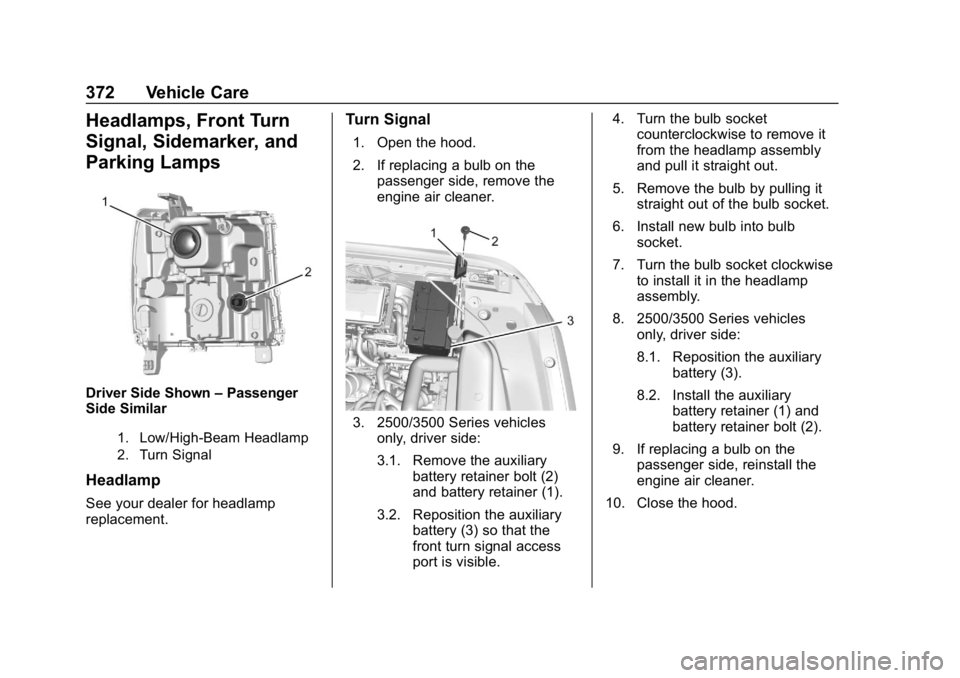
Driver Side Shown–Passenger
Side Similar
1. Low/High-Beam Headlamp
2. Turn Signal
Headlamp
See your dealer for headlamp
replacement.
Turn Signal
1. Open the hood.
2. If replacing a bulb on the
passenger side, remove the
engine air cleaner.
3. 2500/3500 Series vehicles
only, driver side:
3.1. Remove the auxiliary battery retainer bolt (2)
and battery retainer (1).
3.2. Reposition the auxiliary battery (3) so that the
front turn signal access
port is visible. 4. Turn the bulb socket
counterclockwise to remove it
from the headlamp assembly
and pull it straight out.
5. Remove the bulb by pulling it straight out of the bulb socket.
6. Install new bulb into bulb socket.
7. Turn the bulb socket clockwise to install it in the headlamp
assembly.
8. 2500/3500 Series vehicles only, driver side:
8.1. Reposition the auxiliary
battery (3).
8.2. Install the auxiliary battery retainer (1) and
battery retainer bolt (2).
9. If replacing a bulb on the passenger side, reinstall the
engine air cleaner.
10. Close the hood.