2018 CHEVROLET SILVERADO 2500 tire pressure
[x] Cancel search: tire pressurePage 160 of 489
Chevrolet Silverado LD 1500 and Silverado 2500/3500 Owner Manual (GMNA-
Localizing-U.S./Canada-12162993) - 2019 - crc - 4/4/18
Instruments and Controls 159
Vehicle Messages
Messages displayed on the DIC
indicate the status of the vehicle or
some action that may be needed to
correct a condition. Multiple
messages may appear one after
another.
The messages that do not require
immediate action can be
acknowledged and cleared by
pressing
V. The messages that
require immediate action cannot be
cleared until that action is
performed.
All messages should be taken
seriously; clearing the message
does not correct the problem.
If a SERVICE message appears,
see your dealer.
Follow the instructions given in the
messages. The system displays
messages regarding the following
topics:
. Service Messages
. Fluid Levels
. Vehicle Security .
Brakes
. Steering
. Ride Control Systems
. Driver Assistance Systems
. Cruise Control
. Lighting and Bulb Replacement
. Wiper/Washer Systems
. Doors and Windows
. Seat Belts
. Airbag Systems
. Engine and Transmission
. Tire Pressure
. Battery
Engine Power Messages
ENGINE POWER IS REDUCED
This message displays when the
vehicle's propulsion power is
reduced. Reduced propulsion power
can affect the vehicle's ability to
accelerate. If this message is on,
but there is no observed reduction
in performance, proceed to your
destination. The performance may be reduced the next time the vehicle
is driven. The vehicle may be driven
while this message is on, but
maximum acceleration and speed
may be reduced. Anytime this
message stays on, or displays
repeatedly, the vehicle should be
taken to your dealer for service as
soon as possible.
Vehicle Speed Messages
SPEED LIMITED TO
XXX KM/H (MPH)
This message shows that the
vehicle speed has been limited to
the speed displayed. The limited
speed is a protection for various
propulsion and vehicle systems,
such as lubrication, thermal,
suspension, Teen Driver if
equipped, or tires.
Page 231 of 489
Chevrolet Silverado LD 1500 and Silverado 2500/3500 Owner Manual (GMNA-
Localizing-U.S./Canada-12162993) - 2019 - crc - 4/4/18
230 Driving and Operating
If the vehicle starts to slide, follow
these suggestions:
.Ease your foot off the
accelerator pedal and steer the
way you want the vehicle to go.
The vehicle may straighten out.
Be ready for a second skid if it
occurs.
. Slow down and adjust your
driving according to weather
conditions. Stopping distance
can be longer and vehicle
control can be affected when
traction is reduced by water,
snow, ice, gravel, or other
material on the road. Learn to
recognize warning clues —such
as enough water, ice, or packed
snow on the road to make a
mirrored surface —and slow
down when you have any doubt.
. Try to avoid sudden steering,
acceleration, or braking,
including reducing vehicle speed
by shifting to a lower gear. Any
sudden changes could cause
the tires to slide. Remember: Antilock brakes help
avoid only the braking skid.
Off-Road Driving
Four-wheel-drive vehicles can be
used for off-road driving. Vehicles
without four-wheel drive and
vehicles not equipped with All
Terrain (AT) or On-Off Road (OOR)
tires must not be driven off-road
except on a level, solid surface. For
contact information about the
original equipment tires, see the
warranty manual.
One of the best ways for successful
off-road driving is to control the
speed.
{Warning
When driving off-road, bouncing
and quick changes in direction
can easily throw you out of
position. This could cause you to
lose control and crash. You and
your passengers should always
wear seat belts.
Before Driving Off-Road
.
Have all necessary maintenance
and service work completed.
. Fuel the vehicle, fill fluid levels,
and check inflation pressure in
all tires, including the spare,
if equipped.
. Read all the information about
four-wheel-drive vehicles in this
manual.
. Remove any underbody air
deflector, if equipped. Re-attach
the air deflector after off-road
driving.
. Know the local laws that apply to
off-road driving.
To gain more ground clearance if
needed, it may be necessary to
remove the front fascia lower air
dam, if equipped. However, driving
without the air dam reduces fuel
economy.
Page 240 of 489
Chevrolet Silverado LD 1500 and Silverado 2500/3500 Owner Manual (GMNA-
Localizing-U.S./Canada-12162993) - 2019 - crc - 4/4/18
Driving and Operating 239
{Warning
Do not load the vehicle any
heavier than the Gross
Vehicle Weight Rating
(GVWR), or either the
maximum front or rear Gross
Axle Weight Rating (GAWR).
This can cause systems to
break and change the way the
vehicle handles. This could
cause loss of control and a
crash. Overloading can also
reduce stopping distance,
damage the tires, and shorten
the life of the vehicle.Tire and Loading Information
Label
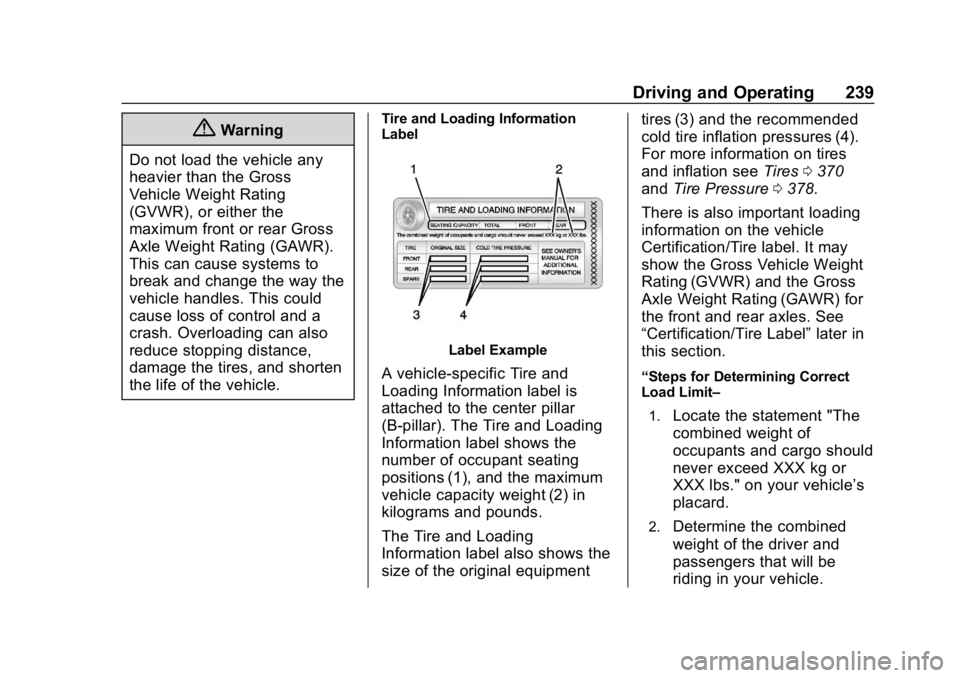
Label Example
A vehicle-specific Tire and
Loading Information label is
attached to the center pillar
(B-pillar). The Tire and Loading
Information label shows the
number of occupant seating
positions (1), and the maximum
vehicle capacity weight (2) in
kilograms and pounds.
The Tire and Loading
Information label also shows the
size of the original equipment tires (3) and the recommended
cold tire inflation pressures (4).
For more information on tires
and inflation see
Tires0370
and Tire Pressure 0378.
There is also important loading
information on the vehicle
Certification/Tire label. It may
show the Gross Vehicle Weight
Rating (GVWR) and the Gross
Axle Weight Rating (GAWR) for
the front and rear axles. See
“Certification/Tire Label” later in
this section.“Steps for Determining Correct
Load Limit–
1.
Locate the statement "The
combined weight of
occupants and cargo should
never exceed XXX kg or
XXX lbs." on your vehicle’s
placard.
2.Determine the combined
weight of the driver and
passengers that will be
riding in your vehicle.
Page 242 of 489
Chevrolet Silverado LD 1500 and Silverado 2500/3500 Owner Manual (GMNA-
Localizing-U.S./Canada-12162993) - 2019 - crc - 4/4/18
Driving and Operating 241
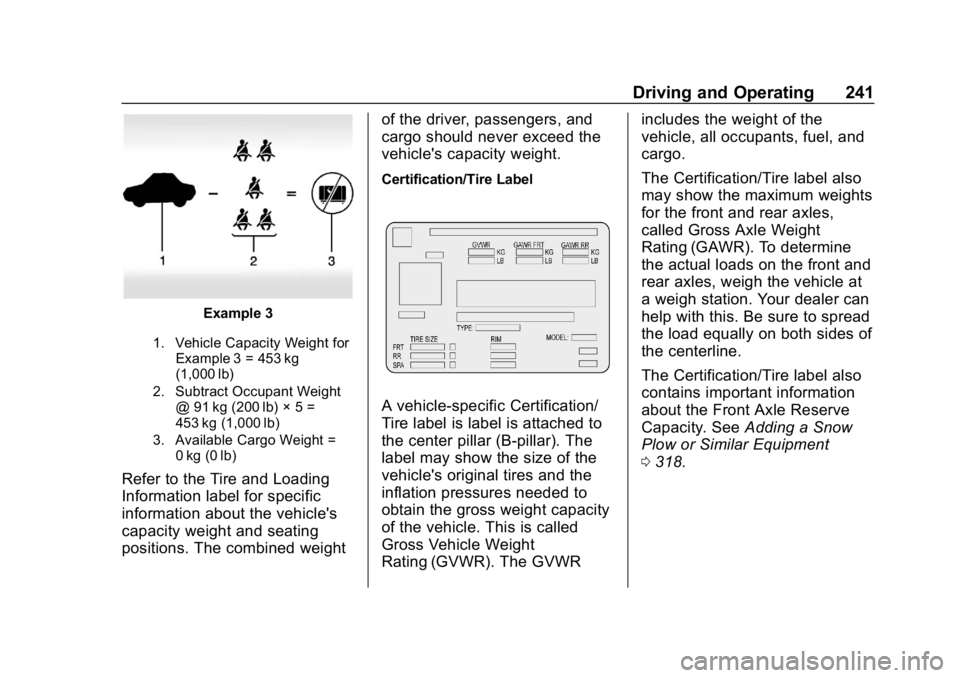
Example 3
1. Vehicle Capacity Weight forExample 3 = 453 kg
(1,000 lb)
2. Subtract Occupant Weight @ 91 kg (200 lb) × 5 =
453 kg (1,000 lb)
3. Available Cargo Weight = 0 kg (0 lb)
Refer to the Tire and Loading
Information label for specific
information about the vehicle's
capacity weight and seating
positions. The combined weight of the driver, passengers, and
cargo should never exceed the
vehicle's capacity weight.
Certification/Tire Label
A vehicle-specific Certification/
Tire label is label is attached to
the center pillar (B-pillar). The
label may show the size of the
vehicle's original tires and the
inflation pressures needed to
obtain the gross weight capacity
of the vehicle. This is called
Gross Vehicle Weight
Rating (GVWR). The GVWRincludes the weight of the
vehicle, all occupants, fuel, and
cargo.
The Certification/Tire label also
may show the maximum weights
for the front and rear axles,
called Gross Axle Weight
Rating (GAWR). To determine
the actual loads on the front and
rear axles, weigh the vehicle at
a weigh station. Your dealer can
help with this. Be sure to spread
the load equally on both sides of
the centerline.
The Certification/Tire label also
contains important information
about the Front Axle Reserve
Capacity. See
Adding a Snow
Plow or Similar Equipment
0 318.
Page 264 of 489
Chevrolet Silverado LD 1500 and Silverado 2500/3500 Owner Manual (GMNA-
Localizing-U.S./Canada-12162993) - 2019 - crc - 4/4/18
Driving and Operating 263
Shifting into 4nwill turn Traction
Control and StabiliTrak/Electronic
Stability Control (ESC) off. See
Traction Control/Electronic Stability
Control 0273.
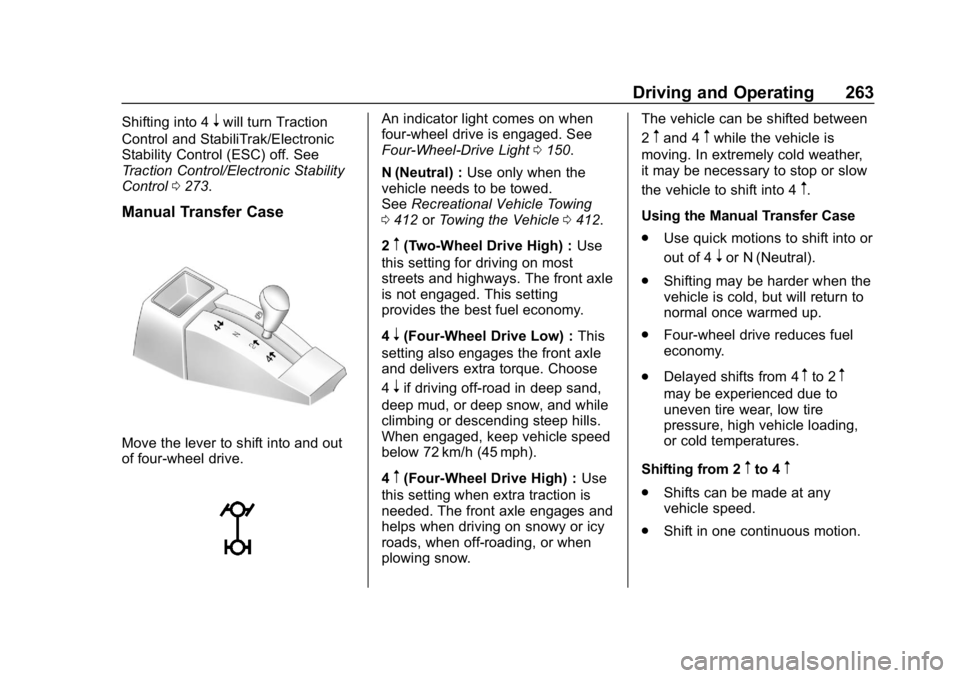
Manual Transfer Case
Move the lever to shift into and out
of four-wheel drive.
An indicator light comes on when
four-wheel drive is engaged. See
Four-Wheel-Drive Light 0150.
N (Neutral) : Use only when the
vehicle needs to be towed.
See Recreational Vehicle Towing
0 412 orTowing the Vehicle 0412.
2
m(Two-Wheel Drive High) : Use
this setting for driving on most
streets and highways. The front axle
is not engaged. This setting
provides the best fuel economy.
4
n(Four-Wheel Drive Low) : This
setting also engages the front axle
and delivers extra torque. Choose
4
nif driving off-road in deep sand,
deep mud, or deep snow, and while
climbing or descending steep hills.
When engaged, keep vehicle speed
below 72 km/h (45 mph).
4
m(Four-Wheel Drive High) : Use
this setting when extra traction is
needed. The front axle engages and
helps when driving on snowy or icy
roads, when off-roading, or when
plowing snow. The vehicle can be shifted between
2
mand 4mwhile the vehicle is
moving. In extremely cold weather,
it may be necessary to stop or slow
the vehicle to shift into 4
m.
Using the Manual Transfer Case
. Use quick motions to shift into or
out of 4
nor N (Neutral).
. Shifting may be harder when the
vehicle is cold, but will return to
normal once warmed up.
. Four-wheel drive reduces fuel
economy.
. Delayed shifts from 4
mto 2m
may be experienced due to
uneven tire wear, low tire
pressure, high vehicle loading,
or cold temperatures.
Shifting from 2
mto 4m
. Shifts can be made at any
vehicle speed.
. Shift in one continuous motion.
Page 266 of 489
Chevrolet Silverado LD 1500 and Silverado 2500/3500 Owner Manual (GMNA-
Localizing-U.S./Canada-12162993) - 2019 - crc - 4/4/18
Driving and Operating 265
The indicator mark on the knob
must line up with the indicator light
before a shift can be commanded.
To command a shift rotate the
transfer case knob to the new
desired position. The light will flash
meaning that the shift is in progress.
When the shift is completed the new
position will be illuminated. If the
transfer case cannot complete a
shift command, it will go back to its
last chosen setting.
In extreme cold weather it may be
necessary to slow or stop the
vehicle to shift from 2
mto 4m.
Delayed shifts from 4
mto 2mmay be
experienced due to uneven tire
wear, low tire pressure, high vehicle
loading, or cold temperatures.
Caution
Shifting the transmission into gear
before the requested mode
indicator light has stopped
flashing could damage the
transfer case. The settings are:
N (Neutral) :
Use only when the
vehicle needs to be towed.
See Recreational Vehicle Towing
0 412 orTowing the Vehicle 0412.
2
m(Two-Wheel Drive High) : Use
for driving on most streets and
highways. The front axle is not
engaged. This setting provides the
best fuel economy.
4
n(Four-Wheel Drive Low) : This
setting engages the front axle and
delivers extra torque. Choose 4
nif
driving off-road in deep sand, deep
mud, or deep snow, and while
climbing or descending steep hills.
When engaged, keep vehicle speed
below 72 km/h (45 mph).
Shifting into 4
nwill turn Traction
Control and StabiliTrak/ESC off.
See Traction Control/Electronic
Stability Control 0273.
4
m(Four-Wheel Drive High) : Use
when extra traction is needed. The
front axle engages and helps when
driving on snowy or icy roads, when off-roading, or when plowing snow.
The vehicle can be shifted from 2
m
to 4mwhile the vehicle is moving.
Shifting Into 4
m
Turn the knob to 4mat any speed
up to 121 km/h (75 mph), except
from 4
n. The indicator light will flash
while shifting and will remain on the
selected setting.
Shifting Into 2
m
Turn the knob to 2mat any speed,
except when shifting from 4
n.
Shifting Into 4
n
When 4nis engaged, vehicle speed
should be kept below 72 km/h
(45 mph).
1. The ignition must be on and the vehicle must be stopped or
moving less than 5 km/h
(3 mph) with the transmission
in N (Neutral). It is best for the
vehicle to be moving
1.6 to 3.2 km/h (1 to 2 mph).
Page 318 of 489
Chevrolet Silverado LD 1500 and Silverado 2500/3500 Owner Manual (GMNA-
Localizing-U.S./Canada-12162993) - 2019 - crc - 4/4/18
Driving and Operating 317
Warning (Continued)
your vehicle and any
optional equipment installed
on your vehicle.
. Before driving, check the
trailer brakes are working
properly, if equipped. Drive
the vehicle with the trailer
attached on a level road
surface that is free of traffic
at about 32-40 km/h
(20-25 mph) and fully apply
the manual trailer brake
apply lever. Also, check the
trailer brake lamps and
other lamps are functioning
correctly.
. If the trailer brakes are not
operating properly at any
time, or if a DIC message
indicates problems with the
trailer connections or trailer
brakes, carefully pull the
vehicle over to the side of
the road when traffic
conditions allow.
Trailer Tires
Special Trailer (ST) tires differ from
vehicle tires. Trailer tires are
designed with stiff sidewalls to help
prevent sway and to support heavy
loads. These features can make it
difficult to determine if the trailer tire
pressures are low only based on a
visual inspection.
Always check all trailer tire
pressures before each trip when the
tires are cool. Low trailer tire
pressure is a leading cause of trailer
tire blow-outs.
Trailer tires deteriorate over time.
The trailer tire sidewall will show the
week and year the tire was
manufactured. Many trailer tire
manufacturers recommend
replacing tires more than six
years old.
Overloading is another leading
cause of trailer tire blow-outs. Never
load your trailer with more weight
than the tires are designed to
support. The load rating is located
on the trailer tire sidewall. Always know the maximum speed
rating for the trailer tires before
driving. This may be significantly
lower than the vehicle tire speed
rating. The speed rating may be on
the trailer tire sidewall. If the speed
rating is not shown, the default
trailer tire speed rating is 105 km/h
(65 mph).
Page 325 of 489
Chevrolet Silverado LD 1500 and Silverado 2500/3500 Owner Manual (GMNA-
Localizing-U.S./Canada-12162993) - 2019 - crc - 4/4/18
324 Vehicle Care
All-Terrain Tires . . . . . . . . . . . . . . . 372
Tire Sidewall Labeling . . . . . . . . 372
Tire Designations . . . . . . . . . . . . . 374
Tire Terminology andDefinitions . . . . . . . . . . . . . . . . . . 376
Tire Pressure . . . . . . . . . . . . . . . . . 378
Tire Pressure for High-Speed Operation . . . . . . . . . . . . . . . . . . . 380
Tire Pressure Monitor System . . . . . . . . . . . . . . . . . . . . . . 380
Tire Pressure Monitor Operation . . . . . . . . . . . . . . . . . . . 381
Tire Inspection . . . . . . . . . . . . . . . . 385
Tire Rotation . . . . . . . . . . . . . . . . . 386
When It Is Time for New Tires . . . . . . . . . . . . . . . . . . . . . . . . 388
Buying New Tires . . . . . . . . . . . . . 389
Different Size Tires and Wheels . . . . . . . . . . . . . . . . . . . . . . 390
Uniform Tire Quality Grading . . . . . . . . . . . . . . . . . . . . . 391
Wheel Alignment and Tire Balance . . . . . . . . . . . . . . . . . . . . . 392
Wheel Replacement . . . . . . . . . . 393
Tire Chains . . . . . . . . . . . . . . . . . . . 394
If a Tire Goes Flat . . . . . . . . . . . . 394
Tire Changing . . . . . . . . . . . . . . . . 396
Full-Size Spare Tire . . . . . . . . . . 407Jump Starting
Jump Starting - North America . . . . . . . . . . . . . . . . . . . . . 408
Towing the Vehicle
Towing the Vehicle . . . . . . . . . . . 412
Recreational VehicleTowing . . . . . . . . . . . . . . . . . . . . . . 412
Appearance Care
Exterior Care . . . . . . . . . . . . . . . . . 418
Interior Care . . . . . . . . . . . . . . . . . . 423
Floor Mats . . . . . . . . . . . . . . . . . . . . 426
General Information
For service and parts needs, visit
your dealer. You will receive
genuine GM parts and GM-trained
and supported service people.
Genuine GM parts have one of
these marks: