2018 CHEVROLET MALIBU coolant level
[x] Cancel search: coolant levelPage 4 of 413
Chevrolet Malibu Owner Manual (GMNA-Localizing-U.S./Canada/Mexico-
11348460) - 2018 - crc - 5/3/17
Introduction 3
{Danger
Danger indicates a hazard with a
high level of risk which will result
in serious injury or death.
{Warning
Warning indicates a hazard that
could result in injury or death.
Caution
Caution indicates a hazard that
could result in property or vehicle
damage.
A circle with a slash through it is a
safety symbol which means“Do
Not,” “Do not do this,” or“Do not let
this happen.”
Symbols
The vehicle has components and
labels that use symbols instead of
text. Symbols are shown along with
the text describing the operation or
information relating to a specific
component, control, message,
gauge, or indicator.
M: Shown when the owner ’s
manual has additional instructions
or information.
*: Shown when the service
manual has additional instructions
or information.
0: Shown when there is more
information on another page —
“see page.”
Vehicle Symbol Chart
Here are some additional symbols
that may be found on the vehicle
and what they mean. See the
features in this manual for
information.
9: Airbag Readiness Light
#:Air Conditioning
!:Antilock Brake System (ABS)
$:Brake System Warning Light
":Charging System (12-Volt
Battery)
I: Cruise Control
`:Do Not Puncture
^:Do Not Service
B:Engine Coolant Temperature
O:Exterior Lamps
g: First Responder
_:Flame/Fire Prohibited
.:Fuel Gauge
+: Fuses
3:Headlamp High/Low-Beam
Changer
_: High Voltage
j: LATCH System Child Restraints
*:Malfunction Indicator Lamp
::Oil Pressure
O:Power
Page 105 of 413

Chevrolet Malibu Owner Manual (GMNA-Localizing-U.S./Canada/Mexico-
11348460) - 2018 - crc - 5/3/17
104 Instruments and Controls
Instruments and
Controls
Controls
Steering Wheel Adjustment . . . 105
Steering Wheel Controls . . . . . . 105
Heated Steering Wheel . . . . . . . 106
Horn . . . . . . . . . . . . . . . . . . . . . . . . . . 106
Windshield Wiper/Washer . . . . 106
Compass . . . . . . . . . . . . . . . . . . . . . 107
Clock . . . . . . . . . . . . . . . . . . . . . . . . . 107
Power Outlets . . . . . . . . . . . . . . . . 109
Wireless Charging . . . . . . . . . . . . 110
Warning Lights, Gauges, and
Indicators
Warning Lights, Gauges, andIndicators . . . . . . . . . . . . . . . . . . . . 111
Instrument Cluster (Base Level) . . . . . . . . . . . . . . . . . . . . . . . 112
Instrument Cluster
(Uplevel) . . . . . . . . . . . . . . . . . . . . 114
Speedometer . . . . . . . . . . . . . . . . . 117
Odometer . . . . . . . . . . . . . . . . . . . . . 117
Trip Odometer . . . . . . . . . . . . . . . . 117
Tachometer (Non-Hybrid) . . . . . 117
Fuel Gauge . . . . . . . . . . . . . . . . . . . 118
Power Indicator Gauge (Hybrid) . . . . . . . . . . . . . . . . . . . . . 119 Engine Coolant Temperature
Gauge . . . . . . . . . . . . . . . . . . . . . . 119
Seat Belt Reminders . . . . . . . . . 120
Airbag Readiness Light . . . . . . . 120
Passenger Airbag Status Indicator . . . . . . . . . . . . . . . . . . . . 121
Charging System Light . . . . . . . 122
Malfunction Indicator Lamp (Check Engine Light) . . . . . . . . 122
Brake System Warning Light . . . . . . . . . . . . . . . . . . . . . . . . 124
Electric Parking Brake Light . . . . . . . . . . . . . . . . . . . . . . . . 124
Service Electric Parking Brake Light . . . . . . . . . . . . . . . . . . . . . . . . 125
Antilock Brake System (ABS) Warning Light . . . . . . . . . . . . . . . 125
Lane Keep Assist (LKA) Light . . . . . . . . . . . . . . . . . . . . . . . . 125
Vehicle Ahead Indicator . . . . . . 126
Pedestrian Ahead Indicator . . . 126
Traction Off Light . . . . . . . . . . . . . 126
StabiliTrak OFF Light . . . . . . . . . 127
Traction Control System (TCS)/ StabiliTrak Light . . . . . . . . . . . . . 127
Tire Pressure Light . . . . . . . . . . . 127
Engine Oil Pressure Light . . . . 128
Low Fuel Warning Light (Uplevel) . . . . . . . . . . . . . . . . . . . . 128
Low Fuel Warning Light (Base Level) . . . . . . . . . . . . . . . . . . . . . . . 129 Security Light . . . . . . . . . . . . . . . . . 129
Vehicle Ready Light
(Hybrid) . . . . . . . . . . . . . . . . . . . . . 129
High-Beam On Light . . . . . . . . . . 129
Lamps On Reminder . . . . . . . . . 130
Cruise Control Light . . . . . . . . . . 130
Door Ajar Light (Uplevel) . . . . . 130
Information Displays
Power Flows (Hybrid) . . . . . . . . . 130
Energy Information (Hybrid) . . . . . . . . . . . . . . . . . . . . . 131
Driver Information Center (DIC) (Base Level) . . . . . . . . . . . . . . . . 131
Driver Information Center (DIC) (Uplevel) . . . . . . . . . . . . . . . . . . . . 134
Vehicle Messages
Vehicle Messages . . . . . . . . . . . . 137
Engine Power Messages . . . . . 138
Vehicle Speed Messages . . . . . 138
Vehicle Personalization
Vehicle Personalization . . . . . . . 138
Universal Remote System
Universal Remote System . . . . 150
Universal Remote SystemProgramming . . . . . . . . . . . . . . . 150
Universal Remote System Operation . . . . . . . . . . . . . . . . . . . 153
Page 120 of 413
Chevrolet Malibu Owner Manual (GMNA-Localizing-U.S./Canada/Mexico-
11348460) - 2018 - crc - 5/3/17
Instruments and Controls 119
Power Indicator Gauge
(Hybrid)
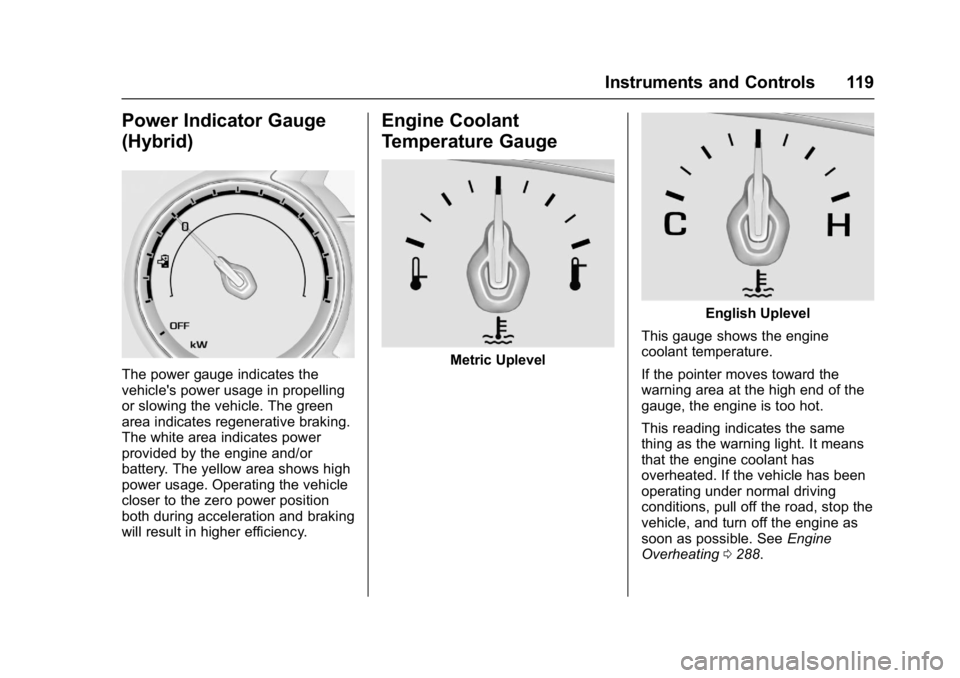
The power gauge indicates the
vehicle's power usage in propelling
or slowing the vehicle. The green
area indicates regenerative braking.
The white area indicates power
provided by the engine and/or
battery. The yellow area shows high
power usage. Operating the vehicle
closer to the zero power position
both during acceleration and braking
will result in higher efficiency.
Engine Coolant
Temperature Gauge
Metric Uplevel
English Uplevel
This gauge shows the engine
coolant temperature.
If the pointer moves toward the
warning area at the high end of the
gauge, the engine is too hot.
This reading indicates the same
thing as the warning light. It means
that the engine coolant has
overheated. If the vehicle has been
operating under normal driving
conditions, pull off the road, stop the
vehicle, and turn off the engine as
soon as possible. See Engine
Overheating 0288.
Page 265 of 413
Chevrolet Malibu Owner Manual (GMNA-Localizing-U.S./Canada/Mexico-
11348460) - 2018 - crc - 5/3/17
264 Driving and Operating
brakes might have to be used so
much that they would get hot and no
longer work well.
The vehicle can tow in D (Drive).
Use a lower gear if the transmission
shifts too often.
When towing at high altitude on
steep uphill grades, engine coolant
boils at a lower temperature than at
normal altitudes. If the engine is
turned off immediately after towing
at high altitude on steep uphill
grades, the vehicle could show
signs similar to engine overheating.
To avoid this, let the engine run
while parked, preferably on level
ground, with the transmission in
P (Park) for a few minutes before
turning the engine off. If the
overheat warning comes on, see
Engine Overheating0288.Parking on Hills
{Warning
Parking the vehicle on a hill with
the trailer attached can be
dangerous. If something goes
wrong, the rig could start to move.
People can be injured, and both
the vehicle and the trailer can be
damaged. When possible, always
park the rig on a flat surface.
If parking the rig on a hill: 1. Press the brake pedal, but do not shift into P (Park) yet. Turn
the wheels into the curb if
facing downhill or into traffic if
facing uphill.
2. Have someone place chocks under the trailer wheels.
3. When the wheel chocks are in place, release the brake pedal
until the chocks absorb
the load.
4. Reapply the brake pedal. Then apply the parking brake and
shift into P (Park). 5. Release the brake pedal.
Leaving After Parking on a Hill
1. Apply and hold the brake pedal
while you:
1.1. Start the engine.
1.2. Shift into a gear.
1.3. Release the parking brake.
2. Let up on the brake pedal.
3. Drive slowly until the trailer is clear of the chocks.
4. Stop and have someone pick up and store the chocks.
Maintenance When Trailer
Towing
The vehicle needs service more
often when pulling a trailer. See the
Maintenance Schedule 0360.
Things that are especially important
in trailer operation are automatic
transmission fluid, engine oil, axle
lubricant, belts, cooling system, and
brake system. Inspect these before
and during the trip.
Page 279 of 413
Chevrolet Malibu Owner Manual (GMNA-Localizing-U.S./Canada/Mexico-
11348460) - 2018 - crc - 5/3/17
278 Vehicle Care
1.Engine Air Cleaner/Filter 0282.
2. Engine Oil Fill Cap. See Engine Oil 0278.
3. Engine Oil Dipstick. See Engine Oil 0278.
4. Engine Cooling Fan (Out of View).
See Cooling System (Engine)
0 283 orCooling System
(Power Electronics) 0287.
5. Brake Fluid Reservoir. See Brakes 0289.
6. Coolant Surge Tank and Pressure Cap.
See Cooling System (Engine)
0 283 orCooling System
(Power Electronics) 0287.
7. Battery - North America 0291.
8. Remote Positive (+) Battery Terminal (Under Cover). See
Jump Starting - North America
0343.
9. Engine Compartment Fuse
Block 0302.
10. Windshield Washer Fluid Reservoir. See Washer Fluid
0 289. 11. Remote Negative (-) Battery
Terminal. See Jump Starting -
North America 0343.
Engine Oil
To ensure proper engine
performance and long life, careful
attention must be paid to engine oil.
Following these simple, but
important steps will help protect
your investment:
.
Use engine oil approved to the
proper specification and of the
proper viscosity grade. See
“Selecting the Right Engine Oil”
in this section.
. Check the engine oil level
regularly and maintain the
proper oil level. See “Checking
Engine Oil” and“When to Add
Engine Oil” in this section.
. Change the engine oil at the
appropriate time. See Engine Oil
Life System 0281.
. Always dispose of engine oil
properly. See “What to Do with
Used Oil” later in this section.
Checking Engine Oil
Check the engine oil level regularly,
every 650 km (400 mi), especially
prior to a long trip. The engine oil
dipstick handle is a loop. See
Engine Compartment Overview
0273 for the location.
{Warning
The engine oil dipstick handle
may be hot; it could burn you.
Use a towel or glove to touch the
dipstick handle.
If a low oil Driver Information Center
(DIC) message displays, check the
oil level.
Follow these guidelines:
. To get an accurate reading, park
the vehicle on level ground.
Check the engine oil level after
the engine has been off for at
least two hours. Checking the
engine oil level on steep grades
or too soon after engine shutoff
can result in incorrect readings.
Accuracy improves when
Page 286 of 413
Chevrolet Malibu Owner Manual (GMNA-Localizing-U.S./Canada/Mexico-
11348460) - 2018 - crc - 5/3/17
Vehicle Care 285
.Helps keep the proper engine
temperature.
Caution
Do not use anything other than a
mix of DEX-COOL coolant that
meets GM Standard
GMW3420 and clean, drinkable
water. Anything else can cause
damage to the vehicle’ s engine
cooling system and vehicle, which
would not be covered by the
vehicle warranty.
Never dispose of engine coolant by
putting it in the trash, or by pouring
it on the ground, or into sewers,
streams or bodies of water. Have
the coolant changed by an
authorized service center, familiar
with legal requirements regarding
used coolant disposal. This will help
protect the environment and your
health.
Checking Coolant
The vehicle must be on a level
surface when checking the coolant
level.
Check to see if coolant is visible in
the coolant surge tank. If the coolant
inside the coolant surge tank is
boiling, do not do anything else until
it cools down.
If coolant is visible but the coolant
level is not at or above the mark
pointed to, add a 50/50 mixture of
clean, drinkable water and
DEX-COOL coolant.
Be sure the cooling system is cool
before this is done.
If no coolant is visible in the coolant
surge tank, add coolant as follows:
How to Add Coolant to the
Coolant Surge Tank
{Warning
Spilling coolant on hot engine
parts can burn you. Coolant
contains ethylene glycol and it will
burn if the engine parts are hot
enough.
{Warning
Plain water, or other liquids such
as alcohol, can boil before the
proper coolant mixture will. With
plain water or the wrong mixture,
the engine could get too hot but
there would not be an overheat
warning. The engine could catch
fire and you or others could be
burned.
Page 287 of 413
Chevrolet Malibu Owner Manual (GMNA-Localizing-U.S./Canada/Mexico-
11348460) - 2018 - crc - 5/3/17
286 Vehicle Care
{Warning
Steam and scalding liquids from a
hot cooling system are under
pressure. Turning the pressure
cap, even a little, can cause them
to come out at high speed and
you could be burned. Never turn
the cap when the cooling system,
including the pressure cap, is hot.
Wait for the cooling system and
pressure cap to cool.
Caution
Failure to follow the specific
coolant fill procedure could cause
the engine to overheat and could
cause system damage. If coolant
is not visible in the surge tank,
contact your dealer.
The coolant surge tank pressure
cap can be removed when the
cooling system, including the surge
tank pressure cap and upper
radiator hose, is no longer hot.
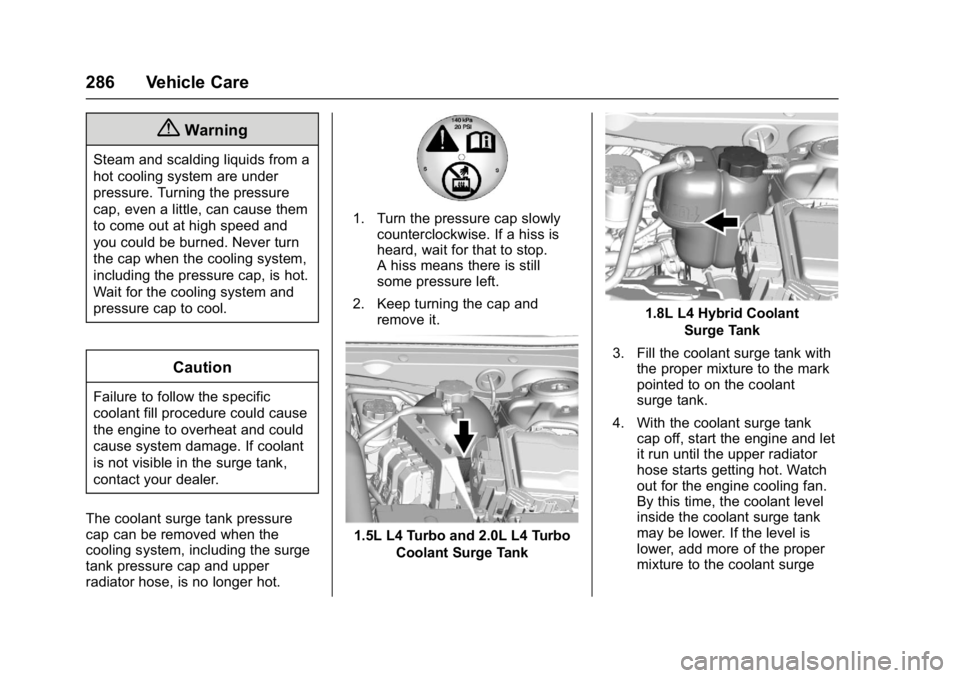
1. Turn the pressure cap slowly counterclockwise. If a hiss is
heard, wait for that to stop.
A hiss means there is still
some pressure left.
2. Keep turning the cap and remove it.
1.5L L4 Turbo and 2.0L L4 Turbo
Coolant Surge Tank
1.8L L4 Hybrid CoolantSurge Tank
3. Fill the coolant surge tank with the proper mixture to the mark
pointed to on the coolant
surge tank.
4. With the coolant surge tank cap off, start the engine and let
it run until the upper radiator
hose starts getting hot. Watch
out for the engine cooling fan.
By this time, the coolant level
inside the coolant surge tank
may be lower. If the level is
lower, add more of the proper
mixture to the coolant surge
Page 288 of 413
Chevrolet Malibu Owner Manual (GMNA-Localizing-U.S./Canada/Mexico-
11348460) - 2018 - crc - 5/3/17
Vehicle Care 287
tank until the level reaches the
mark pointed to on the coolant
surge tank.
5. Replace the cap tightly.
6. Check the level in the surge tank when the cooling system
has cooled down. If the coolant
is not at the proper level,
repeat Steps 1–6 and reinstall
the pressure cap. If the coolant
still is not at the proper level
when the system cools down
again, see your dealer.
Caution
If the pressure cap is not tightly
installed, coolant loss and engine
damage may occur. Be sure the
cap is properly and tightly
secured.
Cooling System (Power
Electronics)
The power electronics cooling
system keeps the hybrid propulsion
system within a normal operating
temperature range.
What to Use
The power electronics coolant
reservoir in the vehicle is filled with
GM Premix DEX-COOL coolant.
If using this mixture, nothing else
needs to be added.
The coolant needs to be replaced at
the appropriate interval. See
Maintenance Schedule 0360.
Checking Coolant
The vehicle must be on a level
surface when checking the coolant
level.
The power electronics coolant
reservoir is located in the engine
compartment. See Engine
Compartment Overview 0273.
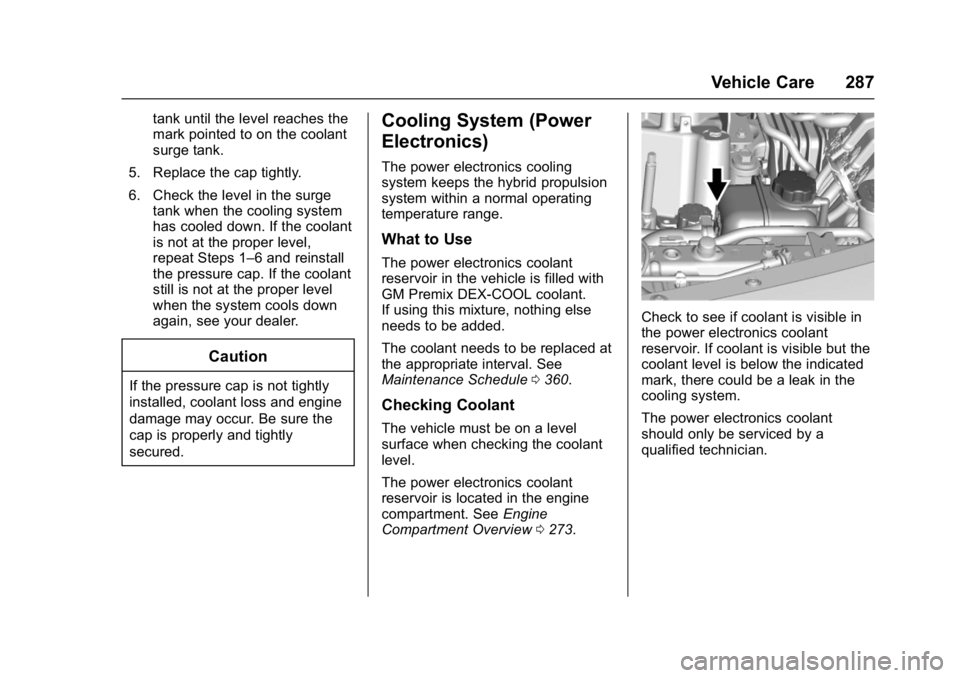
Check to see if coolant is visible in
the power electronics coolant
reservoir. If coolant is visible but the
coolant level is below the indicated
mark, there could be a leak in the
cooling system.
The power electronics coolant
should only be serviced by a
qualified technician.