2018 CHEVROLET MALIBU transmission
[x] Cancel search: transmissionPage 306 of 413

Chevrolet Malibu Owner Manual (GMNA-Localizing-U.S./Canada/Mexico-
11348460) - 2018 - crc - 5/3/17
Vehicle Care 305
FusesUsage
56 Starter motor
57 Transmission auxiliary pump
58 –
59 High-beam headlamps
60 Cooling fan
61 –
62 –
63 –
65 Air conditioning–HEV
67 –
68 –
69 Right low-beam HID headlamp
70 Left low-beam HID headlamp
72 Starter pinion
74 – Fuses
Usage
75 Engine control module main
76 Powertrain off engine
78 Horn
79 Washer pump
81 Transmission control module/Engine control
module
82 –
83 Ignition coil
84 Powertrain on engine
85 Engine control module switch 2
86 Engine control module switch 1
87 SAI reaction pump
88 Aeroshutter
89 Headlamp washer
91 – Fuses
Usage
92 Traction power inverter module/Motor
generator unit pump
93 Active headlamp leveling
95 SAI reaction solenoid
96 Fuel heater
97 –
99 Coolant pump
Relays Usage
4 AC DC inverter
20 Rear defogger
25 Front wiper control
31 Run/Crank
37 Front wiper speed
42 Transmission auxiliary pump
64 Starter motor
Page 308 of 413

Chevrolet Malibu Owner Manual (GMNA-Localizing-U.S./Canada/Mexico-
11348460) - 2018 - crc - 5/3/17
Vehicle Care 307
The vehicle may not be equipped
with all of the fuses, relays, and
features shown.Fuses Usage
F1 Left power windows
F2 Right power windows
F3 –
F4 Heating, ventilation, and air conditioning
blower Fuses Usage
F5 Body control module 2
F6 Left rear heated seat
F7 Right rear heated seat
F8 Body control module 3
F9 Engine control module/Rear battery
F10 Body control module 2 (w/ Stop/Start option) Fuses Usage
F11 –
F12 –
F13 –
F14 –
F15 Transmission control module (w/ Stop/Start
option)
F16 Amplifier
F17 Seat power lumbar
F18 OnStar
F19 –
F20 Body control module 1
F21 Body control module 4
F22 –
F23 Electric steering column lock –China
and Russia only
F24 Airbag
F25 Data link connector
F26 –
F27 AC DC inverter
Page 315 of 413
Chevrolet Malibu Owner Manual (GMNA-Localizing-U.S./Canada/Mexico-
11348460) - 2018 - crc - 5/3/17
314 Vehicle Care
Tire Terminology and
Definitions
Air Pressure:The amount of
air inside the tire pressing
outward on each square inch of
the tire. Air pressure is
expressed in kPa (kilopascal)
or psi (pounds per square inch).
Accessory Weight
:The
combined weight of optional
accessories. Some examples of
optional accessories are
automatic transmission, power
windows, power seats, and air
conditioning.
Aspect Ratio
:The relationship
of a tire's height to its width.
Belt
:A rubber coated layer of
cords between the plies and the
tread. Cords may be made from
steel or other reinforcing
materials. Bead
:The tire bead contains
steel wires wrapped by steel
cords that hold the tire onto
the rim.
Bias Ply Tire
:A pneumatic tire
in which the plies are laid at
alternate angles less than
90 degrees to the centerline of
the tread.
Cold Tire Pressure
:The
amount of air pressure in a tire,
measured in kPa (kilopascal)
or psi (pounds per square inch)
before a tire has built up heat
from driving. See Tire Pressure
0 316.
Curb Weight
:The weight of a
motor vehicle with standard and
optional equipment including the
maximum capacity of fuel, oil,
and coolant, but without
passengers and cargo.
DOT Markings
:A code molded
into the sidewall of a tire
signifying that the tire is in
compliance with the U.S. Department of Transportation
(DOT) Motor Vehicle Safety
Standards. The DOT code
includes the Tire Identification
Number (TIN), an alphanumeric
designator which can also
identify the tire manufacturer,
production plant, brand, and
date of production.
GVWR
:Gross Vehicle Weight
Rating. See Vehicle Load Limits
0 212.
GAWR FRT
:Gross Axle Weight
Rating for the front axle. See
Vehicle Load Limits 0212.
GAWR RR
:Gross Axle Weight
Rating for the rear axle. See
Vehicle Load Limits 0212.
Intended Outboard Sidewall
:
The side of an asymmetrical tire
that must always face outward
when mounted on a vehicle.
Kilopascal (kPa)
:The metric
unit for air pressure.
Page 331 of 413
Chevrolet Malibu Owner Manual (GMNA-Localizing-U.S./Canada/Mexico-
11348460) - 2018 - crc - 5/3/17
330 Vehicle Care
Warning (Continued)
tire service center repair or
replace the flat tire as soon as
possible.
{Warning
Lifting a vehicle and getting under
it to do maintenance or repairs is
dangerous without the
appropriate safety equipment and
training. If a jack is provided with
the vehicle, it is designed only for
changing a flat tire. If it is used for
anything else, you or others could
be badly injured or killed if the
vehicle slips off the jack. If a jack
is provided with the vehicle, only
use it for changing a flat tire.
If a tire goes flat, avoid further tire
and wheel damage by driving slowly
to a level place, well off the road,
if possible. Turn on the hazard
warning flashers. See Hazard
Warning Flashers 0157.
{Warning
Changing a tire can be
dangerous. The vehicle can slip
off the jack and roll over or fall
causing injury or death. Find a
level place to change the tire. To
help prevent the vehicle from
moving:
1. Set the parking brake firmly.
2. Put an automatictransmission in P (Park) or a
manual transmission in
1 (First) or R (Reverse).
3. Turn off the engine and do not restart while the vehicle
is raised.
4. Do not allow passengers to remain in the vehicle.
5. Place wheel blocks, if equipped, on both sides of
the tire at the opposite
corner of the tire being
changed. This vehicle may come with a jack
and spare tire or a tire sealant and
compressor kit. To use the jacking
equipment to change a spare tire
safely, follow the instructions below.
Then see
Tire Changing 0337. To
use the tire sealant and compressor
kit, see Tire Sealant and
Compressor Kit 0331.
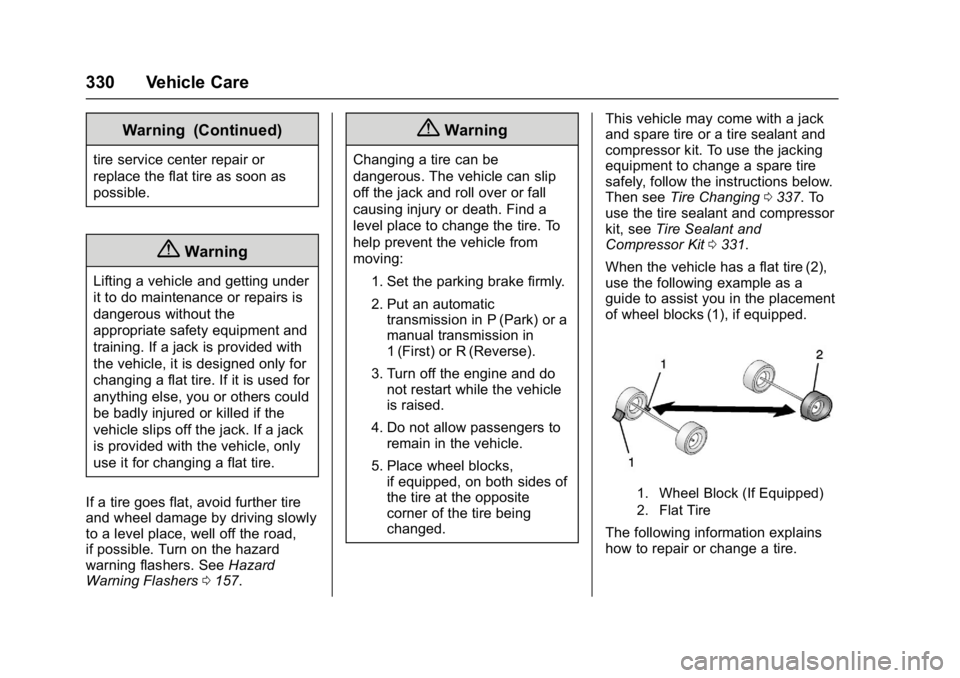
When the vehicle has a flat tire (2),
use the following example as a
guide to assist you in the placement
of wheel blocks (1), if equipped.
1. Wheel Block (If Equipped)
2. Flat Tire
The following information explains
how to repair or change a tire.
Page 345 of 413
Chevrolet Malibu Owner Manual (GMNA-Localizing-U.S./Canada/Mexico-
11348460) - 2018 - crc - 5/3/17
344 Vehicle Care
Caution
Ignoring these steps could result
in costly damage to the vehicle
that would not be covered by the
vehicle warranty. Trying to start
the vehicle by pushing or pulling it
will not work, and it could damage
the vehicle.
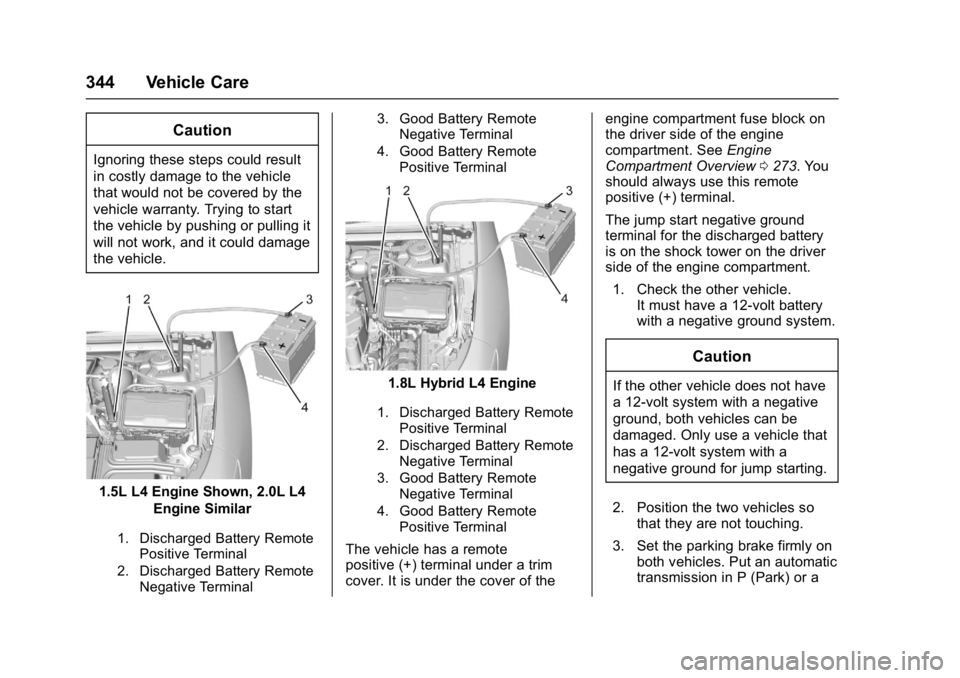
1.5L L4 Engine Shown, 2.0L L4Engine Similar
1. Discharged Battery RemotePositive Terminal
2. Discharged Battery Remote Negative Terminal 3. Good Battery Remote
Negative Terminal
4. Good Battery Remote Positive Terminal
1.8L Hybrid L4 Engine
1. Discharged Battery Remote
Positive Terminal
2. Discharged Battery Remote Negative Terminal
3. Good Battery Remote Negative Terminal
4. Good Battery Remote Positive Terminal
The vehicle has a remote
positive (+) terminal under a trim
cover. It is under the cover of the engine compartment fuse block on
the driver side of the engine
compartment. See
Engine
Compartment Overview 0273. You
should always use this remote
positive (+) terminal.
The jump start negative ground
terminal for the discharged battery
is on the shock tower on the driver
side of the engine compartment.
1. Check the other vehicle. It must have a 12-volt battery
with a negative ground system.
Caution
If the other vehicle does not have
a 12-volt system with a negative
ground, both vehicles can be
damaged. Only use a vehicle that
has a 12-volt system with a
negative ground for jump starting.
2. Position the two vehicles so that they are not touching.
3. Set the parking brake firmly on both vehicles. Put an automatic
transmission in P (Park) or a
Page 346 of 413
Chevrolet Malibu Owner Manual (GMNA-Localizing-U.S./Canada/Mexico-
11348460) - 2018 - crc - 5/3/17
Vehicle Care 345
manual transmission in Neutral
before setting the parking
brake.
Caution
If any accessories are left on or
plugged in during the jump
starting procedure, they could be
damaged. The repairs would not
be covered by the vehicle
warranty. Whenever possible, turn
off or unplug all accessories on
either vehicle when jump starting.
4. Turn the ignition off and switch off all lights and accessories in
both vehicles, except the
hazard warning flashers if
needed.
{Warning
An electric fan can start up even
when the engine is not running
and can injure you. Keep hands,
clothing, and tools away from any
underhood electric fan.
{Warning
Using a match near a battery can
cause battery gas to explode.
People have been hurt doing this,
and some have been blinded.
Use a flashlight if you need more
light.
Battery fluid contains acid that
can burn you. Do not get it on
you. If you accidentally get it in
your eyes or on your skin, flush
the place with water and get
medical help immediately.
{Warning
Fans or other moving engine
parts can injure you badly. Keep
your hands away from moving
parts once the engine is running.
6. Connect the red positive (+) cable to the positive (+) or
remote positive (+) terminal of
the discharged battery. 7. Connect the other end of the
positive (+) cable to the
positive (+) terminal of the
good battery. Use a remote
positive (+) terminal if the
vehicle has one.
8. Connect one end of the black negative (−) cable to the
negative (−) terminal of the
good battery.
9. Connect the other end of the negative (−) cable to the
negative (–) ground terminal for
the discharged battery.
10. Start the vehicle with the good battery and run the engine at
idle speed for at least
four minutes.
11. Try to start the vehicle that had the dead battery. If it will not
start after a few tries, it
probably needs service.
For hybrid vehicles, the engine will
only start if needed after pressing
ENGINE START/STOP. The vehicle
ready light will come on when the
propulsion system is on and ready.
Page 349 of 413
Chevrolet Malibu Owner Manual (GMNA-Localizing-U.S./Canada/Mexico-
11348460) - 2018 - crc - 5/3/17
348 Vehicle Care
To dinghy tow the vehicle from the
front with all four wheels on the
ground:1. Position the vehicle to tow and then secure it to the towing
vehicle.
2. Start the engine and place the vehicle in N (Neutral).
3. Press ENGINE START/STOP once to turn the engine off. See
Ignition Positions 0216.
4. To prevent the battery from draining while the vehicle is
being towed, remove fuses
F10 and F41 from the
instrument panel fuse block.
See Instrument Panel Fuse
Block 0306.
Remember to reinstall the fuses
once the destination has been
reached.Caution
If 105 km/h (65 mph) is exceeded
while towing the vehicle, it could
be damaged. Never exceed
105 km/h (65 mph) while towing
the vehicle.
Caution
Use of a shield mounted in front
of the vehicle grille could restrict
airflow and cause damage to the
transmission. The repairs would
not be covered by the vehicle
warranty. If using a shield, only
use one that attaches to the
towing vehicle.
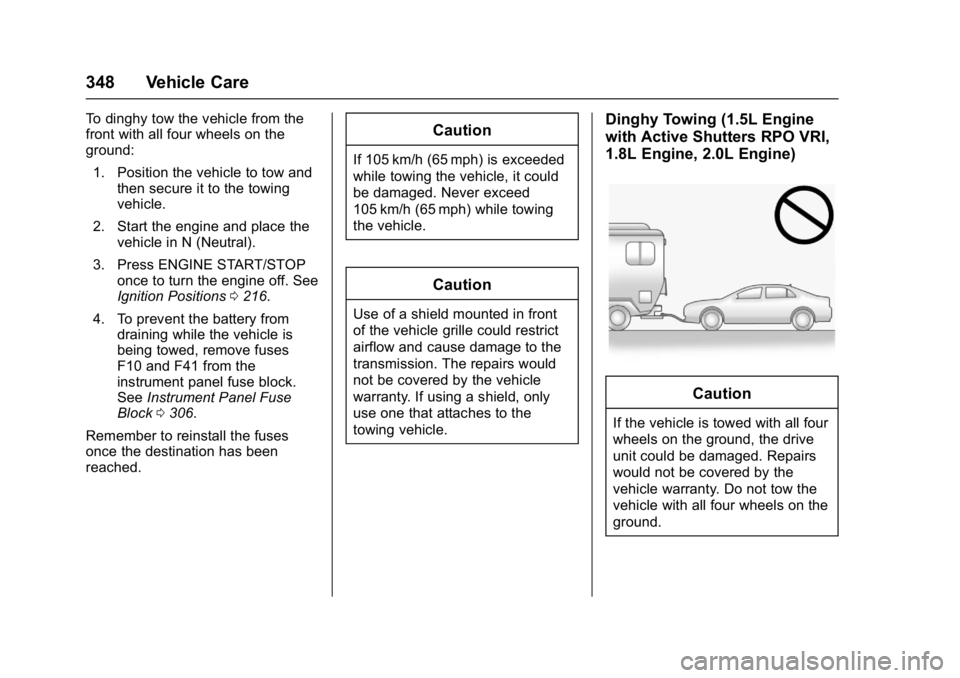
Dinghy Towing (1.5L Engine
with Active Shutters RPO VRI,
1.8L Engine, 2.0L Engine)
Caution
If the vehicle is towed with all four
wheels on the ground, the drive
unit could be damaged. Repairs
would not be covered by the
vehicle warranty. Do not tow the
vehicle with all four wheels on the
ground.
Page 363 of 413

Chevrolet Malibu Owner Manual (GMNA-Localizing-U.S./Canada/Mexico-
11348460) - 2018 - crc - 5/3/17
362 Service and Maintenance
.Check automatic transmission
shift lock control function. See
Automatic Transmission Shift
Lock Control Function Check
0293.
. Check parking brake and
automatic transmission park
mechanism. See Park Brake and
P (Park) Mechanism Check
0 294.
. Check accelerator pedal for
damage, high effort, or binding.
Replace if needed.
. Visually inspect gas strut for
signs of wear, cracks, or other
damage. Check the hold open
ability of the strut. If the hold
open ability is low, service the
gas strut. See Gas Strut(s)
0 295.
. Inspect sunroof track and seal,
if equipped. See Sunroof052.