2018 CHEVROLET MALIBU service
[x] Cancel search: servicePage 176 of 413
Chevrolet Malibu Owner Manual (GMNA-Localizing-U.S./Canada/Mexico-
11348460) - 2018 - crc - 5/3/17
Infotainment System 175
Backglass Antenna
The AM-FM antenna is integrated
with the rear window defogger,
located in the rear window. Make
sure that the inside surface of the
rear window is not scratched and
that the lines on the glass are not
damaged. If the inside surface is
damaged, it could interfere with
radio reception. For proper radio
reception, the antenna connector
needs to be properly attached to the
post on the glass.
If a cellular telephone antenna
needs to be attached to the glass,
make sure that the grid lines for the
AM-FM antenna are not damaged.
There is enough space between the
grid lines to attach a cellular
telephone antenna without
interfering with radio reception.Caution
Using a razor blade or sharp
object to clear the inside rear
window can damage the rear
window antenna and/or the rear
window defogger. Repairs would
not be covered by the vehicle
warranty. Do not clear the inside
rear window with sharp objects.
Caution
Do not apply aftermarket glass
tinting with metallic film. The
metallic film in some tinting
materials will interfere with or
distort the incoming radio
reception. Any damage caused to
the backglass antenna due to
metallic tinting materials will not
be covered by the vehicle
warranty.
Multi-Band Antenna
The multi-band antenna is on the
roof of the vehicle. The antenna is
used for OnStar, the SiriusXM
Satellite Radio Service System, and
GPS (Global Positioning System),
if the vehicle has these features.
Keep the antenna clear of
obstructions for clear reception.
If the vehicle has a sunroof, and it is
open, reception can also be
affected.
Page 196 of 413
Chevrolet Malibu Owner Manual (GMNA-Localizing-U.S./Canada/Mexico-
11348460) - 2018 - crc - 5/3/17
Infotainment System 195
iPod and iPhone are trademarks of
Apple Computer, Inc., registered in
the U.S. and other countries.
Fees and Taxes: Subscription fee,
taxes, one time activation fee, and
other fees may apply. Subscription
fee is consumer only. All fees and
programming subject to change.
Subscriptions subject to Customer
Agreement available at
www.siriusxm.com or
www.siriusxm.ca. SiriusXM service
only available in the 48 contiguous
United States and Canada.
In Canada: Some deterioration of
service may occur in extreme
northern latitudes. This is beyond
the control of SiriusXM Satellite
Radio.
It is prohibited to copy, decompile,
disassemble, reverse engineer,
hack, manipulate, or otherwisemake available any technology or
software incorporated in receivers
compatible with the SiriusXM
Satellite Radio System or that
support the SiriusXM website, the
Online Service or any of its content.
Furthermore, the AMBER voice
compression software included in
this product is protected by
intellectual property rights including
patent rights, copyrights, and trade
secrets of Digital Voice
Systems, Inc.
General Requirements:
1. A License Agreement from SiriusXM is required for any
product that incorporates
SiriusXM Technology and/or for
use of any of the SiriusXM
marks to be manufactured,
distributed, or marketed in the
SiriusXM Service Area.
2. For products to be distributed, marketed, and/or sold in
Canada, a separate agreement
is required with Canadian
Satellite Radio Inc. (operating
as SiriusXM Canada). FreeType 2
Portions of this software are
copyright 2007-2012 The FreeType
Project (www.freetype.org). All rights
reserved.
Libjpeg
The navigation software is based in
part on the work of the independent
JPEG Group.
Page 197 of 413
Chevrolet Malibu Owner Manual (GMNA-Localizing-U.S./Canada/Mexico-
11348460) - 2018 - crc - 5/3/17
196 Climate Controls
Climate Controls
Climate Control Systems
Climate Control Systems . . . . . 196
Dual Automatic ClimateControl System . . . . . . . . . . . . . 199
Air Vents
Air Vents . . . . . . . . . . . . . . . . . . . . . 203
Maintenance
Passenger Compartment AirFilter . . . . . . . . . . . . . . . . . . . . . . . . 203
Service . . . . . . . . . . . . . . . . . . . . . . . 204
Climate Control Systems
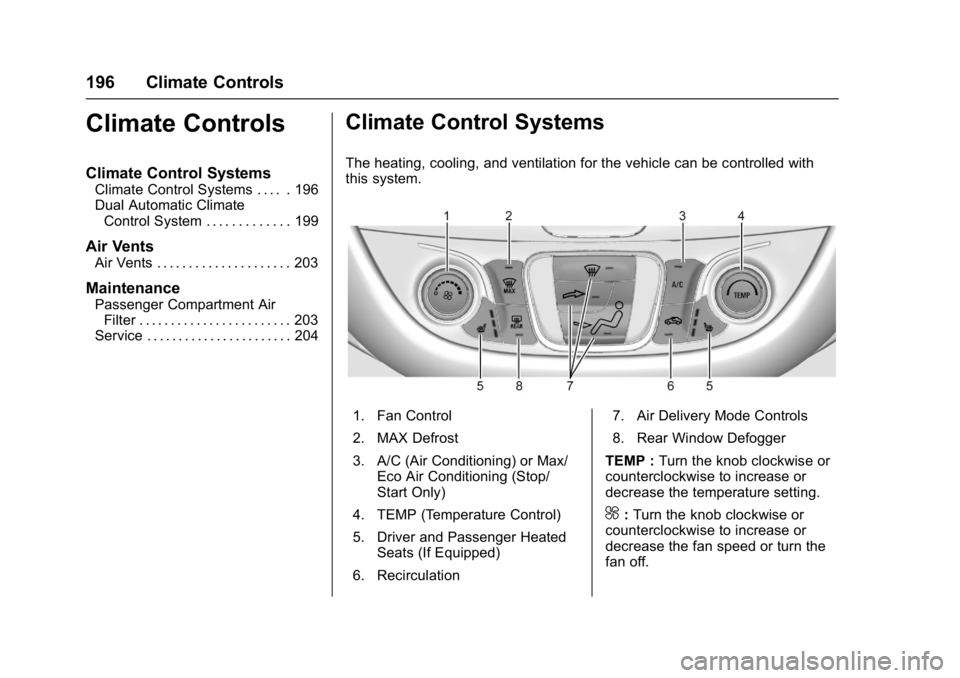
The heating, cooling, and ventilation for the vehicle can be controlled with
this system.
1. Fan Control
2. MAX Defrost
3. A/C (Air Conditioning) or Max/
Eco Air Conditioning (Stop/
Start Only)
4. TEMP (Temperature Control)
5. Driver and Passenger Heated Seats (If Equipped)
6. Recirculation 7. Air Delivery Mode Controls
8. Rear Window Defogger
TEMP : Turn the knob clockwise or
counterclockwise to increase or
decrease the temperature setting.
^: Turn the knob clockwise or
counterclockwise to increase or
decrease the fan speed or turn the
fan off.
Page 205 of 413
Chevrolet Malibu Owner Manual (GMNA-Localizing-U.S./Canada/Mexico-
11348460) - 2018 - crc - 5/3/17
204 Climate Controls
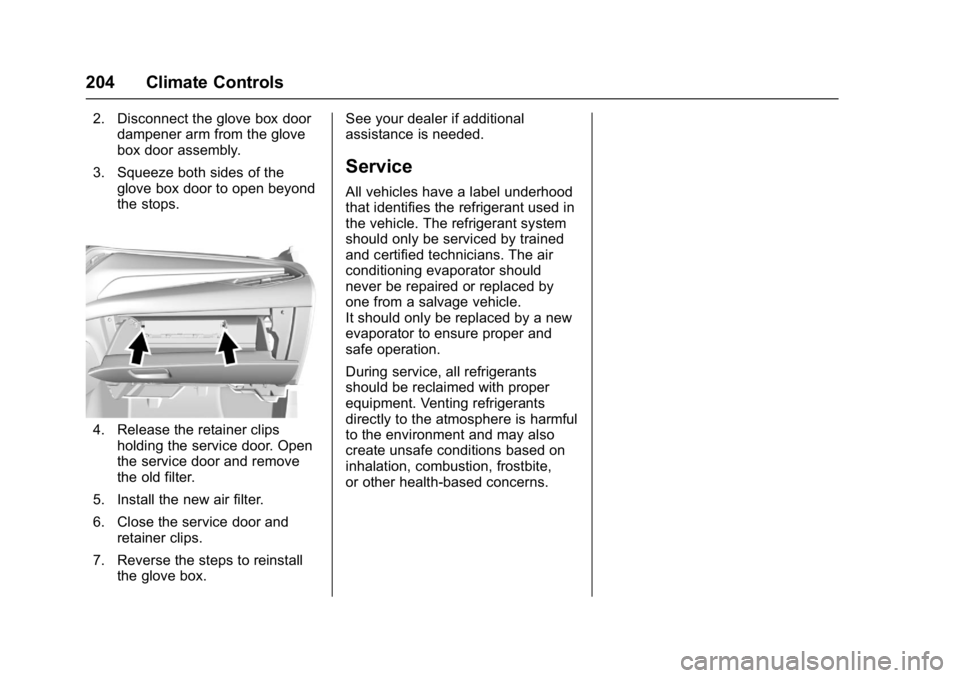
2. Disconnect the glove box doordampener arm from the glove
box door assembly.
3. Squeeze both sides of the glove box door to open beyond
the stops.
4. Release the retainer clipsholding the service door. Open
the service door and remove
the old filter.
5. Install the new air filter.
6. Close the service door and retainer clips.
7. Reverse the steps to reinstall the glove box. See your dealer if additional
assistance is needed.
Service
All vehicles have a label underhood
that identifies the refrigerant used in
the vehicle. The refrigerant system
should only be serviced by trained
and certified technicians. The air
conditioning evaporator should
never be repaired or replaced by
one from a salvage vehicle.
It should only be replaced by a new
evaporator to ensure proper and
safe operation.
During service, all refrigerants
should be reclaimed with proper
equipment. Venting refrigerants
directly to the atmosphere is harmful
to the environment and may also
create unsafe conditions based on
inhalation, combustion, frostbite,
or other health-based concerns.
Page 211 of 413
Chevrolet Malibu Owner Manual (GMNA-Localizing-U.S./Canada/Mexico-
11348460) - 2018 - crc - 5/3/17
210 Driving and Operating
Hydroplaning
Hydroplaning is dangerous. Water
can build up under the vehicle's
tires so they actually ride on the
water. This can happen if the road is
wet enough and you are going fast
enough. When the vehicle is
hydroplaning, it has little or no
contact with the road.
There is no hard and fast rule about
hydroplaning. The best advice is to
slow down when the road is wet.
Other Rainy Weather Tips
Besides slowing down, other wet
weather driving tips include:
.Allow extra following distance.
. Pass with caution.
. Keep windshield wiping
equipment in good shape.
. Keep the windshield washer fluid
reservoir filled.
. Have good tires with proper
tread depth. See Tires0308.
. Turn off cruise control.
Hill and Mountain Roads
Driving on steep hills or through
mountains is different than driving
on flat or rolling terrain. Tips include:
.Keep the vehicle serviced and in
good shape.
. Check all fluid levels and brakes,
tires, cooling system, and
transmission.
. Shift to a lower gear when going
down steep or long hills.
{Warning
Using the brakes to slow the
vehicle on a long downhill slope
can cause brake overheating, can
reduce brake performance, and
could result in a loss of braking.
Shift the transmission to a lower
gear to let the engine assist the
brakes on a steep downhill slope.
{Warning
Coasting downhill in N (Neutral)
or with the ignition off is
dangerous. This can cause
overheating of the brakes and
loss of steering. Always have the
engine running and the vehicle
in gear.
. Drive at speeds that keep the
vehicle in its own lane. Do not
swing wide or cross the
center line.
. Be alert on top of hills;
something could be in your lane
(e.g., stalled car, accident).
. Pay attention to special road
signs (e.g., falling rocks area,
winding roads, long grades,
passing or no-passing zones)
and take appropriate action.
Page 218 of 413
Chevrolet Malibu Owner Manual (GMNA-Localizing-U.S./Canada/Mexico-
11348460) - 2018 - crc - 5/3/17
Driving and Operating 217
Do not turn the engine off when the
vehicle is moving. This will cause a
loss of power assist in the brake
and steering systems and disable
the airbags.
If the vehicle must be shut off in an
emergency:1. Brake using a firm and steady pressure. Do not pump the
brakes repeatedly. This may
deplete power assist, requiring
increased brake pedal force.
2. Shift the vehicle to N (Neutral). This can be done while the
vehicle is moving. After shifting
to N (Neutral), firmly apply the
brakes and steer the vehicle to
a safe location.
3. Come to a complete stop, shift to P (Park), and turn the
ignition off. On vehicles with an
automatic transmission, the
shift lever must be in P (Park)
to turn the ignition off.
4. Set the parking brake. See Parking Brake 0227 and
Electric Parking Brake 0228.{Warning
Turning off the vehicle while
moving may cause loss of power
assist in the brake and steering
systems and disable the airbags.
While driving, only shut the
vehicle off in an emergency.
If the vehicle cannot be pulled over
and must be shut off while driving,
press and hold ENGINE START/
STOP for longer than two seconds,
or press twice in five seconds.
ACC/ACCESSORY (Amber
Indicator Light) : This mode allows
you to use some electrical
accessories when the engine is off.
With the ignition off, pressing the
button one time without the brake
pedal applied will place the ignition
system in ACC/ACCESSORY.
The ignition will switch from ACC/
ACCESSORY to off after
five minutes to prevent battery
run down. ON/RUN/START (Green Indicator
Light) :
This mode is for driving and
starting. With the ignition off, and
the brake pedal applied, pressing
the button once will turn the ignition
on. Once engine cranking begins,
release the button. Engine cranking
will continue until the engine starts.
See Starting the Engine 0218. The
ignition will then remain on.
Service Mode
This power mode is available for
service and diagnostics, and to
verify the proper operation of the
malfunction indicator lamp as may
be required for emission inspection
purposes. With the vehicle off, and
the brake pedal not applied,
pressing and holding the button for
more than five seconds will place
the vehicle in Service Mode. The
instruments and audio systems will
operate as they do with the ignition
on, but the vehicle will not be able
to be driven. The engine will not
start in Service Mode. Press the
button again to turn the vehicle off.
Page 229 of 413
Chevrolet Malibu Owner Manual (GMNA-Localizing-U.S./Canada/Mexico-
11348460) - 2018 - crc - 5/3/17
228 Driving and Operating
To set the manual parking brake,
if equipped:
Hold the brake pedal down, then
push the parking brake pedal down.
If the ignition is on, the brake
system warning light will come on.
SeeBrake System Warning Light
0 124.
Caution
Driving with the parking brake on
can overheat the brake system
and cause premature wear or
damage to brake system parts.
Make sure that the parking brake
is fully released and the brake
warning light is off before driving.
To release the parking brake, hold
the regular brake pedal down, then
push down momentarily on the
parking brake pedal until you feel
the pedal release. Slowly pull your
foot up off the parking brake pedal.
If the parking brake is not released
when you begin to drive, the brake system warning light will be on and
a chime will sound warning you that
the parking brake is still on.
If you are towing a trailer and are
parking on a hill, see
Driving
Characteristics and Towing Tips
0 262.
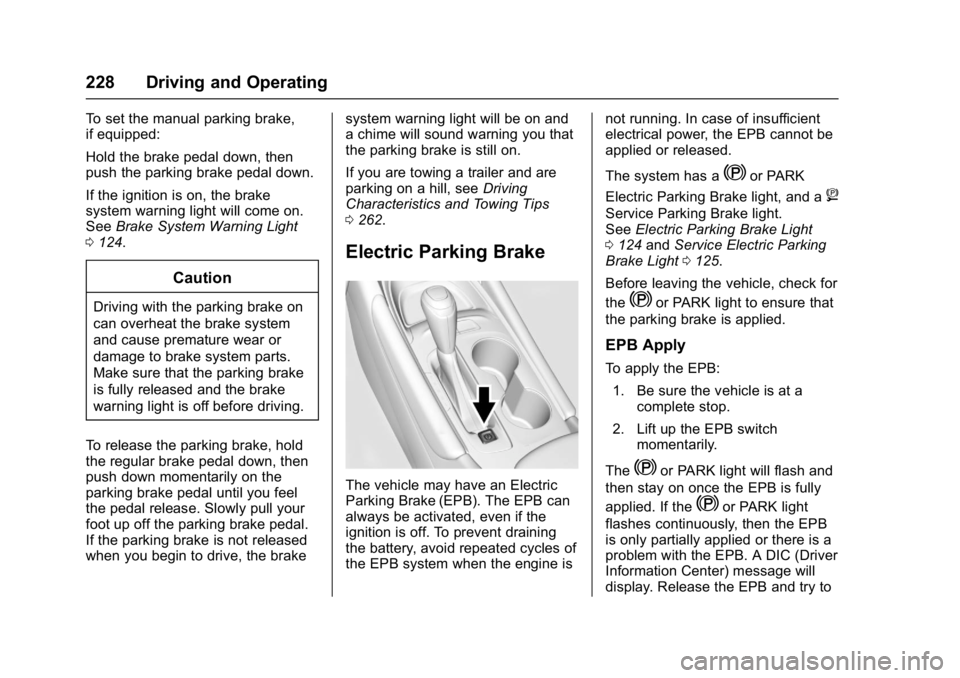
Electric Parking Brake
The vehicle may have an Electric
Parking Brake (EPB). The EPB can
always be activated, even if the
ignition is off. To prevent draining
the battery, avoid repeated cycles of
the EPB system when the engine is not running. In case of insufficient
electrical power, the EPB cannot be
applied or released.
The system has a
Yor PARK
Electric Parking Brake light, and a
8
Service Parking Brake light.
See Electric Parking Brake Light
0 124 andService Electric Parking
Brake Light 0125.
Before leaving the vehicle, check for
the
Yor PARK light to ensure that
the parking brake is applied.
EPB Apply
To apply the EPB:
1. Be sure the vehicle is at a complete stop.
2. Lift up the EPB switch momentarily.
The
Yor PARK light will flash and
then stay on once the EPB is fully
applied. If the
Yor PARK light
flashes continuously, then the EPB
is only partially applied or there is a
problem with the EPB. A DIC (Driver
Information Center) message will
display. Release the EPB and try to
Page 230 of 413
Chevrolet Malibu Owner Manual (GMNA-Localizing-U.S./Canada/Mexico-
11348460) - 2018 - crc - 5/3/17
Driving and Operating 229
apply it again. If the light does not
come on, or keeps flashing, have
the vehicle serviced. Do not drive
the vehicle if the
Yor PARK light
is flashing. See your dealer. See
Electric Parking Brake Light 0124.
If the
8light is on, pull the EPB
switch and hold it. Continue to hold
the switch until the
Yor PARK
light remains on. If the
8light
remains on, see your dealer.
If the EPB is applied while the
vehicle is moving, the vehicle will
decelerate as long as the switch is
pressed. If the switch is pressed
until the vehicle comes to a stop,
the EPB will remain applied.
The vehicle may automatically apply
the EPB in some situations when
the vehicle is not moving. This is
normal, and is done to periodically
check the correct operation of the
EPB system.
If the EPB fails to apply, block the
rear wheels to prevent vehicle
movement.
EPB Release
To release the EPB:
1. Turn the ignition on or to ACC/ ACCESSORY.
2. Apply and hold the brake pedal.
3. Press the EPB switch momentarily.
The EPB is released when the
Y
or PARK light is off.
If the
8light is on, release the EPB
by pressing and holding the EPB
switch. Continue to hold the switch
until the
Yor PARK light is off.
If either light stays on after release
is attempted, see your dealer.
Caution
Driving with the parking brake on
can overheat the brake system
and cause premature wear or
damage to brake system parts.
Make sure that the parking brake
is fully released and the brake
warning light is off before driving.
Automatic EPB Release
The EPB will automatically release if
the vehicle is running, placed into
gear, and an attempt is made to
drive away. Avoid rapid acceleration
when the EPB is applied, to
preserve parking brake lining life.
Brake Assist
The Brake Assist feature is
designed to assist the driver in
stopping or decreasing vehicle
speed in emergency driving
conditions. This feature uses the
stability system hydraulic brake
control module to supplement the
power brake system under
conditions where the driver has
quickly and forcefully applied the
brake pedal in an attempt to quickly
stop or slow down the vehicle. The
stability system hydraulic brake
control module increases brake
pressure at each corner of the
vehicle until the ABS activates.
Minor brake pedal pulsation or
pedal movement during this time is
normal and the driver should
continue to apply the brake pedal as