2018 CHEVROLET MALIBU turn signal
[x] Cancel search: turn signalPage 257 of 413
Chevrolet Malibu Owner Manual (GMNA-Localizing-U.S./Canada/Mexico-
11348460) - 2018 - crc - 5/3/17
256 Driving and Operating
camera to detect lane markings
between 60 km/h (37 mph) and
180 km/h (112 mph).
{Warning
The LKA system does not
continuously steer the vehicle.
It may not keep the vehicle in the
lane or give a Lane Departure
Warning (LDW) alert, even if a
lane marking is detected.
The LKA and LDW systems
may not:. Provide an alert or enough
steering assist to avoid a
lane departure or crash.
. Detect lane markings under
poor weather or visibility
conditions. This can occur if
the windshield or
headlamps are blocked by
dirt, snow, or ice, if they are
not in proper condition, or if
the sun shines directly into
the camera.
. Detect road edges.
(Continued)
Warning (Continued)
.Detect lanes on winding or
hilly roads.
If LKA only detects lane markings
on one side of the road, it will
only assist or provide an LDW
alert when approaching the lane
on the side where it has detected
a lane marking. Even with LKA
and LDW, you must steer the
vehicle. Always keep your
attention on the road and
maintain proper vehicle position
within the lane, or vehicle
damage, injury, or death could
occur. Always keep the
windshield, headlamps, and
camera sensors clean and in
good repair. Do not use LKA in
bad weather conditions.
{Warning
Using LKA while towing a trailer
or on slippery roads could cause
loss of control of the vehicle and
a crash. Turn the system off.
How the System Works
The LKA camera sensor is on the
windshield ahead of the rearview
mirror.
To turn LKA on and off, press
A
on the steering wheel.
When on,
Ais green if LKA is
available to assist and provide LDW
alerts. It may assist by gently
turning the steering wheel and
display
Aas amber if the vehicle
approaches a detected lane marking
without using a turn signal in that
direction. It may also provide an
LDW alert by flashing
Aamber
as the lane marking is crossed.
Additionally, there may be three
beeps on the right or left, depending
on the lane departure direction.
Page 264 of 413
Chevrolet Malibu Owner Manual (GMNA-Localizing-U.S./Canada/Mexico-
11348460) - 2018 - crc - 5/3/17
Driving and Operating 263
combination moving and then apply
the trailer brake controller by hand
to be sure the brakes work.
During the trip, check occasionally
to be sure that the load is secure
and the lamps and any trailer
brakes still work.
Towing with a Stability Control
System
When towing, the sound of the
stability control system might be
heard. The system is reacting to the
vehicle movement caused by the
trailer, which mainly occurs during
cornering. This is normal when
towing heavier trailers.
Following Distance
Stay at least twice as far behind the
vehicle ahead as you would when
driving the vehicle without a trailer.
This can help to avoid situations
that require heavy braking and
sudden turns.
Passing
More passing distance is needed
when towing a trailer. Because the
rig is longer, it is necessary to go
farther beyond the passed vehicle
before returning to the lane.
Backing Up
Hold the bottom of the steering
wheel with one hand. To move the
trailer to the left, move your hand to
the left. To move the trailer to the
right, move your hand to the right.
Always back up slowly and,
if possible, have someone
guide you.
Making TurnsCaution
Making very sharp turns while
trailering could cause the trailer to
come in contact with the vehicle.
The vehicle could be damaged.
Avoid making very sharp turns
while trailering. When turning with a trailer, make
wider turns than normal so the
trailer will not strike soft shoulders,
curbs, road signs, trees, or other
objects. Use the turn signal well in
advance and avoid jerky or sudden
maneuvers.
Turn Signals When Towing a
Trailer
The turn signal indicators on the
instrument cluster flash whenever
signaling a turn or lane change.
Properly hooked up, the trailer
lamps also flash, telling other
drivers the vehicle is turning,
changing lanes, or stopping.
When towing a trailer, the arrows on
the instrument cluster flash for turns
even if the bulbs on the trailer are
burned out. Check occasionally to
be sure the trailer bulbs are still
working.
Driving on Grades
Reduce speed and shift to a
lower gear before starting down a
long or steep downgrade. If the
transmission is not shifted down, the
Page 269 of 413
Chevrolet Malibu Owner Manual (GMNA-Localizing-U.S./Canada/Mexico-
11348460) - 2018 - crc - 5/3/17
268 Vehicle Care
Vehicle Care
General Information
General Information . . . . . . . . . . 269
California Proposition65 Warning . . . . . . . . . . . . . . . . . 269
California Perchlorate Materials Requirements . . . . . 270
Accessories and Modifications . . . . . . . . . . . . . . . . 270
Vehicle Checks
Doing Your OwnService Work . . . . . . . . . . . . . . . 270
Hood . . . . . . . . . . . . . . . . . . . . . . . . . 271
Engine Compartment Overview . . . . . . . . . . . . . . . . . . . . 273
Engine Oil . . . . . . . . . . . . . . . . . . . . 278
Engine Oil Life System . . . . . . . 281
Automatic Transmission Fluid . . . . . . . . . . . . . . . . . . . . . . . . 282
Engine Air Cleaner/Filter . . . . . . 282
Cooling System (Engine) . . . . . 283
Cooling System (Power Electronics) . . . . . . . . . . . . . . . . . 287
Engine Overheating . . . . . . . . . . 288
Washer Fluid . . . . . . . . . . . . . . . . . 289
Brakes . . . . . . . . . . . . . . . . . . . . . . . 289
Brake Fluid . . . . . . . . . . . . . . . . . . . 290
Battery - North America . . . . . . 291 Starter Switch Check . . . . . . . . . 293
Automatic Transmission Shift
Lock Control Function
Check . . . . . . . . . . . . . . . . . . . . . . . 293
Park Brake and P (Park)
Mechanism Check . . . . . . . . . . 294
Wiper Blade Replacement . . . . 294
Gas Strut(s) . . . . . . . . . . . . . . . . . . 295
Headlamp Aiming
Headlamp Aiming . . . . . . . . . . . . 296
Bulb Replacement
Bulb Replacement . . . . . . . . . . . . 296
Halogen Bulbs . . . . . . . . . . . . . . . . 296
LED Lighting . . . . . . . . . . . . . . . . . 296
Headlamps, Front Turn Signal, Sidemarker, and Parking
Lamps . . . . . . . . . . . . . . . . . . . . . . 297
Taillamps, Turn Signal, Stoplamps, and Back-Up
Lamps (LS and LT) . . . . . . . . . . 298
Taillamps, Turn Signal, Stoplamps, and Back-Up
Lamps (LTZ) . . . . . . . . . . . . . . . . 299
License Plate Lamp . . . . . . . . . . 300
Electrical System
High Voltage Devices and Wiring . . . . . . . . . . . . . . . . . . . . . . . 300
Electrical System Overload . . . 301
Fuses and Circuit Breakers . . . 301 Engine Compartment Fuse
Block . . . . . . . . . . . . . . . . . . . . . . . . 302
Instrument Panel Fuse Block . . . . . . . . . . . . . . . . . . . . . . . . 306
Wheels and Tires
Tires . . . . . . . . . . . . . . . . . . . . . . . . . . 308
All-Season Tires . . . . . . . . . . . . . . 309
Winter Tires . . . . . . . . . . . . . . . . . . 310
Low-Profile Tires . . . . . . . . . . . . . 310
Summer Tires . . . . . . . . . . . . . . . . 310
Tire Sidewall Labeling . . . . . . . . 311
Tire Designations . . . . . . . . . . . . . 313
Tire Terminology andDefinitions . . . . . . . . . . . . . . . . . . 314
Tire Pressure . . . . . . . . . . . . . . . . . 316
Tire Pressure for High-Speed Operation . . . . . . . . . . . . . . . . . . . 317
Tire Pressure Monitor System . . . . . . . . . . . . . . . . . . . . . . 318
Tire Pressure Monitor Operation . . . . . . . . . . . . . . . . . . . 319
Tire Inspection . . . . . . . . . . . . . . . . 322
Tire Rotation . . . . . . . . . . . . . . . . . 322
When It Is Time for New Tires . . . . . . . . . . . . . . . . . . . . . . . . 323
Buying New Tires . . . . . . . . . . . . . 324
Different Size Tires and Wheels . . . . . . . . . . . . . . . . . . . . . . 325
Uniform Tire Quality Grading . . . . . . . . . . . . . . . . . . . . . 326
Page 298 of 413
Chevrolet Malibu Owner Manual (GMNA-Localizing-U.S./Canada/Mexico-
11348460) - 2018 - crc - 5/3/17
Vehicle Care 297
Headlamps, Front Turn
Signal, Sidemarker, and
Parking Lamps
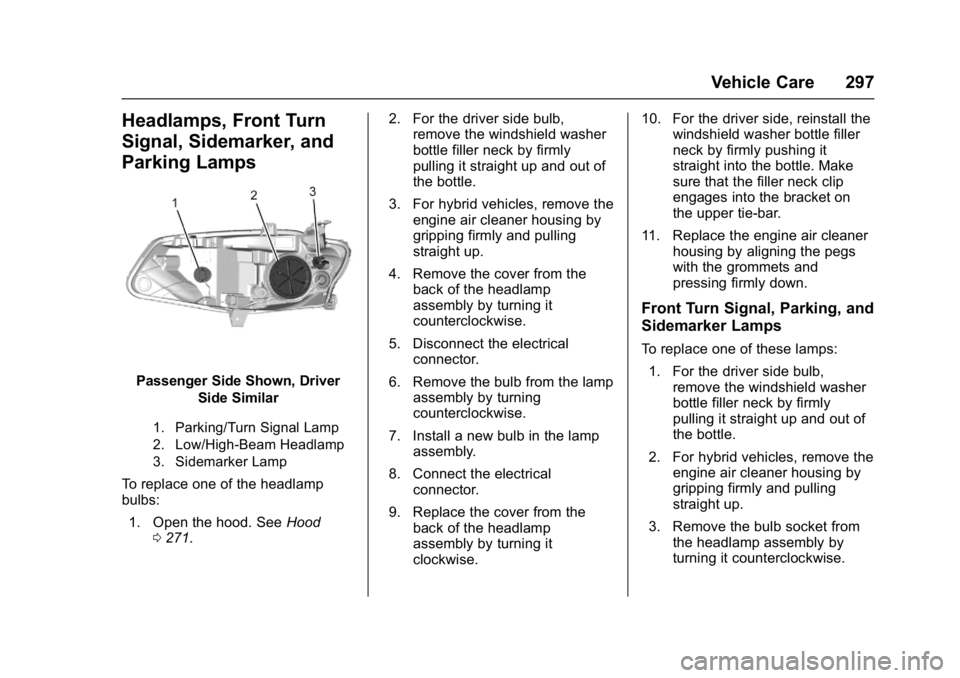
Passenger Side Shown, DriverSide Similar
1. Parking/Turn Signal Lamp
2. Low/High-Beam Headlamp
3. Sidemarker Lamp
To replace one of the headlamp
bulbs:
1. Open the hood. See Hood
0 271. 2. For the driver side bulb,
remove the windshield washer
bottle filler neck by firmly
pulling it straight up and out of
the bottle.
3. For hybrid vehicles, remove the engine air cleaner housing by
gripping firmly and pulling
straight up.
4. Remove the cover from the back of the headlamp
assembly by turning it
counterclockwise.
5. Disconnect the electrical connector.
6. Remove the bulb from the lamp assembly by turning
counterclockwise.
7. Install a new bulb in the lamp assembly.
8. Connect the electrical connector.
9. Replace the cover from the back of the headlamp
assembly by turning it
clockwise. 10. For the driver side, reinstall the
windshield washer bottle filler
neck by firmly pushing it
straight into the bottle. Make
sure that the filler neck clip
engages into the bracket on
the upper tie-bar.
11. Replace the engine air cleaner housing by aligning the pegs
with the grommets and
pressing firmly down.
Front Turn Signal, Parking, and
Sidemarker Lamps
To replace one of these lamps:
1. For the driver side bulb, remove the windshield washer
bottle filler neck by firmly
pulling it straight up and out of
the bottle.
2. For hybrid vehicles, remove the engine air cleaner housing by
gripping firmly and pulling
straight up.
3. Remove the bulb socket from the headlamp assembly by
turning it counterclockwise.
Page 299 of 413
Chevrolet Malibu Owner Manual (GMNA-Localizing-U.S./Canada/Mexico-
11348460) - 2018 - crc - 5/3/17
298 Vehicle Care
4. Remove the bulb from thesocket.
5. Replace the bulb in the bulb socket.
6. Install the bulb socket in the headlamp assembly by turning
it clockwise.
7. For the driver side, reinstall the windshield washer bottle filler
neck by firmly pushing it
straight into the bottle. Make
sure that the filler neck clip
engages into the bracket on
the upper tie-bar.
8. Replace the engine air cleaner housing by aligning the pegs
with the grommets and
pressing firmly down.Taillamps, Turn Signal,
Stoplamps, and Back-Up
Lamps (LS and LT)
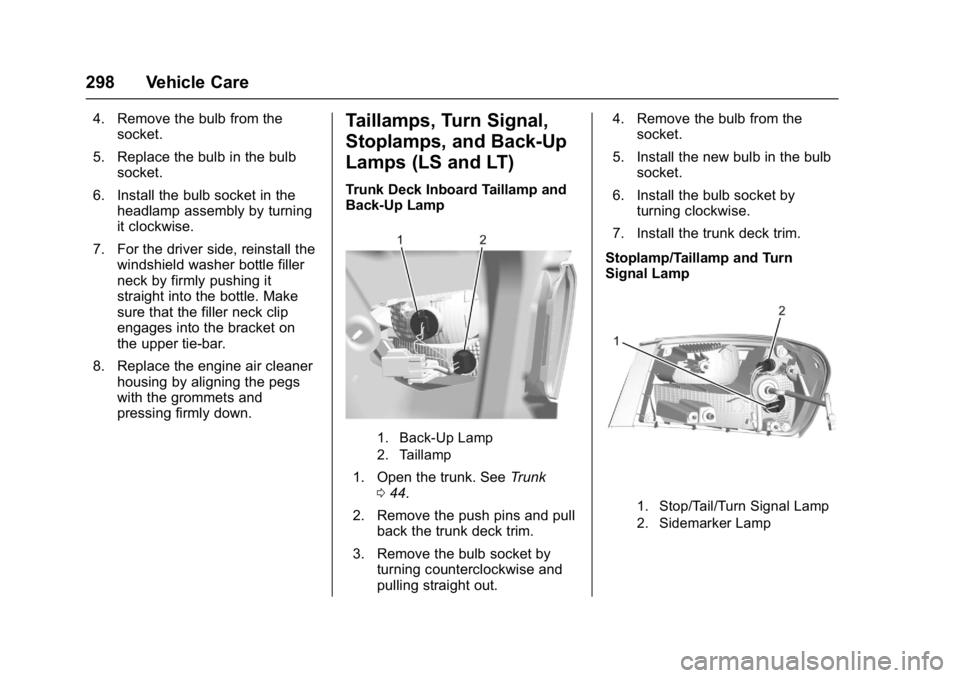
Trunk Deck Inboard Taillamp and
Back-Up Lamp
1. Back-Up Lamp
2. Taillamp
1. Open the trunk. See Trunk
0 44.
2. Remove the push pins and pull back the trunk deck trim.
3. Remove the bulb socket by turning counterclockwise and
pulling straight out. 4. Remove the bulb from the
socket.
5. Install the new bulb in the bulb socket.
6. Install the bulb socket by turning clockwise.
7. Install the trunk deck trim.
Stoplamp/Taillamp and Turn
Signal Lamp
1. Stop/Tail/Turn Signal Lamp
2. Sidemarker Lamp
Page 300 of 413
Chevrolet Malibu Owner Manual (GMNA-Localizing-U.S./Canada/Mexico-
11348460) - 2018 - crc - 5/3/17
Vehicle Care 299
Caution
Improper lamp assembly removal
and installation can cause leaks
and water intrusion which may
cause damage to the taillamp. Do
not remove the taillamp assembly
to replace a bulb. Use the trunk
opening to access the bulb.
To replace any one of these bulbs: 1. Open the trunk. See Trunk
0 44.
2. Remove the push pins and pull the trunk trim away from the
taillamp assembly.
3. Remove three hex-nuts from each stud.
4. Remove the lamp by pulling it straight back.
5. Remove the bulb socket from the taillamp assembly by
turning it counterclockwise.
6. Remove the bulb from the socket by turning the bulb
counterclockwise one-quarter
turn and pulling it straight out. 7. Install a new bulb into the
socket.
8. Install the bulb socket into the taillamp assembly by turning it
clockwise.
9. Install the trunk trim, hex nuts, and push pins.
Taillamps, Turn Signal,
Stoplamps, and Back-Up
Lamps (LTZ)
Caution
Improper lamp assembly removal
and installation can cause leaks
and water intrusion which may
cause damage to the taillamp. Do
not remove the taillamp assembly
to replace a bulb. Use the trunk
opening to access the bulb.
The stoplamp/taillamp and trunk
deck inboard taillamp are LEDs. To
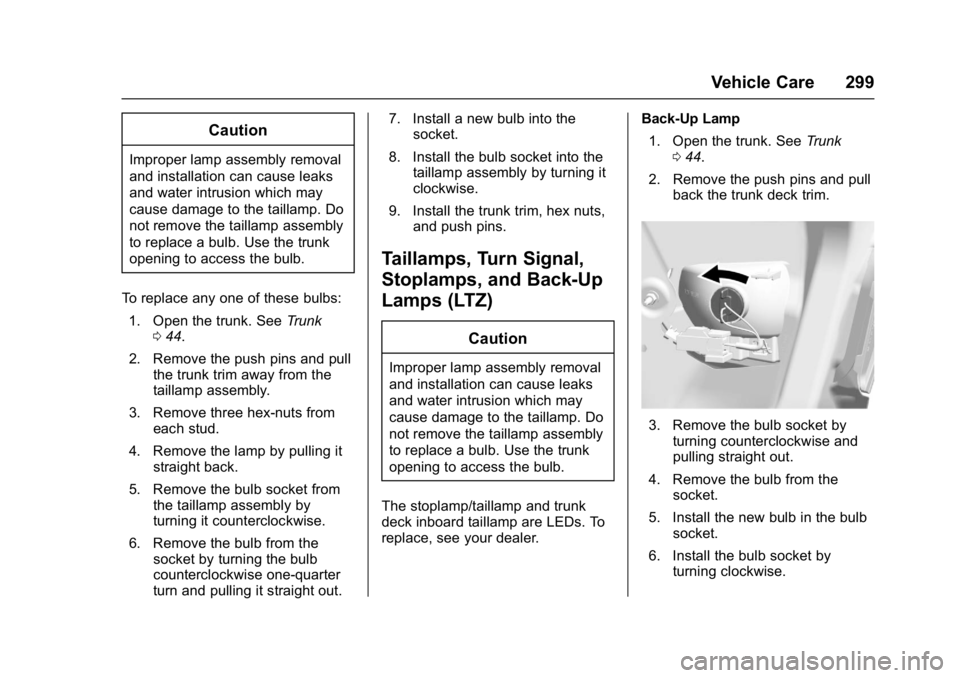
replace, see your dealer. Back-Up Lamp
1. Open the trunk. See Trunk
0 44.
2. Remove the push pins and pull back the trunk deck trim.
3. Remove the bulb socket byturning counterclockwise and
pulling straight out.
4. Remove the bulb from the socket.
5. Install the new bulb in the bulb socket.
6. Install the bulb socket by turning clockwise.
Page 320 of 413
Chevrolet Malibu Owner Manual (GMNA-Localizing-U.S./Canada/Mexico-
11348460) - 2018 - crc - 5/3/17
Vehicle Care 319
This sequence will continue upon
subsequent vehicle start-ups as
long as the malfunction exists.
When the malfunction indicator is
illuminated, the system may not be
able to detect or signal low tire
pressure as intended. TPMS
malfunctions may occur for a variety
of reasons, including the installation
of replacement or alternate tires or
wheels on the vehicle that prevent
the TPMS from functioning properly.
Always check the TPMS malfunction
telltale after replacing one or more
tires or wheels on your vehicle to
ensure that the replacement or
alternate tires and wheels allow the
TPMS to continue to function
properly.
SeeTire Pressure Monitor
Operation 0319.
See Radio Frequency Statement
0 385.Tire Pressure Monitor
Operation
This vehicle may have a Tire
Pressure Monitor System (TPMS).
The TPMS is designed to warn the
driver when a low tire pressure
condition exists. TPMS sensors are
mounted onto each tire and wheel
assembly, excluding the spare tire
and wheel assembly. The TPMS
sensors monitor the air pressure in
the tires and transmit the tire
pressure readings to a receiver
located in the vehicle.
When a low tire pressure condition
is detected, the TPMS illuminates
the low tire pressure warning light
located on the instrument cluster.
If the warning light comes on, stop
as soon as possible and inflate the
tires to the recommended pressure shown on the Tire and Loading
Information label. See
Vehicle Load
Limits 0212.
A message to check the pressure in
a specific tire displays in the Driver
Information Center (DIC). The low
tire pressure warning light and the
DIC warning message come on at
each ignition cycle until the tires are
inflated to the correct inflation
pressure. Using the DIC, tire
pressure levels can be viewed. For
additional information and details
about the DIC operation and
displays see Driver Information
Center (DIC) (Uplevel) 0134 or
Driver Information Center (DIC)
(Base Level) 0131.
The low tire pressure warning light
may come on in cool weather when
the vehicle is first started, and then
turn off as the vehicle is driven. This
could be an early indicator that the
air pressure is getting low and
needs to be inflated to the proper
pressure.
A Tire and Loading Information
label, attached to your vehicle,
shows the size of the original
Page 322 of 413
Chevrolet Malibu Owner Manual (GMNA-Localizing-U.S./Canada/Mexico-
11348460) - 2018 - crc - 5/3/17
Vehicle Care 321
could prevent the TPMS from
functioning properly. SeeBuying
New Tires 0324.
. Operating electronic devices or
being near facilities using radio
wave frequencies similar to the
TPMS could cause the TPMS
sensors to malfunction.
If the TPMS is not functioning
properly it cannot detect or signal a
low tire pressure condition. See
your dealer for service if the TPMS
malfunction light and DIC message
comes on and stays on.
TPMS Sensor Matching
Process
Each TPMS sensor has a unique
identification code. The identification
code needs to be matched to a new
tire/wheel position after rotating the
vehicle’s tires or replacing one or
more of the TPMS sensors. The
TPMS sensor matching process
should also be performed after
replacing a spare tire with a road
tire containing the TPMS sensor.
The malfunction light and the DIC
message should go off at the next
ignition cycle. The sensors are matched to the tire/wheel positions,
using a TPMS relearn tool, in the
following order: driver side front tire,
passenger side front tire, passenger
side rear tire, and driver side rear.
See your dealer for service or to
purchase a relearn tool. A TPMS
relearn tool can also be purchased.
See Tire Pressure Monitor Sensor
Activation Tool at
www.gmtoolsandequipment.com or
call 1-800-GM TOOLS
(1-800-468-6657).
There are two minutes to match the
first tire/wheel position, and
five minutes overall to match all four
tire/wheel positions. If it takes
longer, the matching process stops
and must be restarted.
The TPMS sensor matching
process is:
1. Set the parking brake.
2. Place the vehicle in Service Mode. See Ignition Positions
0 216.
3. Make sure the Tire Pressure info page option is turned on.
The info pages on the DIC can be turned on and off through
the Options menu.
See
Driver Information Center
(DIC) (Uplevel) 0134 orDriver
Information Center (DIC) (Base
Level) 0131.
4. Use the DIC controls on the right side of the steering wheel
to scroll to the Tire Pressure
screen under the DIC
info page.
5. Press and hold
Vin the center
of the DIC controls.
The horn sounds twice to
signal the receiver is in relearn
mode and the TIRE
LEARNING ACTIVE message
displays on the DIC screen.
6. Start with the driver side front tire.
7. Place the relearn tool against the tire sidewall, near the valve
stem. Then press the button to
activate the TPMS sensor.
A horn chirp confirms that the
sensor identification code has
been matched to this tire and
wheel position.