2018 CHEVROLET MALIBU start stop button
[x] Cancel search: start stop buttonPage 8 of 413

Chevrolet Malibu Owner Manual (GMNA-Localizing-U.S./Canada/Mexico-
11348460) - 2018 - crc - 5/3/17
In Brief 7
1.Air Vents 0203.
2. Turn Signal Lever. See Turn
and Lane-Change Signals
0 158.
IntelliBeam System Button
(If Equipped). See Exterior
Lamp Controls 0154.
3. Instrument Cluster (Base
Level) 0112 orInstrument
Cluster (Uplevel) 0114.
Driver Information Center (DIC)
(Uplevel) 0134 orDriver
Information Center (DIC) (Base
Level) 0131.
4. Windshield Wiper/Washer
0106.
5. Light Sensor. See Automatic
Headlamp System 0157.
6. Infotainment 0162.
7. Climate Control Systems
0196.
Dual Automatic Climate Control
System 0199 (If Equipped).
8. Hazard Warning Flashers
0157.
9. Power Outlets 0109. 10.
Traction Control/Electronic
Stability Control 0231.
Assistance Systems for
Parking or Backing 0243
(If Equipped).
11. Shift Lever. See Automatic
Transmission 0224.
12. Electric Parking Brake 0228.
13. USB Port 0176.
14. ENGINE START/STOP Button. SeeIgnition Positions 0216.
15. Steering Wheel Controls 0105.
Driver Information Center
Buttons.
See Driver Information Center
(DIC) (Uplevel) 0134 orDriver
Information Center (DIC) (Base
Level) 0131.
16. Horn 0106.
17. Steering Wheel Adjustment
0105.
18. Cruise Control 0233.
Adaptive Cruise Control 0235
(If Equipped). Heated Steering Wheel
0106
(If Equipped).
Forward Collision Alert (FCA)
System 0247 (If Equipped).
Lane Keep Assist (LKA) 0255
(If Equipped).
19. Hood Release. See Hood
0 271.
20. Data Link Connector (Out of View). See Malfunction
Indicator Lamp (Check Engine
Light) 0122.
21. Exterior Lamp Controls 0154.
22. Instrument Panel Illumination
Control 0158.
Page 37 of 413
Chevrolet Malibu Owner Manual (GMNA-Localizing-U.S./Canada/Mexico-
11348460) - 2018 - crc - 5/3/17
36 Keys, Doors, and Windows
3. Place the first new transmitterinto the transmitter pocket with
the buttons facing the rear of
the vehicle. The transmitter
pocket is inside the center
console storage area.
4. Press ENGINE START/STOP. When the transmitter is
learned, the DIC will show that
it is ready to program the next
transmitter.
5. Remove the transmitter from the transmitter pocket and
press
KorQ.
To program additional
transmitters, repeat Steps 3–5
for each new transmitter.
When all additional transmitters
are programmed, press and
hold ENGINE START/STOP for
12 seconds to exit
programming mode.
6. Put the key back into the transmitter. Programming without Recognized
Transmitters
If two currently recognized
transmitters are not available, follow
this procedure to program up to
eight transmitters. This feature is
not available in Canada. This
procedure will take approximately
30 minutes to complete. The vehicle
must be off and all of the
transmitters to be programmed must
be with you.
1. Remove the key lock cylinder cap on the driver door handle.
See Door Locks 040. Insert
the vehicle key of the
transmitter into the key lock
cylinder on the outside of the
driver door and turn the key
counterclockwise five times
within 10 seconds.
The Driver Information Center
(DIC) displays REMOTE
LEARN PENDING,
PLEASE WAIT. 2. Wait for 10 minutes until the
DIC displays PRESS ENGINE
START BUTTON TO LEARN
and then press ENGINE
START/STOP.
The DIC will again display
REMOTE LEARN PENDING,
PLEASE WAIT.
3. Repeat Step 2 two additional times. After the third time, all
previously known transmitters
will no longer work with the
vehicle. Remaining transmitters
can be relearned during the
next steps.
The DIC display should now
show READY FOR REMOTE
# 1.
Page 38 of 413
Chevrolet Malibu Owner Manual (GMNA-Localizing-U.S./Canada/Mexico-
11348460) - 2018 - crc - 5/3/17
Keys, Doors, and Windows 37
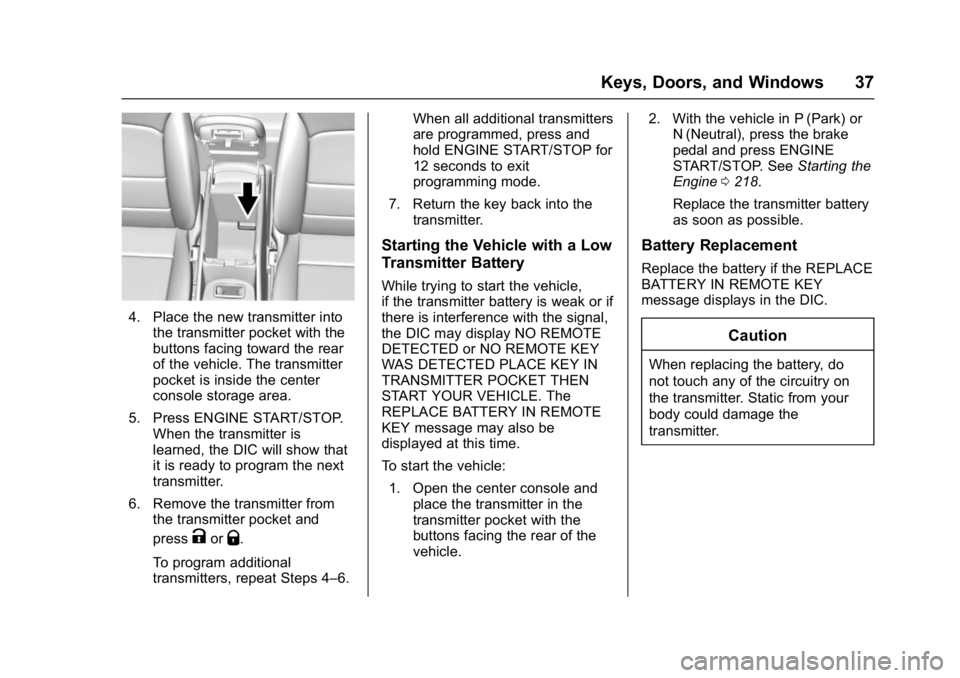
4. Place the new transmitter intothe transmitter pocket with the
buttons facing toward the rear
of the vehicle. The transmitter
pocket is inside the center
console storage area.
5. Press ENGINE START/STOP. When the transmitter is
learned, the DIC will show that
it is ready to program the next
transmitter.
6. Remove the transmitter from the transmitter pocket and
press
KorQ.
To program additional
transmitters, repeat Steps 4–6. When all additional transmitters
are programmed, press and
hold ENGINE START/STOP for
12 seconds to exit
programming mode.
7. Return the key back into the transmitter.
Starting the Vehicle with a Low
Transmitter Battery
While trying to start the vehicle,
if the transmitter battery is weak or if
there is interference with the signal,
the DIC may display NO REMOTE
DETECTED or NO REMOTE KEY
WAS DETECTED PLACE KEY IN
TRANSMITTER POCKET THEN
START YOUR VEHICLE. The
REPLACE BATTERY IN REMOTE
KEY message may also be
displayed at this time.
To start the vehicle:
1. Open the center console and place the transmitter in the
transmitter pocket with the
buttons facing the rear of the
vehicle. 2. With the vehicle in P (Park) or
N (Neutral), press the brake
pedal and press ENGINE
START/STOP. See Starting the
Engine 0218.
Replace the transmitter battery
as soon as possible.
Battery Replacement
Replace the battery if the REPLACE
BATTERY IN REMOTE KEY
message displays in the DIC.
Caution
When replacing the battery, do
not touch any of the circuitry on
the transmitter. Static from your
body could damage the
transmitter.
Page 61 of 413
Chevrolet Malibu Owner Manual (GMNA-Localizing-U.S./Canada/Mexico-
11348460) - 2018 - crc - 5/3/17
60 Seats and Restraints
2. Start the vehicle with the initialkey or RKE transmitter. The
DIC should display the other
driver number not shown in
step 1.
Saving Memory Positions
Read these instructions completely
before saving memory positions.
To save preferred driving positions
1 and 2: 1. Turn the ignition on or to ACC/ ACCESSORY.
A DIC welcome message may
be displayed indicating number
1 or 2 for memory recalls.
2. Adjust all available memory features to the desired driving
position.
3. Press and release SET; a beep will sound.
4. Immediately press and hold the 1 or 2 memory button matching
the above DIC welcome
message until two beeps
sound. If too much time passes
between releasing SET and
pressing 1, the memory
position will not be saved and
two beeps will not sound.
Repeat Steps 3 and 4.
1 or 2 corresponds to the driver
number. See
“Identifying Driver
Number” in this section.
5. Repeat Steps 1–4 for a second driver using 1 or 2.
To save the position for
Band
easy exit features, repeat Steps 1–4
using
B. This stores the position
for getting out of the vehicle.
Save preferred memory feature
positions to both 1 and 2 if you are
the only driver.
Manually Recalling Memory
Positions
Press and hold 1, 2, or
Bto recall
the previously stored memory
positions.
To stop manual recall movement,
release 1, 2, or
B. Recall can also
be stopped by pressing a power seat, SET, or power mirror control,
if memory equipped. The driver or
passenger side mirror must be
selected.
Auto Memory Recall
The vehicle identifies the number of
the current driver
’s RKE transmitter
(1–8). See Remote Keyless Entry
(RKE) System Operation 032. If the
RKE transmitter is 1 or 2, and Auto
Memory Recall is programmed on in
vehicle personalization, the
positions saved to the same
memory button number 1 or 2 are
automatically recalled when the
ignition is turned on, or turned from
off to ACC/ACCESSORY. RKE
transmitters 3–8 will not provide
automatic memory recalls.
To turn Auto Memory Recall on or
off, see "Vehicle Personalization
Settings" previously in this section
and Vehicle Personalization 0138.
The transmission must be in
P (Park) to initiate Auto Memory
Recall. Auto Memory Recall will
complete if the vehicle is shifted out
of P (Park) prior to reaching the
stored memory position.
Page 107 of 413
Chevrolet Malibu Owner Manual (GMNA-Localizing-U.S./Canada/Mexico-
11348460) - 2018 - crc - 5/3/17
106 Instruments and Controls
Heated Steering Wheel
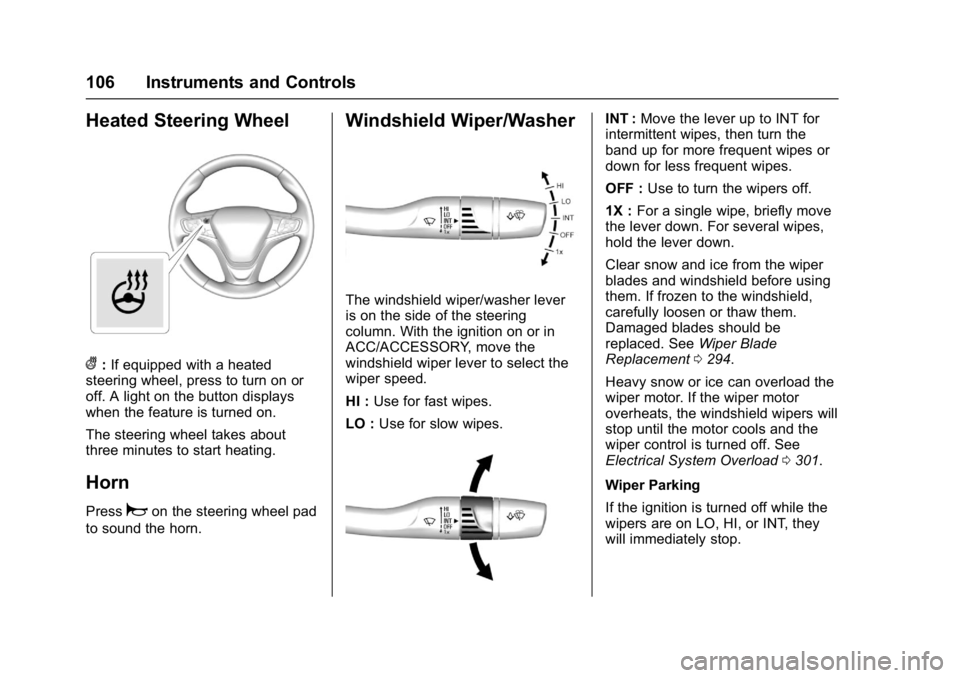
(:If equipped with a heated
steering wheel, press to turn on or
off. A light on the button displays
when the feature is turned on.
The steering wheel takes about
three minutes to start heating.
Horn
Pressaon the steering wheel pad
to sound the horn.
Windshield Wiper/Washer
The windshield wiper/washer lever
is on the side of the steering
column. With the ignition on or in
ACC/ACCESSORY, move the
windshield wiper lever to select the
wiper speed.
HI : Use for fast wipes.
LO : Use for slow wipes.
INT : Move the lever up to INT for
intermittent wipes, then turn the
band up for more frequent wipes or
down for less frequent wipes.
OFF : Use to turn the wipers off.
1X : For a single wipe, briefly move
the lever down. For several wipes,
hold the lever down.
Clear snow and ice from the wiper
blades and windshield before using
them. If frozen to the windshield,
carefully loosen or thaw them.
Damaged blades should be
replaced. See Wiper Blade
Replacement 0294.
Heavy snow or ice can overload the
wiper motor. If the wiper motor
overheats, the windshield wipers will
stop until the motor cools and the
wiper control is turned off. See
Electrical System Overload 0301.
Wiper Parking
If the ignition is turned off while the
wipers are on LO, HI, or INT, they
will immediately stop.
Page 171 of 413
Chevrolet Malibu Owner Manual (GMNA-Localizing-U.S./Canada/Mexico-
11348460) - 2018 - crc - 5/3/17
170 Infotainment System
home hotspot or public hotspot can
be used. Applicable data rates may
apply.
To connect the infotainment system
to a secured mobile device hotspot,
home hotspot, or a public hotspot,
touch SETTINGS on the Home
Page, followed by Wi-Fi, and then
Manage Wi-Fi Networks. Select the
appropriate Wi-Fi network, and
follow the on-screen prompts.
Download speeds may vary.
On most compatible mobile devices,
activation of the Wi-Fi hotspot is in
the Settings menu under Mobile
Network Sharing, Personal Hotspot,
Mobile Hotspot or similar.
Availability of Over-the-Air vehicle
software updates varies by vehicle
and country. For more information
on this feature, see
my.chevrolet.com/learn.Radio
AM-FM Radio
Playing the Radio without
Touchscreen
Audio Source Menu
O:Press and hold to turn the
system on and off. Turn to increase
or decrease the volume or to cancel
mute when the audio system is
muted.
MENU : Turn to change the radio
station.
RADIO : Press to select AM
and FM.
7or6: Press to seek the
previous or next station.
Press and hold to quick seek a
station.
FAV : Press to open the favorites
list and select a favorite page or
view the radio station and current
song playing information.
Preset Buttons 1–4 : Press to
select preset stations.
Radio Data System (RDS)
RDS is a service by FM stations
that makes it easier to find radio
stations with fault-free reception.
RDS stations are indicated by the
program service name with
broadcasting frequency.
Selecting a Band
Press RADIO to choose AM or FM.
The last station that was playing
starts playing again.
Selecting an Auxiliary Device
Press MEDIA to select a connected
auxiliary device.
Selecting a Station
Seek Tuning
If the radio station is not known:
Press
7or6to automatically
search for available radio stations.
Press and hold
7or6to change
the radio stations as desired, then
release to stop at the next available
station.
Page 172 of 413
Chevrolet Malibu Owner Manual (GMNA-Localizing-U.S./Canada/Mexico-
11348460) - 2018 - crc - 5/3/17
Infotainment System 171
Favorites List
There are two ways to select a
station from the Favorites List:
.Press FAV repeatedly, until the
desired FAV page is displayed,
then press the preset button of
the desired FAV station.
. Press FAV, turn MENU until the
desired FAV station is
highlighted, then press MENU to
select the desired FAV station.
Stations List 1. From AM or FM, turn MENU to select Stations List, then press
to select.
2. Turn MENU to move to the desired station from the
Stations List, then press to
receive the station.
Category List
Most stations that broadcast an
RDS program type code specify the
type of programming transmitted.
Some stations change the program
type code depending on the content. The system stores the RDS
stations sorted by program type in
the FM category list.
To search for a programming type
determined by station:
1. From the FM menu, turn MENU to select FM Category List,
then press MENU.
2. Turn MENU to move to the desired station, then press
MENU to receive the selected
broadcasting channel.
Update Stations List
From AM or FM, press MENU, turn
MENU to Update Stations List, then
press MENU.
During the AM or FM broadcasting
list update, press the preset button
under Cancel or BACK to stop the
updates.
Storing a Station as a Favorite
Stations from all bands can be
stored in any order in the favorite
pages.
Up to four stations can be stored in
each favorite page. Storing Stations
Press FAV to select the desired
page of saved favorites.
To store the station to a position in
the list, press and hold the
corresponding preset button 1−4
until a beep is heard.
Playing the Radio with
Touchscreen
Audio Source Menu
{:
Press to go to the Home Page.
O:Press to turn on, mute,
or unmute the system. Press and
hold to turn off the system.
Selecting a Band
1. Press{.
2. Touch AUDIO.
3. Touch Source.
4. Select AM, FM, or SXM, if equipped.
The last station that was playing
starts playing again.
Page 198 of 413
Chevrolet Malibu Owner Manual (GMNA-Localizing-U.S./Canada/Mexico-
11348460) - 2018 - crc - 5/3/17
Climate Controls 197
Air Delivery Mode Controls :
Press the air delivery mode buttons
to change the direction of the
airflow. The indicator light in the
selected button will turn on. The
current mode appears in the display
screen.
To change the current mode, select
one or more of the following modes:
0:Clears the windows of fog or
moisture. Air is directed to the
windshield.
{: Air is directed to the
instrument panel outlets.
z: Air is directed to the floor
outlets.
0MAX : Air is directed to the
windshield and the fan runs at a
higher speed. This mode overrides
the previous mode selected and
clears fog or frost from the
windshield more quickly. When the
button is pressed again, the system
returns to the previous mode setting
and fan speed.
For best results, clear all snow and
ice from the windshield before
defrosting. A/C :
Press to turn the air
conditioning system on or off. If the
fan control is turned off or the
outside temperature falls below
freezing, the air conditioner will
not run.
A/C (Max/Eco A/C For Stop/Start
Vehicles) : Press to cycle between
the max, eco, and off air
conditioning modes. The indicator
will be lit in max and eco modes and
turns off when there is no A/C
function. If the fan is turned off, the
air conditioner will not run and the
indicator light will turn off.
For max a/c, press A/C. The
indicator will turn amber. Auto stops
will occur less frequently, be shorter,
and will not occur in extremely warm
weather.
For eco a/c, press A/C again. The
indicator will turn green. This setting
balances fuel economy and air
conditioning comfort. In warm
weather conditions, auto stops may
occur more frequently, last longer,
and the vehicle interior may be
warmer during auto stops as
compared to the max a/c setting. This setting allows higher humidity
inside the vehicle and window
fogging may occur before the
engine restarts.
@:
Press to turn on recirculation.
An indicator light comes on. Air is
recirculated to quickly cool the
inside of the vehicle or to reduce the
entry of outside air and odors.
Auto Defog : The climate control
system may have a sensor to
automatically detect high humidity
inside the vehicle. When high
humidity is detected, the climate
control system may adjust to
outside air supply and turn on the
air conditioner. If the climate control
system does not detect possible
window fogging, it returns to normal
operation.
To turn Auto Defog off or on, see
“Climate and Air Quality” under
Vehicle Personalization 0138.