2018 CHEVROLET CRUZE key
[x] Cancel search: keyPage 261 of 404
Chevrolet Cruze Owner Manual (GMNA-Localizing-U.S./Canada/Mexico-
11348462) - 2018 - crc - 5/15/17
260 Vehicle Care
California Perchlorate
Materials Requirements
Certain types of automotive
applications, such as airbag
initiators, seat belt pretensioners,
and lithium batteries contained in
Remote Keyless Entry transmitters,
may contain perchlorate materials.
Special handling may be necessary.
For additional information, see
www.dtsc.ca.gov/hazardouswaste/
perchlorate.
Accessories and
Modifications
Adding non-dealer accessories or
making modifications to the vehicle
can affect vehicle performance and
safety, including such things as
airbags, braking, stability, ride and
handling, emissions systems,
aerodynamics, durability, and
electronic systems like antilock
brakes, traction control, and stability
control. These accessories or
modifications could even cause
malfunction or damage not covered
by the vehicle warranty.Damage to suspension components
caused by modifying vehicle height
outside of factory settings will not be
covered by the vehicle warranty.
Damage to vehicle components
resulting from modifications or the
installation or use of non-GM
certified parts, including control
module or software modifications, is
not covered under the terms of the
vehicle warranty and may affect
remaining warranty coverage for
affected parts.
GM Accessories are designed to
complement and function with other
systems on the vehicle. See your
dealer to accessorize the vehicle
using genuine GM Accessories
installed by a dealer technician.
Also, see
Adding Equipment to the
Airbag-Equipped Vehicle 086.
Vehicle Checks
Doing Your Own
Service Work
{Warning
It can be dangerous to work on
your vehicle if you do not have
the proper knowledge, service
manual, tools, or parts. Always
follow owner ’s manual procedures
and consult the service manual
for your vehicle before doing any
service work.
If doing some of your own service
work, use the proper service
manual. It tells you much more
about how to service the vehicle
than this manual can. To order the
proper service manual, see Service
Publications Ordering Information
0 376.
This vehicle has an airbag system.
Before attempting to do your own
service work, see Servicing the
Airbag-Equipped Vehicle 085.
Page 270 of 404

Chevrolet Cruze Owner Manual (GMNA-Localizing-U.S./Canada/Mexico-
11348462) - 2018 - crc - 5/15/17
Vehicle Care 269
change is not necessary for up to a
year. The engine oil and filter must
be changed at least once a year
and, at this time, the system must
be reset. Your dealer has trained
service people who will perform this
work and reset the system. It is also
important to check the oil regularly
over the course of an oil drain
interval and keep it at the proper
level.
If the system is ever reset
accidentally, the oil must be
changed at 5 000 km (3,000 mi)
since the last oil change.
Remember to reset the oil life
system whenever the oil is changed.
How to Reset the Engine Oil
Life System
Reset the system whenever the
engine oil is changed so that the
system can calculate the next
engine oil change. To reset the
system:Resetting the Oil Life System
(Base Level Cluster)
1. Display the REMAINING OIL LIFE on the DIC.
See Driver Information Center
(DIC) (Base) 0138 orDriver
Information Center (DIC)
(Uplevel) 0141.
2. Press and hold SET/CLR on the turn signal lever while the
Oil Life display is active. The
oil life will change to 100%.
Resetting the Oil Life System
(Uplevel Cluster) 1. Display the REMAINING OIL LIFE on the DIC.
See Driver Information Center
(DIC) (Base) 0138 orDriver
Information Center (DIC)
(Uplevel) 0141.
2. Press and hold
Von the DIC
while the Oil Life display is
active. The oil life will change
to 100%. The oil life system can also be reset
as follows:
1. Turn the ignition on with the engine off.
See Ignition Positions (Key
Access) 0206 orIgnition
Positions (Keyless Access)
0 208.
2. Fully press and release the accelerator pedal three times
within five seconds.
The system is reset when the
CHANGE ENGINE OIL SOON
message goes off.
If the CHANGE ENGINE OIL SOON
message comes back on when the
vehicle is started, the engine oil life
system has not been reset. Repeat
the procedure.Automatic Transmission
Fluid
How to Check Automatic
Transmission Fluid
It is not necessary to check the
transmission fluid level.
A transmission fluid leak is the only
Page 282 of 404
Chevrolet Cruze Owner Manual (GMNA-Localizing-U.S./Canada/Mexico-
11348462) - 2018 - crc - 5/15/17
Vehicle Care 281
For manual transmission
vehicles, put the shift lever in
Neutral, push the clutch pedal
down halfway, and try to start
the engine. The vehicle should
start only when the clutch
pedal is pushed down all the
way to the floor. If the vehicle
starts when the clutch pedal is
not pushed all the way down,
contact your dealer for service.
Automatic Transmission
Shift Lock Control
Function Check
{Warning
When you are doing this
inspection, the vehicle could
move suddenly. If the vehicle
moves, you or others could be
injured.
1. Before starting this check, be sure there is enough room
around the vehicle. It should be
parked on a level surface. 2. Apply the parking brake. Be
ready to apply the regular
brake immediately if the vehicle
begins to move.
3. With the engine off, turn the ignition on, but do not start the
engine. Without applying the
regular brake, try to move the
shift lever out of P (Park) with
normal effort. If the shift lever
moves out of P (Park), contact
your dealer for service.
Ignition Transmission
Lock Check
If equipped with a Key Access
ignition, while parked and with the
parking brake set, try to turn the
ignition off in each shift lever
position.
.The ignition should turn off only
when the shift lever is in
P (Park).
. The key should come out only
when the ignition is off.
Contact your dealer if service is
required.
Park Brake and P (Park)
Mechanism Check
{Warning
When you are doing this check,
the vehicle could begin to move.
You or others could be injured
and property could be damaged.
Make sure there is room in front
of the vehicle in case it begins to
roll. Be ready to apply the regular
brake at once should the vehicle
begin to move.
Park on a fairly steep hill, with the
vehicle facing downhill. Keeping
your foot on the regular brake, set
the parking brake.
. To check the parking brake's
holding ability: With the engine
running and the transmission in
N (Neutral), slowly remove foot
pressure from the regular brake
pedal. Do this until the vehicle is
held by the parking brake only.
Page 311 of 404
Chevrolet Cruze Owner Manual (GMNA-Localizing-U.S./Canada/Mexico-
11348462) - 2018 - crc - 5/15/17
310 Vehicle Care
matched to the tire/wheel positions,
using a TPMS relearn tool, in the
following order: driver side front tire,
passenger side front tire, passenger
side rear tire, and driver side rear.
See your dealer for service or to
purchase a relearn tool. A TPMS
relearn tool can also be purchased.
See Tire Pressure Monitor Sensor
Activation Tool at
www.gmtoolsandequipment.com or
call 1-800-GM TOOLS
(1-800-468-6657).
There are two minutes to match the
first tire/wheel position, and
five minutes overall to match all four
tire/wheel positions. If it takes
longer, the matching process stops
and must be restarted.
The TPMS sensor matching
process is:1. Set the parking brake.
2. Turn the ignition on without starting the vehicle or place the
vehicle in Service Mode.
See Ignition Positions (Key
Access) 0206 orIgnition
Positions (Keyless Access)
0 208. 3. Uplevel DIC Only: Make sure
the Tire Pressure info page
option is turned on. The info
pages on the DIC can be
turned on and off through the
Options menu.
See Driver Information Center
(DIC) (Base) 0138 orDriver
Information Center (DIC)
(Uplevel) 0141.
4. If the vehicle has an uplevel DIC, use the DIC controls on
the right side of the steering
wheel to scroll to the Tire
Pressure screen under the DIC
info page.
If the vehicle has a base level
DIC, press MENU to select the
Vehicle Information Menu in
the DIC. Use the thumbwheel
to scroll to the Tire Pressure
Menu item screen.
5. If the vehicle has an uplevel DIC, press and hold the
V
(Set/Reset) button in the center
of the DIC controls.
If the vehicle has a base level
DIC, press SET/CLR to begin
the sensor matching process. A message requesting
acceptance of the process may
display.
If the vehicle has a base level
DIC, press SET/CLR again to
confirm the selection.
The horn sounds twice to
signal the receiver is in relearn
mode and the TIRE
LEARNING ACTIVE message
displays on the DIC screen.
6. Start with the driver side front tire.
7. Place the relearn tool against the tire sidewall, near the valve
stem. Then press the button to
activate the TPMS sensor.
A horn chirp confirms that the
sensor identification code has
been matched to this tire and
wheel position.
8. Proceed to the passenger side front tire, and repeat the
procedure in Step 7.
9. Proceed to the passenger side rear tire, and repeat the
procedure in Step 7.
Page 344 of 404
Chevrolet Cruze Owner Manual (GMNA-Localizing-U.S./Canada/Mexico-
11348462) - 2018 - crc - 5/15/17
Vehicle Care 343
Caution
Chrome wheels and other chrome
trim may be damaged if the
vehicle is not washed after driving
on roads that have been sprayed
with magnesium, calcium,
or sodium chloride. These
chlorides are used on roads for
conditions such as ice and dust.
Always wash the chrome with
soap and water after exposure.
Caution
To avoid surface damage, do not
use strong soaps, chemicals,
abrasive polishes, cleaners,
brushes, or cleaners that contain
acid on aluminum or
chrome-plated wheels. Use only
approved cleaners. Also, never
drive a vehicle with aluminum or
chrome-plated wheels through an
automatic car wash that uses
silicone carbide tire cleaning(Continued)
Caution (Continued)
brushes. Damage could occur
and the repairs would not be
covered by the vehicle warranty.
Brake System
Visually inspect brake lines and
hoses for proper hook-up, binding,
leaks, cracks, chafing, etc. Inspect
disc brake pads for wear and rotors
for surface condition. Inspect drum
brake linings/shoes for wear or
cracks. Inspect all other brake parts.
Steering, Suspension, and
Chassis Components
Visually inspect steering,
suspension, and chassis
components for damaged, loose,
or missing parts or signs of wear at
least once a year.
Inspect power steering for proper
attachment, connections, binding,
leaks, cracks, chafing, etc.
Visually check constant velocity joint
boots and axle seals for leaks.
Body Component Lubrication
Lubricate all key lock cylinders,
hood hinges, decklid hinges, steel
fuel door hinge, unless the
components are plastic. Applying
silicone grease on weatherstrips
with a clean cloth will make them
last longer, seal better, and not stick
or squeak.
Underbody Maintenance
At least twice a year, spring and fall,
use plain water to flush any
corrosive materials from the
underbody. Take care to thoroughly
clean any areas where mud and
other debris can collect.
Do not directly power wash the
transfer case and/or front/rear axle
output seals. High pressure water
can overcome the seals and
contaminate the fluid. Contaminated
fluid will decrease the life of the
transfer case and/or axles and
should be replaced.
Page 360 of 404
Chevrolet Cruze Owner Manual (GMNA-Localizing-U.S./Canada/Mexico-
11348462) - 2018 - crc - 5/15/17
Service and Maintenance 359
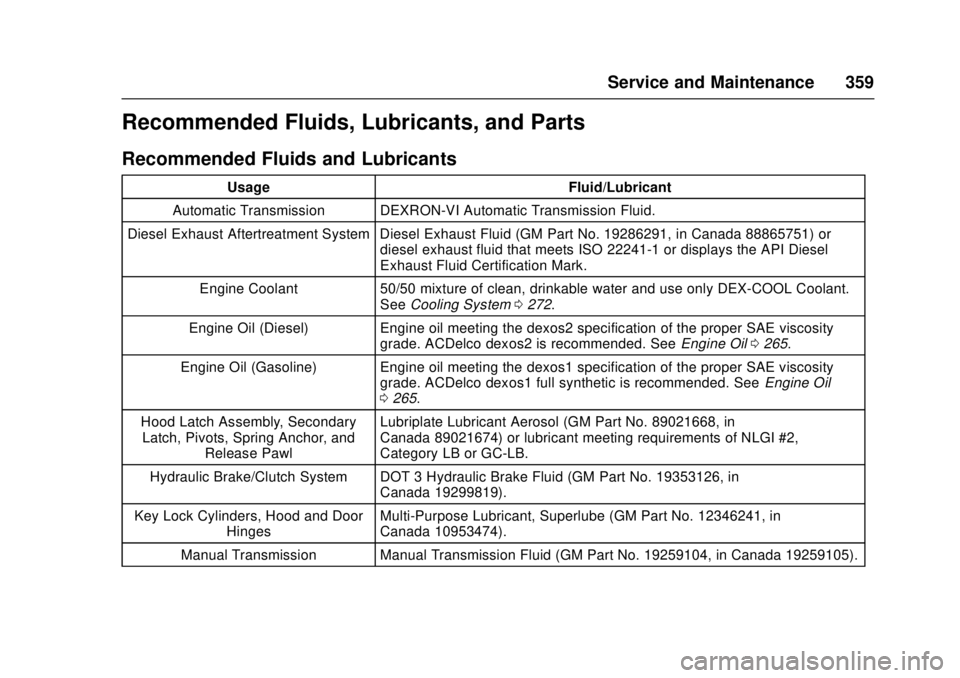
Recommended Fluids, Lubricants, and Parts
Recommended Fluids and Lubricants
UsageFluid/Lubricant
Automatic Transmission DEXRON-VI Automatic Transmission Fluid.
Diesel Exhaust Aftertreatment System Diesel Exhaust Fluid (GM Part No. 19286291, in Canada 88865751) or diesel exhaust fluid that meets ISO 22241-1 or displays the API Diesel
Exhaust Fluid Certification Mark.
Engine Coolant 50/50 mixture of clean, drinkable water and use only DEX-COOL Coolant.
See Cooling System 0272.
Engine Oil (Diesel) Engine oil meeting the dexos2 specification of the proper SAE viscosity
grade. ACDelco dexos2 is recommended. See Engine Oil0265.
Engine Oil (Gasoline) Engine oil meeting the dexos1 specification of the proper SAE viscosity grade. ACDelco dexos1 full synthetic is recommended. See Engine Oil
0 265.
Hood Latch Assembly, Secondary Latch, Pivots, Spring Anchor, and Release Pawl Lubriplate Lubricant Aerosol (GM Part No. 89021668, in
Canada 89021674) or lubricant meeting requirements of NLGI #2,
Category LB or GC-LB.
Hydraulic Brake/Clutch System DOT 3 Hydraulic Brake Fluid (GM Part No. 19353126, in Canada 19299819).
Key Lock Cylinders, Hood and Door Hinges Multi-Purpose Lubricant, Superlube (GM Part No. 12346241, in
Canada 10953474).
Manual Transmission Manual Transmission Fluid (GM Part No. 19259104, in Canada 19259105).
Page 383 of 404

Chevrolet Cruze Owner Manual (GMNA-Localizing-U.S./Canada/Mexico-
11348462) - 2018 - crc - 5/15/17
382 OnStar
Or
.Make a call, end a call,
or answer an incoming call.
. Give OnStar Hands-Free Calling
voice commands.
. Give OnStar Turn-by-Turn
Navigation voice commands.
. Obtain and customize the Wi-Fi
hotspot name or SSID and
password, if equipped.
Press
Qto connect to an
Advisor to:
. Verify account information or
update contact information.
. Get driving directions.
. Receive a Diagnostic check of
the vehicle's key operating
systems.
. Receive Roadside Assistance.
. Manage Wi-Fi Settings,
if equipped. Press
>to get a priority connection
to an OnStar Advisor available
24/7 to:
. Get help for an emergency.
. Be a Good Samaritan or
respond to an AMBER Alert.
. Get assistance in severe
weather or other crisis situations
and find evacuation routes.OnStar Services
Emergency
Emergency Services require an
active, OnStar service plan
(excludes Basic Plan). With
Automatic Crash Response, built-in
sensors can automatically alert a
specially trained OnStar Advisor
who is immediately connected in to
the vehicle to help.
Press
>for a priority connection to
an OnStar Advisor who can contact
emergency service providers, direct
them to your exact location, and
relay important information.
With OnStar Crisis Assist, specially
trained Advisors are available
24 hours a day, 7 days a week, to
provide a central point of contact,
assistance, and information during a
crisis.
With Roadside Assistance, Advisors
can locate a nearby service provider
to help with a flat tire, a battery
jump, or an empty gas tank.
Page 387 of 404
Chevrolet Cruze Owner Manual (GMNA-Localizing-U.S./Canada/Mexico-
11348462) - 2018 - crc - 5/15/17
386 OnStar
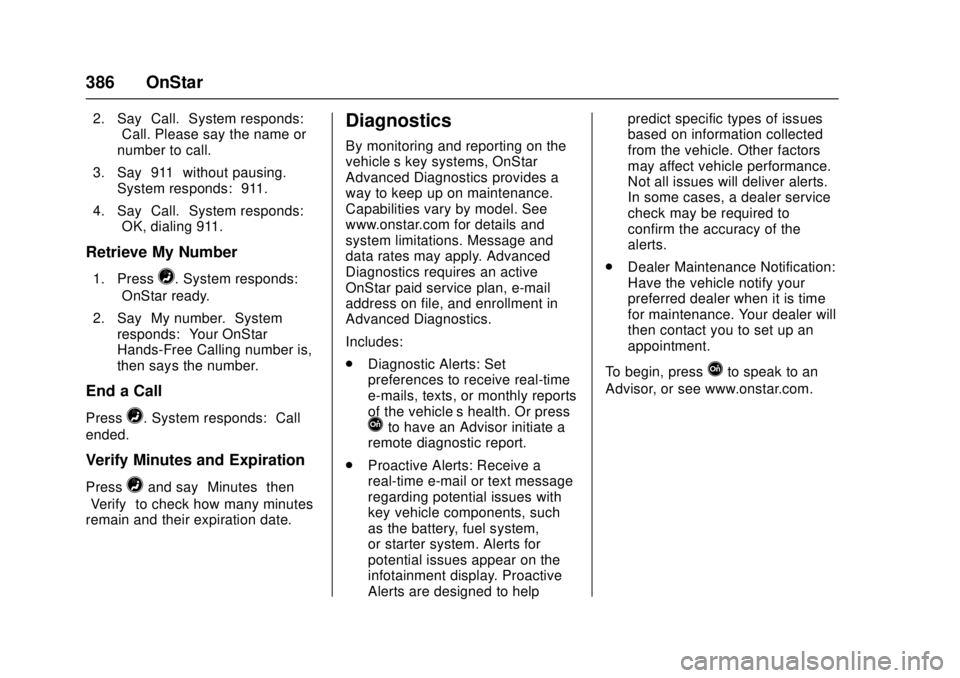
2. Say“Call.”System responds:
“Call. Please say the name or
number to call.”
3. Say “911”without pausing.
System responds: “911.”
4. Say “Call.”System responds:
“OK, dialing 911.”
Retrieve My Number
1. Press=. System responds:
“OnStar ready.”
2. Say “My number.” System
responds: “Your OnStar
Hands-Free Calling number is,”
then says the number.
End a Call
Press=. System responds: “Call
ended.”
Verify Minutes and Expiration
Press=and say “Minutes” then
“Verify” to check how many minutes
remain and their expiration date.
Diagnostics
By monitoring and reporting on the
vehicle’s key systems, OnStar
Advanced Diagnostics provides a
way to keep up on maintenance.
Capabilities vary by model. See
www.onstar.com for details and
system limitations. Message and
data rates may apply. Advanced
Diagnostics requires an active
OnStar paid service plan, e-mail
address on file, and enrollment in
Advanced Diagnostics.
Includes:
. Diagnostic Alerts: Set
preferences to receive real-time
e-mails, texts, or monthly reports
of the vehicle’s health. Or press
Qto have an Advisor initiate a
remote diagnostic report.
. Proactive Alerts: Receive a
real-time e-mail or text message
regarding potential issues with
key vehicle components, such
as the battery, fuel system,
or starter system. Alerts for
potential issues appear on the
infotainment display. Proactive
Alerts are designed to help predict specific types of issues
based on information collected
from the vehicle. Other factors
may affect vehicle performance.
Not all issues will deliver alerts.
In some cases, a dealer service
check may be required to
confirm the accuracy of the
alerts.
. Dealer Maintenance Notification:
Have the vehicle notify your
preferred dealer when it is time
for maintenance. Your dealer will
then contact you to set up an
appointment.
To begin, press
Qto speak to an
Advisor, or see www.onstar.com.