2018 CHEVROLET CRUZE steering wheel
[x] Cancel search: steering wheelPage 243 of 404
Chevrolet Cruze Owner Manual (GMNA-Localizing-U.S./Canada/Mexico-
11348462) - 2018 - crc - 5/15/17
242 Driving and Operating
LCA displays may not come on
when passing a vehicle quickly, for
a stopped vehicle, or when towing a
trailer. The LCA detection zones
that extend back from the side of
the vehicle do not move further back
when a trailer is towed. Use caution
while changing lanes when towing a
trailer. LCA may alert to objects
attached to the vehicle, such as a
trailer, bicycle, or object extending
out to either side of the vehicle.
Attached objects may also interfere
with the detection of vehicles. This
is normal system operation; the
vehicle does not need service.
LCA may not always alert the driver
to vehicles in the next lane over,
especially in wet conditions or when
driving on sharp curves. The system
does not need to be serviced. The
system may light up due to
guardrails, signs, trees, shrubs, and
other non-moving objects. This is
normal system operation; the
vehicle does not need service.
LCA may not operate when the LCA
sensors in the left or right corners of
the rear bumper are covered with
mud, dirt, snow, ice, or slush, or inheavy rainstorms. For cleaning
instructions, see "Washing the
Vehicle" under
Exterior Care0339.
If the DIC still displays the system
unavailable message after cleaning
both sides of the vehicle toward the
rear corners of the vehicle, see your
dealer.
If the LCA displays do not light up
when moving vehicles are in the
side blind zone or rapidly
approaching this zone and the
system is clean, the system may
need service. Take the vehicle to
your dealer.
When LCA is disabled for any
reason other than the driver turning
it off, the Lane Change Alert On
option will not be available on the
personalization menu.
Radio Frequency Information
See Radio Frequency Statement
0 377.
Lane Departure
Warning (LDW)
If equipped, LDW may help avoid
crashes due to unintentional lane
departures. It may provide a
warning if the vehicle is crossing a
detected lane marking without using
a turn signal in the lane departure
direction. Since this system is part
of the Lane Keep Assist (LKA)
system, read the entire LKA section
before using this feature.
Lane Keep Assist (LKA)
If equipped, LKA may help avoid
crashes due to unintentional lane
departures. It may assist by gently
turning the steering wheel if the
vehicle approaches a detected lane
marking without using a turn signal
in that direction. It may also provide
a Lane Departure Warning (LDW)
system alert as the lane marking is
crossed. The LKA system will not
assist or provide an LDW alert if it
detects that you are actively
steering. Override LKA by turning
the steering wheel. LKA uses a
Page 244 of 404
Chevrolet Cruze Owner Manual (GMNA-Localizing-U.S./Canada/Mexico-
11348462) - 2018 - crc - 5/15/17
Driving and Operating 243
camera to detect lane markings
between 60 km/h (37 mph) and
180 km/h (112 mph).
{Warning
The LKA system does not
continuously steer the vehicle.
It may not keep the vehicle in the
lane or give a Lane Departure
Warning (LDW) alert, even if a
lane marking is detected.
The LKA and LDW systems
may not:. Provide an alert or enough
steering assist to avoid a
lane departure or crash.
. Detect lane markings under
poor weather or visibility
conditions. This can occur if
the windshield or
headlamps are blocked by
dirt, snow, or ice, if they are
not in proper condition, or if
the sun shines directly into
the camera.
. Detect road edges.
(Continued)
Warning (Continued)
.Detect lanes on winding or
hilly roads.
If LKA only detects lane markings
on one side of the road, it will
only assist or provide an LDW
alert when approaching the lane
on the side where it has detected
a lane marking. Even with LKA
and LDW, you must steer the
vehicle. Always keep your
attention on the road and
maintain proper vehicle position
within the lane, or vehicle
damage, injury, or death could
occur. Always keep the
windshield, headlamps, and
camera sensors clean and in
good repair. Do not use LKA in
bad weather conditions.
{Warning
Using LKA while towing a trailer
or on slippery roads could cause
loss of control of the vehicle and
a crash. Turn the system off.
How the System Works
The LKA camera sensor is on the
windshield ahead of the rearview
mirror.
To turn LKA on and off, press
A
on the steering wheel.
When on,
Ais green if LKA is
available to assist and provide LDW
alerts. It may assist by gently
turning the steering wheel and
display
Aas amber if the vehicle
approaches a detected lane marking
without using a turn signal in that
direction. It may also provide an
LDW alert by flashing
Aamber
as the lane marking is crossed.
Additionally, there may be three
beeps on the right or left, depending
on the lane departure direction.
Page 245 of 404
Chevrolet Cruze Owner Manual (GMNA-Localizing-U.S./Canada/Mexico-
11348462) - 2018 - crc - 5/15/17
244 Driving and Operating
Take Steering
The LKA system does not
continuously steer the vehicle.
If LKA does not detect active driver
steering, an alert, chime, or DIC
message may be provided. Move
the steering wheel to dismiss.
When the System Does Not
Seem to Work Properly
The system performance may be
affected by:
.Close vehicles ahead.
. Sudden lighting changes, such
as when driving through tunnels.
. Banked roads.
. Roads with poor lane markings,
such as two-lane roads.
If the LKA system is not functioning
properly when lane markings are
clearly visible, cleaning the
windshield may help. A system unavailable message may
display if the camera is blocked.
The LKA system does not need
service.
LKA assistance and/or LDW alerts
may occur due to tar marks,
shadows, cracks in the road,
temporary or construction lane
markings, or other road
imperfections. This is normal system
operation; the vehicle does not need
service. Turn LKA off if these
conditions continue.
Fuel
Fuel (Gasoline)
GM recommends the use of TOP
TIER detergent gasoline to keep the
engine cleaner and reduce engine
deposits. See www.toptiergas.com
for a list of TOP TIER detergent
gasoline marketers and applicable
countries.
Do not use any fuel labeled E85 or
FlexFuel. Do not use gasoline with
ethanol levels greater than 15% by
volume.
Page 262 of 404
Chevrolet Cruze Owner Manual (GMNA-Localizing-U.S./Canada/Mexico-
11348462) - 2018 - crc - 5/15/17
Vehicle Care 261
Keep a record with all parts receipts
and list the mileage and the date of
any service work performed. See
Maintenance Records0362.
Caution
Even small amounts of
contamination can cause damage
to vehicle systems. Do not allow
contaminants to contact the fluids,
reservoir caps, or dipsticks.
Hood
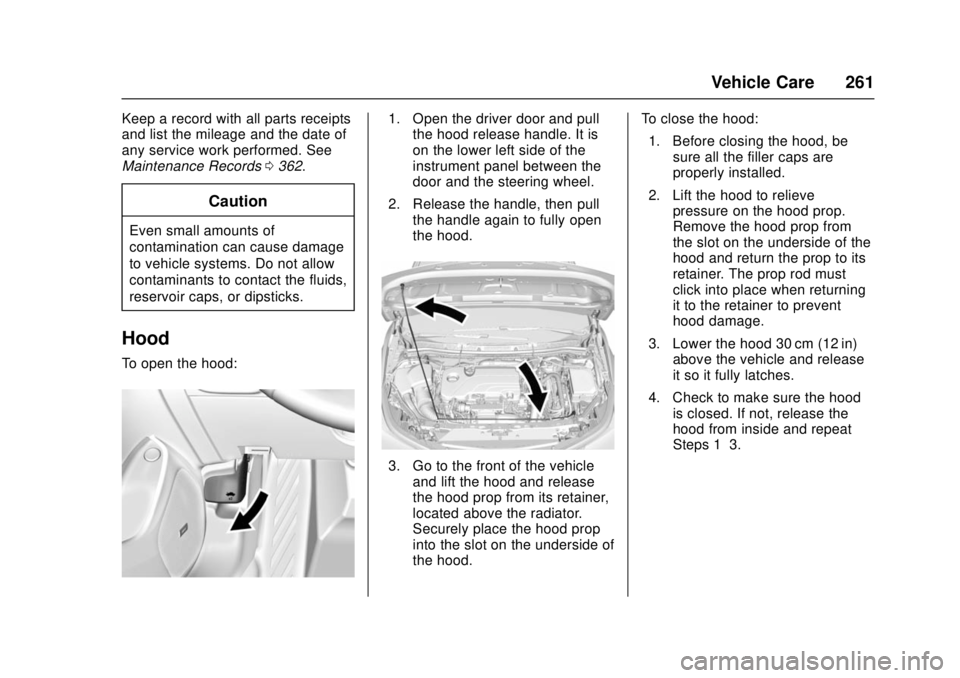
To open the hood:
1. Open the driver door and pull
the hood release handle. It is
on the lower left side of the
instrument panel between the
door and the steering wheel.
2. Release the handle, then pull the handle again to fully open
the hood.
3. Go to the front of the vehicleand lift the hood and release
the hood prop from its retainer,
located above the radiator.
Securely place the hood prop
into the slot on the underside of
the hood. To close the hood:
1. Before closing the hood, be sure all the filler caps are
properly installed.
2. Lift the hood to relieve pressure on the hood prop.
Remove the hood prop from
the slot on the underside of the
hood and return the prop to its
retainer. The prop rod must
click into place when returning
it to the retainer to prevent
hood damage.
3. Lower the hood 30 cm (12 in) above the vehicle and release
it so it fully latches.
4. Check to make sure the hood is closed. If not, release the
hood from inside and repeat
Steps 1–3.
Page 294 of 404
Chevrolet Cruze Owner Manual (GMNA-Localizing-U.S./Canada/Mexico-
11348462) - 2018 - crc - 5/15/17
Vehicle Care 293
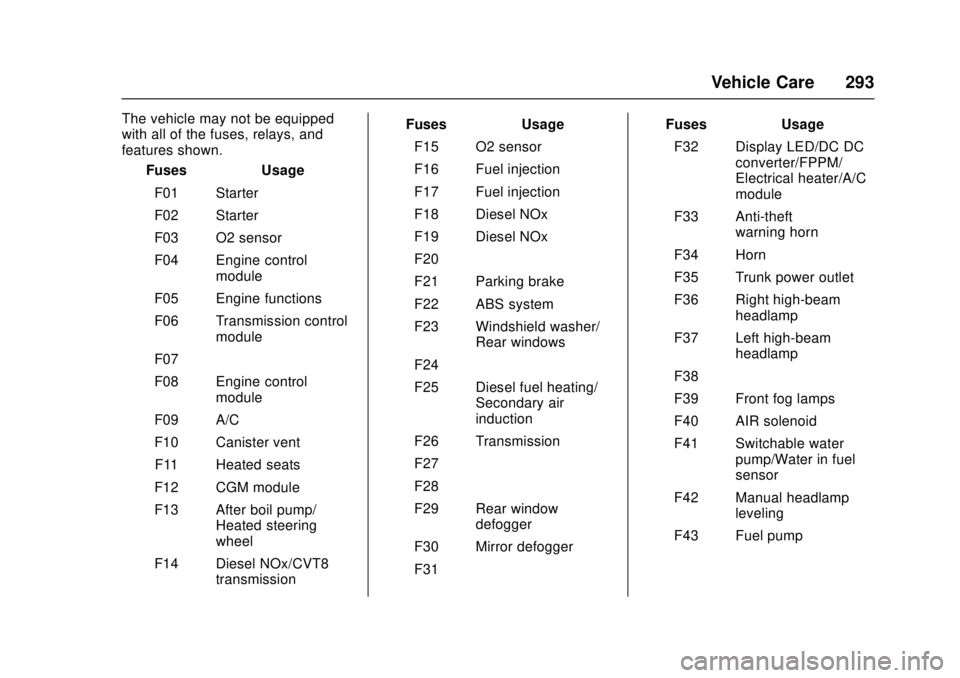
The vehicle may not be equipped
with all of the fuses, relays, and
features shown.Fuses Usage
F01 Starter
F02 Starter
F03 O2 sensor
F04 Engine control module
F05 Engine functions
F06 Transmission control module
F07 –
F08 Engine control module
F09 A/C
F10 Canister vent F11 Heated seats
F12 CGM module
F13 After boil pump/ Heated steering
wheel
F14 Diesel NOx/CVT8 transmission Fuses Usage
F15 O2 sensor
F16 Fuel injection
F17 Fuel injection
F18 Diesel NOx
F19 Diesel NOx
F20 –
F21 Parking brake
F22 ABS system
F23 Windshield washer/ Rear windows
F24 –
F25 Diesel fuel heating/ Secondary air
induction
F26 Transmission
F27 –
F28 –
F29 Rear window defogger
F30 Mirror defogger
F31 – Fuses Usage
F32 Display LED/DC DC converter/FPPM/
Electrical heater/A/C
module
F33 Anti-theft warning horn
F34 Horn
F35 Trunk power outlet
F36 Right high-beam headlamp
F37 Left high-beam headlamp
F38 –
F39 Front fog lamps
F40 AIR solenoid
F41 Switchable water pump/Water in fuel
sensor
F42 Manual headlamp leveling
F43 Fuel pump
Page 295 of 404
Chevrolet Cruze Owner Manual (GMNA-Localizing-U.S./Canada/Mexico-
11348462) - 2018 - crc - 5/15/17
294 Vehicle Care
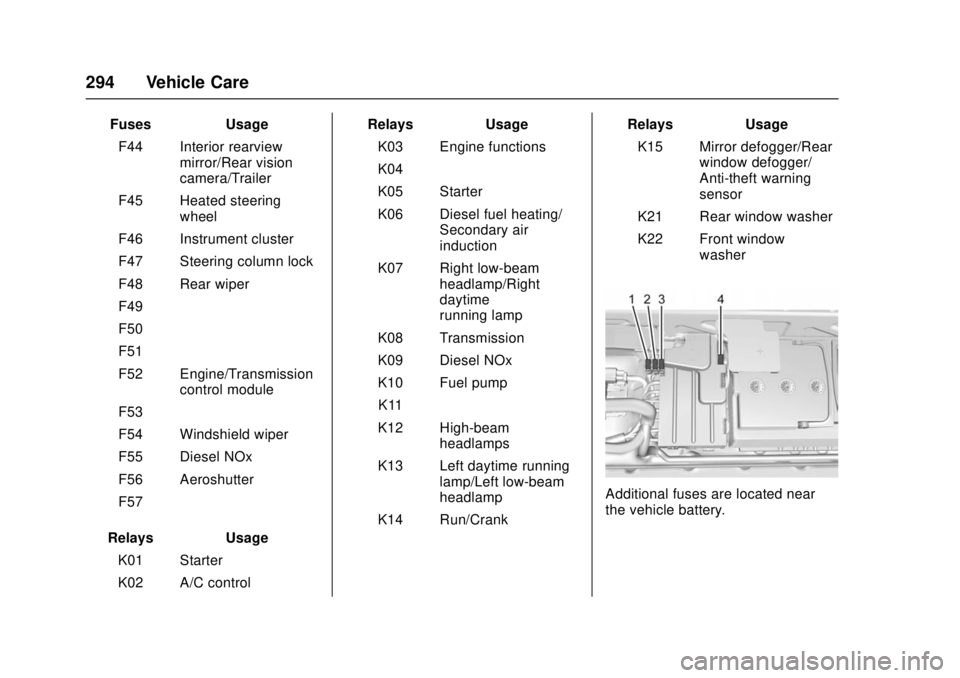
FusesUsage
F44 Interior rearview mirror/Rear vision
camera/Trailer
F45 Heated steering wheel
F46 Instrument cluster
F47 Steering column lock
F48 Rear wiper
F49 –
F50 –
F51 –
F52 Engine/Transmission control module
F53 –
F54 Windshield wiper
F55 Diesel NOx
F56 Aeroshutter
F57 –
Relays Usage
K01 Starter
K02 A/C control Relays
Usage
K03 Engine functions
K04 –
K05 Starter
K06 Diesel fuel heating/ Secondary air
induction
K07 Right low-beam headlamp/Right
daytime
running lamp
K08 Transmission
K09 Diesel NOx
K10 Fuel pump K11 –
K12 High-beam headlamps
K13 Left daytime running lamp/Left low-beam
headlamp
K14 Run/Crank Relays
Usage
K15 Mirror defogger/Rear window defogger/
Anti-theft warning
sensor
K21 Rear window washer
K22 Front window washer
Additional fuses are located near
the vehicle battery.
Page 298 of 404
Chevrolet Cruze Owner Manual (GMNA-Localizing-U.S./Canada/Mexico-
11348462) - 2018 - crc - 5/15/17
Vehicle Care 297
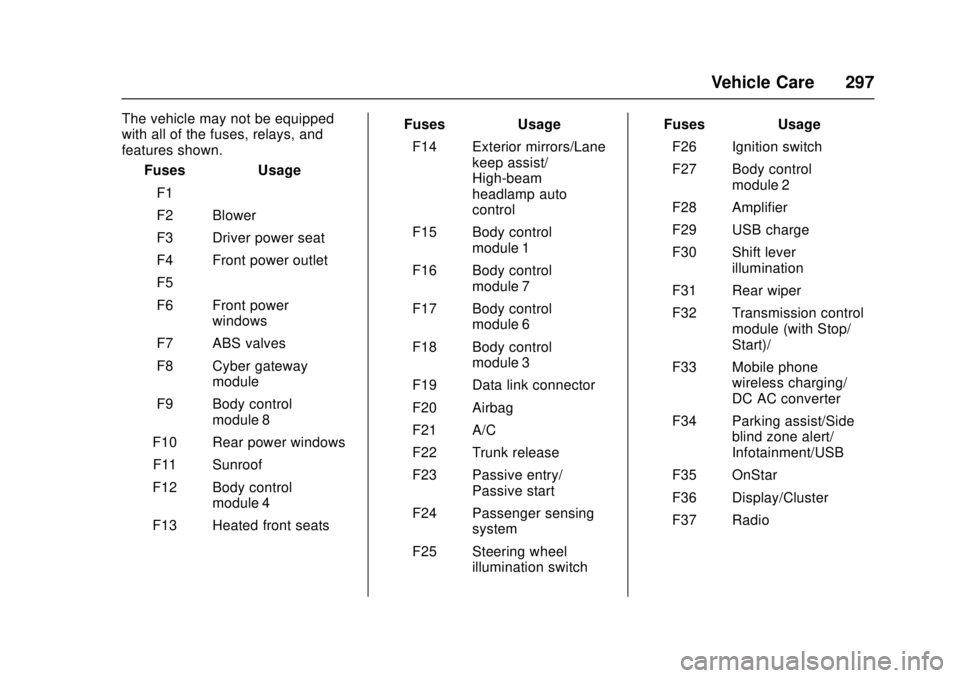
The vehicle may not be equipped
with all of the fuses, relays, and
features shown.Fuses Usage
F1 –
F2 Blower
F3 Driver power seat
F4 Front power outlet
F5 –
F6 Front power windows
F7 ABS valves
F8 Cyber gateway module
F9 Body control module 8
F10 Rear power windows
F11 Sunroof
F12 Body control module 4
F13 Heated front seats Fuses Usage
F14 Exterior mirrors/Lane keep assist/
High-beam
headlamp auto
control
F15 Body control module 1
F16 Body control module 7
F17 Body control module 6
F18 Body control module 3
F19 Data link connector
F20 Airbag
F21 A/C
F22 Trunk release
F23 Passive entry/ Passive start
F24 Passenger sensing system
F25 Steering wheel illumination switch Fuses Usage
F26 Ignition switch
F27 Body control module 2
F28 Amplifier
F29 USB charge
F30 Shift lever illumination
F31 Rear wiper
F32 Transmission control module (with Stop/
Start)/–
F33 Mobile phone wireless charging/
DC AC converter
F34 Parking assist/Side blind zone alert/
Infotainment/USB
F35 OnStar
F36 Display/Cluster
F37 Radio
Page 311 of 404
Chevrolet Cruze Owner Manual (GMNA-Localizing-U.S./Canada/Mexico-
11348462) - 2018 - crc - 5/15/17
310 Vehicle Care
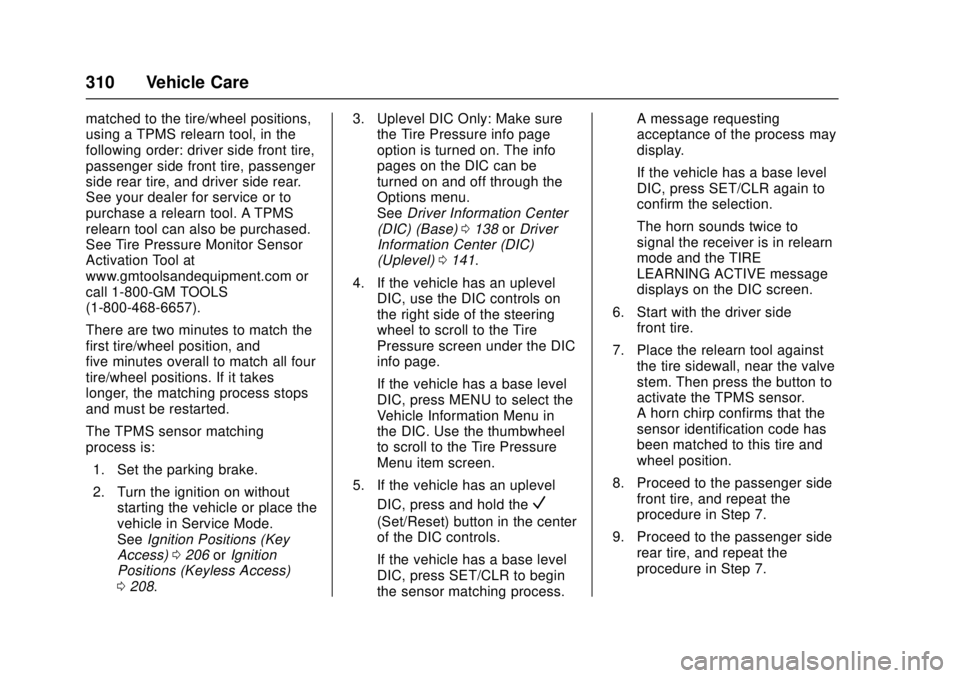
matched to the tire/wheel positions,
using a TPMS relearn tool, in the
following order: driver side front tire,
passenger side front tire, passenger
side rear tire, and driver side rear.
See your dealer for service or to
purchase a relearn tool. A TPMS
relearn tool can also be purchased.
See Tire Pressure Monitor Sensor
Activation Tool at
www.gmtoolsandequipment.com or
call 1-800-GM TOOLS
(1-800-468-6657).
There are two minutes to match the
first tire/wheel position, and
five minutes overall to match all four
tire/wheel positions. If it takes
longer, the matching process stops
and must be restarted.
The TPMS sensor matching
process is:1. Set the parking brake.
2. Turn the ignition on without starting the vehicle or place the
vehicle in Service Mode.
See Ignition Positions (Key
Access) 0206 orIgnition
Positions (Keyless Access)
0 208. 3. Uplevel DIC Only: Make sure
the Tire Pressure info page
option is turned on. The info
pages on the DIC can be
turned on and off through the
Options menu.
See Driver Information Center
(DIC) (Base) 0138 orDriver
Information Center (DIC)
(Uplevel) 0141.
4. If the vehicle has an uplevel DIC, use the DIC controls on
the right side of the steering
wheel to scroll to the Tire
Pressure screen under the DIC
info page.
If the vehicle has a base level
DIC, press MENU to select the
Vehicle Information Menu in
the DIC. Use the thumbwheel
to scroll to the Tire Pressure
Menu item screen.
5. If the vehicle has an uplevel DIC, press and hold the
V
(Set/Reset) button in the center
of the DIC controls.
If the vehicle has a base level
DIC, press SET/CLR to begin
the sensor matching process. A message requesting
acceptance of the process may
display.
If the vehicle has a base level
DIC, press SET/CLR again to
confirm the selection.
The horn sounds twice to
signal the receiver is in relearn
mode and the TIRE
LEARNING ACTIVE message
displays on the DIC screen.
6. Start with the driver side front tire.
7. Place the relearn tool against the tire sidewall, near the valve
stem. Then press the button to
activate the TPMS sensor.
A horn chirp confirms that the
sensor identification code has
been matched to this tire and
wheel position.
8. Proceed to the passenger side front tire, and repeat the
procedure in Step 7.
9. Proceed to the passenger side rear tire, and repeat the
procedure in Step 7.