2018 CHEVROLET CRUZE change time
[x] Cancel search: change timePage 230 of 404
Chevrolet Cruze Owner Manual (GMNA-Localizing-U.S./Canada/Mexico-
11348462) - 2018 - crc - 5/15/17
Driving and Operating 229
If driving safely on a wet road and it
becomes necessary to slam on the
brakes and continue braking to
avoid a sudden obstacle, a
computer senses the wheels are
slowing down. If one of the wheels
is about to stop rolling, the computer
will separately work the brakes at
each wheel.
ABS can change the brake pressure
to each wheel, as required, faster
than any driver could. This can help
you steer around the obstacle while
braking hard.
As the brakes are applied, the
computer keeps receiving updates
on wheel speed and controls
braking pressure accordingly.
Remember: ABS does not change
the time needed to get a foot up to
the brake pedal or always decrease
stopping distance. If you get too
close to the vehicle in front of you,
there will not be enough time to
apply the brakes if that vehicle
suddenly slows or stops. Always
leave enough room up ahead to
stop, even with ABS.Using ABS
Do not pump the brakes. Just hold
the brake pedal down firmly and let
ABS work. You may hear the ABS
pump or motor operating and feel
the brake pedal pulsate. This is
normal.
Braking in Emergencies
ABS allows you to steer and brake
at the same time. In many
emergencies, steering can help
more than even the very best
braking.
Parking Brake
The vehicle is equipped with a
parking brake lever or a parking
brake pedal.
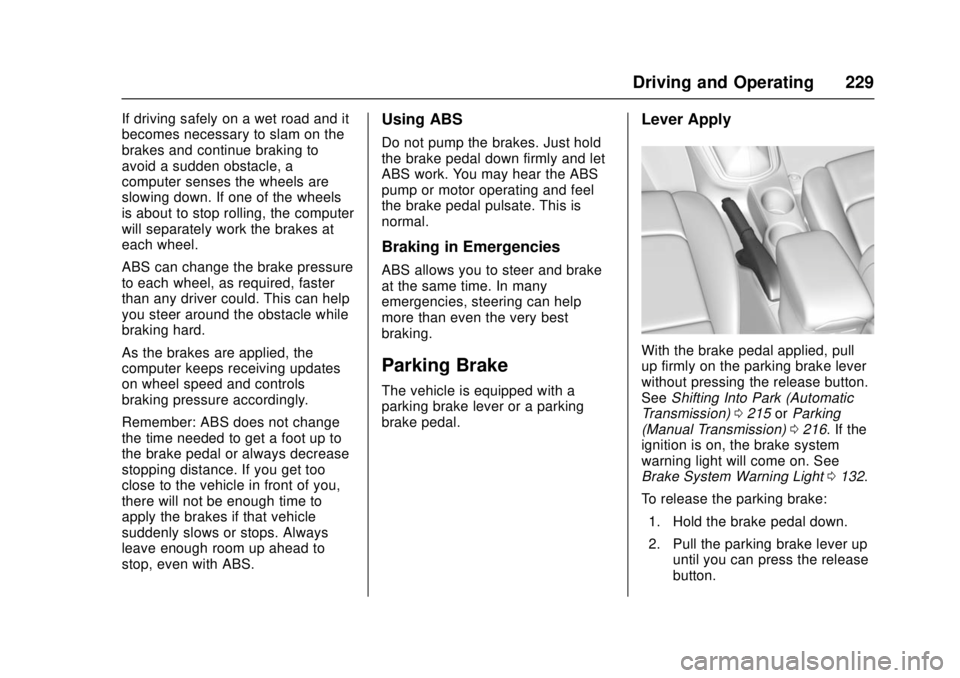
Lever Apply
With the brake pedal applied, pull
up firmly on the parking brake lever
without pressing the release button.
SeeShifting Into Park (Automatic
Transmission) 0215 orParking
(Manual Transmission) 0216. If the
ignition is on, the brake system
warning light will come on. See
Brake System Warning Light 0132.
To release the parking brake: 1. Hold the brake pedal down.
2. Pull the parking brake lever up until you can press the release
button.
Page 239 of 404
Chevrolet Cruze Owner Manual (GMNA-Localizing-U.S./Canada/Mexico-
11348462) - 2018 - crc - 5/15/17
238 Driving and Operating
(65 ft) from the left or right side of
the vehicle. When an object is
detected, three beeps sound from
the left or right, depending on the
direction of the detected vehicle.
Turning the Features On or Off
PressXon the center console to
turn the Rear Parking Assist and
RCTA on or off. The indicator light
next to the button comes on when
the features are on and turns off
when the features have been
disabled.
To turn the rear parking assist
symbols or guidance lines on or off,
see “Rear Camera” underVehicle
Personalization 0145.
RCTA can also be turned on or off
through vehicle personalization. See
“Collision/Detection Systems” under
Vehicle Personalization 0145.
Assistance Systems for
Driving
If equipped, when driving the
vehicle in a forward gear, Forward
Collision Alert (FCA), Lane
Departure Warning (LDW), Lane
Keep Assist (LKA), Side Blind Zone
Alert (SBZA), and/or Lane Change
Alert (LCA) can help to avoid a
crash or reduce crash damage.
Forward Collision Alert
(FCA) System
If equipped, the FCA system may
help to avoid or reduce the harm
caused by front-end crashes. When
approaching a vehicle ahead too
quickly, FCA provides a flashing red
alert on the windshield and rapidly
beeps. FCA also lights an amber
visual alert if following another
vehicle much too closely.
FCA detects vehicles within a
distance of approximately 60 m
(197 ft) and operates at speeds
above 8 km/h (5 mph).
{Warning
FCA is a warning system and
does not apply the brakes. When
approaching a slower-moving or
stopped vehicle ahead too rapidly,
or when following a vehicle too
closely, FCA may not provide a
warning with enough time to help
avoid a crash. It also may not
provide any warning at all. FCA
does not warn of pedestrians,
animals, signs, guardrails,
bridges, construction barrels,
or other objects. Be ready to take
action and apply the brakes. See
Defensive Driving 0197.
FCA can be disabled with either the
FCA steering wheel control or,
if equipped, through vehicle
personalization. See “Collision/
Detection Systems” underVehicle
Personalization 0145.
Page 241 of 404
Chevrolet Cruze Owner Manual (GMNA-Localizing-U.S./Canada/Mexico-
11348462) - 2018 - crc - 5/15/17
240 Driving and Operating
Alert features. The timing of both
alerts will vary based on vehicle
speed. The faster the vehicle speed,
the farther away the alert will occur.
Consider traffic and weather
conditions when selecting the alert
timing. The range of selectable alert
timing may not be appropriate for all
drivers and driving conditions.
Following Distance Indication
The following distance to a moving
vehicle you are following is
indicated in following time in
seconds on the Driver Information
Center (DIC).
SeeDriver Information Center (DIC)
(Base) 0138 orDriver Information
Center (DIC) (Uplevel) 0141. The
minimum following time is
0.5 seconds away. If there is no
vehicle detected ahead, or the
vehicle ahead is out of sensor
range, dashes will be displayed.
Unnecessary Alerts
FCA may provide unnecessary
alerts to turning vehicles, vehicles in
other lanes, objects that are not vehicles, or shadows. These alerts
are normal operation and the
vehicle does not need service.
Cleaning the System
If the FCA system does not seem to
operate properly, cleaning the
outside of the windshield in front of
the camera sensor may correct the
issue
Side Blind Zone
Alert (SBZA)
If equipped, the SBZA system is a
lane-changing aid that assists
drivers with avoiding crashes that
occur with moving vehicles in the
side blind zone (or spot) areas.
When the vehicle is in a forward
gear, the left or right side mirror
display will light up if a moving
vehicle is detected in that blind
zone. If the turn signal is activated
and a vehicle is also detected on
the same side, the display will flash
as an extra warning not to change
lanes. Since this system is part of
the Lane Change Alert (LCA)
system, read the entire LCA section
before using this feature.
Lane Change Alert (LCA)
If equipped, the LCA system is a
lane-changing aid that assists
drivers with avoiding lane change
crashes that occur with moving
vehicles in the side blind zone (or
spot) areas or with vehicles rapidly
approaching these areas from
behind. The LCA warning display
will light up in the corresponding
outside side mirror and will flash if
the turn signal is on.
{Warning
LCA does not alert the driver to
vehicles outside of the system
detection zones, pedestrians,
bicyclists, or animals. It may not
provide alerts when changing
lanes under all driving conditions.
Failure to use proper care when
changing lanes may result in
injury, death, or vehicle damage.
(Continued)
Page 266 of 404
Chevrolet Cruze Owner Manual (GMNA-Localizing-U.S./Canada/Mexico-
11348462) - 2018 - crc - 5/15/17
Vehicle Care 265
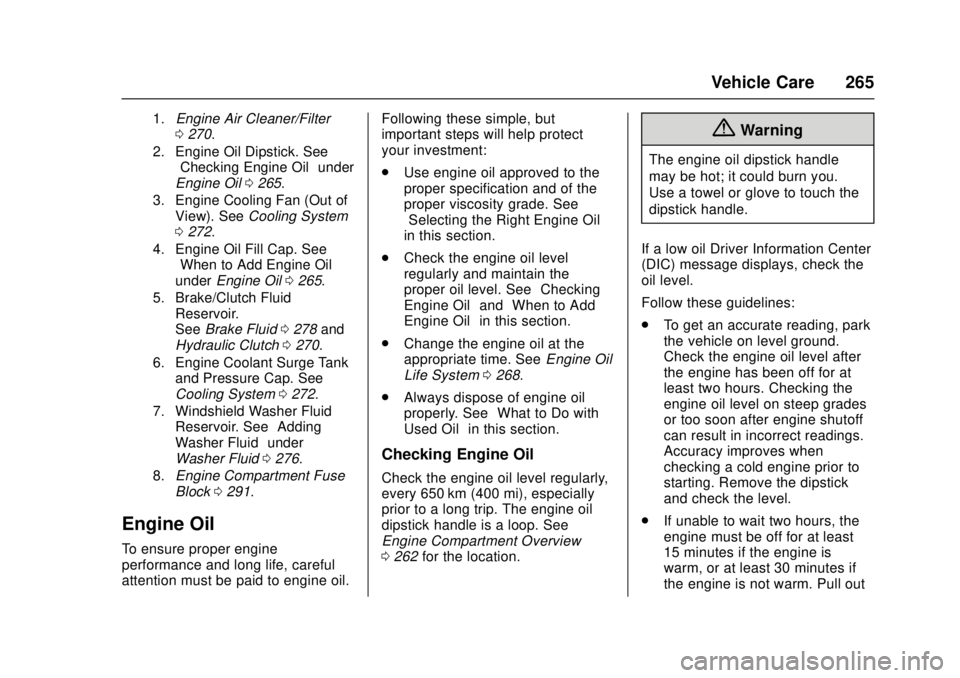
1.Engine Air Cleaner/Filter
0270.
2. Engine Oil Dipstick. See “Checking Engine Oil” under
Engine Oil 0265.
3. Engine Cooling Fan (Out of View). See Cooling System
0 272.
4. Engine Oil Fill Cap. See “When to Add Engine Oil”
under Engine Oil 0265.
5. Brake/Clutch Fluid Reservoir.
See Brake Fluid 0278 and
Hydraulic Clutch 0270.
6. Engine Coolant Surge Tank and Pressure Cap. See
Cooling System 0272.
7. Windshield Washer Fluid Reservoir. See “Adding
Washer Fluid” under
Washer Fluid 0276.
8. Engine Compartment Fuse
Block 0291.
Engine Oil
To ensure proper engine
performance and long life, careful
attention must be paid to engine oil. Following these simple, but
important steps will help protect
your investment:
.
Use engine oil approved to the
proper specification and of the
proper viscosity grade. See
“Selecting the Right Engine Oil”
in this section.
. Check the engine oil level
regularly and maintain the
proper oil level. See “Checking
Engine Oil” and“When to Add
Engine Oil” in this section.
. Change the engine oil at the
appropriate time. See Engine Oil
Life System 0268.
. Always dispose of engine oil
properly. See “What to Do with
Used Oil” in this section.
Checking Engine Oil
Check the engine oil level regularly,
every 650 km (400 mi), especially
prior to a long trip. The engine oil
dipstick handle is a loop. See
Engine Compartment Overview
0262 for the location.
{Warning
The engine oil dipstick handle
may be hot; it could burn you.
Use a towel or glove to touch the
dipstick handle.
If a low oil Driver Information Center
(DIC) message displays, check the
oil level.
Follow these guidelines:
. To get an accurate reading, park
the vehicle on level ground.
Check the engine oil level after
the engine has been off for at
least two hours. Checking the
engine oil level on steep grades
or too soon after engine shutoff
can result in incorrect readings.
Accuracy improves when
checking a cold engine prior to
starting. Remove the dipstick
and check the level.
. If unable to wait two hours, the
engine must be off for at least
15 minutes if the engine is
warm, or at least 30 minutes if
the engine is not warm. Pull out
Page 269 of 404
Chevrolet Cruze Owner Manual (GMNA-Localizing-U.S./Canada/Mexico-
11348462) - 2018 - crc - 5/15/17
268 Vehicle Care
Engine Oil Additives/Engine
Oil Flushes
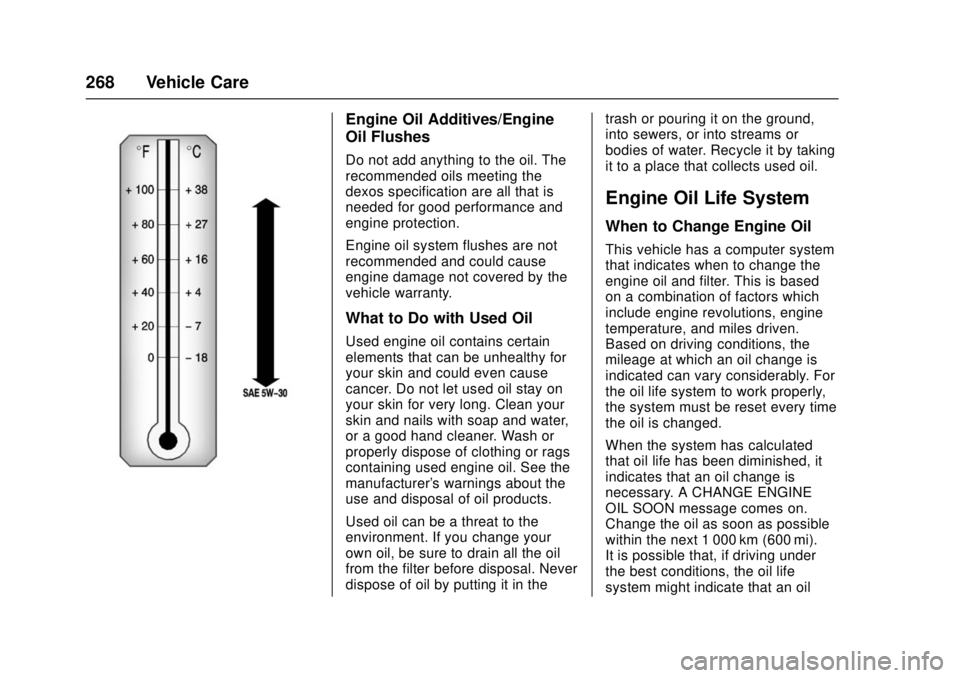
Do not add anything to the oil. The
recommended oils meeting the
dexos specification are all that is
needed for good performance and
engine protection.
Engine oil system flushes are not
recommended and could cause
engine damage not covered by the
vehicle warranty.
What to Do with Used Oil
Used engine oil contains certain
elements that can be unhealthy for
your skin and could even cause
cancer. Do not let used oil stay on
your skin for very long. Clean your
skin and nails with soap and water,
or a good hand cleaner. Wash or
properly dispose of clothing or rags
containing used engine oil. See the
manufacturer's warnings about the
use and disposal of oil products.
Used oil can be a threat to the
environment. If you change your
own oil, be sure to drain all the oil
from the filter before disposal. Never
dispose of oil by putting it in thetrash or pouring it on the ground,
into sewers, or into streams or
bodies of water. Recycle it by taking
it to a place that collects used oil.
Engine Oil Life System
When to Change Engine Oil
This vehicle has a computer system
that indicates when to change the
engine oil and filter. This is based
on a combination of factors which
include engine revolutions, engine
temperature, and miles driven.
Based on driving conditions, the
mileage at which an oil change is
indicated can vary considerably. For
the oil life system to work properly,
the system must be reset every time
the oil is changed.
When the system has calculated
that oil life has been diminished, it
indicates that an oil change is
necessary. A CHANGE ENGINE
OIL SOON message comes on.
Change the oil as soon as possible
within the next 1 000 km (600 mi).
It is possible that, if driving under
the best conditions, the oil life
system might indicate that an oil
Page 270 of 404

Chevrolet Cruze Owner Manual (GMNA-Localizing-U.S./Canada/Mexico-
11348462) - 2018 - crc - 5/15/17
Vehicle Care 269
change is not necessary for up to a
year. The engine oil and filter must
be changed at least once a year
and, at this time, the system must
be reset. Your dealer has trained
service people who will perform this
work and reset the system. It is also
important to check the oil regularly
over the course of an oil drain
interval and keep it at the proper
level.
If the system is ever reset
accidentally, the oil must be
changed at 5 000 km (3,000 mi)
since the last oil change.
Remember to reset the oil life
system whenever the oil is changed.
How to Reset the Engine Oil
Life System
Reset the system whenever the
engine oil is changed so that the
system can calculate the next
engine oil change. To reset the
system:Resetting the Oil Life System
(Base Level Cluster)
1. Display the REMAINING OIL LIFE on the DIC.
See Driver Information Center
(DIC) (Base) 0138 orDriver
Information Center (DIC)
(Uplevel) 0141.
2. Press and hold SET/CLR on the turn signal lever while the
Oil Life display is active. The
oil life will change to 100%.
Resetting the Oil Life System
(Uplevel Cluster) 1. Display the REMAINING OIL LIFE on the DIC.
See Driver Information Center
(DIC) (Base) 0138 orDriver
Information Center (DIC)
(Uplevel) 0141.
2. Press and hold
Von the DIC
while the Oil Life display is
active. The oil life will change
to 100%. The oil life system can also be reset
as follows:
1. Turn the ignition on with the engine off.
See Ignition Positions (Key
Access) 0206 orIgnition
Positions (Keyless Access)
0 208.
2. Fully press and release the accelerator pedal three times
within five seconds.
The system is reset when the
CHANGE ENGINE OIL SOON
message goes off.
If the CHANGE ENGINE OIL SOON
message comes back on when the
vehicle is started, the engine oil life
system has not been reset. Repeat
the procedure.Automatic Transmission
Fluid
How to Check Automatic
Transmission Fluid
It is not necessary to check the
transmission fluid level.
A transmission fluid leak is the only
Page 279 of 404
Chevrolet Cruze Owner Manual (GMNA-Localizing-U.S./Canada/Mexico-
11348462) - 2018 - crc - 5/15/17
278 Vehicle Care
proper sequence to torque
specifications inCapacities and
Specifications 0364.
If the vehicle has rear drum brakes,
they do not have wear indicators,
but if a rear brake rubbing noise is
heard, have the rear brake linings
inspected immediately. Rear brake
drums should be removed and
inspected each time the tires are
removed for rotation or changing.
Drum brakes have an inspection
hole to inspect lining wear during
scheduled maintenance. When the
front brake pads are replaced, have
the rear brakes inspected, too.
Brake linings should always be
replaced as complete axle sets.
Brake Pedal Travel
See your dealer if the brake pedal
does not return to normal height,
or if there is a rapid increase in
pedal travel. This could be a sign
that brake service may be required.
Replacing Brake System Parts
Always replace brake system parts
with new, approved replacement
parts. If this is not done, the brakes may not work properly. The braking
performance expected can change
in many other ways if the wrong
replacement brake parts are
installed or parts are improperly
installed.
Brake Fluid
The brake/clutch master cylinder
reservoir is filled with GM approved
DOT 3 brake fluid as indicated on
the reservoir cap. See
Engine
Compartment Overview 0262 for
the location of the reservoir.
Checking Brake Fluid
Place the vehicle in P (Park) or
Neutral with the parking brake
applied if equipped with a manual
transmission. On a level surface,
the brake fluid level should be between the minimum and
maximum marks on the brake fluid
reservoir.
There are only two reasons why the
brake fluid level in the reservoir may
go down:
.
Normal brake lining wear. When
new linings are installed, the
fluid level goes back up.
. A fluid leak in the brake/clutch
hydraulic system. Have the
brake/clutch hydraulic system
fixed. With a leak, the brakes will
not work well.
Always clean the brake fluid
reservoir cap and the area around
the cap before removing it.
Do not top off the brake/clutch fluid.
Adding fluid does not correct a leak.
If fluid is added when the linings are
worn, there will be too much fluid
when new brake linings are
installed. Add or remove fluid, as
necessary, only when work is done
on the brake/clutch hydraulic
system.
Page 313 of 404
Chevrolet Cruze Owner Manual (GMNA-Localizing-U.S./Canada/Mexico-
11348462) - 2018 - crc - 5/15/17
312 Vehicle Care
Adjust the front and rear tires to
the recommended inflation
pressure on the Tire and
Loading Information label after
the tires have been rotated.
SeeTire Pressure 0305 and
Vehicle Load Limits 0202.
Reset the Tire Pressure Monitor
System. See Tire Pressure
Monitor Operation 0308.
Check that all wheel nuts are
properly tightened. See “Wheel
Nut Torque” underCapacities
and Specifications 0364.
{Warning
Rust or dirt on a wheel, or on the
parts to which it is fastened, can
make wheel nuts become loose
after time. The wheel could come
off and cause an accident. When
changing a wheel, remove any
rust or dirt from places where the
wheel attaches to the vehicle. In
an emergency, a cloth or a paper
(Continued)
Warning (Continued)
towel can be used; however, use
a scraper or wire brush later to
remove all rust or dirt.
Lightly coat the center of the
wheel hub with wheel bearing
grease after a wheel change or
tire rotation to prevent corrosion
or rust build-up. Do not get
grease on the flat wheel
mounting surface or on the
wheel nuts or bolts.
When It Is Time for New
Tires
Factors such as maintenance,
temperatures, driving speeds,
vehicle loading, and road conditions
affect the wear rate of the tires.
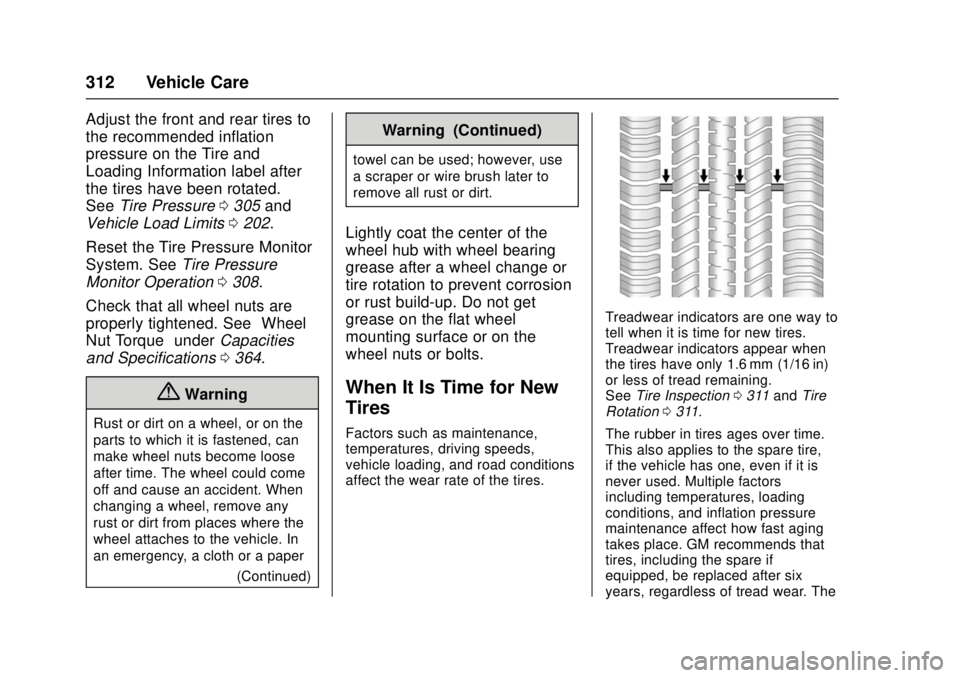
Treadwear indicators are one way to
tell when it is time for new tires.
Treadwear indicators appear when
the tires have only 1.6 mm (1/16 in)
or less of tread remaining.
SeeTire Inspection 0311 and Tire
Rotation 0311.
The rubber in tires ages over time.
This also applies to the spare tire,
if the vehicle has one, even if it is
never used. Multiple factors
including temperatures, loading
conditions, and inflation pressure
maintenance affect how fast aging
takes place. GM recommends that
tires, including the spare if
equipped, be replaced after six
years, regardless of tread wear. The